

Winged Bean Growing Tips: Ever dreamt of harvesting a protein-packed, vitamin-rich superfood right from your own backyard? I know I have! Forget those bland, store-bought veggies – imagine stepping outside and picking fresh, vibrant winged beans, ready to be transformed into a delicious and nutritious meal. This isn’t just about gardening; it’s about embracing a sustainable lifestyle and connecting with nature in a truly rewarding way.
The winged bean, also known as the Goa bean or asparagus pea, boasts a fascinating history, deeply rooted in Southeast Asian cultures. For centuries, it has been a staple food, prized for its versatility and nutritional value. Every part of the plant, from the pods and leaves to the roots and seeds, is edible! But, let’s be honest, sometimes growing these unique plants can feel a little daunting. That’s where these DIY tricks and hacks come in!
In today’s fast-paced world, we’re all looking for ways to simplify our lives and become more self-sufficient. Learning effective winged bean growing tips empowers you to cultivate your own food source, reduce your carbon footprint, and enjoy the unparalleled taste of homegrown goodness. Plus, who doesn’t love a good DIY project? So, grab your gardening gloves, and let’s dive into the secrets of successfully growing these amazing beans, even if you’re a complete beginner!
Growing Winged Beans: A Comprehensive DIY Guide
Hey there, fellow gardening enthusiasts! Today, I’m super excited to share my tried-and-true method for growing winged beans, also known as asparagus peas or goa beans. These fascinating legumes are not only delicious but also incredibly versatile – you can eat the pods, leaves, flowers, seeds, and even the tubers! Plus, they’re nitrogen-fixing, which means they’re great for your soil. Let’s dive into how you can cultivate these beauties in your own backyard.
What You’ll Need
Before we get started, let’s gather all the necessary supplies. Trust me, having everything ready beforehand will make the whole process much smoother.
* Winged Bean Seeds: Choose a variety that suits your climate and taste preferences.
* Seed Starting Trays or Small Pots: For starting seeds indoors (optional but recommended).
* Potting Mix: A well-draining mix is crucial for healthy seedlings.
* Garden Soil: Prepare your garden bed with nutrient-rich soil.
* Compost or Aged Manure: To enrich the soil and provide essential nutrients.
* Trellis or Support Structure: Winged beans are climbers and need something to grow on.
* Watering Can or Hose: For regular watering.
* Gardening Gloves: To protect your hands.
* Hand Trowel: For planting and transplanting.
* Measuring Tape: To ensure proper spacing.
* Optional: Row covers to protect young plants from pests and frost.
Phase 1: Starting Your Winged Bean Seeds
Starting your winged bean seeds indoors gives them a head start, especially if you live in a cooler climate with a shorter growing season. I highly recommend this method for the best results.
1. Soaking the Seeds: Winged bean seeds have a hard outer shell, so soaking them overnight in warm water helps to soften it and improve germination rates. I usually soak mine for about 12-24 hours. You’ll notice they swell up a bit – that’s a good sign!
2. Preparing the Seed Starting Trays: Fill your seed starting trays or small pots with a good quality potting mix. Make sure the mix is moist but not soggy. I like to use a spray bottle to dampen the soil evenly.
3. Sowing the Seeds: Plant the soaked seeds about 1 inch deep in the potting mix. Gently cover them with soil and lightly pat it down. I usually plant 2-3 seeds per cell or pot to increase the chances of germination.
4. Providing Warmth and Moisture: Winged beans need warmth to germinate. Place the trays in a warm location, such as a sunny windowsill or on a heat mat. Keep the soil consistently moist by watering gently whenever the top inch feels dry. Avoid overwatering, as this can lead to rot.
5. Waiting for Germination: Be patient! Winged bean seeds can take anywhere from 7 to 21 days to germinate, depending on the temperature and moisture levels. Once the seedlings emerge, provide them with plenty of light to prevent them from becoming leggy.
Phase 2: Preparing Your Garden Bed
While your seeds are germinating indoors, it’s time to prepare your garden bed. Winged beans thrive in well-drained, fertile soil with plenty of sunlight.
1. Choosing the Right Location: Select a spot in your garden that receives at least 6-8 hours of direct sunlight per day. Winged beans need plenty of sunshine to produce abundant pods.
2. Soil Preparation: Winged beans prefer slightly acidic to neutral soil with a pH between 6.0 and 7.0. Test your soil pH using a soil testing kit and amend it accordingly.
3. Amending the Soil: Dig in plenty of compost or aged manure to enrich the soil and improve drainage. I usually add a generous layer of compost (about 2-3 inches) and mix it thoroughly with the existing soil. This will provide your winged beans with the nutrients they need to thrive.
4. Creating a Trellis System: Winged beans are vigorous climbers and need a sturdy trellis or support structure to grow on. You can use a variety of materials, such as bamboo poles, wooden stakes, or metal fencing. Make sure the trellis is at least 6-8 feet tall to accommodate the plant’s growth. I’ve had great success with a simple A-frame trellis made from bamboo poles.
5. Ensuring Good Drainage: Winged beans don’t like soggy soil, so make sure your garden bed has good drainage. If your soil is heavy clay, consider adding sand or perlite to improve drainage.
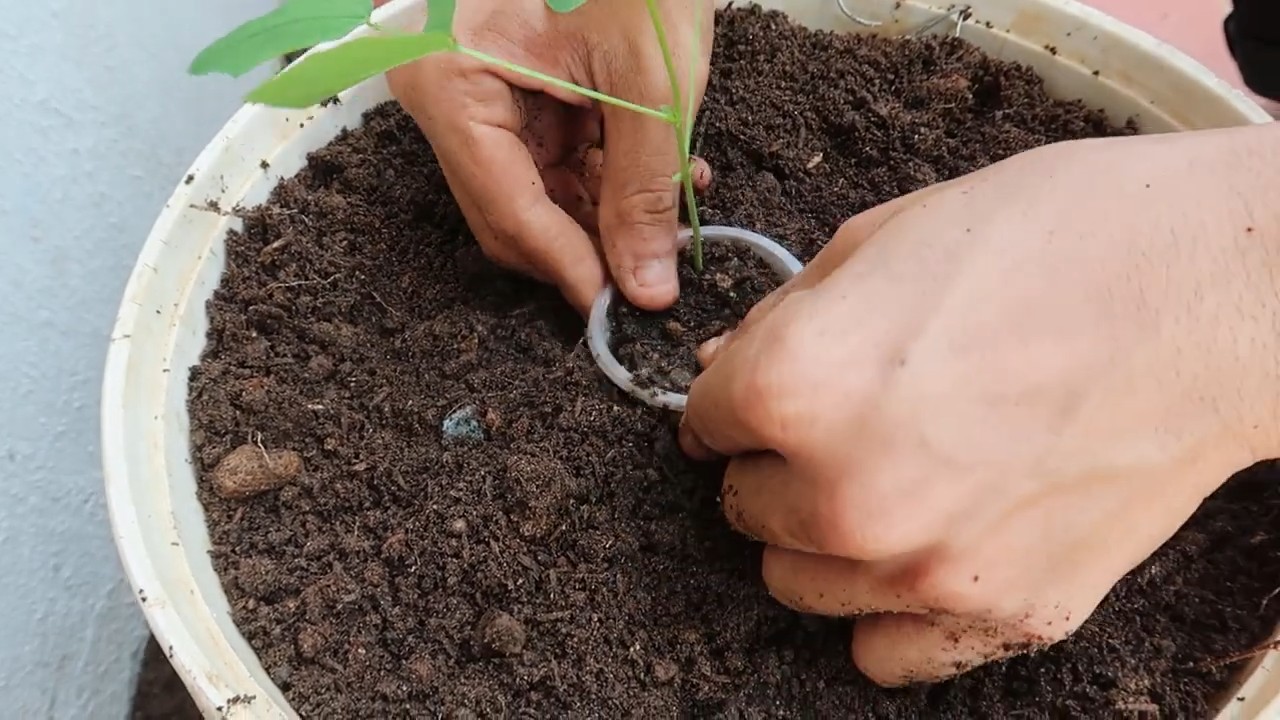
Phase 3: Transplanting Your Seedlings
Once your seedlings have developed a few sets of true leaves and the weather has warmed up, it’s time to transplant them into your garden bed.
1. Hardening Off the Seedlings: Before transplanting, you need to harden off your seedlings to acclimate them to outdoor conditions. This involves gradually exposing them to sunlight, wind, and cooler temperatures over a period of 7-10 days. Start by placing the trays outdoors for a few hours each day, gradually increasing the amount of time they spend outside.
2. Choosing the Right Time to Transplant: Transplant your seedlings after the last frost date in your area. Winged beans are sensitive to frost, so it’s important to wait until the weather is consistently warm.
3. Planting the Seedlings: Dig small holes in your prepared garden bed, spacing them about 12-18 inches apart. Gently remove the seedlings from their trays or pots and place them in the holes. Make sure the top of the root ball is level with the surrounding soil.
4. Watering and Mulching: Water the seedlings thoroughly after transplanting to help them settle in. Apply a layer of mulch around the plants to help retain moisture, suppress weeds, and regulate soil temperature. I like to use straw or wood chips as mulch.
5. Training the Vines: As the winged bean vines grow, gently guide them onto the trellis or support structure. You may need to tie them loosely to the trellis initially to encourage them to climb.
Phase 4: Caring for Your Winged Bean Plants
Once your winged bean plants are established, it’s important to provide them with regular care to ensure healthy growth and abundant yields.
1. Watering: Water your winged bean plants regularly, especially during dry spells. They need consistent moisture to thrive. Aim to keep the soil consistently moist but not waterlogged.
2. Fertilizing: Winged beans are nitrogen-fixing, so they don’t need a lot of nitrogen fertilizer. However, they do benefit from regular applications of phosphorus and potassium. You can use a balanced fertilizer or a fertilizer specifically formulated for legumes. I like to use a liquid seaweed fertilizer every few weeks to provide my plants with essential micronutrients.
3. Weeding: Keep your garden bed free of weeds, as they can compete with your winged bean plants for nutrients and water. Hand-pull weeds regularly or use a hoe to cultivate the soil.
4. Pest and Disease Control: Winged beans are generally resistant to pests and diseases, but they can occasionally be affected by aphids, spider mites, or fungal diseases. Inspect your plants regularly for signs of infestation or disease and take appropriate action. You can use insecticidal soap or neem oil to control aphids and spider mites. For fungal diseases, ensure good air circulation and avoid overwatering.
5. Pruning: Prune your winged bean plants to encourage bushier growth and more pod production. You can pinch off the tips of the vines to promote branching. Remove any yellowing or dead leaves to prevent the spread of disease.
Phase 5: Harvesting Your Winged Beans
The best part of growing winged beans is, of course, harvesting and enjoying the delicious pods, leaves, flowers, seeds, and tubers!
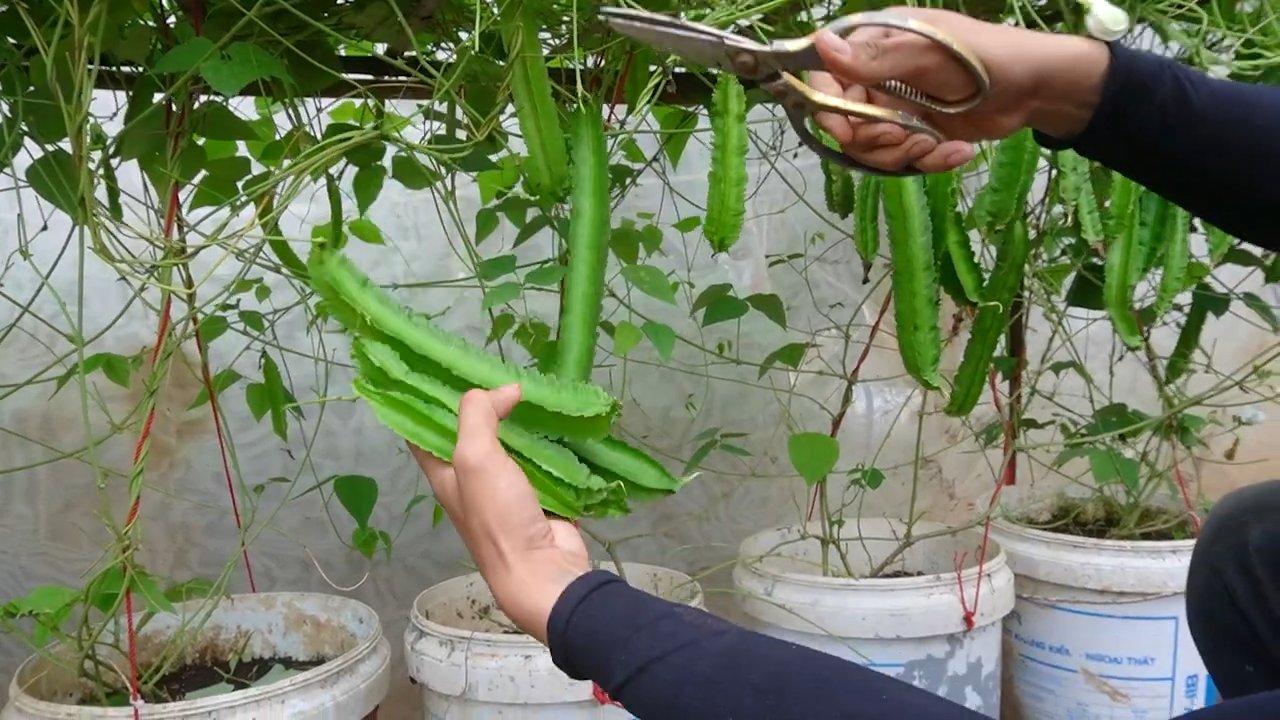
1. Harvesting the Pods: Harvest the pods when they are young and tender, usually about 6-8 inches long. They should be bright green and snap easily when bent. Overripe pods become tough and fibrous. I usually harvest my pods every few days to ensure they are at their peak flavor and texture.
2. Harvesting the Leaves: You can harvest the leaves throughout the growing season. Choose young, tender leaves for the best flavor. They can be used in salads, stir-fries, or soups.
3. Harvesting the Flowers: The flowers are also edible and can be used in salads or as a garnish. They have a slightly sweet flavor.
Hey there, fellow gardening enthusiasts! Today, I’m super excited to share my tried-and-true method for growing winged beans, also known as asparagus peas or goa beans. These fascinating legumes are not only delicious but also incredibly versatile – you can eat the pods, leaves, flowers, seeds, and even the tubers! Plus, they’re nitrogen-fixing, which means they’re great for your soil. Let’s dive into how you can cultivate these beauties in your own backyard.
What You’ll Need
Before we get started, let’s gather all the necessary supplies. Trust me, having everything ready beforehand will make the whole process much smoother.
* Winged Bean Seeds: Choose a variety that suits your climate and taste preferences.
* Seed Starting Trays or Small Pots: For starting seeds indoors (optional but recommended).
* Potting Mix: A well-draining mix is crucial for healthy seedlings.
* Garden Soil: Prepare your garden bed with nutrient-rich soil.
* Compost or Aged Manure: To enrich the soil and provide essential nutrients.
* Trellis or Support Structure: Winged beans are climbers and need something to grow on.
* Watering Can or Hose: For regular watering.
* Gardening Gloves: To protect your hands.
* Hand Trowel: For planting and transplanting.
* Measuring Tape: To ensure proper spacing.
* Optional: Row covers to protect young plants from pests and frost.
Phase 1: Starting Your Winged Bean Seeds
Starting your winged bean seeds indoors gives them a head start, especially if you live in a cooler climate with a shorter growing season. I highly recommend this method for the best results.
1. Soaking the Seeds: Winged bean seeds have a hard outer shell, so soaking them overnight in warm water helps to soften it and improve germination rates. I usually soak mine for about 12-24 hours. You’ll notice they swell up a bit – that’s a good sign!
2. Preparing the Seed Starting Trays: Fill your seed starting trays or small pots with a good quality potting mix. Make sure the mix is moist but not soggy. I like to use a spray bottle to dampen the soil evenly.
3. Sowing the Seeds: Plant the soaked seeds about 1 inch deep in the potting mix. Gently cover them with soil and lightly pat it down. I usually plant 2-3 seeds per cell or pot to increase the chances of germination.
4. Providing Warmth and Moisture: Winged beans need warmth to germinate. Place the trays in a warm location, such as a sunny windowsill or on a heat mat. Keep the soil consistently moist by watering gently whenever the top inch feels dry. Avoid overwatering, as this can lead to rot.
5. Waiting for Germination: Be patient! Winged bean seeds can take anywhere from 7 to 21 days to germinate, depending on the temperature and moisture levels. Once the seedlings emerge, provide them with plenty of light to prevent them from becoming leggy.
Phase 2: Preparing Your Garden Bed
While your seeds are germinating indoors, it’s time to prepare your garden bed. Winged beans thrive in well-drained, fertile soil with plenty of sunlight.
1. Choosing the Right Location: Select a spot in your garden that receives at least 6-8 hours of direct sunlight per day. Winged beans need plenty of sunshine to produce abundant pods.
2. Soil Preparation: Winged beans prefer slightly acidic to neutral soil with a pH between 6.0 and 7.0. Test your soil pH using a soil testing kit and amend it accordingly.
3. Amending the Soil: Dig in plenty of compost or aged manure to enrich the soil and improve drainage. I usually add a generous layer of compost (about 2-3 inches) and mix it thoroughly with the existing soil. This will provide your winged beans with the nutrients they need to thrive.
4. Creating a Trellis System: Winged beans are vigorous climbers and need a sturdy trellis or support structure to grow on. You can use a variety of materials, such as bamboo poles, wooden stakes, or metal fencing. Make sure the trellis is at least 6-8 feet tall to accommodate the plant’s growth. I’ve had great success with a simple A-frame trellis made from bamboo poles.
5. Ensuring Good Drainage: Winged beans don’t like soggy soil, so make sure your garden bed has good drainage. If your soil is heavy clay, consider adding sand or perlite to improve drainage.
Phase 3: Transplanting Your Seedlings
Once your seedlings have developed a few sets of true leaves and the weather has warmed up, it’s time to transplant them into your garden bed.
1. Hardening Off the Seedlings: Before transplanting, you need to harden off your seedlings to acclimate them to outdoor conditions. This involves gradually exposing them to sunlight, wind, and cooler temperatures over a period of 7-10 days. Start by placing the trays outdoors for a few hours each day, gradually increasing the amount of time they spend outside.
2. Choosing the Right Time to Transplant: Transplant your seedlings after the last frost date in your area. Winged beans are sensitive to frost, so it’s important to wait until the weather is consistently warm.
3. Planting the Seedlings: Dig small holes in your prepared garden bed, spacing them about 12-18 inches apart. Gently remove the seedlings from their trays or pots and place them in the holes. Make sure the top of the root ball is level with the surrounding soil.
4. Watering and Mulching: Water the seedlings thoroughly after transplanting to help them settle in. Apply a layer of mulch around the plants to help retain moisture, suppress weeds, and regulate soil temperature. I like to use straw or wood chips as mulch.
5. Training the Vines: As the winged bean vines grow, gently guide them onto the trellis or support structure. You may need to tie them loosely to the trellis initially to encourage them to climb.
Phase 4: Caring for Your Winged Bean Plants
Once your winged bean plants are established, it’s important to provide them with regular care to ensure healthy growth and abundant yields.
1. Watering: Water your winged bean plants regularly, especially during dry spells. They need consistent moisture to thrive. Aim to keep the soil consistently moist but not waterlogged.
2. Fertilizing: Winged beans are nitrogen-fixing, so they don’t need a lot of nitrogen fertilizer. However, they do benefit from regular applications of phosphorus and potassium. You can use a balanced fertilizer or a fertilizer specifically formulated for legumes. I like to use a liquid seaweed fertilizer every few weeks to provide my plants with essential micronutrients.
3. Weeding: Keep your garden bed free of weeds, as they can compete with your winged bean plants for nutrients and water. Hand-pull weeds regularly or use a hoe to cultivate the soil.
4. Pest and Disease Control: Winged beans are generally resistant to pests and diseases, but they can occasionally be affected by aphids, spider mites, or fungal diseases. Inspect your plants regularly for signs of infestation or disease and take appropriate action. You can use insecticidal soap or neem oil to control aphids and spider mites. For fungal diseases, ensure good air circulation and avoid overwatering.
5. Pruning: Prune your winged bean plants to encourage bushier growth and more pod production. You can pinch off the tips of the vines to promote branching. Remove any yellowing or dead leaves to prevent the spread of disease.
Phase 5: Harvesting Your Winged Beans
The best part of growing winged beans is, of course, harvesting and enjoying the delicious pods, leaves, flowers, seeds, and tubers!
1. Harvesting the Pods: Harvest the pods when they are young and tender, usually about 6-8 inches long. They should be bright green and snap easily when bent. Overripe pods become tough and fibrous. I usually harvest my pods every few days to ensure they are at their peak flavor and texture.
2. Harvesting the Leaves: You can harvest the leaves throughout the growing season. Choose young, tender leaves for the best flavor. They can be used in salads, stir-fries, or soups.
3. Harvesting the Flowers: The flowers are also edible and can be used in salads or as a garnish. They have a slightly sweet flavor.
4. Harvesting the Seeds: Allow some of the pods to mature and dry on the vine. Once the pods are completely dry, you can harvest the seeds. They can be used in soups, stews, or roasted as a snack.
5. Harvesting the Tubers: The tubers can be harvested in the fall after the plants have died back. They are similar in flavor and texture to potatoes. Dig them up carefully and store them in a cool, dry place.
Enjoying Your Harvest
Winged beans are incredibly versatile in
Conclusion
So, there you have it! Mastering the art of growing winged beans doesn’t require a green thumb blessed by the gardening gods. It’s about understanding the plant’s needs, providing the right support, and being patient. This DIY approach, focusing on creating the ideal growing environment and utilizing simple, readily available materials, is a game-changer for anyone looking to cultivate this nutritious and versatile legume.
Why is this a must-try? Because it empowers you to take control of your food source, reduces your reliance on commercially grown produce (often shipped from afar), and allows you to enjoy the unparalleled freshness and flavor of homegrown winged beans. Plus, let’s be honest, there’s a certain satisfaction that comes from nurturing a plant from seed to harvest, knowing you played a vital role in its success.
But the beauty of gardening lies in its adaptability. Feel free to experiment with variations on these techniques. For instance, if you live in a particularly windy area, consider using a sturdier trellis system, perhaps one made from metal or reinforced wood. Or, if your soil is naturally acidic, amend it with lime to raise the pH to the optimal range for winged beans. You could even try companion planting, pairing your winged beans with beneficial plants like basil or marigolds to deter pests and attract pollinators.
Another exciting variation is to explore different winged bean varieties. Some are known for their vibrant colors, ranging from deep purple to creamy white, while others boast unique flavor profiles. Experimenting with different varieties can add a delightful element of surprise to your garden and your plate.
Don’t be afraid to get your hands dirty and embrace the learning process. Gardening is a journey, not a destination. There will be challenges along the way, but the rewards – fresh, delicious winged beans and the satisfaction of a thriving garden – are well worth the effort.
We wholeheartedly encourage you to try these DIY winged bean growing tips. Start small, be observant, and don’t be discouraged by initial setbacks. The key is to learn from your experiences and adapt your approach as needed.
And most importantly, we want to hear about your journey! Share your successes, your challenges, and your unique variations in the comments below. Let’s create a community of winged bean enthusiasts, sharing knowledge and inspiring each other to grow the best winged beans possible. Your experiences can help others learn and improve their own gardening techniques. Let’s cultivate a thriving community alongside our thriving winged bean plants! Remember, successful **winged bean growing** is within your reach with a little knowledge and effort.
Frequently Asked Questions (FAQ)
What is the ideal soil pH for growing winged beans?
Winged beans thrive in slightly acidic to neutral soil, with a pH range of 6.0 to 7.0. If your soil is too acidic, you can amend it with lime to raise the pH. Soil testing kits are readily available at most garden centers and can help you determine your soil’s pH level. Regular soil testing is recommended, especially if you’re unsure of your soil’s composition.
How often should I water my winged bean plants?
Winged beans need consistent moisture, especially during hot and dry periods. Water deeply whenever the top inch of soil feels dry to the touch. Avoid overwatering, as this can lead to root rot. A good rule of thumb is to water thoroughly every 2-3 days, depending on the weather conditions. Mulching around the base of the plants can help retain moisture and reduce the need for frequent watering.
What kind of trellis system is best for winged beans?
Winged beans are vigorous climbers and require a sturdy trellis system to support their growth. A trellis made from bamboo poles, wooden stakes, or metal fencing works well. The trellis should be at least 6-8 feet tall to accommodate the plant’s climbing habit. Ensure the trellis is securely anchored to the ground to prevent it from toppling over in strong winds. You can also use a combination of vertical and horizontal supports to create a more robust trellis system.
How long does it take for winged beans to mature?
Winged beans typically take 120-180 days to mature from seed to harvest. The exact time will depend on the variety, climate, and growing conditions. You can start harvesting the pods when they are about 6-8 inches long and still tender. Regular harvesting encourages the plant to produce more pods.
What are some common pests and diseases that affect winged beans?
Winged beans are generally resistant to pests and diseases, but they can be susceptible to aphids, spider mites, and fungal diseases like powdery mildew. Regularly inspect your plants for signs of infestation or disease. If you notice any problems, treat them promptly with appropriate organic pesticides or fungicides. Good air circulation and proper watering practices can help prevent fungal diseases.
Can I grow winged beans in containers?
Yes, you can grow winged beans in containers, but you’ll need to choose a large container (at least 15-20 gallons) to accommodate the plant’s root system. Use a well-draining potting mix and provide a sturdy trellis for the plant to climb on. Container-grown winged beans may require more frequent watering and fertilization than those grown in the ground.
How do I harvest winged beans?
Harvest winged beans when the pods are young and tender, typically 6-8 inches long. Use scissors or pruning shears to cut the pods from the plant. Avoid pulling the pods, as this can damage the plant. Regular harvesting encourages the plant to produce more pods.
Are all parts of the winged bean plant edible?
Yes, all parts of the winged bean plant are edible, including the pods, leaves, flowers, roots, and seeds. The pods are the most commonly consumed part, but the other parts can also be used in various culinary preparations. The leaves can be eaten raw in salads or cooked like spinach. The flowers can be added to salads or used as a garnish. The roots can be cooked like potatoes. The seeds can be roasted or ground into flour.
How do I store winged beans?
Freshly harvested winged beans can be stored in the refrigerator for up to a week. To store them for longer periods, you can blanch them and freeze them. Alternatively, you can dry the seeds and store them in an airtight container.
What are the nutritional benefits of winged beans?
Winged beans are a highly nutritious food source, rich in protein, fiber, vitamins, and minerals. They are a good source of vitamin C, vitamin A, iron, and calcium. Winged beans are also a good source of antioxidants, which can help protect against cell damage. Incorporating winged beans into your diet can contribute to overall health and well-being.


Leave a Comment