

Grow broccoli at home, even if you think you don’t have a green thumb! Have you ever dreamed of strolling into your backyard and harvesting fresh, vibrant broccoli for dinner? It’s more achievable than you might think, and this DIY guide is your secret weapon. Forget those bland, overpriced heads from the grocery store; imagine the satisfaction of nurturing your own delicious, nutrient-packed broccoli from seed to table.
Broccoli, a member of the Brassica family, has a rich history dating back to the Roman Empire, where it was highly valued for its nutritional benefits. For centuries, cultivating your own food has been a way to connect with nature and ensure access to fresh, healthy produce. In today’s world, with concerns about food miles and pesticide use, the desire to grow broccoli at home is stronger than ever.
But why should you bother with DIY broccoli growing? Well, for starters, you’ll know exactly what’s going into your food. Plus, homegrown broccoli tastes infinitely better than store-bought! This article will provide you with simple, effective tricks and hacks to overcome common challenges, from choosing the right variety to dealing with pests. I’m going to show you how to cultivate a thriving broccoli patch, even in small spaces. Get ready to unleash your inner gardener and enjoy the rewards of fresh, homegrown goodness!
Growing Broccoli at Home: A Beginner’s Guide
Hey there, fellow gardening enthusiasts! Ever dreamt of harvesting your own crisp, green broccoli heads right from your backyard? Well, dream no more! Growing broccoli at home is totally achievable, even if you’re a complete newbie. I’m going to walk you through everything you need to know, from seed to harvest. Let’s get our hands dirty!
Choosing Your Broccoli Variety
First things first, let’s talk broccoli varieties. There are tons to choose from, and the best one for you will depend on your climate and personal preferences. Here are a few popular options:
* ‘Waltham 29’: A classic, reliable variety that produces large, tight heads. It’s also pretty heat-tolerant, which is a bonus if you live in a warmer area.
* ‘DiCicco’: This one’s known for its early maturity, meaning you’ll be harvesting sooner! It produces smaller main heads, but also lots of side shoots, giving you a longer harvest period.
* ‘Green Magic’: As the name suggests, this variety produces beautiful, dark green heads. It’s also known for its excellent flavor and disease resistance.
* ‘Romanesco’: Want something a little different? Romanesco broccoli is a stunning fractal vegetable with a unique nutty flavor. It’s a bit more challenging to grow, but totally worth it for the visual appeal!
* ‘Purple Sprouting’: If you’re in a cooler climate, purple sprouting broccoli is a great choice. It produces lots of tender purple shoots over a long period.
Once you’ve picked your variety, it’s time to get started!
Starting Your Broccoli Seeds
You have two options here: starting your seeds indoors or direct sowing them in your garden. I usually prefer starting indoors, as it gives the seedlings a head start and protects them from pests and harsh weather.
Starting Seeds Indoors:
1. Gather Your Supplies: You’ll need seed starting trays or small pots, seed starting mix (not regular potting soil!), broccoli seeds, a spray bottle, and a grow light (optional, but highly recommended).
2. Sow the Seeds: Fill your trays or pots with seed starting mix, leaving about half an inch of space at the top. Moisten the mix with your spray bottle – you want it damp, but not soggy. Sow 2-3 broccoli seeds per cell or pot, about ¼ inch deep. Gently cover the seeds with more seed starting mix.
3. Water and Cover: Lightly water the seeds again with your spray bottle. Cover the trays or pots with a clear plastic lid or plastic wrap to create a humid environment. This helps with germination.
4. Provide Light and Warmth: Place the trays or pots in a warm location (around 70-75°F) and under a grow light if you have one. If you don’t have a grow light, a sunny windowsill will work, but be sure to rotate the trays regularly to prevent the seedlings from leaning towards the light.
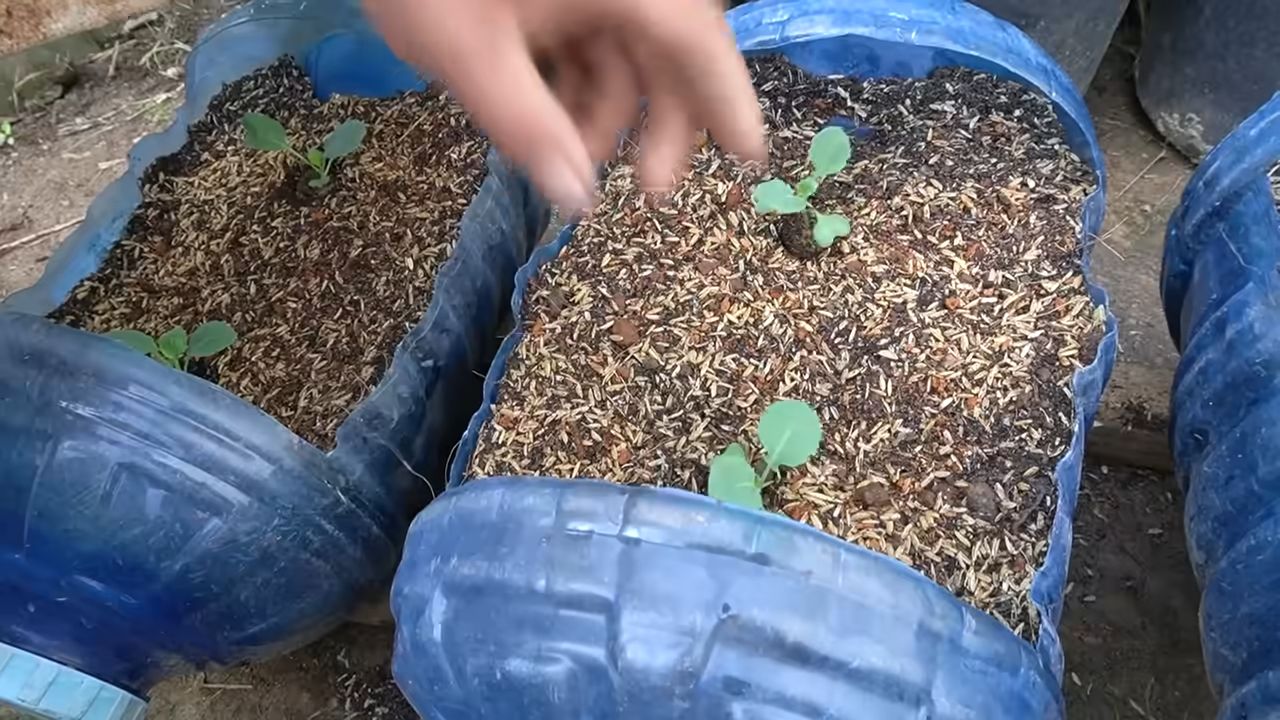
5. Monitor and Water: Check the trays daily and keep the seed starting mix moist, but not waterlogged. Once the seedlings emerge (usually within 5-10 days), remove the plastic lid or wrap.
6. Thin the Seedlings: Once the seedlings have their first true leaves (the second set of leaves that appear after the initial seed leaves), thin them to one seedling per cell or pot. Snip off the weaker seedlings at the soil line with scissors. Don’t try to pull them out, as you might damage the roots of the remaining seedling.
7. Harden Off the Seedlings: About a week before you plan to transplant the seedlings into your garden, you’ll need to “harden them off.” This means gradually exposing them to outdoor conditions to acclimate them to the sun, wind, and temperature changes. Start by placing the trays or pots outside in a sheltered location for an hour or two each day, gradually increasing the amount of time they spend outdoors over the course of the week.
Direct Sowing Seeds:
If you live in a climate with mild springs and summers, you can direct sow broccoli seeds directly into your garden.
1. Prepare the Soil: Choose a sunny spot in your garden with well-drained soil. Amend the soil with compost or other organic matter to improve its fertility and drainage.
2. Sow the Seeds: Sow the seeds about ½ inch deep and 18-24 inches apart.
3. Water and Thin: Keep the soil consistently moist until the seeds germinate. Once the seedlings emerge, thin them to one plant every 18-24 inches.
Transplanting Your Broccoli Seedlings
Once your seedlings are about 4-6 weeks old and have been hardened off, it’s time to transplant them into your garden.
1. Prepare the Garden Bed: Choose a sunny spot in your garden with well-drained soil. Broccoli needs at least 6 hours of sunlight per day. Amend the soil with compost or other organic matter to improve its fertility and drainage. Broccoli is a heavy feeder, so adding some slow-release fertilizer at this stage is a good idea.
2. Dig the Holes: Dig holes that are slightly larger than the root balls of your seedlings, spacing them 18-24 inches apart.
3. Transplant the Seedlings: Gently remove the seedlings from their trays or pots, being careful not to damage the roots. Place each seedling in a hole and backfill with soil, gently firming the soil around the base of the plant.
4. Water Thoroughly: Water the newly transplanted seedlings thoroughly to help them settle in.
5. Mulch: Apply a layer of mulch around the plants to help retain moisture, suppress weeds, and regulate soil temperature. Straw, wood chips, or shredded leaves are all good options.
Caring for Your Broccoli Plants
Now that your broccoli plants are in the ground, it’s time to give them the care they need to thrive.
* Watering: Broccoli needs consistent moisture, especially during hot, dry weather. Water deeply and regularly, aiming for about 1-1.5 inches of water per week. Avoid overhead watering, as this can lead to fungal diseases.
* Fertilizing: Broccoli is a heavy feeder, so it will benefit from regular fertilization. Side-dress the plants with compost or a balanced fertilizer every 2-3 weeks.
* Weeding: Keep the garden bed free of weeds, as they can compete with the broccoli plants for nutrients and water. Hand-pull weeds regularly or use a hoe to cultivate the soil.
* Pest Control: Broccoli is susceptible to several pests, including cabbage worms, aphids, and flea beetles. Inspect your plants regularly for signs of infestation and take action promptly.
* Cabbage Worms: These green caterpillars can quickly devour broccoli leaves. Hand-pick them off the plants or use Bacillus thuringiensis (Bt), a natural insecticide that is safe for humans and beneficial insects.
* Aphids: These tiny, sap-sucking insects can weaken broccoli plants. Spray them off with a strong stream of water or use insecticidal soap.
* Flea Beetles: These small, jumping beetles can create tiny holes in broccoli leaves. Cover the plants with row covers to prevent flea beetles from reaching them.
* Disease Prevention: Broccoli can be susceptible to fungal diseases, such as downy mildew and black rot. To prevent these diseases, avoid overhead watering, provide good air circulation, and remove any infected leaves promptly.
Harvesting Your Broccoli
The moment you’ve been waiting for! Harvesting your own homegrown broccoli is incredibly rewarding.
1. Timing is Key: Broccoli is ready to harvest when the central head is firm, tight, and dark green. The individual florets should be tightly closed. If the florets start to open and turn yellow, it’s time to harvest immediately.
2. Cut the Head: Use a sharp knife to cut the central head from the plant, leaving about 4-6 inches of stem.
3. Encourage Side Shoots: After you harvest the main head, the plant will produce side shoots, which are smaller broccoli heads that will continue to develop. Harvest these side shoots as they mature.
4. Enjoy Your Harvest: Enjoy your fresh, homegrown broccoli in salads, stir-fries, soups, or roasted as a side dish. It’s also great for freezing!
Troubleshooting Common Broccoli Problems
Even with the best care, you might encounter some problems while growing broccoli. Here are a few common issues and how to address them:
* Buttoning: This is when the broccoli head forms prematurely and remains small. It’s often caused by stress, such as lack of water or nutrients. Make sure your plants are getting enough water and fertilizer.
* Bolting: This is when the broccoli plant starts to flower prematurely. It’s usually caused by hot weather. Choose heat-tolerant varieties and provide shade during the hottest part of the day.
Conclusion
So, there you have it! Growing broccoli at home is not only achievable, but it’s also a deeply rewarding experience that connects you to your food in a way that store-bought produce simply can’t. We’ve walked you through the essential steps, from selecting the right variety to warding off common pests, and hopefully, demystified the process along the way.
Why is this DIY trick a must-try? Because fresh, homegrown broccoli bursts with flavor and nutrients that often diminish during transportation and storage. Imagine the satisfaction of harvesting your own vibrant green heads, knowing exactly where they came from and what went into nurturing them. Plus, growing your own food is a fantastic way to reduce your carbon footprint and embrace a more sustainable lifestyle.
But the beauty of gardening lies in its adaptability. Feel free to experiment with different broccoli varieties to find your personal favorite. Try planting companion herbs like rosemary or thyme to naturally deter pests and enhance the flavor of your broccoli. Consider succession planting to enjoy a continuous harvest throughout the growing season. If you’re short on space, explore container gardening options – even a small balcony can become a thriving broccoli patch!
Don’t be intimidated by the learning curve. Every gardener, regardless of experience, faces challenges. The key is to learn from your mistakes, adapt your approach, and never give up on the joy of nurturing life from a tiny seed.
We wholeheartedly encourage you to give growing broccoli at home a try. It’s an investment in your health, your well-being, and your connection to the natural world. And most importantly, it’s fun!
Once you’ve harvested your first head of homegrown broccoli, we’d love to hear about your experience. Share your tips, triumphs, and even your challenges in the comments below. Let’s build a community of home gardeners, sharing our knowledge and inspiring each other to grow more of our own food. Happy gardening!
Frequently Asked Questions (FAQs)
Q: What is the best time of year to plant broccoli?
A: The timing for planting broccoli depends largely on your climate. Broccoli is a cool-season crop, meaning it thrives in temperatures between 60°F and 70°F (15°C and 21°C). In regions with mild winters, you can plant broccoli in the fall for a winter or early spring harvest. In colder climates, start seeds indoors 6-8 weeks before the last expected frost and transplant them outdoors in the spring after the danger of frost has passed. You can also plant a second crop in late summer for a fall harvest. Pay attention to your local weather patterns and frost dates to determine the optimal planting time for your area.
Q: What kind of soil does broccoli need?
A: Broccoli prefers well-drained, fertile soil that is rich in organic matter. The ideal soil pH for broccoli is between 6.0 and 7.0. Before planting, amend your soil with compost or well-rotted manure to improve its fertility and drainage. If your soil is heavy clay, consider adding sand or other amendments to improve drainage. A soil test can help you determine the specific nutrient needs of your soil and guide you in selecting the appropriate amendments.
Q: How much sunlight does broccoli need?
A: Broccoli requires at least 6 hours of direct sunlight per day to thrive. Choose a planting location that receives full sun for most of the day. If you live in a particularly hot climate, some afternoon shade may be beneficial to prevent the broccoli heads from bolting (going to seed prematurely).
Q: How often should I water my broccoli plants?
A: Broccoli needs consistent moisture to produce large, healthy heads. Water your plants deeply and regularly, especially during dry periods. Aim to keep the soil consistently moist but not waterlogged. Mulching around your plants can help retain moisture and suppress weeds. A good rule of thumb is to water when the top inch of soil feels dry to the touch.
Q: What are some common pests and diseases that affect broccoli?
A: Broccoli is susceptible to a variety of pests and diseases, including cabbage worms, aphids, flea beetles, clubroot, and downy mildew. Regularly inspect your plants for signs of pests or diseases. Use organic pest control methods, such as handpicking pests, using insecticidal soap, or applying Bacillus thuringiensis (Bt) to control cabbage worms. To prevent diseases, practice crop rotation, ensure good air circulation, and avoid overhead watering.
Q: How do I know when my broccoli is ready to harvest?
A: Broccoli is ready to harvest when the central head is firm, compact, and has tightly closed florets. The size of the head will vary depending on the variety, but generally, you should harvest when the head is about 6-8 inches in diameter. Use a sharp knife to cut the head from the plant, leaving a few inches of stem. After harvesting the central head, the plant may produce smaller side shoots that can also be harvested.
Q: Can I grow broccoli in containers?
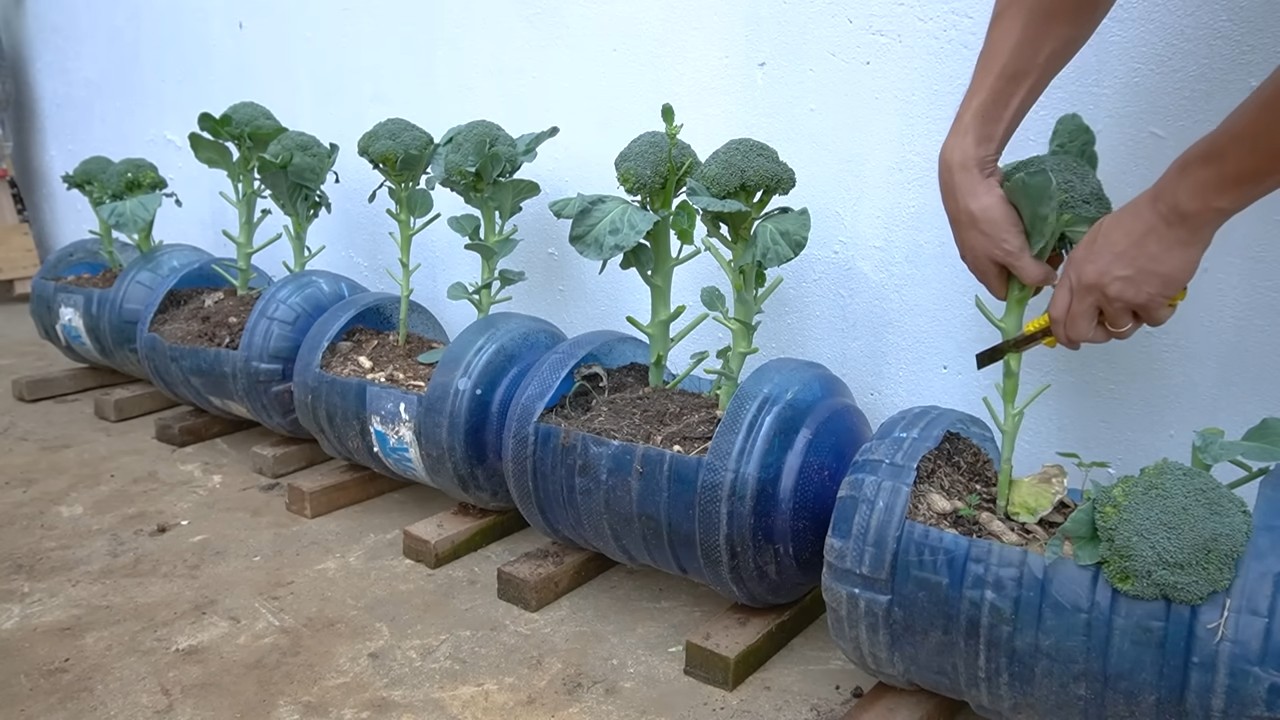
A: Yes, you can successfully grow broccoli in containers, especially if you have limited garden space. Choose a large container that is at least 12 inches in diameter and 12 inches deep. Use a high-quality potting mix and ensure that the container has good drainage. Water regularly and fertilize as needed. Select a compact broccoli variety that is well-suited for container gardening.
Q: What are some good companion plants for broccoli?
A: Companion planting can help deter pests, attract beneficial insects, and improve the overall health of your broccoli plants. Some good companion plants for broccoli include:
* **Herbs:** Rosemary, thyme, sage, dill, and mint can help repel pests.
* **Flowers:** Marigolds and nasturtiums can attract beneficial insects and deter pests.
* **Vegetables:** Onions, garlic, and radishes can help deter pests.
Q: My broccoli plant is bolting. What should I do?
A: Bolting occurs when broccoli plants are exposed to stress, such as high temperatures or lack of water. Once a broccoli plant bolts, the head will become loose and the florets will start to open. While you can still eat bolted broccoli, it will be less tender and have a more bitter flavor. To prevent bolting, choose heat-tolerant varieties, provide adequate water, and protect your plants from extreme temperatures.
Q: Can I freeze broccoli that I have grown at home?
A: Yes, freezing is a great way to preserve your homegrown broccoli. To freeze broccoli, blanch it in boiling water for 3-5 minutes, then immediately transfer it to an ice bath to stop the cooking process. Drain the broccoli thoroughly and spread it out on a baking sheet to freeze. Once frozen, transfer the broccoli to freezer bags or containers. Frozen broccoli can be stored in the freezer for up to 12 months.


Leave a Comment