

Potato Growing Hack: Unlock the secrets to bountiful harvests right in your backyard! Have you ever dreamed of digging up your own homegrown potatoes, bursting with flavor and freshness? Imagine the satisfaction of serving a meal made with ingredients you nurtured from tiny seed potatoes to plump, delicious spuds. This isn’t just a dream; it’s an achievable reality with the right knowledge and a few clever tricks.
Growing potatoes has a rich history, dating back thousands of years to the Andes Mountains of South America. These humble tubers have sustained civilizations and continue to be a staple food around the globe. But you don’t need acres of farmland to enjoy the fruits (or rather, vegetables!) of your labor.
In today’s busy world, finding time and space for traditional gardening can be a challenge. That’s where this potato growing hack comes in! I’m going to share simple, effective DIY techniques that will allow you to grow potatoes even in small spaces, like balconies or patios. Forget complicated setups and expensive equipment. These methods are designed to be accessible, affordable, and, most importantly, fun! Whether you’re a seasoned gardener or a complete beginner, you’ll discover how to maximize your potato yield with minimal effort. Get ready to transform your gardening game and enjoy the taste of homegrown goodness!
Kartoffeln anbauen leicht gemacht: Mein DIY-Turm für eine reiche Ernte auf kleinem Raum
Hallo liebe Gartenfreunde! Habt ihr auch so wenig Platz im Garten, aber trotzdem Lust auf eine reiche Kartoffelernte? Dann habe ich genau das Richtige für euch: einen Kartoffelturm! Mit dieser genialen DIY-Methode könnt ihr auf kleinstem Raum unglaublich viele Kartoffeln anbauen. Und das Beste daran: Es ist super einfach und macht richtig Spaß! Ich zeige euch, wie ihr euren eigenen Kartoffelturm baut und was ihr dabei beachten müsst. Los geht’s!
Was ihr für euren Kartoffelturm braucht:
* Kartoffelpflanzkartoffeln: Am besten wählt ihr eine frühe Sorte, damit ihr schnell ernten könnt. Ich empfehle festkochende Sorten wie ‘Annabelle’ oder ‘Cilena’.
* Einen großen Behälter: Das kann ein alter Mülleimer, ein großer Pflanzkübel oder sogar ein selbstgebauter Rahmen aus Holz sein. Wichtig ist, dass er mindestens 60 cm Durchmesser hat und etwa 80-100 cm hoch ist.
* Erde: Am besten eine Mischung aus Gartenerde, Kompost und etwas Sand. Das sorgt für eine gute Drainage und ausreichend Nährstoffe.
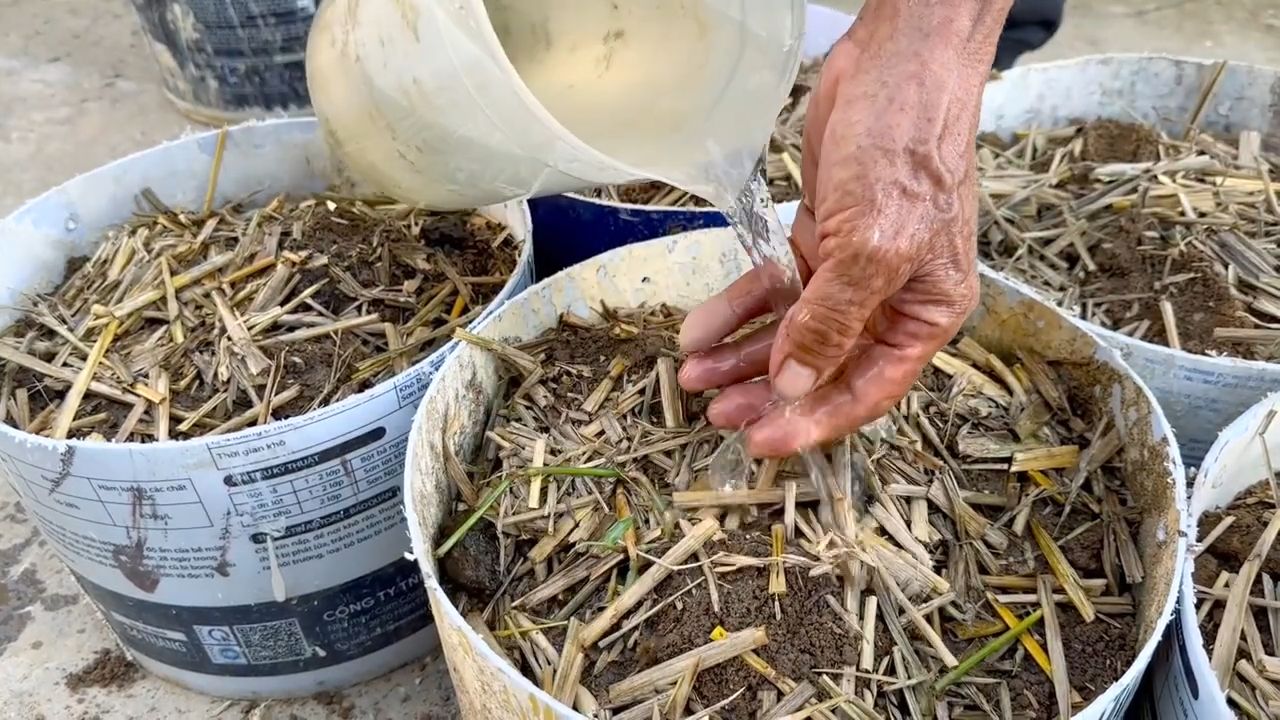
* Stroh oder Heu: Das brauchen wir später zum Abdecken der Kartoffelpflanzen.
* Gießkanne oder Schlauch: Zum regelmäßigen Gießen.
* Optional: Ein paar Steine oder Ziegelsteine für den Boden des Behälters.
Schritt-für-Schritt-Anleitung: So baut ihr euren Kartoffelturm
1. Den Behälter vorbereiten: Zuerst solltet ihr euren Behälter reinigen, falls er gebraucht ist. Wenn er keine Löcher im Boden hat, bohrt ein paar hinein, damit das Wasser gut ablaufen kann. Legt dann eine Schicht Steine oder Ziegelsteine auf den Boden, um die Drainage zu verbessern. Das verhindert Staunässe, die Kartoffeln gar nicht mögen.
2. Die erste Schicht Erde einfüllen: Füllt nun etwa 20 cm Erde in den Behälter. Achtet darauf, dass die Erde locker und gut durchlüftet ist.
3. Die Kartoffeln setzen: Legt nun eure Pflanzkartoffeln auf die Erde. Achtet darauf, dass die “Augen” (die kleinen Triebe) nach oben zeigen. Verteilt die Kartoffeln gleichmäßig im Behälter. Je nach Größe des Behälters könnt ihr 3-5 Kartoffeln pro Schicht setzen.
4. Mit Erde bedecken: Bedeckt die Kartoffeln mit einer etwa 10 cm dicken Schicht Erde. Drückt die Erde leicht an.
5. Gießen: Gießt die Erde gut an, damit die Kartoffeln einen guten Start haben.
6. Warten und beobachten: Jetzt heißt es warten! Nach ein paar Wochen werden die ersten Triebe aus der Erde sprießen.
Die zweite Phase: Anhäufeln und weitere Schichten
Sobald die Triebe etwa 20 cm hoch sind, beginnt die eigentliche Magie des Kartoffelturms: das Anhäufeln.
1. Anhäufeln: Füllt nun wieder Erde um die Triebe herum, sodass nur noch die obersten Blätter herausschauen. Das regt die Kartoffelpflanze an, weitere Knollen zu bilden.
2. Wiederholen: Wiederholt diesen Vorgang alle paar Wochen, sobald die Triebe wieder etwa 20 cm hoch sind. Füllt immer wieder Erde nach, bis der Behälter fast voll ist.
3. Gießen nicht vergessen: Achtet darauf, dass die Erde immer feucht bleibt, aber nicht zu nass. Gießt regelmäßig, besonders an heißen Tagen.
4. Düngen (optional): Wenn ihr möchtet, könnt ihr die Kartoffeln während des Wachstums zusätzlich düngen. Ich verwende gerne organischen Dünger wie Kompost oder Hornspäne.
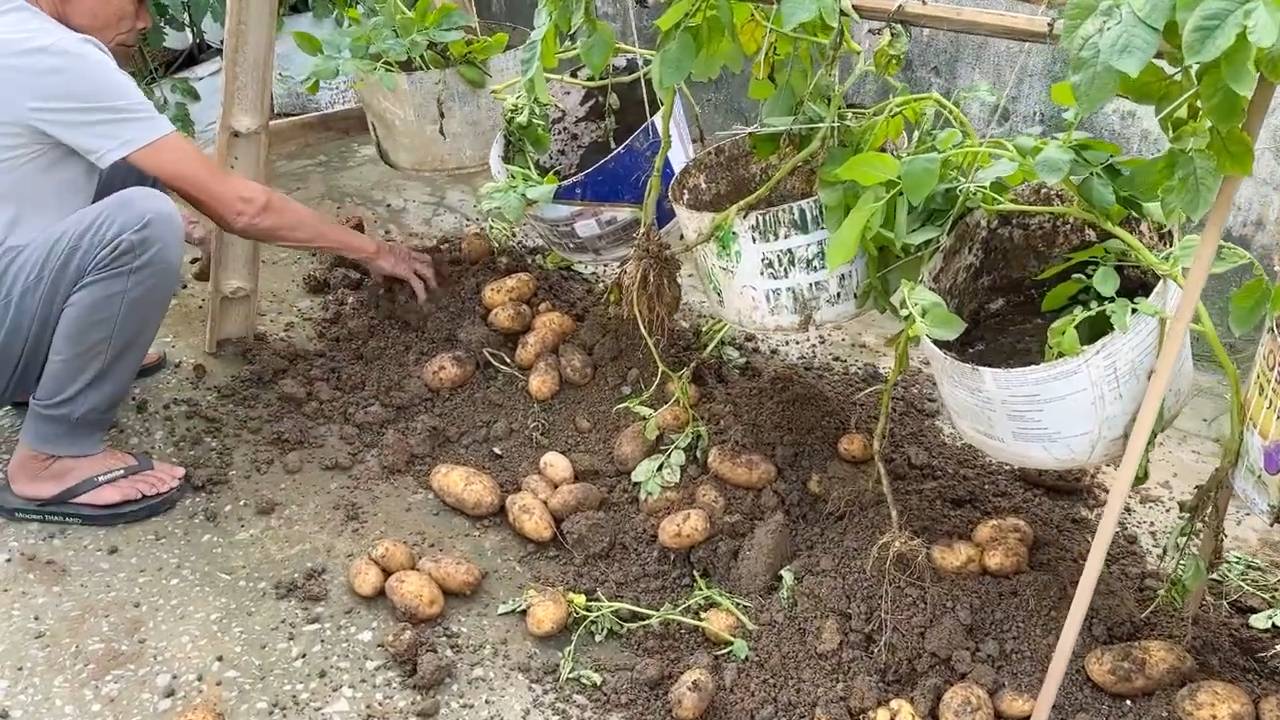
Die dritte Phase: Erntezeit!
Nach etwa 3-4 Monaten, je nach Sorte, sind eure Kartoffeln erntereif.
1. Erntezeitpunkt erkennen: Ihr erkennt den Erntezeitpunkt daran, dass das Kraut (die Blätter und Stängel) gelb wird und abstirbt.
2. Ernten: Nun könnt ihr euren Kartoffelturm ernten! Das ist der spaßigste Teil! Ihr könnt entweder den ganzen Behälter umkippen und die Kartoffeln heraussuchen oder vorsichtig von oben nach unten graben.
3. Lagern: Lagert die geernteten Kartoffeln an einem kühlen, dunklen und trockenen Ort. So halten sie sich mehrere Monate.
Zusätzliche Tipps und Tricks für eine erfolgreiche Kartoffelernte im Turm
* Sonniger Standort: Kartoffeln lieben die Sonne! Stellt euren Kartoffelturm an einen sonnigen Standort, damit die Pflanzen optimal wachsen können.
* Gute Drainage: Achtet unbedingt auf eine gute Drainage, um Staunässe zu vermeiden.
* Regelmäßiges Gießen: Kartoffeln brauchen ausreichend Wasser, besonders während der Knollenbildung.
* Schutz vor Schädlingen: Kontrolliert eure Kartoffelpflanzen regelmäßig auf Schädlinge wie Kartoffelkäfer oder Blattläuse. Bei Bedarf könnt ihr natürliche Schädlingsbekämpfungsmittel einsetzen.
* Sortenwahl: Wählt eine Kartoffelsorte, die für den Anbau im Kübel geeignet ist. Frühkartoffeln sind oft eine gute Wahl.
* Bodenqualität: Eine gute Bodenqualität ist entscheidend für eine reiche Ernte. Verwendet eine Mischung aus Gartenerde, Kompost und Sand.
* Rotation: Baut Kartoffeln nicht jedes Jahr am selben Standort an, um Krankheiten und Schädlingen vorzubeugen.
* Mulchen: Mulcht die Erde um die Kartoffelpflanzen herum mit Stroh oder Heu. Das hält die Feuchtigkeit im Boden und unterdrückt Unkraut.
* Vertikal gärtnern: Der Kartoffelturm ist ein tolles Beispiel für vertikales Gärtnern. Nutzt den Platz in eurem Garten optimal aus!
* Experimentieren: Probiert verschiedene Kartoffelsorten und Anbaumethoden aus, um herauszufinden, was für euch am besten funktioniert.
Häufige Fehler vermeiden:
* Zu wenig Sonne: Kartoffeln brauchen mindestens 6 Stunden Sonne pro Tag.
* Staunässe: Eine schlechte Drainage führt zu Staunässe und kann die Kartoffeln faulen lassen.
* Zu wenig Wasser: Kartoffeln brauchen besonders während der Knollenbildung ausreichend Wasser.
* Schädlinge: Ignoriert Schädlinge nicht! Kontrolliert eure Pflanzen regelmäßig und bekämpft Schädlinge frühzeitig.
* Falsche Erde: Verwendet keine reine Gartenerde, sondern eine Mischung aus Gartenerde, Kompost und Sand.
Warum ein Kartoffelturm? Die Vorteile auf einen Blick
* Platzsparend: Ideal für kleine Gärten, Balkone oder Terrassen.
* Hoher Ertrag: Auf kleinem Raum könnt ihr eine große Menge Kartoffeln ernten.
* Einfache Ernte: Die Ernte ist viel einfacher als im Beet.
* Weniger Unkraut: Durch die Höhe des Turms haben Unkräuter weniger Chancen.
* Dekorativ: Ein Kartoffelturm ist ein echter Hingucker im Garten.
* Nachhaltig: Ihr könnt eure eigenen Kartoffeln anbauen und spart euch den Kauf im Supermarkt.
Ich hoffe, diese Anleitung hat euch gefallen und inspiriert, euren eigenen Kartoffelturm zu bauen. Es ist wirklich eine tolle Möglichkeit, auch auf kleinem Raum eine reiche Kartoffelernte zu erzielen. Viel Spaß beim Gärtnern und guten Appetit!
Conclusion
So, there you have it! This simple yet incredibly effective potato growing hack transforms the way you think about cultivating your own spuds. Forget vast gardens and back-breaking labor. This method, utilizing readily available materials and minimal space, opens the door for anyone, regardless of their gardening experience, to enjoy the unparalleled satisfaction of harvesting their own homegrown potatoes.
Why is this a must-try? Because it’s accessible, efficient, and rewarding. It’s accessible because it requires no specialized equipment or extensive knowledge. You likely already have most of the materials you need lying around your home. It’s efficient because it maximizes space and minimizes effort. The layered approach allows you to continuously harvest potatoes as they mature, extending your growing season and increasing your yield. And it’s rewarding because there’s nothing quite like the taste of freshly dug potatoes, bursting with flavor and the pride of your own accomplishment.
But the beauty of this potato growing hack lies not only in its simplicity but also in its adaptability. Feel free to experiment with different potato varieties. Russets, Yukon Golds, red potatoes – each will bring its unique flavor and texture to your table. Consider adding companion plants like marigolds or basil to deter pests and enhance the overall health of your potato plants. You can also adjust the size of your container to suit your available space. A smaller container is perfect for a balcony or patio, while a larger container can accommodate more plants and yield a bigger harvest.
Don’t be afraid to get creative with your container choices. While plastic grow bags are a popular option, you can also use old tires, large buckets, or even repurposed laundry baskets. Just make sure your container has adequate drainage to prevent waterlogging, which can lead to root rot.
This potato growing hack is more than just a gardening technique; it’s an invitation to connect with nature, to learn about the life cycle of plants, and to appreciate the simple pleasures of growing your own food. It’s a chance to reduce your carbon footprint, support sustainable practices, and enjoy healthier, more flavorful meals.
We wholeheartedly encourage you to try this potato growing hack for yourself. It’s a fun, educational, and ultimately delicious experience. And once you’ve harvested your first crop of homegrown potatoes, we’d love to hear about your experience! Share your photos, tips, and stories with us in the comments below. Let’s build a community of potato-growing enthusiasts and inspire others to discover the joys of gardening. What are you waiting for? Grab a container, some seed potatoes, and get growing! You’ll be amazed at what you can achieve with this simple yet powerful technique. Happy gardening!
FAQ
What kind of potatoes work best with this method?
Almost any variety of potato can be grown using this method, but some tend to perform better than others in containers. Seed potatoes are specifically grown for planting and are readily available at garden centers. Popular choices include:
* **Yukon Gold:** Known for their creamy texture and buttery flavor, Yukon Golds are a versatile option that works well for boiling, roasting, and mashing.
* **Red Potatoes:** These potatoes have a thin, red skin and a waxy texture, making them ideal for salads and boiling.
* **Russet Potatoes:** The classic baking potato, Russets are known for their fluffy texture and earthy flavor. They require a slightly larger container due to their size.
* **Fingerling Potatoes:** These small, elongated potatoes have a unique shape and a nutty flavor. They are a great choice for roasting or grilling.
Experiment with different varieties to find your favorites! Consider your local climate and growing conditions when making your selection.
How often should I water my potato plants?
Watering is crucial for healthy potato growth. The frequency of watering will depend on several factors, including the weather, the size of your container, and the type of soil you’re using. As a general rule, you should water your potato plants whenever the top inch of soil feels dry to the touch.
Avoid overwatering, as this can lead to root rot. Ensure your container has adequate drainage to prevent water from pooling at the bottom. During hot, dry weather, you may need to water your plants daily. In cooler, wetter weather, you may only need to water them every few days.
A good way to check if your plants need water is to stick your finger into the soil. If the soil feels dry, it’s time to water. If it feels moist, wait a day or two and check again.
What kind of soil should I use?
Potatoes thrive in well-draining, nutrient-rich soil. A good potting mix is essential for success. Avoid using garden soil, as it can be too heavy and compact, hindering root growth.
A mixture of equal parts potting soil, compost, and perlite or vermiculite is ideal. Compost provides essential nutrients, while perlite or vermiculite improves drainage and aeration. You can also add a slow-release fertilizer to the soil to provide a steady supply of nutrients throughout the growing season.
Ensure the soil is loose and well-aerated to allow the potato tubers to develop properly.
How do I know when my potatoes are ready to harvest?
The timing of your harvest will depend on the variety of potato you’re growing and your personal preference. You can begin harvesting “new potatoes” – small, immature potatoes – a few weeks after the plants begin to flower. These potatoes have a delicate flavor and thin skin.
For larger, more mature potatoes, wait until the foliage begins to turn yellow and die back. This indicates that the potatoes have reached their full size and are ready to be harvested.
To harvest, gently dig around the base of the plant and lift the potatoes from the soil. Be careful not to damage the tubers.
Can I grow potatoes in a container indoors?
While it’s possible to grow potatoes indoors, it can be challenging. Potatoes require a lot of sunlight, so you’ll need to provide them with supplemental lighting if you’re growing them indoors. A grow light is a good option.
You’ll also need to ensure that your container is large enough to accommodate the potato plants’ root system. A 10-gallon container or larger is recommended.
Indoor potato plants may also be more susceptible to pests and diseases. Monitor your plants regularly and take action if you notice any problems.
What are some common problems I might encounter when growing potatoes in containers?
Some common problems you might encounter include:
* **Pests:** Aphids, potato beetles, and flea beetles can all attack potato plants. Inspect your plants regularly and take action if you notice any pests. Insecticidal soap or neem oil can be effective treatments.
* **Diseases:** Early blight and late blight are fungal diseases that can affect potato plants. Ensure good air circulation and avoid overwatering to prevent these diseases.
* **Root Rot:** Overwatering can lead to root rot, which can kill your potato plants. Ensure your container has adequate drainage and avoid watering too frequently.
* **Sunscald:** If potatoes are exposed to direct sunlight, they can develop sunscald, which causes green patches on the skin. Cover the potatoes with soil or mulch to prevent sunscald.
By being aware of these potential problems and taking preventative measures, you can increase your chances of success when growing potatoes in containers. Remember, this **potato growing hack** is all about learning and adapting!
Leave a Comment