

Mushroom Growing Bowl Method: Unlock the secrets to cultivating your own delicious and nutritious mushrooms right in your kitchen! Have you ever dreamed of harvesting fresh, gourmet mushrooms without the hassle of complicated setups? Well, get ready to turn that dream into reality with this incredibly simple and rewarding DIY project.
For centuries, mushroom cultivation has been revered in various cultures, from ancient Chinese medicinal practices to European culinary traditions. The ability to grow these fascinating fungi was once shrouded in mystery, but now, with the mushroom growing bowl method, it’s accessible to everyone, regardless of their gardening experience.
In today’s fast-paced world, knowing where your food comes from and having control over its quality is more important than ever. Store-bought mushrooms can be expensive and often lack the freshness and flavor of homegrown varieties. Plus, there’s something incredibly satisfying about nurturing a living thing and harvesting its bounty. This DIY trick not only saves you money but also provides a sustainable and eco-friendly way to enjoy fresh mushrooms. I’m excited to share this easy and effective method with you, so you can start enjoying the delicious rewards of your own mushroom garden!
Pilzzucht im Schüsselverfahren: Dein DIY-Leitfaden für eine reiche Ernte
Hallo liebe Pilzfreunde! Habt ihr euch jemals gefragt, wie ihr eure eigenen köstlichen Pilze zu Hause züchten könnt, ohne gleich ein riesiges Gewächshaus zu bauen? Dann seid ihr hier genau richtig! Ich zeige euch, wie ihr mit der Schüsselmethode ganz einfach und platzsparend eure eigenen Pilze ziehen könnt. Es ist ein super spannendes Projekt, das nicht nur Spaß macht, sondern euch auch mit frischen, selbstgezogenen Pilzen belohnt. Los geht’s!
Was du für dein Pilzzucht-Schüssel-Projekt brauchst
Bevor wir loslegen, hier eine Liste aller Materialien, die du benötigst. Keine Sorge, die meisten davon hast du wahrscheinlich schon zu Hause!
* Eine oder mehrere Schüsseln: Wähle Schüsseln aus, die tief genug sind (mindestens 15 cm) und einen Durchmesser von mindestens 20 cm haben. Glas, Keramik oder lebensmittelechter Kunststoff sind ideal.
* Substrat: Das ist das Futter für deine Pilze. Du kannst verschiedene Substrate verwenden, je nachdem, welche Pilzart du züchten möchtest. Beliebte Optionen sind:
* Kaffeesatz: Super für Austernpilze!
* Stroh: Gut für viele verschiedene Pilzarten.
* Holzspäne: Perfekt für Shiitake und andere holzzersetzende Pilze.
* Sägemehl: Auch eine gute Option für holzzersetzende Pilze.
* Pilzbrut (Spawn): Das ist das “Saatgut” für deine Pilze. Du kannst sie online oder in spezialisierten Pilzzucht-Shops kaufen. Achte darauf, dass die Brut frisch und von guter Qualität ist.
* Vermiculit oder Perlit: Diese Materialien helfen, die Feuchtigkeit im Substrat zu halten.
* Wasser: Am besten destilliertes oder abgekochtes Wasser, um Verunreinigungen zu vermeiden.
* Sprühflasche: Zum Befeuchten des Substrats.
* Alufolie oder Frischhaltefolie: Um die Schüssel abzudecken und die Feuchtigkeit zu halten.
* Handschuhe: Um das Substrat sauber zu halten und Kontaminationen zu vermeiden.
* Optional: Ein Thermometer und ein Hygrometer, um Temperatur und Luftfeuchtigkeit zu überwachen.
Vorbereitung des Substrats
Die Vorbereitung des Substrats ist ein entscheidender Schritt für den Erfolg deiner Pilzzucht. Je nachdem, welches Substrat du verwendest, gibt es unterschiedliche Methoden. Hier sind die gängigsten:
Kaffeesatz-Substrat
Kaffeesatz ist ein fantastisches Substrat für Austernpilze, da er bereits pasteurisiert ist (durch das Brühen des Kaffees).
1. Sammle Kaffeesatz: Sammle deinen Kaffeesatz über ein paar Tage. Bewahre ihn im Kühlschrank auf, um Schimmelbildung zu vermeiden.
2. Pasteurisierung (optional): Obwohl Kaffeesatz bereits pasteurisiert ist, kannst du ihn zur Sicherheit noch einmal pasteurisieren. Gib den Kaffeesatz in einen Topf und erhitze ihn für 30 Minuten bei etwa 70°C.
3. Abkühlen lassen: Lass den Kaffeesatz vollständig abkühlen, bevor du ihn verwendest.
Stroh-Substrat
Stroh muss vor der Verwendung pasteurisiert werden, um unerwünschte Mikroorganismen abzutöten.
1. Stroh zerkleinern: Schneide oder zerkleinere das Stroh in kleine Stücke (ca. 5-10 cm lang).
2. Einweichen: Weiche das Stroh für 24 Stunden in kaltem Wasser ein. Dadurch wird es mit Feuchtigkeit gesättigt.
3. Pasteurisierung: Es gibt verschiedene Methoden zur Pasteurisierung von Stroh:
* Heißwasser-Methode: Gib das eingeweichte Stroh in einen großen Topf und übergieße es mit kochendem Wasser. Lass es für 1-2 Stunden ziehen.
* Kalk-Methode: Mische das eingeweichte Stroh mit Kalkhydrat (ca. 1-2% des Strohgewichts) und Wasser. Der pH-Wert sollte bei etwa 12 liegen. Lass es für 12-24 Stunden ziehen.
4. Abtropfen lassen: Lass das pasteurisierte Stroh gut abtropfen, bis es nur noch feucht ist, aber nicht mehr tropft.
Holzspäne- oder Sägemehl-Substrat
Auch Holzspäne und Sägemehl müssen pasteurisiert werden.
1. Anfeuchten: Befeuchte die Holzspäne oder das Sägemehl mit Wasser, bis sie feucht, aber nicht tropfnass sind.
2. Pasteurisierung: Gib das angefeuchtete Substrat in hitzebeständige Beutel oder Behälter.
3. Dampfsterilisation: Sterilisiere das Substrat im Dampfkochtopf oder Autoklaven für 90-120 Minuten bei 121°C. Alternativ kannst du es im Backofen bei 120°C für 2-3 Stunden pasteurisieren.
4. Abkühlen lassen: Lass das Substrat vollständig abkühlen, bevor du es verwendest.
Die Schüssel befüllen und beimpfen
Jetzt kommt der spannende Teil: Wir befüllen die Schüssel mit dem vorbereiteten Substrat und beimpfen es mit der Pilzbrut.
1. Reinigung: Reinige die Schüssel gründlich mit Seife und Wasser. Spüle sie gut aus und trockne sie ab.
2. Substrat einfüllen: Fülle eine Schicht des vorbereiteten Substrats in die Schüssel (ca. 5-7 cm hoch).
3. Pilzbrut verteilen: Verteile eine Schicht Pilzbrut über das Substrat. Die Menge der Brut hängt von der Größe der Schüssel und der Art der Pilze ab. Als Faustregel gilt: Verwende etwa 5-10% des Substratgewichts an Brut.
4. Wiederhole die Schichten: Wiederhole die Schichten von Substrat und Pilzbrut, bis die Schüssel fast voll ist. Die oberste Schicht sollte aus Substrat bestehen.
5. Abdecken: Bedecke die Schüssel mit Alufolie oder Frischhaltefolie. Steche ein paar kleine Löcher in die Folie, um die Luftzirkulation zu gewährleisten.
Die Inkubationsphase
In der Inkubationsphase wächst das Myzel (das Pilzgeflecht) durch das Substrat.
1. Platzierung: Stelle die Schüssel an einen dunklen, kühlen Ort (idealerweise zwischen 18-24°C).
2. Feuchtigkeit: Überprüfe regelmäßig die Feuchtigkeit des Substrats. Es sollte feucht, aber nicht nass sein. Befeuchte es bei Bedarf mit einer Sprühflasche.
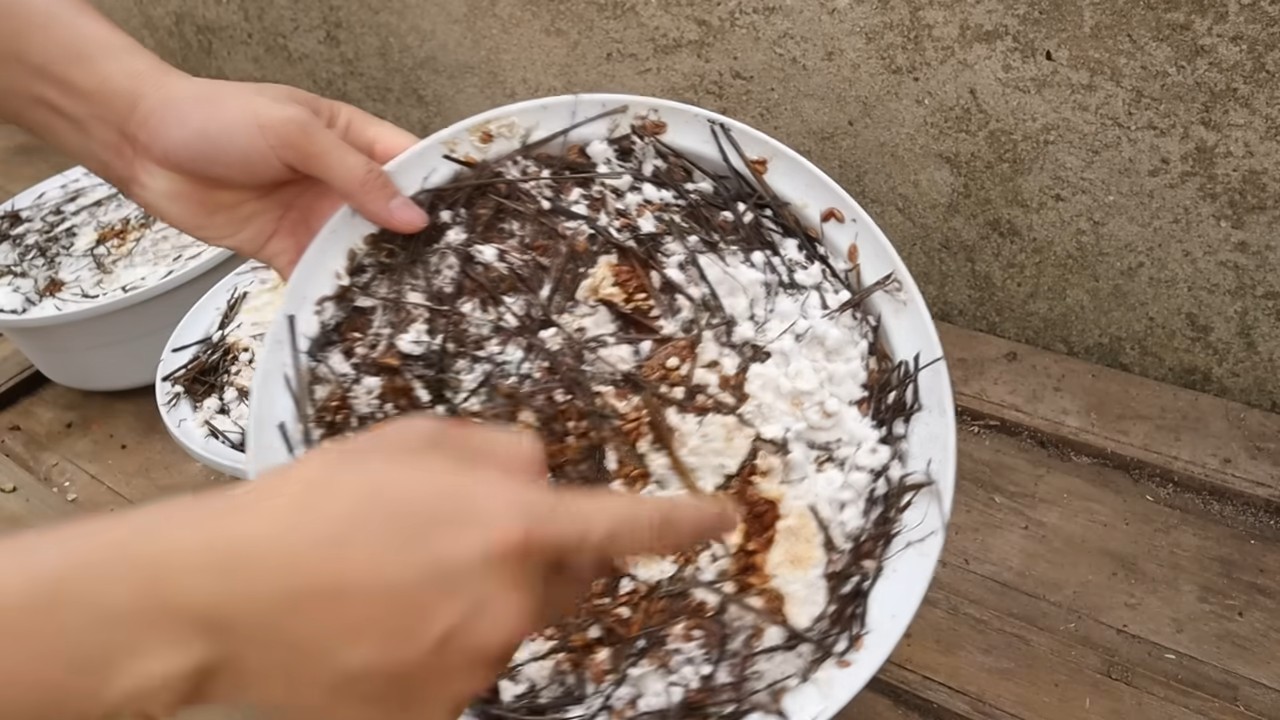
3. Beobachtung: Beobachte das Substrat. Nach einigen Tagen oder Wochen solltest du sehen, wie sich weißes Myzel auf dem Substrat ausbreitet.
4. Geduld: Die Inkubationsphase kann je nach Pilzart und Substrat mehrere Wochen dauern. Hab Geduld und lass das Myzel seine Arbeit machen.
Die Fruchtungsphase
Sobald das Myzel das Substrat vollständig besiedelt hat, beginnt die Fruchtungsphase, in der die Pilze wachsen.
1. Licht: Stelle die Schüssel an einen helleren Ort, aber vermeide direktes Sonnenlicht.
2. Luftfeuchtigkeit: Erhöhe die Luftfeuchtigkeit. Du kannst die Schüssel in eine Plastiktüte stellen und diese mehrmals täglich besprühen. Alternativ kannst du einen Luftbefeuchter verwenden.
3. Belüftung: Sorge für eine gute Belüftung, um Schimmelbildung zu vermeiden. Lüfte den Raum regelmäßig oder fächere die Luft um die Schüssel herum.
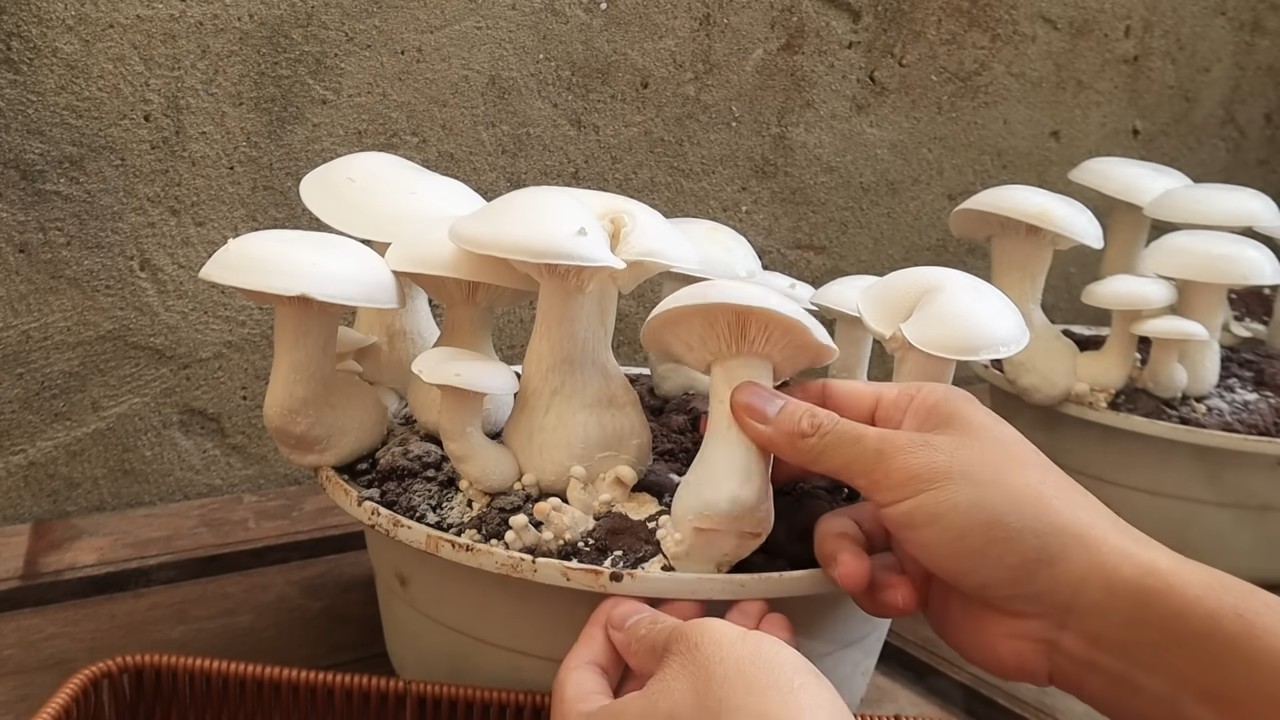
4. Beobachtung: Beobachte die Schüssel genau. Nach einigen Tagen solltest du kleine Pilzköpfe sehen, die aus dem Substrat wachsen.
5. Ernte: Ernte die Pilze, wenn sie ausgewachsen sind, aber bevor sie ihre Sporen abwerfen. Schneide sie mit einem scharfen Messer am Stiel ab.
Tipps und Tricks für eine erfolgreiche Pilzz
Conclusion
So, there you have it! The Mushroom Growing Bowl Method – a simple, accessible, and surprisingly effective way to cultivate your own delicious mushrooms right in your kitchen. We’ve walked through the process, highlighting the ease with which you can transform a humble bowl into a thriving fungal farm. But why is this DIY trick a must-try?
Firstly, it’s about control. You’re no longer reliant on supermarket availability or the often-exorbitant prices of specialty mushrooms. You dictate the variety, the freshness, and the overall quality of your harvest. Imagine the satisfaction of adding freshly picked oyster mushrooms to your pasta dish, knowing you nurtured them from spore to plate.
Secondly, it’s an incredibly rewarding experience. Watching the mycelium colonize the substrate, witnessing the first pinheads emerge, and finally harvesting your own mushrooms is a truly fascinating process. It connects you to the natural world in a tangible way, offering a glimpse into the intricate beauty of fungal life.
Thirdly, it’s adaptable. While we’ve focused on a general method, the Mushroom Growing Bowl Method lends itself to experimentation. Want to try different substrates? Go for it! Coffee grounds, straw, even cardboard can be used, each potentially yielding unique flavors and textures. Interested in cultivating different mushroom varieties? With a little research, you can adapt the method to suit your preferences. Lion’s Mane, Shiitake, or even Wine Caps could find a home in your bowl.
Consider these variations to elevate your mushroom growing game:
* Nutrient Boost: Experiment with adding small amounts of nutrient supplements to your substrate. Bran, gypsum, or even a diluted molasses solution can provide extra fuel for the mycelium, potentially leading to larger and more abundant harvests.
* Humidity Control: While the bowl provides a degree of humidity, you can further enhance it by covering the bowl with a clear plastic dome or bag. Just be sure to provide adequate ventilation to prevent the buildup of excess moisture and potential mold growth.
* Light Exposure: While mushrooms don’t require light for photosynthesis, some varieties benefit from a small amount of indirect light to encourage proper fruiting. Experiment with placing your bowl near a window or under a grow light for a few hours each day.
* Strain Selection: The type of mushroom you choose to grow will greatly impact your success. Oyster mushrooms are generally considered the easiest for beginners, but don’t be afraid to branch out and try other varieties as you gain experience.
But the most important reason to try the Mushroom Growing Bowl Method is simply because it’s fun! It’s a project that’s both educational and delicious, offering a unique and engaging way to connect with your food.
So, what are you waiting for? Gather your supplies, inoculate your substrate, and embark on your own mushroom growing adventure. We’re confident that you’ll be amazed by the results. And once you’ve harvested your first crop, we encourage you to share your experience with us! Post photos of your mushrooms, share your tips and tricks, and let us know what you’ve learned. Together, we can cultivate a community of mushroom enthusiasts, sharing our knowledge and passion for these fascinating fungi. Happy growing!
Frequently Asked Questions (FAQ)
What type of mushrooms are best for the Mushroom Growing Bowl Method?
Oyster mushrooms (Pleurotus ostreatus) are generally considered the best choice for beginners using the Mushroom Growing Bowl Method. They are relatively easy to cultivate, fast-growing, and tolerant of a wider range of environmental conditions compared to other mushroom varieties. Other good options for beginners include:
* Pearl Oyster Mushrooms: A classic choice, known for their mild flavor and versatility.
* Blue Oyster Mushrooms: Similar to pearl oysters but with a slightly more robust flavor and a beautiful blue hue.
* Pink Oyster Mushrooms: A visually stunning variety with a delicate, slightly sweet flavor.
As you gain experience, you can experiment with other varieties like Shiitake, Lion’s Mane, or Wine Caps, but be aware that these may require more specific conditions and care.
What kind of substrate should I use?
The ideal substrate for the Mushroom Growing Bowl Method depends on the type of mushroom you’re growing. However, some common and readily available options include:
* Straw: A readily available and inexpensive option, especially for oyster mushrooms. It needs to be pasteurized before use to kill off competing organisms.
* Coffee Grounds: A great way to recycle coffee grounds and provide a nutrient-rich substrate. Make sure to use spent coffee grounds and mix them with other materials like straw or sawdust.
* Sawdust: A good option for Shiitake and other wood-loving mushrooms. Use hardwood sawdust and supplement it with bran or other nutrients.
* Cardboard: A surprisingly effective substrate, especially for oyster mushrooms. Shred the cardboard into small pieces and soak it in water before using it.
Remember to pasteurize or sterilize your substrate before inoculation to prevent contamination.
How do I pasteurize or sterilize my substrate?
Pasteurization and sterilization are crucial steps to eliminate competing organisms and give your mushroom spawn a head start. Here are a few methods:
* Pasteurization (for straw, coffee grounds, cardboard):
* Hot Water Bath: Submerge the substrate in hot water (around 160-180°F or 71-82°C) for 1-2 hours. This kills off most harmful organisms without completely sterilizing the substrate.
* Steam Pasteurization: Place the substrate in a steamer or on a rack above boiling water for 1-2 hours.
* Sterilization (for sawdust, grains):
* Pressure Cooker: The most effective method for sterilization. Place the substrate in jars or bags and pressure cook at 15 PSI for 90 minutes.
* Oven Sterilization: Place the substrate in oven-safe containers and bake at 250°F (121°C) for 2 hours. This method is less reliable than pressure cooking.
Always allow the substrate to cool completely before inoculating it with mushroom spawn.
How long does it take for mushrooms to grow using the Mushroom Growing Bowl Method?
The time it takes for mushrooms to grow depends on several factors, including the mushroom variety, the substrate used, and the environmental conditions. However, here’s a general timeline:
* Colonization: After inoculation, the mycelium will start to colonize the substrate. This can take anywhere from 1-3 weeks, depending on the mushroom variety and the temperature.
* Pinning: Once the substrate is fully colonized, small mushroom “pins” will start to form. This usually takes a few days to a week.
* Fruiting: The pins will rapidly grow into mature mushrooms. This can take anywhere from a few days to a week, depending on the variety.
Overall, you can expect to harvest your first crop of mushrooms within 3-6 weeks of inoculation.
How do I know when my mushrooms are ready to harvest?
The best time to harvest mushrooms is just before the caps fully open and release their spores. Here are some specific indicators:
* Oyster Mushrooms: Harvest when the caps are fully formed but still slightly curled under.
* Shiitake Mushrooms: Harvest when the caps are fully open and the edges are starting to flatten out.
* Lion’s Mane Mushrooms: Harvest when the spines are fully developed and start to turn slightly brown.
Harvesting at the right time will ensure the best flavor and texture.
What if my substrate gets contaminated with mold?
Contamination is a common problem in mushroom cultivation. If you see mold growing on your substrate, it’s important to take action immediately.
* Small Contamination: If the contamination is small and localized, you can try to remove the affected area with a clean knife or spoon.
* Large Contamination: If the contamination is widespread, it’s best to discard the entire substrate to prevent the mold from spreading.
To prevent contamination, make sure to use sterile techniques when inoculating your substrate and maintain a clean growing environment.
Can I get multiple flushes of mushrooms from the same bowl?
Yes, you can often get multiple flushes of mushrooms from the same bowl. After harvesting your first crop, soak the substrate in water for a few hours to rehydrate it. Then, drain the excess water and place the bowl back in its growing environment. You should see another flush of mushrooms within a few weeks. You can typically get 2-3 flushes from the same substrate before it becomes depleted of nutrients.
Where can I buy mushroom spawn?
Mushroom spawn can be purchased from a variety of sources, including:
* Online Retailers: Many online retailers specialize in mushroom growing supplies and offer a wide selection of spawn.
* Local Nurseries and Garden Centers: Some nurseries and garden centers carry mushroom spawn, especially during the spring and fall.
* Mushroom Farms: If you live near a mushroom farm, they may sell spawn directly to the public.
When purchasing spawn, make sure to choose a reputable supplier and select a strain that is well-suited to your growing

Leave a Comment