

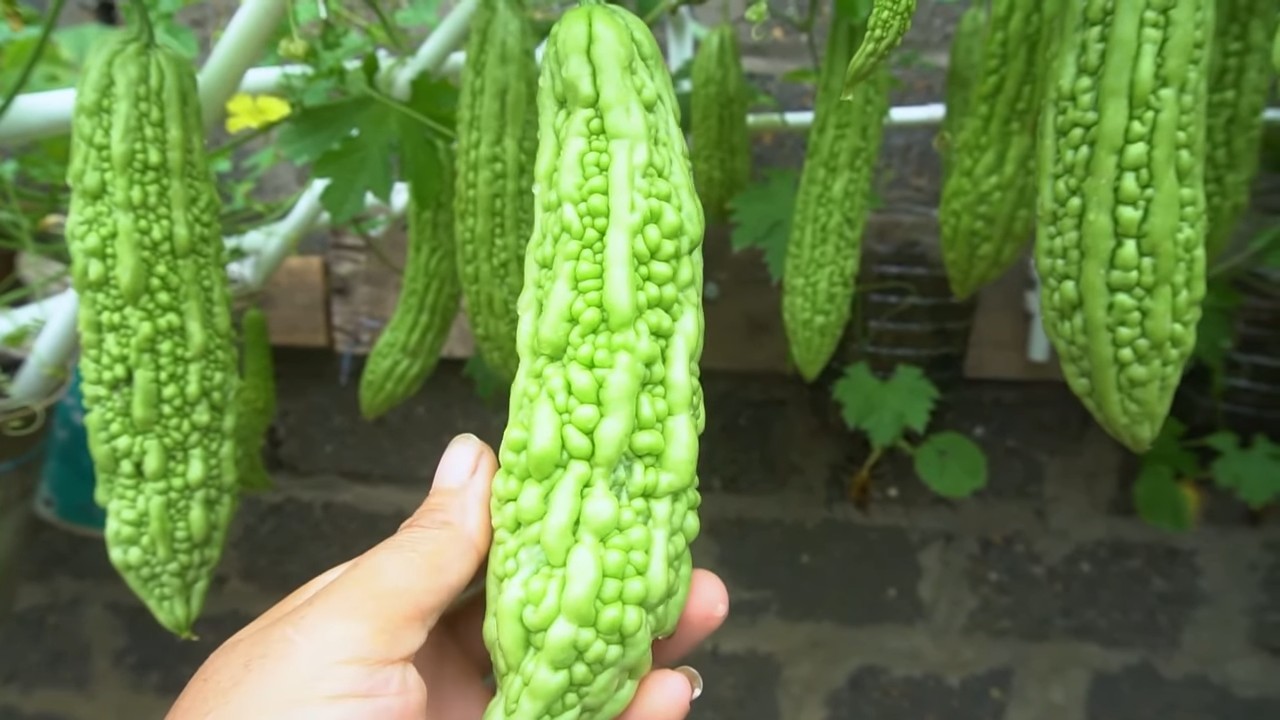
Grow Bitter Melon Easily and unlock the secrets to cultivating this unique and nutritious vegetable right in your own backyard! Have you ever looked at those knobbly, green gourds at the market and wondered if you could actually grow them yourself? Well, wonder no more! This DIY guide is your passport to a thriving bitter melon harvest, even if you’re a complete beginner.
Bitter melon, also known as bitter gourd or karela, has a rich history deeply intertwined with traditional medicine and culinary practices across Asia and Africa. For centuries, it’s been celebrated not just for its distinctive bitter flavor, but also for its potential health benefits. Imagine being able to harvest your own supply of this powerful plant, knowing exactly where it came from and how it was grown!
Let’s face it, store-bought produce can be expensive, and sometimes, the quality just isn’t there. Plus, there’s nothing quite like the satisfaction of nurturing a plant from seed to table. This DIY guide will provide you with simple, effective tricks and hacks to grow bitter melon easily, regardless of your gardening experience. We’ll cover everything from seed starting and soil preparation to trellising and pest control, ensuring you have all the knowledge you need to succeed. So, grab your gardening gloves, and let’s get started on this exciting journey to homegrown bitter melon goodness! I’m excited to share my tips and tricks with you!
Bittermelone einfach selbst anbauen: Dein DIY-Guide für eine reiche Ernte
Ich liebe Bittermelone! Ihr einzigartiger, leicht bitterer Geschmack ist einfach unvergleichlich, und sie ist auch noch super gesund. Deshalb möchte ich dir heute zeigen, wie du Bittermelone ganz einfach selbst anbauen kannst. Es ist gar nicht so schwer, wie du vielleicht denkst, und mit ein bisschen Geduld und den richtigen Tipps wirst du bald deine eigene Ernte genießen können.
Was du für den Bittermelonen-Anbau brauchst
Bevor wir loslegen, lass uns sicherstellen, dass du alles hast, was du brauchst. Hier ist eine Liste der wichtigsten Dinge:
* Bittermelonen-Samen: Du kannst sie online, in Gartencentern oder sogar aus einer reifen Bittermelone gewinnen. Achte darauf, dass die Samen gesund und keimfähig aussehen.
* Anzuchttöpfe oder -schalen: Für die Voranzucht der Samen.
* Anzuchterde: Eine spezielle Erde, die nährstoffarm ist und eine gute Drainage bietet.
* Pflanztöpfe (optional): Wenn du die Bittermelone in Töpfen anbauen möchtest. Sie sollten mindestens 30 cm Durchmesser haben.
* Gartenerde: Für das Auspflanzen ins Freiland oder in größere Töpfe.
* Kompost oder organischer Dünger: Um den Boden mit Nährstoffen anzureichern.
* Rankhilfe: Bittermelonen sind Kletterpflanzen und brauchen eine Rankhilfe, z.B. ein Spalier, einen Zaun oder ein Rankgitter.
* Gießkanne oder Gartenschlauch: Zum Bewässern der Pflanzen.
* Gartenschere: Zum Beschneiden der Pflanzen.
* Handschuhe: Zum Schutz deiner Hände.
* Ein sonniger Standort: Bittermelonen lieben die Sonne!
Die Vorbereitung: Samen keimen lassen
Die Voranzucht der Samen ist ein wichtiger Schritt, um sicherzustellen, dass deine Bittermelonen gut starten. Ich mache das immer so:
1. Samen vorbereiten: Um die Keimung zu beschleunigen, kannst du die Samen leicht anrauen. Reibe sie vorsichtig mit Schleifpapier oder einer Nagelfeile an. Achte darauf, die Samenschale nicht zu beschädigen.
2. Einweichen: Lege die Samen für 24 Stunden in lauwarmes Wasser. Das hilft, die Samenschale aufzuweichen und die Keimung zu fördern.
3. Aussaat: Fülle die Anzuchttöpfe mit Anzuchterde. Drücke die Erde leicht an und säe die Samen etwa 1-2 cm tief ein. Lege pro Topf 2-3 Samen, um sicherzugehen, dass mindestens einer keimt.
4. Bewässern: Gieße die Erde vorsichtig an, sodass sie feucht, aber nicht nass ist.
5. Warm stellen: Stelle die Anzuchttöpfe an einen warmen Ort (ca. 25-30°C). Ein Mini-Gewächshaus oder eine Fensterbank über der Heizung sind ideal.
6. Feuchtigkeit halten: Decke die Anzuchttöpfe mit Frischhaltefolie oder einem Deckel ab, um die Luftfeuchtigkeit zu erhöhen. Lüfte sie täglich kurz, um Schimmelbildung zu vermeiden.
7. Geduld haben: Die Keimung dauert in der Regel 7-14 Tage. Sobald die ersten Keimlinge erscheinen, entferne die Abdeckung und stelle die Töpfe an einen helleren Ort.
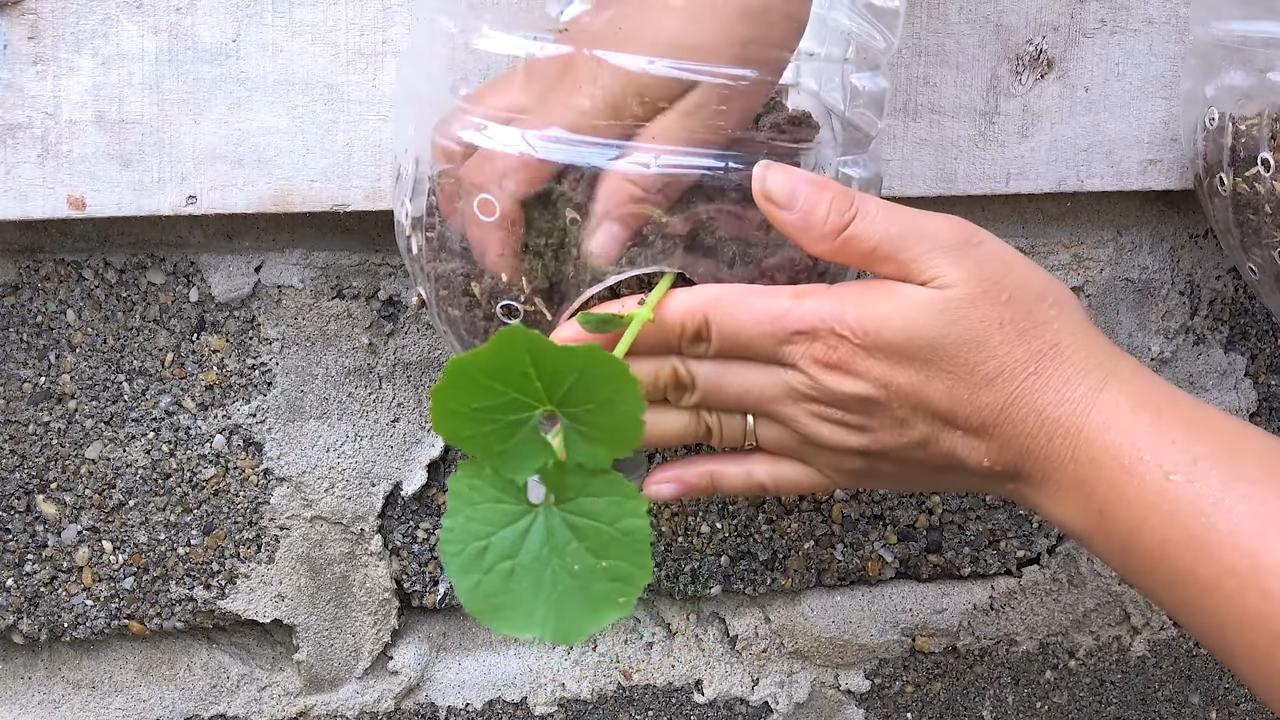
Auspflanzen: Der Umzug ins Freie oder in größere Töpfe
Sobald die Keimlinge ein paar Blätter entwickelt haben und kräftig genug aussehen, ist es Zeit, sie auszupflanzen. Das ist normalerweise nach etwa 4-6 Wochen der Fall.
1. Abhärten: Bevor du die Pflanzen ins Freie pflanzt, solltest du sie langsam an die Bedingungen draußen gewöhnen. Stelle sie für ein paar Stunden am Tag nach draußen und verlängere die Zeit jeden Tag. Das nennt man “Abhärten”.
2. Standort vorbereiten: Wähle einen sonnigen Standort mit gut durchlässigem Boden. Lockere den Boden auf und mische Kompost oder organischen Dünger unter.
3. Pflanzen: Grabe ein Loch, das etwas größer ist als der Wurzelballen der Pflanze. Setze die Pflanze vorsichtig hinein und fülle das Loch mit Erde auf. Drücke die Erde leicht an und gieße die Pflanze gut an.
4. Rankhilfe installieren: Bringe die Rankhilfe in der Nähe der Pflanze an, damit sie sich daran festhalten kann.
5. Abstand halten: Wenn du mehrere Pflanzen setzt, achte auf einen Abstand von mindestens 50 cm zwischen den Pflanzen.
Pflege: Gießen, Düngen und Beschneiden
Die richtige Pflege ist entscheidend für eine reiche Ernte. Hier sind ein paar Tipps, die du beachten solltest:
1. Gießen: Bittermelonen brauchen regelmäßig Wasser, besonders während der heißen Sommermonate. Gieße die Pflanzen am besten morgens oder abends, wenn die Sonne nicht so stark scheint. Vermeide Staunässe, da dies zu Wurzelfäule führen kann.
2. Düngen: Dünge die Pflanzen alle 2-3 Wochen mit einem organischen Dünger oder Komposttee. Das versorgt sie mit den nötigen Nährstoffen für ein gesundes Wachstum und eine gute Fruchtbildung.
3. Beschneiden: Das Beschneiden der Bittermelonen kann die Fruchtbildung fördern. Entferne regelmäßig Seitentriebe, die keine Blüten tragen. Du kannst auch die Spitze der Haupttriebe abschneiden, um das Wachstum zu verzweigen.
4. Unkraut entfernen: Halte den Bereich um die Pflanzen herum unkrautfrei, um Konkurrenz um Nährstoffe und Wasser zu vermeiden.
5. Schädlinge und Krankheiten: Achte auf Schädlinge wie Blattläuse oder Spinnmilben. Bei Bedarf kannst du biologische Schädlingsbekämpfungsmittel einsetzen. Achte auch auf Anzeichen von Krankheiten wie Mehltau. Entferne befallene Blätter sofort.
Die Ernte: Wann ist der richtige Zeitpunkt?
Die Erntezeit der Bittermelonen hängt von der Sorte und den Anbaubedingungen ab. In der Regel kannst du etwa 2-3 Monate nach dem Auspflanzen die ersten Früchte ernten.
1. Reife erkennen: Die Bittermelonen sind reif, wenn sie ihre typische Farbe (grün, weiß oder gelb, je nach Sorte) erreicht haben und sich leicht vom Stiel lösen lassen. Sie sollten noch fest sein und keine weichen Stellen haben.
2. Ernten: Schneide die Bittermelonen mit einer Gartenschere vom Stiel ab. Achte darauf, die Pflanze nicht zu beschädigen.
3. Regelmäßig ernten: Ernte die Bittermelonen regelmäßig, um die Pflanze zur Bildung neuer Früchte anzuregen.
Zusätzliche Tipps für eine erfolgreiche Ernte
* Mulchen: Eine Mulchschicht aus Stroh oder Rasenschnitt hilft, die Feuchtigkeit im Boden zu halten und Unkraut zu unterdrücken.
* Bestäubung: Bittermelonen haben männliche und weibliche Blüten. Wenn du sicherstellen willst, dass die weiblichen Blüten bestäubt werden, kannst du sie von Hand bestäuben. Übertrage einfach mit einem Pinsel Pollen von den männlichen auf die weiblichen Blüten.
* Sortenwahl: Es gibt viele verschiedene Bittermelonen-Sorten. Informiere dich vor dem Anbau über die verschiedenen Sorten und wähle diejenige aus, die am besten zu deinen Bedingungen passt.
* Geduld: Der Anbau von Bittermelonen erfordert Geduld. Lass dich nicht entmutigen, wenn es nicht sofort klappt. Mit etwas Übung wirst du bald eine reiche Ernte erzielen.
Ich hoffe, dieser Guide hilft dir dabei, deine eigenen Bittermelonen anzubauen. Es ist ein lohnendes Projekt, und der Geschmack der selbst angebauten Bittermelonen ist einfach unschlagbar! Viel Erfolg und lass es mich wissen, wenn du Fragen hast!
Conclusion
So, there you have it! Growing bitter melon easily at home is not only achievable but also incredibly rewarding. Forget those expensive, often lackluster, store-bought options. Imagine stepping into your garden and harvesting fresh, vibrant bitter melon whenever you need it. The satisfaction of nurturing a plant from seed to harvest is unparalleled, and the flavor of homegrown bitter melon is simply unmatched. It’s fresher, more flavorful, and you know exactly what went into growing it – no hidden pesticides or questionable practices.
This DIY trick, focusing on optimal soil preparation, strategic trellising, and consistent watering, is a game-changer for anyone who has struggled with bitter melon cultivation in the past. It addresses the common pitfalls that often lead to disappointing yields and ensures that your plants have the best possible environment to thrive.
But the beauty of gardening lies in experimentation! Feel free to adapt this method to suit your specific climate and growing conditions. For instance, if you live in a particularly hot and dry region, consider providing your bitter melon plants with some afternoon shade to prevent sunscald. You could also experiment with different types of organic fertilizers to see which one yields the best results for you.
Variations to Consider:
* Vertical Gardening: If you’re short on space, explore vertical gardening techniques. Bitter melon vines are natural climbers, so they’re perfect for growing on trellises, fences, or even repurposed pallets. This not only saves space but also improves air circulation around the plants, reducing the risk of fungal diseases.
* Companion Planting: Consider planting companion plants alongside your bitter melon. Marigolds, for example, can help deter pests, while basil can improve the overall health and vigor of your plants.
* Seed Saving: Once your bitter melon plants start producing fruit, consider saving some of the seeds for future planting. This is a great way to ensure a continuous supply of fresh bitter melon and to adapt the plants to your specific growing conditions over time.
* Grafting: For more advanced gardeners, grafting bitter melon onto a more vigorous rootstock can improve disease resistance and overall plant health.
Don’t be afraid to get your hands dirty and experiment! Gardening is a journey of learning and discovery, and there’s no one-size-fits-all approach. The key is to observe your plants closely, pay attention to their needs, and adapt your methods accordingly.
We are confident that by following these simple steps, you’ll be well on your way to enjoying a bountiful harvest of fresh, homegrown bitter melon. So, grab your gardening gloves, gather your supplies, and get ready to embark on this exciting gardening adventure.
We’re eager to hear about your experiences! Share your success stories, challenges, and any variations you’ve tried in the comments below. Let’s create a community of bitter melon enthusiasts and learn from each other. Happy gardening!
Frequently Asked Questions (FAQ)
What is the best time of year to plant bitter melon?
Bitter melon thrives in warm weather, so the best time to plant it is in late spring or early summer, after the last frost has passed. The soil temperature should be at least 65°F (18°C) for optimal germination. If you live in a region with a short growing season, you can start the seeds indoors 4-6 weeks before the last expected frost. This will give your plants a head start and ensure that they have enough time to mature and produce fruit.
How much sunlight does bitter melon need?
Bitter melon requires at least 6-8 hours of direct sunlight per day. Choose a planting location that receives plenty of sunlight throughout the day. If you live in a particularly hot climate, providing some afternoon shade can help prevent sunscald, especially during the hottest months of the year. Insufficient sunlight can lead to stunted growth, reduced flowering, and lower fruit production.
What type of soil is best for growing bitter melon?
Bitter melon prefers well-drained, fertile soil that is rich in organic matter. Before planting, amend the soil with compost, aged manure, or other organic materials to improve its drainage, fertility, and water-holding capacity. A slightly acidic to neutral soil pH of 6.0 to 7.0 is ideal. Avoid planting in heavy clay soil, as this can lead to waterlogging and root rot. If you have clay soil, consider amending it with sand and organic matter to improve its drainage.
How often should I water bitter melon?
Bitter melon needs consistent watering, especially during hot, dry weather. Water deeply and regularly, aiming to keep the soil consistently moist but not waterlogged. Avoid overhead watering, as this can promote fungal diseases. Instead, water at the base of the plants, using a soaker hose or drip irrigation system. Mulching around the plants can help retain moisture in the soil and reduce the need for frequent watering. Check the soil moisture regularly and adjust your watering schedule accordingly.
What kind of fertilizer should I use for bitter melon?
Bitter melon benefits from regular fertilization throughout the growing season. Use a balanced fertilizer with equal amounts of nitrogen, phosphorus, and potassium (e.g., 10-10-10) or a fertilizer specifically formulated for vegetables. Apply the fertilizer according to the manufacturer’s instructions. You can also supplement with organic fertilizers, such as compost tea or fish emulsion, to provide additional nutrients and improve soil health. Avoid over-fertilizing, as this can lead to excessive vegetative growth and reduced fruit production.
How do I control pests and diseases on bitter melon plants?
Bitter melon can be susceptible to various pests and diseases, including aphids, spider mites, squash bugs, and fungal diseases like powdery mildew. Regularly inspect your plants for signs of pests or diseases and take action promptly. Use organic pest control methods, such as insecticidal soap, neem oil, or horticultural oil, to control pests. For fungal diseases, improve air circulation around the plants, avoid overhead watering, and apply a fungicide if necessary. Companion planting with marigolds or basil can also help deter pests.
When is bitter melon ready to harvest?
Bitter melon is typically ready to harvest 8-12 weeks after planting, depending on the variety and growing conditions. The fruit should be firm, green (or white, depending on the variety), and slightly immature. Overripe bitter melon will turn yellow or orange and become bitter and less palatable. Use a sharp knife or pruners to harvest the fruit, leaving a short stem attached. Harvest regularly to encourage continued fruit production.
How do I store bitter melon?
Freshly harvested bitter melon can be stored in the refrigerator for up to a week. Wrap the fruit in a paper towel and place it in a plastic bag to prevent it from drying out. Bitter melon can also be frozen for longer storage. Blanch the fruit in boiling water for 2-3 minutes, then cool it in ice water. Drain well and freeze in airtight containers or freezer bags.
My bitter melon plant is flowering, but not producing fruit. What could be the problem?
There are several reasons why your bitter melon plant might be flowering but not producing fruit. One common reason is poor pollination. Bitter melon is a monoecious plant, meaning it has separate male and female flowers on the same plant. The female flowers need to be pollinated by the male flowers in order to produce fruit. If there are not enough pollinators in your area, you may need to hand-pollinate the flowers. Another possible reason is nutrient deficiency. Make sure your plants are getting enough phosphorus and potassium, which are essential for fruit development. Stressful growing conditions, such as extreme heat or drought, can also prevent fruit set. Ensure your plants are getting adequate water and protection from the elements.
Can I grow bitter melon in a container?
Yes, you can grow bitter melon in a container, but you’ll need to choose a large container that is at least 12 inches in diameter and depth. Use a well-draining potting mix that is rich in organic matter. Provide a trellis or other support for the vines to climb on. Water regularly and fertilize every 2-3 weeks. Container-grown bitter melon may require more frequent watering and fertilization than plants grown in the ground.
Leave a Comment