

Growing Bottle Gourds Easily is simpler than you might think! Have you ever dreamed of harvesting your own uniquely shaped, homegrown bottle gourds? Imagine the satisfaction of crafting them into birdhouses, bowls, or even musical instruments! For centuries, bottle gourds have been cultivated across the globe, holding a special place in various cultures. From ancient civilizations using them as water containers to modern artisans transforming them into stunning works of art, the bottle gourd boasts a rich and fascinating history.
But let’s be honest, sometimes gardening feels more like a chore than a joy, right? That’s where these DIY tricks come in. Many gardeners struggle with getting their bottle gourds to thrive, facing challenges like poor germination, pest infestations, or simply not knowing the best techniques for optimal growth. That’s why I’m so excited to share these simple yet effective DIY hacks that will help you growing bottle gourds easily, even if you’re a complete beginner.
These tips will save you time, money, and frustration, allowing you to enjoy the rewarding experience of nurturing your own bottle gourd patch. So, grab your gardening gloves, and let’s dive into the secrets of cultivating these versatile and fascinating plants!
Flaschenkürbisse einfach selbst anbauen: Mein DIY-Leitfaden
Ich liebe es, meinen eigenen Garten zu haben und frische, gesunde Lebensmittel anzubauen. Eines meiner Lieblingsprojekte ist der Anbau von Flaschenkürbissen. Sie sind nicht nur unglaublich vielseitig (man kann sie essen, aber auch zu Gefäßen, Lampen und vielem mehr verarbeiten!), sondern auch relativ einfach anzubauen, wenn man ein paar grundlegende Dinge beachtet. In diesem Artikel zeige ich dir Schritt für Schritt, wie du deine eigenen Flaschenkürbisse erfolgreich anbauen kannst.
Was du brauchst: Die Vorbereitung
Bevor wir loslegen, lass uns sicherstellen, dass wir alles Nötige zur Hand haben. Hier ist eine Liste der Materialien und Werkzeuge, die du benötigen wirst:
* Flaschenkürbissamen: Wähle eine Sorte, die dir gefällt. Es gibt viele verschiedene Formen und Größen!
* Anzuchttöpfe oder -schalen: Für die Voranzucht der Samen.
* Anzuchterde: Eine leichte, gut durchlässige Erde ist ideal.
* Gartenerde: Für das endgültige Beet oder den Topf.
* Kompost oder organischer Dünger: Um den Boden anzureichern.
* Pflanzgefäße (optional): Wenn du die Kürbisse in Töpfen anbauen möchtest. Große Töpfe sind wichtig!
* Rankhilfe: Flaschenkürbisse sind Kletterpflanzen und brauchen eine stabile Rankhilfe. Das kann ein Zaun, ein Spalier oder ein selbstgebautes Gerüst sein.
* Gießkanne oder Gartenschlauch: Für die Bewässerung.
* Gartenhandschuhe: Zum Schutz deiner Hände.
* Gartenschere oder Messer: Zum Beschneiden der Pflanze und Ernten der Kürbisse.
* Mulch (optional): Um den Boden feucht zu halten und Unkraut zu unterdrücken.
Phase 1: Die Aussaat und Voranzucht
Die Voranzucht der Samen ist besonders in kühleren Klimazonen empfehlenswert, um den Pflanzen einen Vorsprung zu verschaffen.
1. Samen vorbereiten: Um die Keimung zu beschleunigen, kannst du die Samen vor der Aussaat 24 Stunden in lauwarmem Wasser einweichen. Das hilft, die harte Schale aufzuweichen.
2. Aussaat in Anzuchttöpfen: Fülle die Anzuchttöpfe mit Anzuchterde. Lege in jeden Topf ein bis zwei Samen, etwa 2-3 cm tief. Bedecke die Samen mit Erde und drücke sie leicht an.
3. Bewässerung: Gieße die Erde vorsichtig an, sodass sie feucht, aber nicht nass ist.
4. Standort: Stelle die Anzuchttöpfe an einen warmen, hellen Ort. Eine Fensterbank oder ein Gewächshaus sind ideal. Die optimale Keimtemperatur liegt bei 20-25°C.
5. Feuchtigkeit: Halte die Erde feucht, indem du sie regelmäßig besprühst oder gießt. Vermeide Staunässe.
6. Keimung: Die Samen sollten innerhalb von 7-14 Tagen keimen.
Phase 2: Das Auspflanzen
Sobald die Jungpflanzen kräftig genug sind (etwa 10-15 cm hoch und mit mehreren Blättern), können sie ins Freie gepflanzt werden.
1. Vorbereitung des Beetes oder Topfes: Wähle einen sonnigen Standort mit gut durchlässigem Boden. Flaschenkürbisse brauchen viel Sonne und Nährstoffe. Grabe das Beet um und reicher es mit Kompost oder organischem Dünger an. Wenn du die Kürbisse in Töpfen anbauen möchtest, wähle große Töpfe (mindestens 50 Liter Volumen) und fülle sie mit einer Mischung aus Gartenerde und Kompost.
2. Abhärten der Jungpflanzen: Bevor du die Jungpflanzen ins Freie pflanzt, solltest du sie einige Tage lang abhärten. Stelle sie dazu tagsüber für einige Stunden ins Freie und hole sie abends wieder herein. Das hilft ihnen, sich an die neuen Bedingungen zu gewöhnen.
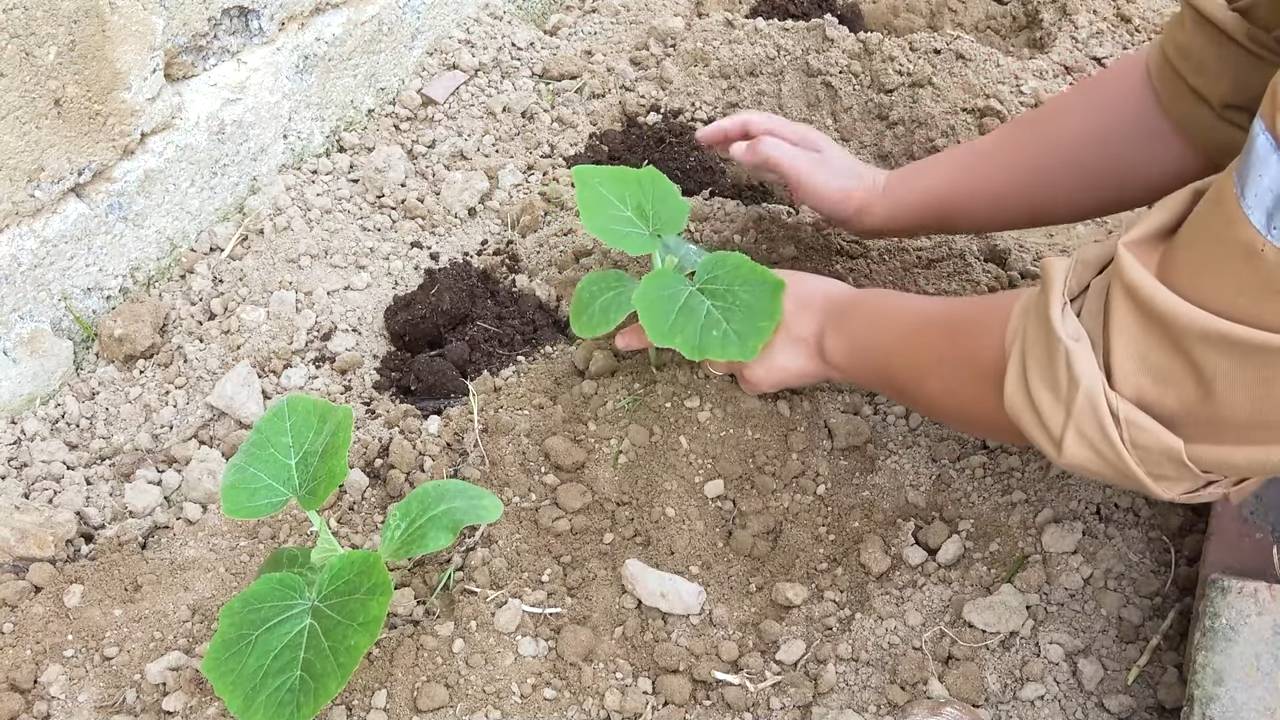
3. Auspflanzen: Grabe ein Loch, das groß genug ist, um den Wurzelballen der Jungpflanze aufzunehmen. Setze die Pflanze vorsichtig ein und fülle das Loch mit Erde. Drücke die Erde leicht an und gieße die Pflanze gründlich.
4. Abstand: Achte auf ausreichend Abstand zwischen den Pflanzen. Flaschenkürbisse brauchen viel Platz zum Wachsen. Ein Abstand von 1-1,5 Metern ist empfehlenswert.
5. Rankhilfe installieren: Stelle sicher, dass die Rankhilfe stabil und gut befestigt ist. Leite die jungen Triebe der Kürbispflanze vorsichtig an der Rankhilfe entlang.
Phase 3: Pflege und Wachstum
Die richtige Pflege ist entscheidend für eine reiche Ernte.
1. Bewässerung: Flaschenkürbisse brauchen regelmäßig Wasser, besonders während der Blütezeit und Fruchtbildung. Gieße die Pflanzen am besten morgens, damit die Blätter über den Tag abtrocknen können. Vermeide Staunässe.
2. Düngung: Dünge die Pflanzen regelmäßig mit einem organischen Dünger oder Kompost. Das fördert das Wachstum und die Fruchtbildung.
3. Beschneiden: Um das Wachstum zu fördern und die Fruchtbildung anzuregen, kannst du die Pflanze beschneiden. Entferne überflüssige Seitentriebe und Blätter, die die Früchte beschatten.
4. Unkrautbekämpfung: Halte das Beet oder den Topf unkrautfrei. Unkraut konkurriert mit den Kürbispflanzen um Nährstoffe und Wasser.
5. Schutz vor Schädlingen und Krankheiten: Kontrolliere die Pflanzen regelmäßig auf Schädlinge und Krankheiten. Bei Bedarf kannst du biologische Schädlingsbekämpfungsmittel einsetzen. Mehltau ist eine häufige Krankheit bei Kürbispflanzen. Achte auf eine gute Belüftung und vermeide es, die Blätter beim Gießen zu benetzen.
Phase 4: Die Ernte
Die Erntezeit hängt von der Sorte und den klimatischen Bedingungen ab.
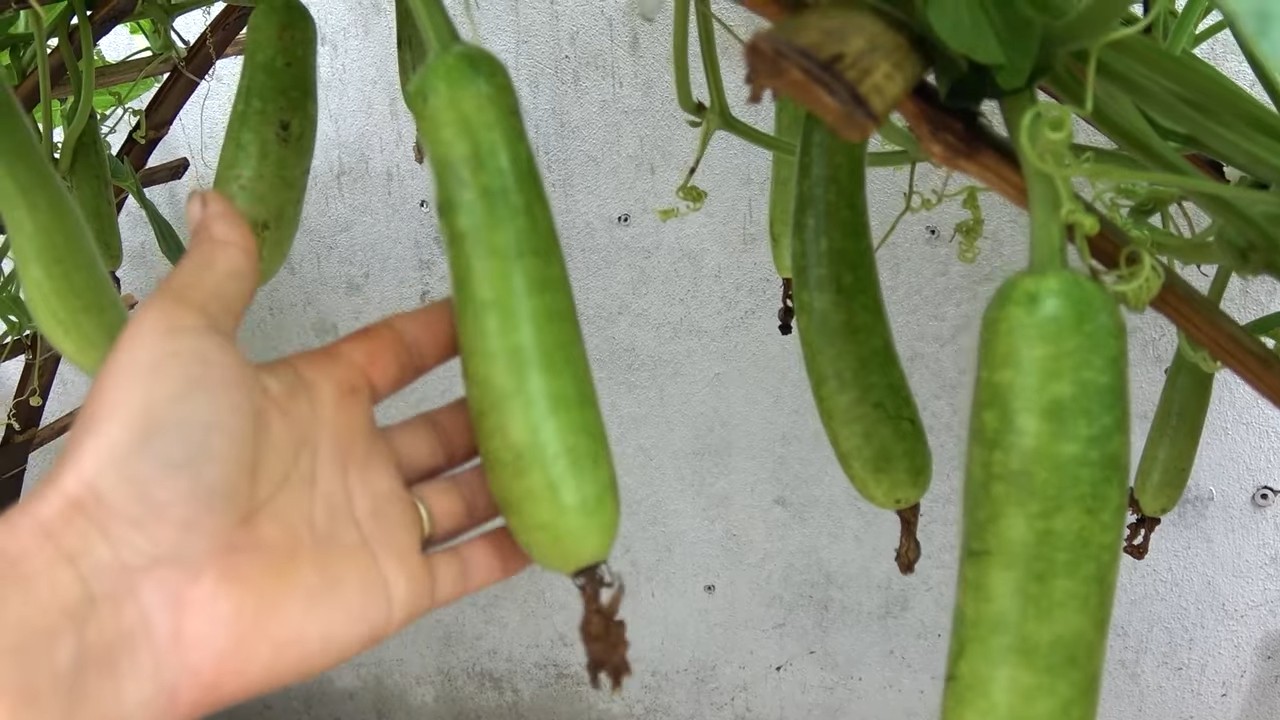
1. Reifezeichen: Flaschenkürbisse sind reif, wenn die Schale hart und undurchdringlich ist. Du kannst das testen, indem du mit dem Fingernagel auf die Schale klopfst. Wenn sie hohl klingt, ist der Kürbis reif. Die Stiele sollten ebenfalls trocken und braun sein.
2. Ernten: Schneide die Kürbisse mit einer Gartenschere oder einem Messer ab. Lasse dabei einen Stielansatz von etwa 5-10 cm stehen. Das verlängert die Haltbarkeit.
3. Trocknen und Aushärten: Um die Kürbisse haltbar zu machen, müssen sie getrocknet und ausgehärtet werden. Lege sie dazu an einen trockenen, gut belüfteten Ort, geschützt vor direkter Sonneneinstrahlung. Drehe die Kürbisse regelmäßig, damit sie gleichmäßig trocknen. Der Trocknungsprozess kann mehrere Wochen dauern.
4. Lagerung: Lagere die getrockneten Kürbisse an einem kühlen, trockenen und dunklen Ort.
Zusätzliche Tipps und Tricks
* Bestäubung: Flaschenkürbisse sind einhäusig, das heißt, sie haben männliche und weibliche Blüten auf derselben Pflanze. Die Bestäubung erfolgt durch Insekten, hauptsächlich Bienen. Wenn du sicherstellen möchtest, dass die Bestäubung erfolgreich ist, kannst du die Blüten auch von Hand bestäuben. Trage dazu mit einem Pinsel Pollen von einer männlichen Blüte auf eine weibliche Blüte. Weibliche Blüten erkennst du an dem kleinen Fruchtansatz direkt unter der Blüte.
* Sortenwahl: Es gibt viele verschiedene Sorten von Flaschenkürbissen. Informiere dich vor der Aussaat über die Eigenschaften der verschiedenen Sorten und wähle eine Sorte, die zu deinen Bedürfnissen und Vorlieben passt. Einige Sorten eignen sich besser zum Essen, andere sind besser für die Herstellung von Gefäßen oder Lampen geeignet.
* Bodenverbesserung: Flaschenkürbisse bevorzugen einen nährstoffreichen, gut durchlässigen Boden. Verbessere den Boden
Conclusion
So, there you have it! Growing bottle gourds doesn’t have to be an intimidating endeavor. By implementing this simple yet effective DIY trick, you’re not just planting seeds; you’re setting the stage for a bountiful harvest of these versatile and fascinating vegetables. The beauty of this method lies in its accessibility. Whether you’re a seasoned gardener or a complete novice, the steps are straightforward and require minimal investment.
Why is this DIY trick a must-try? Because it significantly increases your chances of success. Bottle gourds, while rewarding, can be a bit finicky, especially in their early stages. This method provides a protected and nurturing environment, shielding the delicate seedlings from harsh weather, pests, and diseases. It also promotes stronger root development, which is crucial for the plant’s overall health and productivity. Think of it as giving your bottle gourd seedlings a head start in life, setting them up for vigorous growth and abundant fruit production.
But the fun doesn’t stop there! Feel free to experiment with variations. For instance, if you live in a particularly hot climate, consider using a slightly larger container to provide more insulation for the roots. You could also try adding a layer of mulch around the base of the plant to help retain moisture and suppress weeds. Another exciting variation is to explore different varieties of bottle gourds. From the classic long-necked types to the rounder, more ornamental shapes, there’s a bottle gourd out there to suit every taste and garden.
Remember, gardening is all about learning and adapting. Don’t be afraid to tweak the method to suit your specific needs and conditions. The most important thing is to get your hands dirty and give it a try!
We are confident that this DIY trick will revolutionize your bottle gourd growing experience. Imagine the satisfaction of harvesting your own homegrown bottle gourds, knowing that you played a crucial role in their success. Picture the delicious meals you can create with these versatile vegetables, from savory curries to refreshing summer drinks.
So, what are you waiting for? Gather your supplies, follow the steps outlined in this article, and embark on your bottle gourd growing adventure today! And most importantly, we want to hear about your experiences. Share your photos, tips, and stories in the comments section below. Let’s create a community of bottle gourd enthusiasts, sharing our knowledge and inspiring each other to grow the best bottle gourds possible. Your insights could be invaluable to other gardeners, and together, we can unlock the full potential of this amazing plant. Let’s get growing! This **growing bottle gourds** method is sure to bring you success.
Frequently Asked Questions (FAQ)
What type of container is best for starting bottle gourd seedlings using this DIY trick?
Ideally, you should use a container that is at least 6-8 inches in diameter and depth. This provides ample space for the roots to develop without becoming root-bound. Biodegradable pots are an excellent option, as they can be directly planted into the ground, minimizing transplant shock. Plastic pots are also suitable, but ensure they have drainage holes to prevent waterlogging. Avoid using containers that are too small, as this can stunt the growth of the seedlings.
How often should I water the bottle gourd seedlings in the container?
Watering frequency depends on several factors, including the weather, the type of container, and the soil mix. Generally, you should water the seedlings when the top inch of soil feels dry to the touch. Avoid overwatering, as this can lead to root rot. A good rule of thumb is to water deeply but infrequently, allowing the soil to dry out slightly between waterings. During hot and dry weather, you may need to water more frequently.
What type of soil mix is best for growing bottle gourd seedlings?
A well-draining soil mix is essential for healthy bottle gourd seedlings. A good option is a mix of equal parts potting soil, compost, and perlite or vermiculite. The potting soil provides nutrients, the compost adds organic matter, and the perlite or vermiculite improves drainage and aeration. Avoid using heavy clay soil, as it can become waterlogged and suffocate the roots.
How much sunlight do bottle gourd seedlings need?
Bottle gourd seedlings need plenty of sunlight to thrive. Aim for at least 6-8 hours of direct sunlight per day. If you are starting the seedlings indoors, place them near a sunny window or use grow lights to supplement the natural light. Insufficient sunlight can lead to weak and leggy seedlings.
When is the best time to transplant the bottle gourd seedlings into the garden?
The best time to transplant bottle gourd seedlings into the garden is after the last frost, when the soil has warmed up to at least 60°F (15°C). Choose a sunny location with well-draining soil. Before transplanting, harden off the seedlings by gradually exposing them to outdoor conditions for a week or two. This will help them adjust to the change in environment and reduce transplant shock.
What kind of support system do bottle gourds need as they grow?
Bottle gourds are vigorous climbers and require a strong support system to grow properly. A sturdy trellis, fence, or arbor are all excellent options. The support system should be at least 6-8 feet tall to accommodate the plant’s growth. As the plant grows, train the vines to climb the support system by gently guiding them and tying them with soft twine or plant ties.
How do I prevent pests and diseases from affecting my bottle gourd plants?
Prevention is key when it comes to pests and diseases. Start by choosing disease-resistant varieties of bottle gourds. Ensure good air circulation around the plants by spacing them properly and pruning any overcrowded foliage. Regularly inspect the plants for signs of pests or diseases, such as aphids, squash bugs, or powdery mildew. If you spot any problems, take action immediately by using organic pest control methods or fungicides.
How long does it take for bottle gourds to mature?
The time it takes for bottle gourds to mature depends on the variety and growing conditions. Generally, it takes about 90-120 days from planting to harvest. The gourds are ready to harvest when they are mature and the skin is hard and dry.
Can I eat bottle gourds?
Yes, bottle gourds are edible when they are young and tender. They can be used in a variety of dishes, such as curries, soups, and stews. However, it is important to note that some bottle gourds can be bitter and potentially toxic if they are not properly prepared. Always taste a small piece of the gourd before cooking it to ensure it is not bitter. If it is bitter, discard it.
What are some creative ways to use bottle gourds after harvesting?
Bottle gourds are incredibly versatile and can be used for a variety of purposes after harvesting. They can be dried and used as containers, bowls, or musical instruments. They can also be painted, carved, or decorated to create beautiful works of art. The possibilities are endless!
Leave a Comment