

Grow Black Corn at Home? Absolutely! Imagine the look on your friends’ faces when you serve up vibrant, almost gothic, corn on the cob that you grew yourself. It’s not just a conversation starter; it’s a testament to your gardening prowess! For centuries, corn has been a staple crop, deeply woven into the cultures of the Americas. While yellow and white corn are commonplace, black corn, with its unique anthocyanin pigments, offers a striking visual and nutritional twist.
But why should you bother with this slightly unconventional variety? Well, beyond the sheer novelty, black corn is packed with antioxidants, making it a healthier choice than its paler cousins. Plus, let’s be honest, who doesn’t love a good DIY project that yields delicious and visually stunning results? This article is your ultimate guide to successfully grow black corn at home, even if you’re a beginner gardener. I’ll share all my tried-and-true tips and tricks, from seed selection to harvesting, ensuring you’ll be enjoying your own homegrown black corn in no time. Get ready to impress your neighbors and elevate your summer barbecues with this unique and rewarding gardening adventure!
Schwarzer Maisanbau für Zuhause: Eine Schritt-für-Schritt-Anleitung
Hallo liebe Gartenfreunde! Habt ihr schon mal von schwarzem Mais gehört? Er ist nicht nur wunderschön anzusehen, sondern auch super gesund und eine tolle Ergänzung für euren Garten. Ich zeige euch heute, wie ihr diesen besonderen Mais ganz einfach selbst anbauen könnt. Keine Angst, es ist gar nicht so schwer, wie es klingt!
Was du für den Anbau von schwarzem Mais brauchst
Bevor wir loslegen, hier eine Liste mit allen Materialien und Werkzeugen, die du benötigst:
* Schwarze Maissamen: Diese bekommst du in gut sortierten Gartencentern oder online. Achte darauf, dass es sich um samenfestes Saatgut handelt, damit du im nächsten Jahr wieder Samen gewinnen kannst.
* Gartenboden: Schwarzer Mais bevorzugt einen lockeren, humusreichen Boden.
* Kompost oder organischer Dünger: Für eine gute Nährstoffversorgung.
* Gartengeräte: Spaten, Harke, eventuell eine Pflanzkelle.
* Gießkanne oder Gartenschlauch: Zum Bewässern.
* Pflanzstäbe und Schnur (optional): Zum Stützen der Pflanzen bei starkem Wind.
* Vogelschutznetz (optional): Um die jungen Keimlinge vor Vögeln zu schützen.
Die Vorbereitung: Der richtige Standort und die Bodenvorbereitung
Der Erfolg beim Maisanbau hängt stark vom Standort und der Bodenvorbereitung ab. Hier sind meine Tipps:
* Der Standort: Schwarzer Mais liebt die Sonne! Wähle einen Standort, der mindestens 6-8 Stunden direkte Sonneneinstrahlung pro Tag bekommt. Vermeide schattige Plätze, da dies das Wachstum beeinträchtigen kann.
* Der Boden: Der Boden sollte gut durchlässig sein, damit sich keine Staunässe bildet. Schwarzer Mais bevorzugt einen pH-Wert zwischen 6,0 und 7,0.
* Die Bodenvorbereitung:
1. Boden lockern: Grabe den Boden mit einem Spaten um und lockere ihn gründlich auf. Entferne dabei Steine, Wurzeln und Unkraut.
2. Kompost einarbeiten: Arbeite reichlich Kompost oder organischen Dünger in den Boden ein. Das verbessert die Bodenstruktur und versorgt den Mais mit wichtigen Nährstoffen. Ich verwende gerne gut verrotteten Pferdemist, aber auch anderer Kompost ist super.
3. Boden ebnen: Harke den Boden glatt, um eine ebene Fläche für die Aussaat zu schaffen.
Die Aussaat: So bringst du die Samen in die Erde
Jetzt kommt der spannende Teil: Die Aussaat! Hier ist, wie ich es mache:
* Der richtige Zeitpunkt: Schwarzer Mais ist frostempfindlich. Warte mit der Aussaat, bis keine Frostgefahr mehr besteht. In der Regel ist das ab Mitte Mai der Fall. Die Bodentemperatur sollte mindestens 10°C betragen.
* Die Aussaatmethode: Ich säe den Mais direkt ins Freiland. Du kannst ihn aber auch in Töpfen vorziehen, wenn du in einer Region mit kurzem Sommer wohnst.
* Die Aussaat im Freiland:
1. Reihen ziehen: Ziehe mit einer Harke oder einem Stock Reihen im Abstand von etwa 75 cm.
2. Samen legen: Lege die Samen in einem Abstand von etwa 20-25 cm in die Reihen. Die Saattiefe sollte etwa 2-3 cm betragen.
3. Mit Erde bedecken: Bedecke die Samen mit Erde und drücke sie leicht an.
4. Gießen: Gieße die Reihen vorsichtig an, damit die Erde feucht ist.
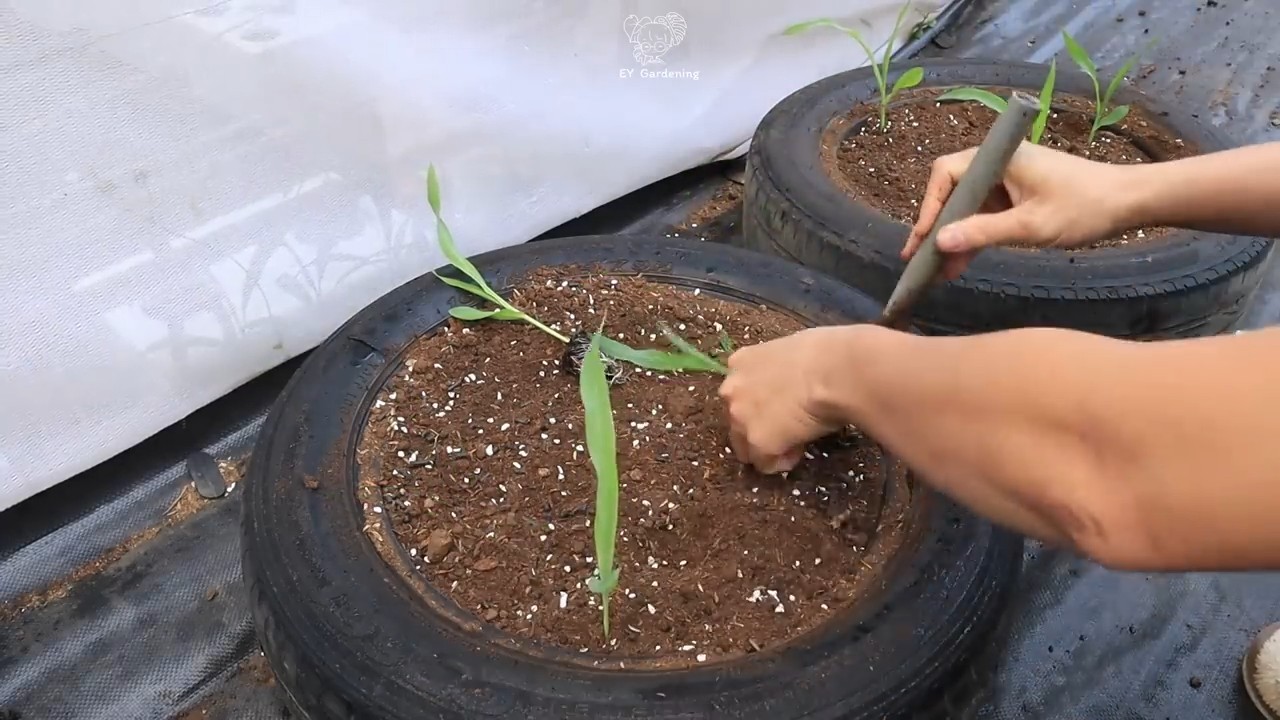
* Die Aussaat in Töpfen (Vorziehen):
1. Töpfe vorbereiten: Fülle kleine Töpfe mit Anzuchterde.
2. Samen legen: Lege 2-3 Samen pro Topf in die Erde. Die Saattiefe sollte etwa 2-3 cm betragen.
3. Mit Erde bedecken: Bedecke die Samen mit Erde und drücke sie leicht an.
4. Gießen: Gieße die Töpfe vorsichtig an, damit die Erde feucht ist.
5. Warm stellen: Stelle die Töpfe an einen warmen, hellen Ort. Die Keimung dauert in der Regel 7-14 Tage.
6. Pikieren: Sobald die Keimlinge groß genug sind (etwa 10 cm hoch), kannst du sie ins Freiland umpflanzen. Achte darauf, dass keine Frostgefahr mehr besteht.
Die Pflege: Gießen, Düngen und Unkraut jäten
Nach der Aussaat ist die richtige Pflege entscheidend für eine reiche Ernte. Hier sind meine Tipps:
* Gießen: Schwarzer Mais braucht regelmäßig Wasser, besonders während der Blütezeit und der Kornbildung. Gieße am besten früh morgens oder spät abends, um Verdunstung zu vermeiden. Vermeide Staunässe.
* Düngen: Dünge den Mais regelmäßig mit einem organischen Dünger. Ich verwende gerne Hornspäne oder Brennnesseljauche. Dünge das erste Mal, wenn die Pflanzen etwa 30 cm hoch sind, und dann noch einmal während der Blütezeit.
* Unkraut jäten: Halte den Boden um die Maispflanzen herum unkrautfrei. Unkraut konkurriert mit dem Mais um Nährstoffe und Wasser.
* Häufeln: Häufle die Maispflanzen an, sobald sie etwa 50 cm hoch sind. Das gibt ihnen zusätzlichen Halt und fördert die Wurzelbildung.
* Schädlinge und Krankheiten: Achte auf Schädlinge wie Maiszünsler oder Blattläuse. Bei Bedarf kannst du biologische Schädlingsbekämpfungsmittel einsetzen. Schwarzer Mais ist relativ resistent gegen Krankheiten, aber bei feuchtem Wetter kann es zu Pilzbefall kommen. Sorge für eine gute Belüftung der Pflanzen.
* Stützen: Bei starkem Wind können die Maispflanzen umknicken. Stütze sie bei Bedarf mit Pflanzstäben und Schnur.
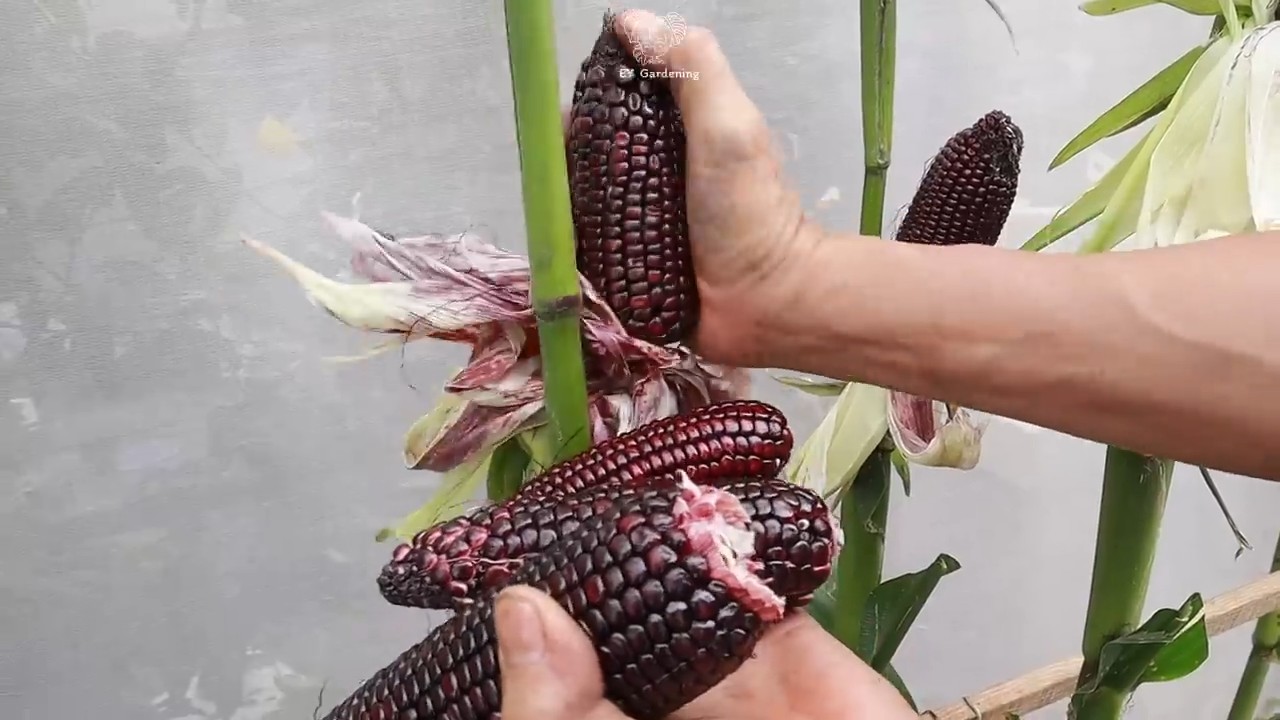
Die Ernte: Wann ist der Mais reif?
Die Erntezeit hängt von der Sorte und den Witterungsbedingungen ab. In der Regel ist der schwarze Mais etwa 100-120 Tage nach der Aussaat reif. Hier sind einige Anzeichen für die Reife:
* Die Hüllblätter sind trocken und braun.
* Die Maiskörner sind hart und prall.
* Die Maisfäden (Griffel) sind braun und trocken.
So erntest du den schwarzen Mais:
1. Kolben abbrechen: Breche die Maiskolben vorsichtig von der Pflanze ab.
2. Hüllblätter entfernen: Entferne die Hüllblätter und die Maisfäden.
3. Trocknen (optional): Wenn du den Mais lagern möchtest, solltest du ihn trocknen. Lege die Kolben an einen trockenen, luftigen Ort. Nach einigen Wochen sind sie trocken genug für die Lagerung.
Verwendung des schwarzen Maises
Schwarzer Mais ist vielseitig verwendbar. Du kannst ihn kochen, grillen, zu Maismehl verarbeiten oder als Zierde verwenden. Die Körner sind reich an Anthocyanen, die antioxidative Eigenschaften haben.
* Kochen: Koche die Maiskolben in Salzwasser, bis die Körner weich sind.
* Grillen: Grille die Maiskolben auf dem Grill, bis sie leicht gebräunt sind.
* Maismehl: Mahle die getrockneten Maiskörner zu Maismehl. Du kannst es für Tortillas, Polenta oder andere Gerichte verwenden.
* Zierde: Die getrockneten Maiskolben sind eine schöne Dekoration für den Herbst.
Zusätzliche Tipps und Tricks
* Fruchtfolge beachten: Baue Mais nicht jedes Jahr am selben Standort an. Wechsle die Kulturen, um den Boden gesund zu halten.
* Mischkultur: Mais verträgt sich gut mit Bohnen, Kürbis und Sonnenblumen. Diese Pflanzen können als Mischkultur angebaut werden.
* Samen gewinnen: Wenn du samenfestes Saatgut verwendet hast, kannst du im nächsten Jahr wieder Samen gewinnen. Lasse einige
Conclusion
So, there you have it! Growing black corn at home is not just a fun gardening project; it’s a journey into the heart of agricultural heritage and a pathway to unlocking unique culinary possibilities. We’ve explored the simple steps, from selecting the right seeds to nurturing your plants and harvesting those beautiful, dark kernels. But why should you actually take the plunge and dedicate some space in your garden to this intriguing crop?
Firstly, the sheer novelty of growing black corn is a compelling reason. Imagine the conversations sparked when you present a cob of this striking grain at your next barbecue! It’s a guaranteed conversation starter and a testament to your adventurous spirit in the garden. Beyond the visual appeal, however, lies a wealth of nutritional benefits. Black corn is packed with antioxidants, particularly anthocyanins, which are known for their health-promoting properties. By growing your own, you’re ensuring a fresh, readily available source of these valuable compounds.
Secondly, the taste. While the flavor profile can vary slightly depending on the variety and growing conditions, black corn generally offers a subtly sweet and nutty taste that is distinct from yellow or white corn. This unique flavor lends itself beautifully to a wide range of dishes. Think vibrant black corn tortillas, hearty black corn bread, or even a striking black corn salsa. The possibilities are truly endless.
But perhaps the most compelling reason to try growing black corn at home is the sense of accomplishment and connection to nature that it fosters. There’s something deeply satisfying about nurturing a plant from seed to harvest, especially when that plant yields such a unique and rewarding crop. You’ll gain a greater appreciation for the food you eat and a deeper understanding of the agricultural processes that sustain us.
Now, let’s talk about variations and suggestions. While we’ve focused on the basic method, there are plenty of ways to customize your black corn growing experience. Consider experimenting with different varieties of black corn to find one that suits your taste and climate. Some varieties are better suited for cooler climates, while others thrive in warmer regions. You can also try companion planting to improve the health and yield of your corn. Planting beans or squash alongside your corn can help to fix nitrogen in the soil and suppress weeds.
Another suggestion is to explore different methods of preserving your black corn harvest. You can dry the kernels for later use in flour or grits, or you can freeze the whole cobs for a taste of summer in the middle of winter. Get creative and experiment with different recipes and techniques to find what works best for you.
Ultimately, the best way to learn is by doing. So, we strongly encourage you to give growing black corn at home a try. Don’t be afraid to experiment, make mistakes, and learn from your experiences. Gardening is a journey, not a destination, and the rewards are well worth the effort.
And finally, we want to hear from you! Share your experiences, tips, and photos with us in the comments below. Let us know what varieties of black corn you’ve tried, what challenges you’ve faced, and what successes you’ve celebrated. Together, we can build a community of black corn enthusiasts and share our knowledge and passion for this amazing crop. So, grab your seeds, get your hands dirty, and start growing your own black corn today! You won’t regret it. Remember, successful **black corn** cultivation is within your reach!
Frequently Asked Questions (FAQ)
What exactly is black corn, and is it different from regular corn?
Black corn is a variety of corn that produces kernels with a deep, dark purple or black color. This coloration is due to the presence of anthocyanins, which are powerful antioxidants. While it is still corn, the nutritional profile and flavor can differ slightly from yellow or white corn. Black corn often has a nuttier and slightly sweeter taste. The texture can also vary depending on the specific variety. It’s important to note that “black corn” can refer to several different varieties, each with its own unique characteristics.
What are the best varieties of black corn to grow at home?
Several varieties of black corn are well-suited for home gardens. ‘Black Aztec’ is a popular choice, known for its early maturity and good flavor. ‘Midnight Snack’ is another excellent option, producing smaller ears that are perfect for snacking. ‘Delectable’ is a newer variety that is gaining popularity for its sweet taste and high yields. When choosing a variety, consider your climate, growing season length, and personal taste preferences. Researching the specific needs of each variety will help you make the best choice for your garden.
How much space do I need to grow black corn?
Corn plants generally require a fair amount of space to thrive. As a general rule, allow at least 1 foot between plants within a row and 2-3 feet between rows. This spacing allows for adequate sunlight and air circulation, which are essential for healthy growth and good yields. If you are growing multiple rows of corn, consider orienting them north to south to maximize sunlight exposure. You can also use the “square foot gardening” method, planting corn closer together in a grid pattern, but be sure to provide adequate support for the stalks.
What kind of soil is best for growing black corn?
Black corn, like other types of corn, prefers well-drained soil that is rich in organic matter. Before planting, amend your soil with compost or well-rotted manure to improve its fertility and drainage. A slightly acidic to neutral soil pH (around 6.0 to 7.0) is ideal. If your soil is heavy clay or sandy, consider adding amendments to improve its structure and water-holding capacity. Regular soil testing can help you determine if your soil is lacking any essential nutrients and guide your fertilization strategy.
How often should I water my black corn plants?
Corn plants need consistent moisture, especially during germination and pollination. Water deeply and regularly, aiming to keep the soil consistently moist but not waterlogged. During hot, dry weather, you may need to water daily. A good rule of thumb is to provide about 1 inch of water per week. Mulching around the base of the plants can help to retain moisture and suppress weeds. Using a soaker hose or drip irrigation system can also help to deliver water directly to the roots, minimizing water loss through evaporation.
What are some common pests and diseases that affect black corn, and how can I prevent them?
Common pests that can affect black corn include corn earworms, aphids, and Japanese beetles. Diseases such as corn smut and leaf blight can also be problematic. To prevent pest and disease problems, practice good garden hygiene, such as removing weeds and crop debris. Companion planting with beneficial insects, such as ladybugs and lacewings, can help to control aphids and other pests. Crop rotation can also help to prevent the buildup of soilborne diseases. If you do encounter pest or disease problems, consider using organic pest control methods, such as insecticidal soap or neem oil.
How do I know when my black corn is ready to harvest?
The timing of harvest depends on the specific variety of black corn you are growing and your intended use. For sweet corn, harvest when the silks have turned brown and dry and the kernels are plump and milky. You can test the kernels by piercing one with your fingernail; if a milky liquid squirts out, it’s ready to harvest. For corn intended for drying and grinding into flour, allow the ears to dry completely on the stalk before harvesting. The kernels should be hard and dry to the touch.
Can I save seeds from my black corn to plant next year?
Yes, you can save seeds from your black corn, but keep in mind that corn is open-pollinated, meaning that it can cross-pollinate with other varieties of corn. If you want to save true-to-type seeds, you will need to isolate your black corn from other varieties of corn by a distance of at least a few hundred feet. To save seeds, allow the ears to dry completely on the stalk. Then, remove the kernels from the cob and store them in a cool, dry place.
What are some creative ways to use black corn in cooking?
Black corn can be used in a variety of dishes. It can be grilled, roasted, or boiled and eaten on the cob. The kernels can be used to make tortillas, tamales, and cornbread. Black corn flour can be used in baking to add a unique flavor and color to breads, muffins, and pancakes. You can also use black corn to make salsa, soup, and salads. The possibilities are endless! Experiment with different recipes and techniques to discover your favorite ways to enjoy this unique and delicious grain.
Is growing black corn at home worth the effort?
Absolutely! While it requires some effort and attention, growing black corn at home is a rewarding experience that offers numerous benefits. You’ll have access to fresh, nutritious, and uniquely flavored corn that you can’t find in most grocery stores. You’ll also gain a deeper appreciation for the food you eat and a connection to the natural world. Plus, you’ll have the satisfaction of knowing that you grew your own food from seed to harvest. So, if you’re looking for a fun and rewarding gardening project, give growing black corn a try!


Leave a Comment