

Hanging sweet potato planting: Imagine a cascade of lush green vines, adorned with vibrant purple flowers, all spilling from a charming hanging basket right outside your window. Sounds idyllic, doesn’t it? Well, it’s not just a dream! With a few simple tricks and a little DIY spirit, you can transform ordinary sweet potatoes into stunning hanging displays.
For centuries, sweet potatoes have been a staple food source, deeply woven into the cultures of South America and beyond. But their beauty is often overlooked. We often think of them as just a root vegetable, but their vining nature makes them perfect for creating unique and eye-catching hanging gardens.
Why should you try hanging sweet potato planting? Because it’s a fantastic way to add a touch of whimsy and natural beauty to your home, even if you’re short on ground space! Plus, it’s incredibly rewarding to watch these humble spuds transform into thriving, living art. In this article, I’m going to share my favorite DIY tricks and hacks to help you create your own breathtaking hanging sweet potato garden. Get ready to impress your neighbors and enjoy the satisfaction of growing something truly special!
DIY Hängende Süßkartoffelpflanzung: Ein Leitfaden für üppige Ranken und köstliche Ernte
Hallo Pflanzenfreunde! Habt ihr schon mal darüber nachgedacht, Süßkartoffeln in Hängekörben anzubauen? Es ist nicht nur eine platzsparende Lösung, besonders wenn ihr keinen großen Garten habt, sondern auch eine wunderschöne Möglichkeit, eure Terrasse oder euren Balkon zu verschönern. Die rankenden Blätter der Süßkartoffelpflanze sind einfach atemberaubend! Und das Beste daran: Ihr könnt am Ende sogar eure eigenen Süßkartoffeln ernten. Ich zeige euch, wie es geht!
Was ihr für eure hängende Süßkartoffelpflanzung benötigt:
* Süßkartoffeln: Am besten Bio-Süßkartoffeln, da diese weniger wahrscheinlich mit Wachstumsinhibitoren behandelt wurden.
* Hängekörbe: Wählt Körbe mit guter Drainage. Kokosfaser-Auskleidungen sind ideal, aber ihr könnt auch andere Materialien verwenden, solange das Wasser gut ablaufen kann.
* Hochwertige Blumenerde: Eine gut durchlässige, nährstoffreiche Erde ist entscheidend für das Wachstum eurer Süßkartoffeln.
* Wasser: Regelmäßiges Gießen ist wichtig, besonders während der heißen Sommermonate.
* Messer oder Zahnstocher: Für die Anzucht der Triebe.
* Wassergläser oder -behälter: Zum Bewurzeln der Süßkartoffeln.
* Dünger: Ein ausgewogener Flüssigdünger für Gemüse.
* Sonniger Standort: Süßkartoffeln lieben die Sonne!
* Geduld: Das Warten lohnt sich!
Phase 1: Die Süßkartoffeln zum Austreiben bringen
Dieser Schritt ist entscheidend, um gesunde Triebe zu erhalten, die ihr später in eure Hängekörbe pflanzen könnt.
1. Süßkartoffeln vorbereiten: Wählt gesunde, unbeschädigte Süßkartoffeln aus. Wascht sie gründlich ab, um Schmutz zu entfernen.
2. Triebe anregen: Es gibt zwei Methoden, um die Süßkartoffeln zum Austreiben zu bringen:
* Methode 1: Halb eintauchen: Füllt ein Glas oder einen Behälter mit Wasser. Steckt Zahnstocher in die Mitte der Süßkartoffel, sodass sie am Rand des Glases aufliegen und die untere Hälfte der Süßkartoffel im Wasser ist. Achtet darauf, dass das Wasser regelmäßig gewechselt wird, um Fäulnis zu vermeiden.
* Methode 2: Auf Erde legen: Legt die Süßkartoffel horizontal auf eine Schicht feuchte Blumenerde in einem Behälter. Bedeckt die Süßkartoffel leicht mit Erde. Haltet die Erde feucht, aber nicht nass.
3. Standort wählen: Stellt die Gläser oder Behälter an einen warmen, hellen Ort, aber nicht in direkte Sonneneinstrahlung. Ein Fensterbrett ist ideal.
4. Geduld haben: Es kann einige Wochen dauern, bis die Süßkartoffeln Triebe bilden. Seid geduldig und wechselt das Wasser regelmäßig.
5. Triebe pflegen: Sobald die Triebe etwa 10-15 cm lang sind, könnt ihr sie vorsichtig von der Süßkartoffel abbrechen oder abschneiden.
Phase 2: Die Triebe bewurzeln
Bevor ihr die Triebe in die Hängekörbe pflanzt, müssen sie Wurzeln bilden.
1. Triebe vorbereiten: Entfernt die unteren Blätter der Triebe, damit sie nicht im Wasser faulen.
2. Bewurzeln im Wasser: Stellt die Triebe in ein Glas mit Wasser. Achtet darauf, dass die unteren Knoten (wo die Blätter entfernt wurden) unter Wasser sind.
3. Standort wählen: Stellt die Gläser mit den Trieben an einen hellen Ort, aber nicht in direkte Sonneneinstrahlung.
4. Wasser wechseln: Wechselt das Wasser alle paar Tage, um Fäulnis zu vermeiden.
5. Wurzelbildung beobachten: Nach etwa einer Woche sollten sich Wurzeln bilden. Sobald die Wurzeln etwa 2-3 cm lang sind, können die Triebe in die Hängekörbe gepflanzt werden.
Phase 3: Die Hängekörbe bepflanzen
Jetzt kommt der spaßige Teil: Das Bepflanzen der Hängekörbe!
1. Hängekörbe vorbereiten: Stellt sicher, dass eure Hängekörbe eine gute Drainage haben. Wenn ihr Kokosfaser-Auskleidungen verwendet, könnt ihr eine Schicht Kies oder Tonscherben auf den Boden legen, um die Drainage zu verbessern.
2. Erde einfüllen: Füllt die Hängekörbe mit hochwertiger Blumenerde. Lasst etwa 5-7 cm Platz bis zum Rand.
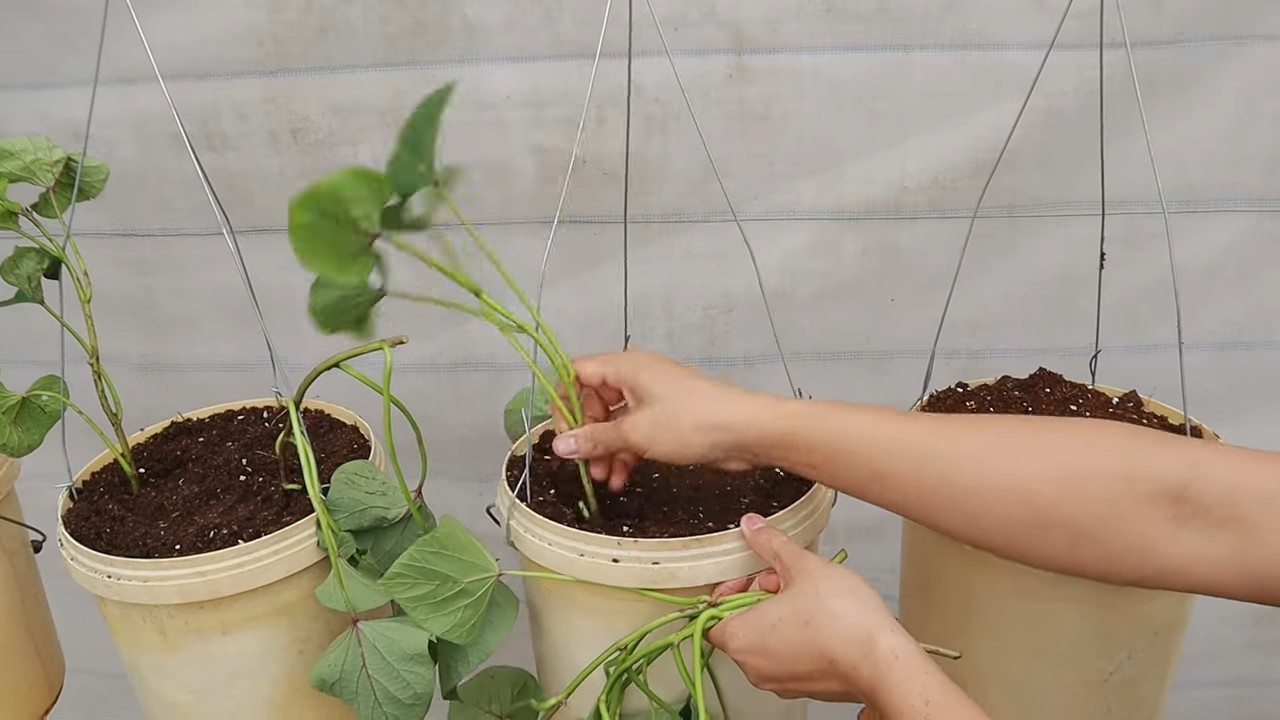
3. Pflanzen: Macht kleine Löcher in die Erde und pflanzt die bewurzelten Triebe vorsichtig ein. Achtet darauf, dass die Wurzeln gut bedeckt sind. Pflanzt mehrere Triebe in jeden Korb, um eine üppige Pflanze zu erhalten. Die Anzahl der Triebe hängt von der Größe des Korbes ab. Für einen Korb mit einem Durchmesser von 30 cm würde ich etwa 3-5 Triebe empfehlen.
4. Angießen: Gießt die Pflanzen gründlich an, bis das Wasser aus den Drainagelöchern läuft.
5. Standort wählen: Hängt die Körbe an einem sonnigen Standort auf. Süßkartoffeln benötigen mindestens 6 Stunden Sonne pro Tag.
Phase 4: Pflege eurer hängenden Süßkartoffelpflanzen
Die richtige Pflege ist entscheidend für eine gesunde und ertragreiche Ernte.
1. Gießen: Gießt die Pflanzen regelmäßig, besonders während der heißen Sommermonate. Die Erde sollte immer leicht feucht sein, aber nicht nass. Überprüft die Feuchtigkeit der Erde, indem ihr euren Finger etwa 2-3 cm tief in die Erde steckt. Wenn sich die Erde trocken anfühlt, ist es Zeit zum Gießen.
2. Düngen: Düngt die Pflanzen alle zwei Wochen mit einem ausgewogenen Flüssigdünger für Gemüse. Befolgt die Anweisungen auf der Düngemittelverpackung.
3. Schneiden: Schneidet die langen Ranken regelmäßig zurück, um die Pflanze buschiger zu machen und die Bildung von Süßkartoffeln zu fördern. Ihr könnt die abgeschnittenen Ranken auch verwenden, um neue Pflanzen zu vermehren.
4. Schädlinge und Krankheiten: Achtet auf Schädlinge wie Blattläuse oder Spinnmilben. Bei Befall könnt ihr die Pflanzen mit einem Insektizid auf Basis von Neemöl behandeln. Achtet auch auf Anzeichen von Krankheiten wie Mehltau.
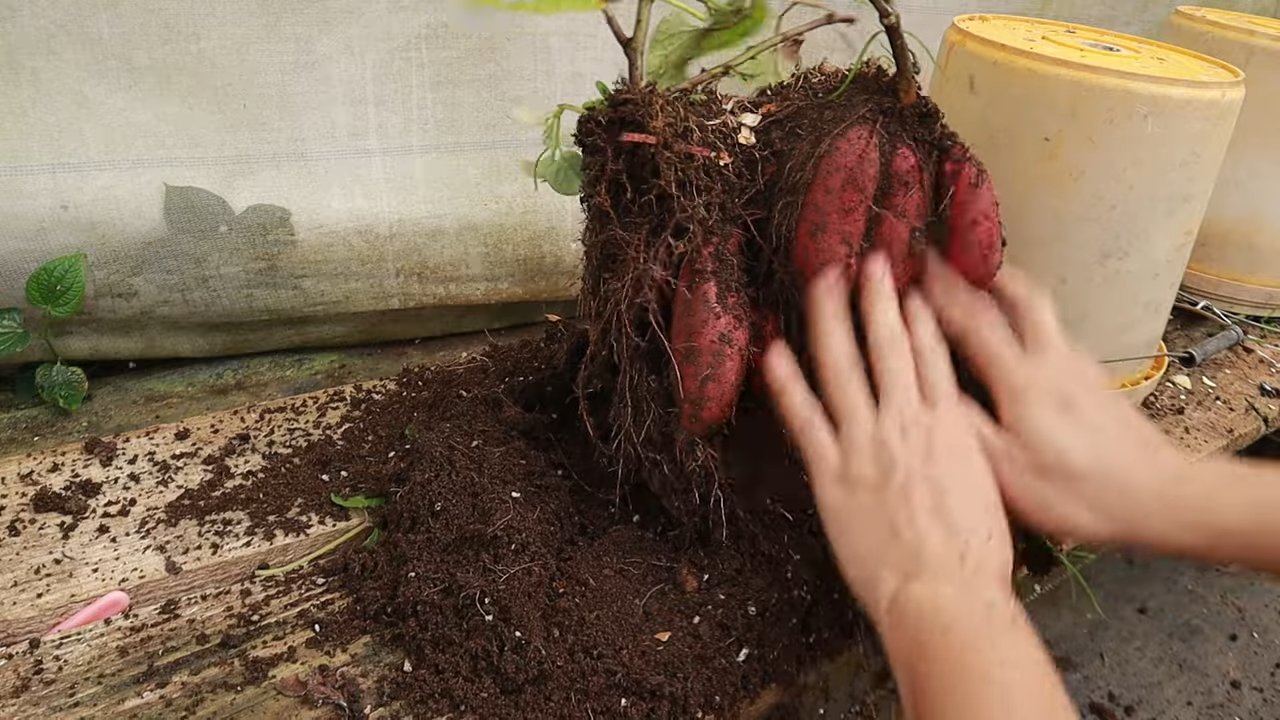
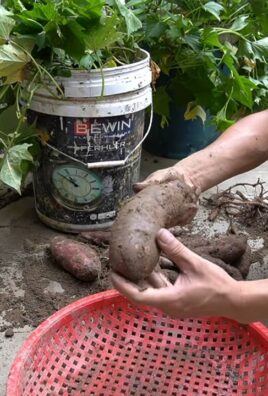
5. Ernte: Die Erntezeit für Süßkartoffeln ist im Herbst, bevor der erste Frost kommt. Die Blätter der Pflanze beginnen dann, gelb zu werden und abzusterben. Um die Süßkartoffeln zu ernten, kippt ihr den Korb vorsichtig aus und sucht nach den Knollen in der Erde.
Zusätzliche Tipps für eine erfolgreiche Süßkartoffelpflanzung:
* Sortenwahl: Es gibt viele verschiedene Süßkartoffelsorten. Einige Sorten sind besser für den Anbau in Hängekörben geeignet als andere. Informiert euch über die verschiedenen Sorten und wählt eine Sorte, die gut in eurem Klima und in Hängekörben wächst.
* Mulchen: Eine Schicht Mulch auf der Erde hilft, die Feuchtigkeit zu speichern und Unkraut zu unterdrücken.
* Drehung: Dreht die Hängekörbe regelmäßig, damit die Pflanzen gleichmäßig mit Sonnenlicht versorgt werden.
* Überwinterung: In kälteren Klimazonen könnt ihr die Süßkartoffeln im Herbst ernten und die Knollen an einem kühlen, trockenen Ort lagern. Die Ranken können im Haus überwintert werden, wenn ihr sie zurückschneidet und an einen hellen Ort stellt.
Ich hoffe, diese Anleitung hilft euch dabei, eure eigenen hängenden Süßkartoffelpflanzen anzubauen! Es ist ein lohnendes Projekt, das euch mit wunderschönen Ranken und köstlichen Süßkartoffeln belohnt. Viel Spaß beim Gärtnern!
Conclusion
So, there you have it! Transforming a humble sweet potato into a stunning, cascading hanging plant is not only incredibly easy but also a deeply rewarding experience. Forget those expensive nursery trips for unique greenery; with this simple DIY trick, you can cultivate a vibrant, living masterpiece right in your own home. The beauty of this project lies in its simplicity and the sheer joy of watching life unfold before your eyes.
Why is this a must-try? Because it’s more than just growing a plant; it’s about connecting with nature, fostering creativity, and adding a touch of personalized charm to your living space. Imagine the conversations sparked by your unique hanging sweet potato vine, the envy of your gardening friends, and the satisfaction of knowing you created something beautiful from scratch. Plus, it’s an incredibly budget-friendly way to add a touch of green to your home.
Beyond the basic method, there are countless ways to personalize your hanging sweet potato garden. Consider using different varieties of sweet potatoes – the Beauregard with its reddish skin and orange flesh, or the Japanese sweet potato with its purple skin and white flesh – to create a visually diverse display. You can also experiment with different containers, from rustic burlap sacks to sleek, modern ceramic pots. Adding decorative elements like pebbles, moss, or small figurines can further enhance the aesthetic appeal.
For a truly unique twist, try training the vines to grow in specific directions. Use small clips or ties to guide the tendrils along a trellis or frame, creating intricate patterns and shapes. You can even incorporate other trailing plants, such as ivy or pothos, to create a lush, multi-textured hanging garden. Think about adding a small, solar-powered fountain to the container for a touch of tranquility and added humidity.
Don’t be afraid to experiment with different lighting conditions. While sweet potatoes thrive in bright, indirect light, they can also tolerate some shade. Observe how your plant responds to different locations and adjust accordingly. Remember, gardening is a journey of learning and discovery, so embrace the process and enjoy the ride.
We wholeheartedly encourage you to give this DIY hanging sweet potato planting trick a try. It’s a fantastic project for gardeners of all skill levels, from seasoned pros to complete beginners. The results are truly stunning, and the process is incredibly satisfying.
Once you’ve created your own hanging sweet potato masterpiece, we’d love to see it! Share your photos and experiences with us on social media using #HangingSweetPotatoGarden. Let’s inspire others to embrace the beauty of DIY gardening and create their own unique green spaces. We can’t wait to see what you create! This is a fantastic way to get creative and enjoy the process of growing your own plants. The hanging sweet potato is a conversation starter and a beautiful addition to any home.
FAQ
Q: What kind of sweet potato should I use?
A: You can use any variety of sweet potato you find at your local grocery store or farmer’s market. Organic sweet potatoes are a great choice, as they are less likely to have been treated with chemicals that could inhibit sprouting. Experiment with different varieties to see which ones you like best! Beauregard, Japanese, and even purple sweet potatoes will all work beautifully. The key is to choose a firm, healthy sweet potato with no signs of rot or damage.
Q: How long will it take for the sweet potato to sprout?
A: Sprouting time can vary depending on factors such as temperature, humidity, and the variety of sweet potato. Generally, you can expect to see sprouts within 2-4 weeks. Keep the bottom half of the sweet potato consistently submerged in water and place it in a warm, bright location to encourage faster sprouting. Be patient, and don’t give up if you don’t see results immediately.
Q: What kind of container should I use?
A: The container you use is largely a matter of personal preference. You can use anything from a glass jar to a decorative hanging basket. The most important thing is to choose a container that is large enough to accommodate the sweet potato and its developing roots. Make sure the container is stable and won’t tip over easily. If you’re using a hanging basket, ensure it’s strong enough to support the weight of the sweet potato, water, and developing vines. Consider the aesthetic of your space when choosing a container to complement your décor.
Q: How often should I change the water?
A: It’s important to change the water regularly to prevent the growth of algae and bacteria. Change the water every 3-5 days, or more frequently if it appears cloudy or discolored. When changing the water, gently rinse the sweet potato to remove any accumulated debris. Fresh water will help keep your sweet potato healthy and promote vigorous growth.
Q: What kind of light does the sweet potato need?
A: Sweet potatoes thrive in bright, indirect light. Avoid placing your hanging sweet potato in direct sunlight, as this can scorch the leaves. A location near a window that receives filtered sunlight is ideal. If you don’t have access to natural light, you can supplement with artificial grow lights. Rotate the sweet potato regularly to ensure that all sides receive adequate light.
Q: How do I care for the vines once they start growing?
A: Once the vines start growing, you can prune them to encourage bushier growth and maintain the desired shape. Use clean, sharp scissors or pruning shears to trim the vines. You can also train the vines to grow in specific directions by using small clips or ties. Fertilize the vines every few weeks with a diluted liquid fertilizer to provide them with the nutrients they need to thrive.
Q: Can I plant the sweet potato in soil after it sprouts?
A: Yes, you can definitely plant the sweet potato in soil after it sprouts. Once the roots are well-developed and the vines are several inches long, you can carefully transplant the sweet potato into a pot filled with well-draining potting mix. Be gentle when handling the roots to avoid damaging them. Water thoroughly after planting and continue to provide bright, indirect light.
Q: Will I get actual sweet potatoes from this plant?
A: While it’s possible to get actual sweet potatoes from a hanging sweet potato plant, it’s not the primary goal of this project. The focus is on the ornamental value of the vines and foliage. If you want to grow sweet potatoes for harvesting, you’ll need to plant the slips (the sprouts that grow from the sweet potato) in a garden bed or large container.
Q: My sweet potato is rotting. What should I do?
A: If your sweet potato is showing signs of rot, such as soft spots or a foul odor, it’s important to take action immediately. Remove the sweet potato from the water and discard it. Start with a fresh sweet potato and ensure that you’re changing the water regularly to prevent the growth of bacteria. Also, avoid over-submerging the sweet potato in water, as this can contribute to rot.
Q: Can I use tap water?
A: While tap water is generally safe to use, it may contain chlorine or other chemicals that can be harmful to plants. It’s best to use filtered water or let tap water sit out for 24 hours to allow the chlorine to evaporate before using it for your hanging sweet potato.
Q: Is this project safe for pets?
A: Sweet potato vines are generally considered non-toxic to pets, but it’s always best to keep them out of reach to prevent them from chewing on the leaves or vines. Ingesting large quantities of plant material can cause digestive upset in some animals. If you have pets that are prone to nibbling on plants, consider placing your hanging sweet potato in a location that is inaccessible to them.

Leave a Comment