

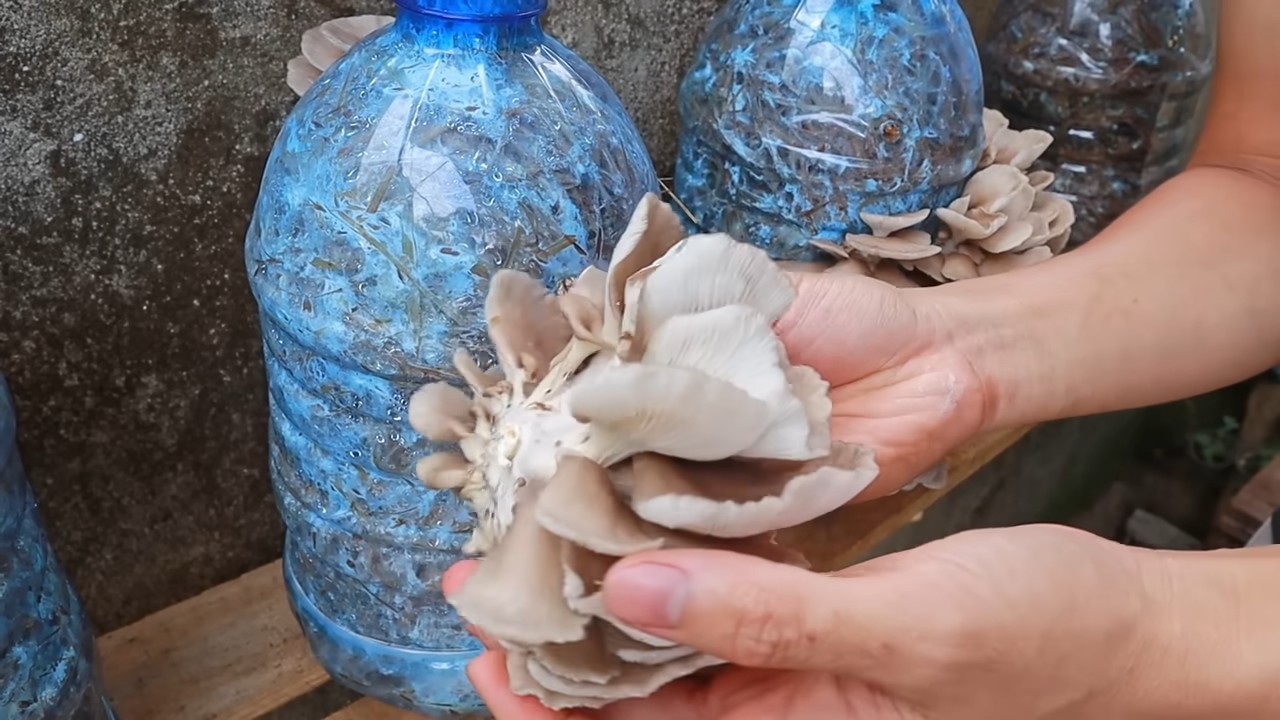
Mushroom growing in plastic bottles? Sounds a little unconventional, right? But trust me, this ingenious DIY project is about to revolutionize your home gardening game! For centuries, mushrooms have been prized for their unique flavor and nutritional benefits, playing a vital role in cuisines around the world. From ancient Roman feasts to traditional Asian medicine, these fungi have held a special place in human history.
But let’s be honest, buying fresh mushrooms from the store can be expensive and sometimes, they just don’t last very long. That’s where this amazing hack comes in! Imagine being able to harvest your own delicious, organic mushrooms right from your kitchen counter. No more trips to the grocery store, no more worrying about spoilage. Just fresh, flavorful fungi at your fingertips!
This DIY method of mushroom growing in plastic bottles is not only incredibly cost-effective, but it’s also a fantastic way to recycle those empty bottles that would otherwise end up in the landfill. It’s a win-win situation for your wallet and the environment. So, are you ready to embark on this exciting journey and discover the secrets to cultivating your own mushroom paradise? Let’s get started!
Pilzzucht im Plastikflaschen-Upcycling: Dein DIY-Guide für zu Hause
Hallo Pilzfreunde! Hast du dich jemals gefragt, wie du deine eigenen köstlichen Pilze zu Hause züchten kannst, ohne viel Platz oder Geld zu investieren? Dann bist du hier genau richtig! In diesem Artikel zeige ich dir, wie du aus alten Plastikflaschen eine Mini-Pilzzuchtstation baust. Es ist ein super nachhaltiges Projekt, das Spaß macht und dir frische Pilze direkt auf deinen Teller bringt. Lass uns loslegen!
Was du brauchst: Die Materialliste
Bevor wir anfangen, stelle sicher, dass du alle notwendigen Materialien zur Hand hast. Das spart Zeit und Nerven!
* Plastikflaschen: Am besten eignen sich 1,5- oder 2-Liter-Flaschen. Je mehr, desto mehr Pilze kannst du züchten! Achte darauf, dass sie sauber und trocken sind.
* Pilzbrut: Das ist das Herzstück deiner Pilzzucht. Du kannst verschiedene Sorten wählen, je nachdem, was dir schmeckt. Austernpilze (Pleurotus ostreatus) sind besonders anfängerfreundlich. Du bekommst Pilzbrut in Gartencentern, Online-Shops oder bei spezialisierten Pilzzüchtern.
* Substrat: Das ist die Nahrungsgrundlage für deine Pilze. Stroh, Kaffeesatz, Sägespäne oder eine Mischung daraus eignen sich gut. Wichtig ist, dass das Substrat sterilisiert wird, um Schimmelbildung zu vermeiden.
* Sprühflasche: Zum Befeuchten des Substrats.
* Bohrer oder Messer: Um Löcher in die Flaschen zu machen.
* Klebeband oder Heißkleber: Zum Abdichten der Flaschen.
* Handschuhe: Um Kontamination zu vermeiden.
* Desinfektionsmittel: Zum Reinigen der Flaschen und Werkzeuge.
* Optional: Ein dunkler, kühler Raum oder Schrank für die Inkubationsphase.
Schritt-für-Schritt-Anleitung: So baust du deine Pilzzuchtstation
Jetzt geht’s ans Eingemachte! Folge diesen Schritten, um deine eigene Pilzzuchtstation aus Plastikflaschen zu bauen:
1. Flaschen vorbereiten:
* Reinige die Plastikflaschen gründlich mit warmem Wasser und Spülmittel. Spüle sie gut aus, um alle Spülmittelreste zu entfernen.
* Desinfiziere die Flaschen mit einem Desinfektionsmittel, um sicherzustellen, dass keine unerwünschten Mikroorganismen vorhanden sind.
* Lass die Flaschen vollständig trocknen.
* Schneide den oberen Teil der Flasche ab, etwa 10-15 cm unterhalb des Flaschenhalses. Diesen Teil werden wir später als Deckel verwenden.
* Bohre oder schneide mehrere kleine Löcher (ca. 0,5-1 cm Durchmesser) in die Seiten der Flasche. Diese Löcher dienen der Belüftung und ermöglichen es den Pilzen, später herauszuwachsen. Achte darauf, dass die Löcher nicht zu groß sind, damit das Substrat nicht herausfällt.
2. Substrat vorbereiten:
* Stroh: Schneide das Stroh in kleine Stücke (ca. 5-10 cm lang).
* Kaffeesatz: Sammle frischen Kaffeesatz. Achte darauf, dass er nicht schimmelt.
* Sägespäne: Verwende unbehandelte Sägespäne von Hartholz.
* Sterilisation: Das ist ein wichtiger Schritt, um Schimmelbildung zu vermeiden. Du kannst das Substrat auf verschiedene Arten sterilisieren:
* Kochen: Gib das Substrat in einen großen Topf und bedecke es mit Wasser. Bringe das Wasser zum Kochen und lasse es für 1-2 Stunden köcheln.
* Dampfsterilisation: Verwende einen Dampfkochtopf oder einen speziellen Sterilisator. Befülle den Topf mit Wasser und gib das Substrat in einen Behälter mit Löchern. Sterilisiere das Substrat für 1-2 Stunden.
* Mikrowelle: Gib das Substrat in einen mikrowellengeeigneten Behälter und füge etwas Wasser hinzu. Erhitze das Substrat für 10-15 Minuten in der Mikrowelle.
* Lass das Substrat nach der Sterilisation abkühlen, bevor du es weiterverarbeitest.
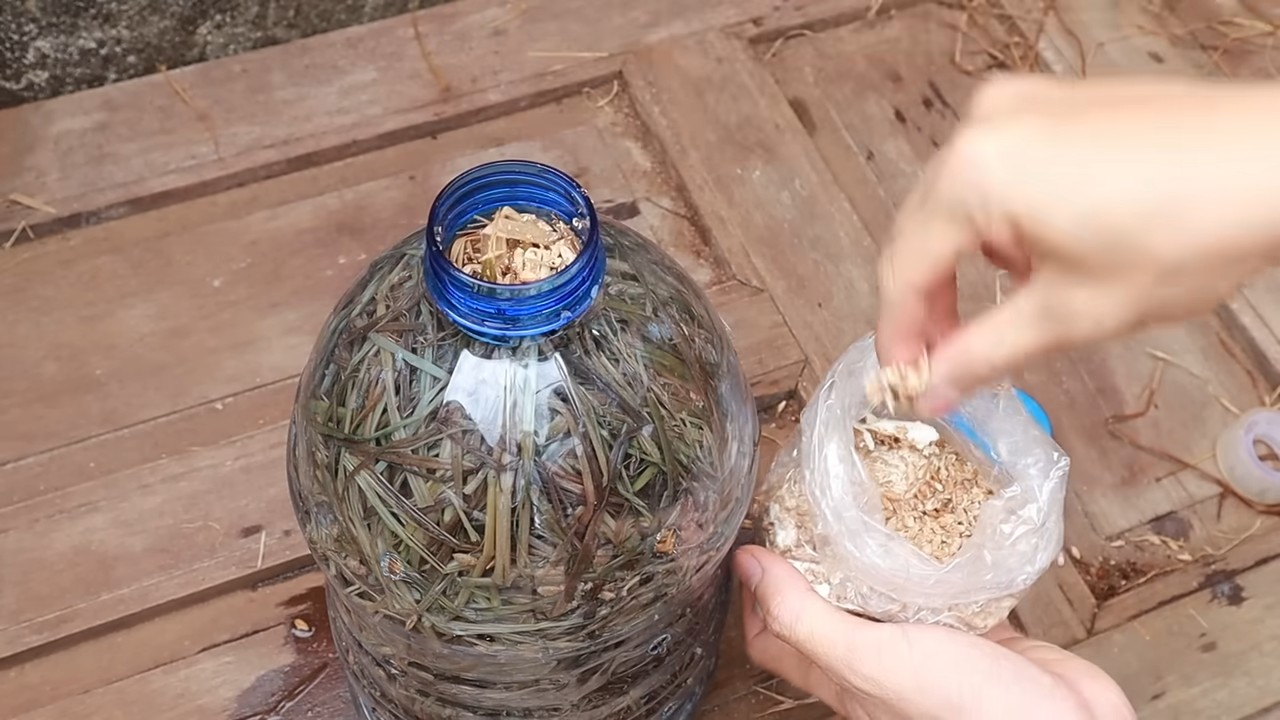
3. Flaschen befüllen:
* Trage Handschuhe, um Kontamination zu vermeiden.
* Mische das sterilisierte Substrat mit der Pilzbrut. Das Verhältnis sollte etwa 10-20% Pilzbrut zu 80-90% Substrat betragen.
* Fülle die Plastikflaschen mit der Substrat-Pilzbrut-Mischung. Drücke das Substrat leicht an, aber nicht zu fest.
* Lass oben in der Flasche etwas Platz (ca. 2-3 cm).
4. Flaschen verschließen:
* Setze den abgeschnittenen Flaschenhals umgedreht auf die Flasche, sodass er wie ein Deckel wirkt.
* Befestige den Deckel mit Klebeband oder Heißkleber, um die Flasche zu verschließen. Achte darauf, dass der Deckel nicht luftdicht verschlossen ist, da die Pilze Sauerstoff benötigen.
5. Inkubationsphase:
* Stelle die befüllten Flaschen an einen dunklen, kühlen Ort (ca. 18-24°C). Ein Keller, ein Schrank oder eine Speisekammer eignen sich gut.
* Besprühe das Substrat regelmäßig mit Wasser, um es feucht zu halten. Achte darauf, dass es nicht zu nass wird, da dies zu Schimmelbildung führen kann.
* Die Inkubationsphase dauert in der Regel 2-3 Wochen. In dieser Zeit wird das Myzel (das Pilzgeflecht) das Substrat durchwachsen. Du kannst beobachten, wie sich weiße Fäden im Substrat ausbreiten.
6. Fruiting-Phase:
* Sobald das Substrat vollständig mit Myzel durchwachsen ist, ist es Zeit für die Fruiting-Phase.
* Stelle die Flaschen an einen helleren Ort, aber vermeide direkte Sonneneinstrahlung.
* Erhöhe die Luftfeuchtigkeit, indem du die Flaschen regelmäßig mit Wasser besprühst. Du kannst auch eine Plastiktüte locker über die Flaschen stülpen, um die Luftfeuchtigkeit zu erhöhen.
* Die Pilze sollten innerhalb weniger Tage aus den Löchern in den Flaschen wachsen.
7. Ernte:
* Ernte die Pilze, wenn sie ihre volle Größe erreicht haben, aber bevor sie Sporen abwerfen.
* Schneide die Pilze mit einem scharfen Messer oder einer Schere am Stiel ab.
* Nach der Ernte kannst du die Flaschen erneut befeuchten und für eine zweite oder sogar dritte Ernte vorbereiten. Die Erträge werden jedoch mit jeder Ernte geringer.
Häufige Probleme und Lösungen
Auch bei der Pilzzucht kann es zu Problemen kommen. Hier sind einige häufige Probleme und wie du sie lösen kannst:
* Schimmelbildung: Schimmelbildung ist ein häufiges Problem bei der Pilzzucht. Sie wird durch unsteriles Substrat, zu hohe Luftfeuchtigkeit oder mangelnde Belüftung verursacht.
* Lösung: Entferne befallenes Substrat sofort. Sorge für bessere Belüftung und reduziere die Luftfeuchtigkeit. Achte darauf, dass das Substrat vor der Verwendung sterilisiert wird.
* Keine Pilzbildung: Wenn sich nach der Inkubationsphase keine Pilze bilden, kann dies verschiedene Ursachen haben:
* Falsche Temperatur: Stelle sicher, dass die Temperatur während der Inkubations- und Fruiting-Phase im optimalen Bereich liegt.
* Zu wenig Licht: Stelle die Flaschen an einen helleren Ort, aber vermeide direkte Sonneneinstrahlung.
* Zu wenig Feuchtigkeit: Besprühe das Substrat regelmäßig mit Wasser.
* Mangelnde Belüftung: Sorge für ausreichende Belüftung.
* Kleine, deformierte Pilze: Kleine, deformierte Pilze können durch zu wenig Licht, zu
Conclusion
So, there you have it! Transforming humble plastic bottles into thriving mushroom farms is not just a quirky DIY project; it’s a sustainable, cost-effective, and incredibly rewarding way to enjoy fresh, delicious mushrooms right from your own home. We’ve walked you through the process, highlighting the simplicity and accessibility of this method. Forget expensive mushroom growing kits or relying solely on store-bought varieties. This method empowers you to cultivate your own supply of these culinary delights, reducing waste and connecting you directly to the food you eat.
The beauty of this DIY mushroom growing technique lies in its adaptability. While we’ve focused on a general method, feel free to experiment! Try different types of mushrooms known for their ease of cultivation, such as oyster mushrooms, which are particularly well-suited for this environment. Consider varying the substrate mix – perhaps adding coffee grounds for extra nitrogen or experimenting with different ratios of straw and sawdust. You could even explore different bottle sizes and configurations to optimize your growing space.
This is more than just a recipe; it’s an invitation to innovate.
Imagine the satisfaction of harvesting your first batch of homegrown mushrooms, knowing that you’ve not only created something delicious but also contributed to a more sustainable lifestyle. Picture the flavorful additions to your favorite dishes, knowing exactly where your ingredients came from and the care that went into growing them.
But the journey doesn’t end here. We encourage you to embrace this DIY project, to get your hands dirty, and to experience the magic of mushroom cultivation firsthand. Don’t be afraid to experiment, to learn from your mistakes, and to adapt the process to suit your specific environment and preferences.
And most importantly, we want to hear about your experiences! Share your successes, your challenges, and your creative variations in the comments below. Let’s build a community of mushroom enthusiasts, sharing knowledge and inspiring each other to grow our own food and live more sustainably.
Ready to embark on your mushroom growing adventure? Grab those plastic bottles and let’s get started! This DIY project is a game-changer for home cooks and gardening enthusiasts alike. You’ll be amazed at how easy it is to cultivate your own fresh, flavorful mushrooms using recycled materials. So, ditch the store-bought varieties and embrace the satisfaction of growing your own. You won’t regret it!
Frequently Asked Questions (FAQ)
What types of mushrooms are best for growing in plastic bottles?
Oyster mushrooms (Pleurotus ostreatus) are generally considered the easiest and most reliable choice for beginners. They are fast-growing, relatively tolerant of varying conditions, and produce abundant yields. Other suitable options include shiitake mushrooms (Lentinula edodes), although they require a bit more patience and attention to detail. Lion’s mane (Hericium erinaceus) can also be grown in bottles, but may require a slightly different substrate mix. Avoid attempting to grow more demanding or specialized mushroom varieties until you have gained some experience with the easier types. Remember to always source your mushroom spawn from a reputable supplier to ensure quality and avoid contamination.
What is the best substrate to use for growing mushrooms in plastic bottles?
A common and effective substrate mix consists of pasteurized straw and sawdust. The straw provides bulk and structure, while the sawdust offers a source of carbon and nutrients. A good starting ratio is approximately 50/50. However, you can also experiment with other materials, such as coffee grounds (which are rich in nitrogen), cardboard (shredded into small pieces), or even agricultural waste products like corn stalks or rice hulls. Regardless of the materials you choose, it’s crucial to properly pasteurize the substrate to eliminate competing microorganisms that could hinder mushroom growth. Pasteurization can be achieved by soaking the substrate in hot water (around 160-180°F) for at least an hour.
How do I pasteurize the substrate properly?
Pasteurization is a critical step in mushroom cultivation, as it eliminates harmful bacteria and fungi that could compete with the mushroom mycelium. The most common method is to soak the substrate in hot water. You can use a large pot or container and heat the water to around 160-180°F (71-82°C). Submerge the substrate completely in the hot water and let it soak for at least one hour. After soaking, drain the excess water and allow the substrate to cool down to room temperature before inoculating it with mushroom spawn. Alternatively, you can use a pressure cooker to sterilize the substrate, which is a more effective method but requires specialized equipment.
How do I maintain the proper humidity levels inside the plastic bottles?
Maintaining adequate humidity is essential for successful mushroom growth. The ideal humidity level is typically around 80-90%. You can achieve this by regularly misting the inside of the bottles with water, especially when you see the substrate starting to dry out. You can also create a more humid environment by placing the bottles inside a larger container or greenhouse with a humidifier. Another trick is to cover the bottle openings with plastic wrap or a damp cloth to trap moisture. However, be sure to provide adequate ventilation to prevent the buildup of stagnant air, which can lead to mold growth.
How long does it take for mushrooms to grow in plastic bottles?
The time it takes for mushrooms to grow can vary depending on the mushroom species, the substrate used, and the environmental conditions. Generally, oyster mushrooms can start to fruit within 2-3 weeks after inoculation, while shiitake mushrooms may take several months. The first sign of growth will be the appearance of white, cottony mycelium spreading throughout the substrate. Once the mycelium has fully colonized the substrate, you should start to see small mushroom pins forming. These pins will then develop into mature mushrooms within a few days. Be patient and monitor the bottles regularly for signs of growth.
What do I do if I see mold growing in the plastic bottles?
Mold contamination is a common problem in mushroom cultivation. If you see mold growing in your plastic bottles, it’s important to take action immediately to prevent it from spreading. In some cases, you may be able to remove the affected area with a clean spoon or knife. However, if the mold is widespread, it’s best to discard the entire bottle to avoid contaminating other cultures. To prevent mold growth, ensure that you are using a clean and sterile substrate, providing adequate ventilation, and maintaining proper humidity levels.
Can I reuse the plastic bottles after harvesting the mushrooms?
Yes, you can reuse the plastic bottles for multiple flushes of mushrooms. After harvesting the first flush, allow the substrate to rest for a week or two, and then rehydrate it by soaking it in water for a few hours. This will encourage the mycelium to produce another flush of mushrooms. You can repeat this process several times until the substrate is depleted of nutrients. Eventually, the substrate will become exhausted and will no longer produce mushrooms. At that point, you can compost the spent substrate and start a new batch with fresh materials.
Where is the best place to put the bottles while the mushrooms are growing?
The ideal location for your mushroom-filled plastic bottles is a cool, dark, and humid environment. A basement, garage, or closet are often good choices. Avoid direct sunlight, as it can dry out the substrate and inhibit mushroom growth. The temperature should be between 60-75°F (15-24°C) for most mushroom species. Good ventilation is also important to prevent the buildup of stagnant air and mold growth.
How do I know when the mushrooms are ready to harvest?
The best time to harvest mushrooms is when the caps are fully developed but before they start to release spores. The caps should be firm and slightly curved downwards. If you wait too long, the mushrooms will become tough and less flavorful. To harvest, simply twist or cut the mushrooms off at the base of the stem.
Is growing mushrooms in plastic bottles safe?
Yes, growing mushrooms in plastic bottles is generally safe, as long as you follow proper hygiene and sanitation practices. Always use clean and sterile materials, and avoid using plastic bottles that have been used to store harmful chemicals. Be sure to wash your hands thoroughly before handling the substrate or mushrooms. And of course, only consume mushrooms that you have positively identified as edible. If you are unsure about the identity of a mushroom, it’s best to err on the side of caution and discard it.
Leave a Comment