

Rooftop kale growing tips are your secret weapon to unlocking a vibrant, edible oasis right above your head! Imagine stepping out onto your roof and harvesting fresh, nutrient-packed kale for your salads, smoothies, or even a delicious kale chip snack. Sounds dreamy, right? Well, it’s more achievable than you think, and I’m here to guide you through every step of the process.
For centuries, urban dwellers have sought ways to connect with nature and cultivate their own food, even in the most concrete-laden environments. From the hanging gardens of Babylon to the community gardens sprouting up in modern cities, the desire to grow our own food is deeply ingrained in our history. Today, with concerns about food security and the environmental impact of industrial agriculture, the need for sustainable, local food sources is more pressing than ever. That’s where rooftop kale growing tips come in!
Let’s face it, not everyone has a sprawling backyard. But that doesn’t mean you can’t enjoy the satisfaction of growing your own food. Rooftop gardening offers a fantastic solution, allowing you to maximize unused space and create a thriving garden in the sky. Kale, in particular, is a fantastic choice for rooftop gardens because it’s relatively easy to grow, incredibly nutritious, and can tolerate a range of conditions. Plus, with the right techniques, you can enjoy a continuous harvest throughout the growing season. So, are you ready to transform your rooftop into a kale-filled paradise? Let’s get started!
Dein eigener Dachgarten: Kale Anbau leicht gemacht!
Hey Leute! Habt ihr auch genug von teurem Supermarkt-Kale? Ich zeige euch, wie ihr euren eigenen, üppigen Kale-Garten auf dem Dach anlegen könnt! Es ist einfacher als ihr denkt und bringt frischen Wind (und leckeres Gemüse!) in euer Leben. Los geht’s!
Was du für deinen Dachgarten brauchst:
* Geeignete Behälter: Wichtig sind stabile Pflanzkästen oder Töpfe mit guter Drainage. Denk dran, dass sie das Gewicht aushalten müssen, wenn sie voll mit Erde und Pflanzen sind.
* Hochwertige Pflanzerde: Eine Mischung aus Gartenerde, Kompost und Kokosfaser ist ideal. Das sorgt für gute Nährstoffversorgung und Wasserspeicherung.
* Kale-Samen oder Jungpflanzen: Du kannst Kale aus Samen ziehen oder direkt Jungpflanzen kaufen. Letzteres ist einfacher, wenn du schnell Ergebnisse sehen willst.
* Dünger: Organischer Dünger ist super für Kale. Ich empfehle Komposttee oder einen speziellen Gemüsedünger.
* Gießkanne oder Schlauch: Regelmäßiges Gießen ist das A und O!
* Gartenschere: Zum Ernten und Ausputzen der Pflanzen.
* Handschuhe: Um deine Hände sauber zu halten.
* Sonnenschutz: Kale liebt Sonne, aber zu viel Hitze kann schaden. Ein Sonnensegel oder eine ähnliche Konstruktion kann helfen.
* Windschutz: Gerade auf dem Dach kann es windig sein. Ein Windschutz schützt deine Pflanzen vor dem Austrocknen und Umknicken.
* Drainagematerial: Blähton oder Kies für den Boden der Behälter, um Staunässe zu vermeiden.
Schritt-für-Schritt Anleitung: Kale Anbau auf dem Dach
1. Die Vorbereitung ist alles: Bevor du loslegst, solltest du sicherstellen, dass dein Dach für einen Garten geeignet ist. Frage im Zweifelsfall einen Statiker, ob die Traglast ausreicht. Außerdem solltest du dich über die örtlichen Bauvorschriften informieren.
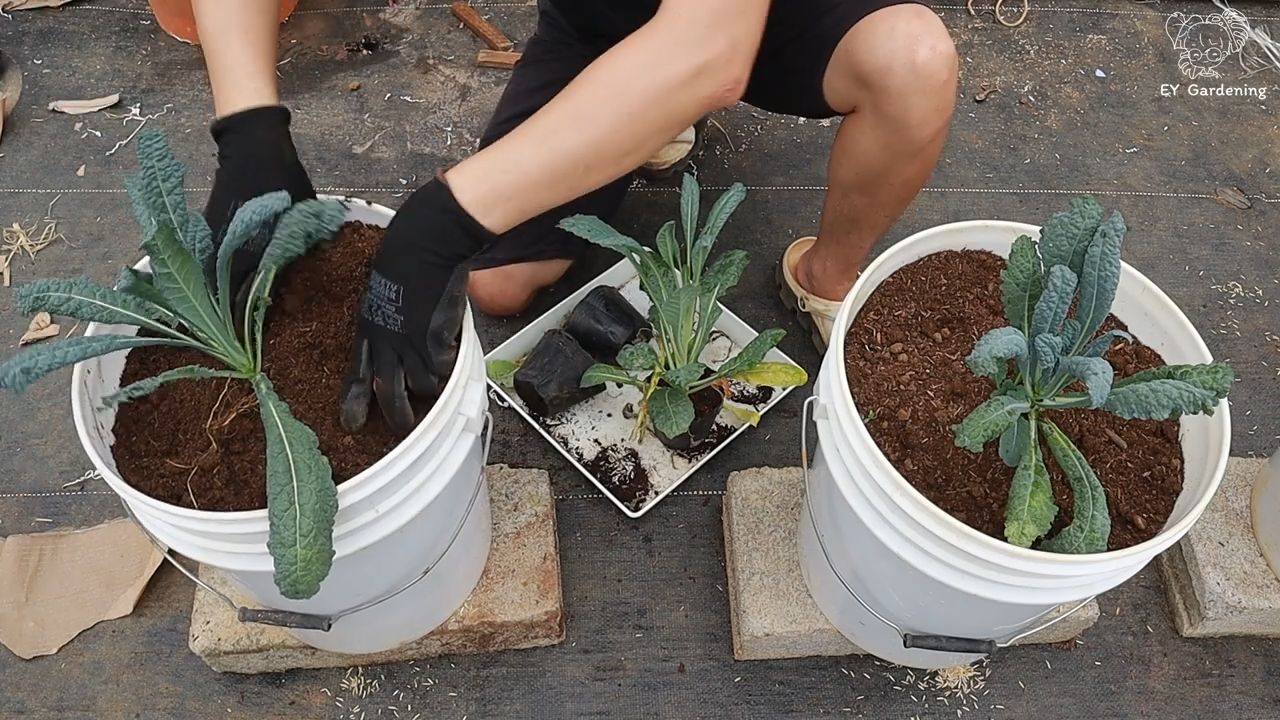
2. Die richtigen Behälter auswählen: Wähle Pflanzkästen oder Töpfe mit ausreichend Volumen. Kale braucht Platz zum Wachsen. Achte auf eine gute Drainage, damit das Wasser ablaufen kann. Ich habe gute Erfahrungen mit Pflanzkästen aus Kunststoff oder Holz gemacht.
3. Drainage legen: Fülle den Boden der Behälter mit einer Schicht Blähton oder Kies. Das verhindert Staunässe und sorgt für eine gute Belüftung der Wurzeln.
4. Die Erde vorbereiten: Mische Gartenerde, Kompost und Kokosfaser im Verhältnis 1:1:1. Das ergibt eine lockere, nährstoffreiche Erde, in der sich Kale wohlfühlt.
5. Aussaat oder Einpflanzen:
* Aussaat: Säe die Kale-Samen in kleinen Reihen oder einzeln in die Erde. Bedecke sie leicht mit Erde und gieße sie vorsichtig an. Halte die Erde feucht, aber nicht nass.
* Einpflanzen: Setze die Jungpflanzen in die vorbereiteten Behälter. Achte darauf, dass der Wurzelballen gut mit Erde bedeckt ist. Gieße die Pflanzen nach dem Einsetzen gründlich an.
6. Der richtige Standort: Kale liebt Sonne! Stelle deine Behälter an einen sonnigen Platz auf dem Dach. Ideal sind mindestens sechs Stunden Sonne pro Tag.
7. Gießen nicht vergessen: Kale braucht regelmäßige Wassergaben. Gieße die Pflanzen, wenn die oberste Erdschicht trocken ist. Vermeide Staunässe, da dies zu Wurzelfäule führen kann. Am besten gießt du morgens oder abends, wenn die Sonne nicht so stark scheint.
8. Düngen für Wachstum: Dünge deine Kale-Pflanzen regelmäßig mit organischem Dünger. Komposttee oder ein spezieller Gemüsedünger sind ideal. Dünge alle zwei bis drei Wochen, um ein gesundes Wachstum zu fördern.
9. Schutz vor Schädlingen: Kale kann von verschiedenen Schädlingen befallen werden, wie z.B. Kohlweißlingen oder Blattläusen. Kontrolliere deine Pflanzen regelmäßig und entferne Schädlinge von Hand. Bei starkem Befall kannst du biologische Schädlingsbekämpfungsmittel einsetzen.
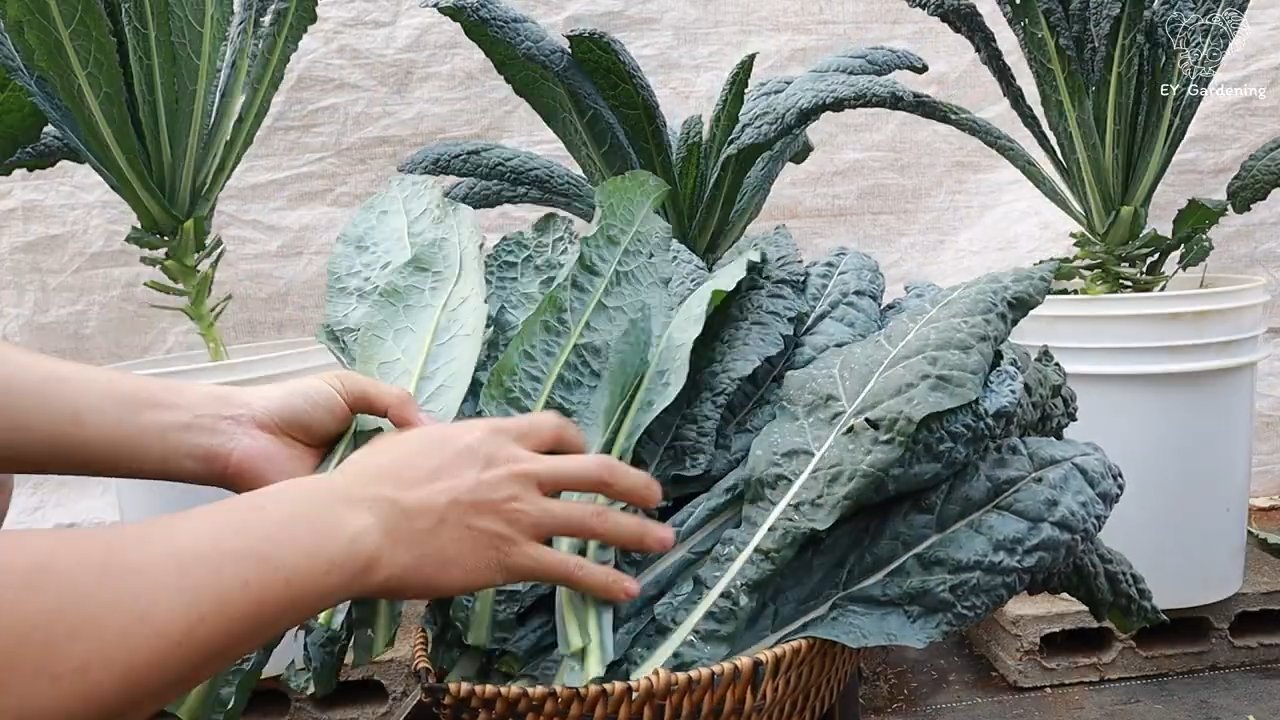
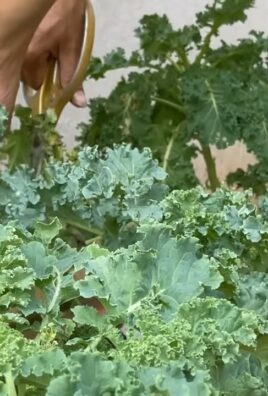
10. Ernten und genießen: Du kannst Kale ernten, sobald die Blätter groß genug sind. Schneide die äußeren Blätter ab und lasse die inneren Blätter weiterwachsen. So kannst du über einen längeren Zeitraum ernten. Kale schmeckt roh im Salat, gedünstet als Beilage oder als Zutat in Smoothies.
Spezielle Herausforderungen beim Dachgarten
Dachgärten sind toll, aber sie haben auch ihre Eigenheiten. Hier sind ein paar Tipps, wie du mit den besonderen Bedingungen auf dem Dach umgehen kannst:
* Wind: Auf dem Dach kann es sehr windig sein. Das kann die Pflanzen austrocknen und umknicken. Schütze deine Pflanzen mit einem Windschutz. Das kann eine Hecke, eine Mauer oder ein spezielles Windschutznetz sein.
* Sonne: Die Sonne kann auf dem Dach sehr intensiv sein. Das kann die Pflanzen verbrennen. Schütze deine Pflanzen mit einem Sonnensegel oder einer ähnlichen Konstruktion.
* Gewicht: Das Gewicht der Erde und der Pflanzen kann beträchtlich sein. Stelle sicher, dass dein Dach die Last tragen kann. Frage im Zweifelsfall einen Statiker.
* Wasser: Das Wasser muss abgeleitet werden, damit es nicht zu Staunässe kommt. Achte auf eine gute Drainage in den Behältern und auf dem Dach.
* Zugänglichkeit: Der Zugang zum Dach kann schwierig sein. Plane den Garten so, dass er leicht zu pflegen ist.
Sortenwahl: Welcher Kale ist der Richtige für dich?
Es gibt viele verschiedene Kale-Sorten, die sich in Geschmack, Aussehen und Anbaueigenschaften unterscheiden. Hier sind ein paar beliebte Sorten:
* Grünkohl (Brassica oleracea var. sabellica): Der Klassiker! Er hat krause, dunkelgrüne Blätter und einen kräftigen Geschmack. Er ist sehr robust und winterhart.
* Palmkohl (Brassica oleracea var. palmifolia): Auch bekannt als Schwarzkohl oder Cavolo Nero. Er hat lange, schmale, dunkelgrüne Blätter und einen milderen Geschmack als Grünkohl.
* Roter Grünkohl (Brassica oleracea var. sabellica rubra): Er hat krause, rot-violette Blätter und einen leicht süßlichen Geschmack. Er ist nicht ganz so winterhart wie der grüne Grünkohl.
* Zierkohl (Brassica oleracea var. acephala): Er hat dekorative, krause Blätter in verschiedenen Farben. Er ist nicht so schmackhaft wie die anderen Kale-Sorten, aber er ist ein echter Hingucker.
Wähle die Sorten, die dir am besten schmecken und die gut zu den Bedingungen auf deinem Dach passen.
Pflege-Tipps für deinen Kale-Garten
* Regelmäßiges Gießen: Kale braucht regelmäßige Wassergaben, besonders an heißen Tagen.
* Regelmäßiges Düngen: Dünge deine Kale-Pflanzen regelmäßig mit organischem Dünger, um ein gesundes Wachstum zu fördern.
* Unkraut entfernen: Entferne regelmäßig Unkraut, damit es deinen Kale-Pflanzen nicht die Nährstoffe wegnimmt.
* Schädlinge bekämpfen: Kontrolliere deine Pflanzen regelmäßig auf Schädlinge und bekämpfe sie bei Bedarf.
* Verwelkte Blätter entfernen: Entferne regelmäßig verwelkte Blätter, damit sich keine Krankheiten ausbreiten.
* Winterpflege: Kale ist winterhart. Du kannst ihn auch im Winter ernten. Schütze die Pflanzen bei starkem Frost mit einem Vlies.
Häufige Probleme und Lösungen
* Gelbe Blätter: Gelbe Blätter können ein Zeichen für Nährstoffmangel sein. Dünge deine Pflanzen mit einem organischen Dünger.
* Braune Blätter: Braune Blätter können ein Zeichen für Sonnenbrand sein. Schütze deine Pflanzen mit einem Sonnensegel.
* Löcher in den Blättern: Löcher in den Blättern können ein Zeichen für Schädlingsbefall sein. Kontrolliere deine Pflanzen auf Schädlinge und bekämpfe sie bei Bedarf.
*
Conclusion
So, there you have it! Transforming your rooftop into a thriving kale garden is not only achievable, but it’s also incredibly rewarding. We’ve explored the essential steps, from selecting the right containers and soil to providing optimal sunlight and protection from the elements. But why is this DIY rooftop kale growing endeavor a must-try?
First and foremost, imagine stepping onto your rooftop and harvesting fresh, vibrant kale just moments before adding it to your salad, smoothie, or favorite dish. The taste and nutritional value of homegrown kale far surpass anything you can find in a grocery store. You’ll be enjoying the peak of freshness, packed with vitamins, minerals, and antioxidants.
Beyond the culinary benefits, rooftop kale growing offers a unique connection to nature, especially for those living in urban environments. It’s a chance to create a green oasis amidst the concrete jungle, attracting beneficial insects and pollinators, and contributing to a healthier ecosystem. The simple act of tending to your kale plants can be incredibly therapeutic, providing a sense of calm and accomplishment.
Furthermore, growing your own kale is a sustainable choice. You’re reducing your carbon footprint by eliminating the need for transportation and packaging associated with store-bought produce. You’re also in control of the growing process, ensuring that your kale is free from harmful pesticides and herbicides.
But the beauty of rooftop kale growing lies in its adaptability. Feel free to experiment with different varieties of kale, such as curly kale, lacinato kale (also known as dinosaur kale), or red Russian kale. Each variety offers a unique flavor and texture, allowing you to create a diverse and exciting culinary experience.
Consider companion planting to enhance the growth and flavor of your kale. Marigolds can deter pests, while herbs like rosemary and thyme can attract beneficial insects. You can also add other leafy greens like spinach or lettuce to your rooftop garden for a wider variety of fresh produce.
Don’t be afraid to get creative with your container choices. While traditional pots and planters work well, you can also repurpose old buckets, crates, or even tires to create a unique and eco-friendly growing space. Just make sure that your containers have adequate drainage to prevent waterlogging.
We encourage you to embrace the challenge and embark on your own rooftop kale growing adventure. It’s a journey of learning, experimentation, and ultimately, delicious rewards. And most importantly, don’t forget to share your experiences with us! We’d love to hear about your successes, challenges, and any tips or tricks you’ve discovered along the way. Share your photos and stories on social media using #RooftopKale or leave a comment below. Let’s build a community of rooftop kale growers and inspire others to transform their urban spaces into thriving gardens.
Ready to Grow Your Own?
Remember, even small steps can lead to big results. Start with a few containers, choose a sunny spot, and watch your kale flourish. With a little patience and care, you’ll be enjoying fresh, homegrown kale in no time. Happy growing!
Frequently Asked Questions (FAQ)
What is the best time of year to start growing kale on my rooftop?
The best time to start growing kale depends on your climate. In general, kale is a cool-season crop, meaning it thrives in temperatures between 60°F and 70°F (15°C and 21°C). For most regions, this means planting kale in early spring or late summer/early fall. Spring planting allows you to harvest kale throughout the summer, while fall planting provides a harvest during the cooler months. If you live in a region with mild winters, you may even be able to grow kale year-round. Check your local climate data to determine the best planting times for your area.
What kind of soil should I use for rooftop kale growing?
Kale prefers well-draining, fertile soil with a pH between 6.0 and 7.5. A good potting mix specifically designed for vegetables is ideal. You can also amend your soil with compost or other organic matter to improve its fertility and drainage. Avoid using heavy clay soils, as they can become waterlogged and inhibit root growth. When filling your containers, leave a few inches of space at the top to allow for watering.
How much sunlight does kale need when grown on a rooftop?
Kale requires at least 6 hours of direct sunlight per day to thrive. Choose a location on your rooftop that receives ample sunlight throughout the day. If your rooftop is partially shaded, try to position your kale plants in the sunniest spot. If you don’t have enough natural sunlight, you can supplement with grow lights.
How often should I water my rooftop kale plants?
Water your kale plants regularly, especially during hot, dry weather. The frequency of watering will depend on the weather conditions, the size of your containers, and the type of soil you’re using. Check the soil moisture regularly by sticking your finger into the soil. If the top inch of soil feels dry, it’s time to water. Avoid overwatering, as this can lead to root rot.
What are some common pests and diseases that affect rooftop kale?
Common pests that can affect rooftop kale include aphids, cabbage worms, and flea beetles. You can control these pests by handpicking them off the plants, using insecticidal soap, or introducing beneficial insects like ladybugs. Common diseases that can affect kale include powdery mildew and black rot. To prevent these diseases, ensure good air circulation around your plants, avoid overwatering, and remove any infected leaves promptly.
How do I harvest kale from my rooftop garden?
You can start harvesting kale leaves when they are about 4-6 inches long. Harvest the outer leaves first, leaving the inner leaves to continue growing. This will allow you to harvest kale continuously throughout the growing season. To harvest, simply cut the leaves off at the base of the stem using a sharp knife or scissors.
Can I grow kale in containers on a windy rooftop?
Yes, you can grow kale in containers on a windy rooftop, but you’ll need to take some precautions to protect your plants. Choose sturdy containers that won’t easily tip over. You can also weigh down the containers with rocks or bricks. Consider using a windbreak, such as a fence or trellis, to shield your kale plants from strong winds.
How can I fertilize my rooftop kale plants?
Kale is a heavy feeder, so it’s important to fertilize your plants regularly. You can use a balanced fertilizer specifically designed for vegetables. Follow the instructions on the fertilizer package for application rates. You can also amend your soil with compost or other organic matter to provide a slow-release source of nutrients.
What are some creative ways to use my rooftop-grown kale?
The possibilities are endless! You can add kale to salads, smoothies, soups, stews, and stir-fries. You can also bake kale chips, sauté kale with garlic and olive oil, or add kale to your favorite pasta dishes. Get creative and experiment with different recipes to find your favorite ways to enjoy your rooftop-grown kale.
Is rooftop kale growing organic?
Rooftop kale growing can absolutely be organic! By using organic soil, fertilizers, and pest control methods, you can ensure that your kale is free from synthetic chemicals. Look for potting mixes and fertilizers that are certified organic. For pest control, consider using natural methods like handpicking pests, using insecticidal soap, or introducing beneficial insects. Growing your kale organically is a great way to enjoy healthy, delicious produce while protecting the environment.

Leave a Comment