

Balcony Cabbage Growing Tips: Dreaming of fresh, homegrown cabbage but lacking a sprawling garden? Don’t let limited space squash your gardening aspirations! I’m here to tell you that a bountiful cabbage harvest is entirely possible, even on the tiniest of balconies. For centuries, resourceful gardeners have adapted their techniques to cultivate food in urban environments, and now it’s your turn to join the ranks of balcony farming pioneers.
Growing your own food, especially something as versatile as cabbage, offers a unique connection to nature and a sense of accomplishment that’s hard to beat. Plus, think of the savings! No more overpriced, wilted cabbage from the grocery store. You’ll have crisp, vibrant heads ready for slaws, stir-fries, and hearty soups, all grown with your own two hands.
This article is packed with easy-to-follow balcony cabbage growing tips and DIY hacks that will transform your outdoor space into a mini-farm. We’ll cover everything from choosing the right container and soil to warding off pests and ensuring a healthy, delicious harvest. So, grab your gardening gloves, and let’s get started on your balcony cabbage adventure!
Balkonkohl: Dein eigener kleiner Gemüsegarten auf dem Balkon
Hey Gartenfreunde! Habt ihr auch Lust, frisches, knackiges Gemüse direkt vor der Haustür zu ernten? Dann seid ihr hier genau richtig! Ich zeige euch, wie ihr ganz einfach Kohl auf eurem Balkon anbauen könnt. Keine Angst, es ist einfacher als ihr denkt und macht super viel Spaß!
Warum Kohl auf dem Balkon?
Kohl ist nicht nur super gesund, sondern auch unglaublich vielseitig in der Küche. Ob als Salat, gedünstet, gebraten oder fermentiert – die Möglichkeiten sind endlos. Und das Beste: Selbst auf kleinstem Raum, wie einem Balkon, lässt sich Kohl prima anbauen.
Vorteile des Balkonkohls:
* Frische Ernte: Immer frisches Gemüse griffbereit.
* Platzsparend: Ideal für kleine Balkone.
* Nachhaltig: Reduziert den CO2-Fußabdruck durch kurze Transportwege.
* Gesund: Du weißt genau, was drin ist.
* Befriedigend: Es macht einfach Spaß, sein eigenes Gemüse wachsen zu sehen!
Welche Kohlsorten eignen sich für den Balkon?
Nicht jeder Kohl fühlt sich auf dem Balkon wohl. Einige Sorten werden einfach zu groß. Aber keine Sorge, es gibt genug Alternativen, die sich perfekt für den Anbau im Topf eignen.
Empfehlenswerte Kohlsorten:
* Blumenkohl (kleinwüchsige Sorten): ‘Minuteman’ oder ‘Snow Crown’ sind gute Optionen.
* Brokkoli (kleinwüchsige Sorten): ‘De Cicco’ oder ‘Waltham 29’.
* Grünkohl: Sehr robust und pflegeleicht, ideal für Anfänger.
* Rosenkohl (kleinwüchsige Sorten): ‘Rubine’ oder ‘Long Island Improved’.
* Kopfkohl (kleinwüchsige Sorten): ‘Brunswick’ oder ‘Golden Acre’.
* Chinakohl: Wächst schnell und ist unkompliziert.
* Pak Choi: Ebenfalls schnellwachsend und sehr dekorativ.
Was du für deinen Balkonkohl brauchst:
Bevor wir loslegen, hier eine Liste mit allem, was du für dein Balkonkohl-Projekt benötigst:
* Saatgut oder Jungpflanzen: Wähle deine Lieblingskohlsorten aus.
* Töpfe oder Kübel: Achte auf ausreichend Größe (mindestens 20 Liter pro Pflanze).
* Pflanzerde: Am besten spezielle Gemüseerde oder eine Mischung aus Gartenerde, Kompost und Sand.
* Dünger: Organischer Gemüsedünger oder Kompost.
* Gießkanne oder Schlauch: Für die regelmäßige Bewässerung.
* Schere oder Messer: Zum Ernten.
* Eventuell: Schneckenzaun oder -korn, um deine Pflanzen vor Schnecken zu schützen.
Schritt-für-Schritt-Anleitung: Kohl auf dem Balkon anbauen
So, jetzt geht’s ans Eingemachte! Ich zeige euch Schritt für Schritt, wie ihr euren Balkonkohl erfolgreich anbauen könnt.
1. Die Vorbereitung:
1. Töpfe vorbereiten: Wähle Töpfe oder Kübel mit ausreichend Volumen (mindestens 20 Liter pro Pflanze). Achte darauf, dass die Töpfe Abzugslöcher haben, damit überschüssiges Wasser ablaufen kann.
2. Erde vorbereiten: Fülle die Töpfe mit hochwertiger Pflanzerde. Du kannst spezielle Gemüseerde verwenden oder eine Mischung aus Gartenerde, Kompost und Sand selbst herstellen. Die Erde sollte locker und gut durchlässig sein.
3. Dünger untermischen: Mische organischen Gemüsedünger oder Kompost unter die Erde. Das versorgt deine Kohlpflanzen von Anfang an mit wichtigen Nährstoffen.
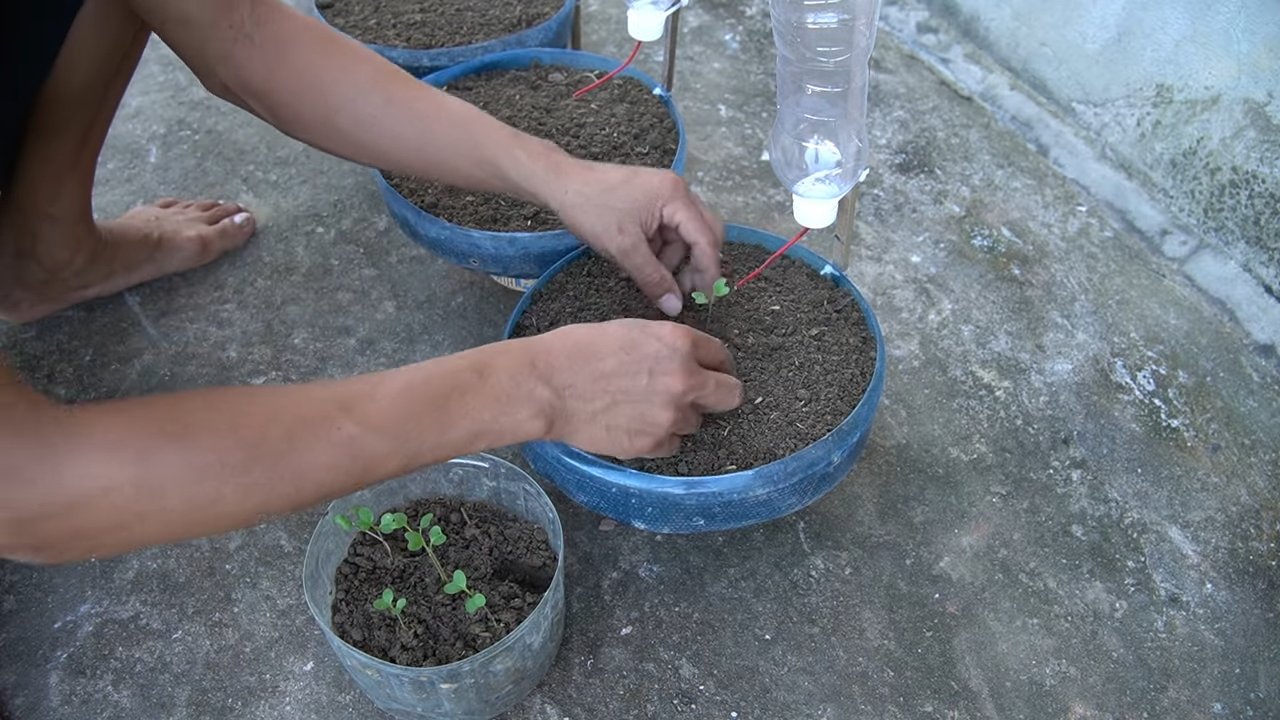
2. Aussaat oder Pflanzung:
Hier hast du zwei Möglichkeiten: Entweder du ziehst deine Kohlpflanzen selbst aus Samen vor oder du kaufst fertige Jungpflanzen.
Aussaat (aus Samen):
1. Aussaatzeitpunkt: Die meisten Kohlsorten werden im Frühjahr (März/April) vorgezogen. Beachte die Angaben auf der Saatgutpackung.
2. Aussaatgefäße: Verwende kleine Anzuchttöpfe oder eine Anzuchtschale.
3. Aussaat: Fülle die Anzuchttöpfe mit Anzuchterde und säe die Samen etwa 1 cm tief ein.
4. Gießen: Gieße die Erde vorsichtig an, sodass sie feucht, aber nicht nass ist.
5. Standort: Stelle die Anzuchttöpfe an einen hellen und warmen Ort (z.B. auf der Fensterbank).
6. Pflege: Halte die Erde feucht und lüfte die Anzuchttöpfe regelmäßig, um Schimmelbildung zu vermeiden.
7. Pikieren: Sobald die Keimlinge ihre ersten richtigen Blätter entwickelt haben (nach ca. 2-3 Wochen), kannst du sie in größere Töpfe pikieren.
Pflanzung (Jungpflanzen):
1. Pflanzzeitpunkt: Jungpflanzen können ab Mitte Mai, nach den Eisheiligen, ins Freie gepflanzt werden.
2. Pflanzlöcher: Grabe in die vorbereiteten Töpfe Pflanzlöcher, die etwas größer sind als die Wurzelballen der Jungpflanzen.
3. Pflanzen: Setze die Jungpflanzen vorsichtig in die Pflanzlöcher und fülle die Löcher mit Erde auf.
4. Andrücken: Drücke die Erde leicht an.
5. Gießen: Gieße die Pflanzen gründlich an.
3. Die Pflege:
Jetzt heißt es, die Pflanzen gut zu pflegen, damit sie prächtig gedeihen.
1. Gießen: Kohlpflanzen brauchen regelmäßig Wasser, besonders während der Wachstumsphase. Gieße am besten morgens oder abends, wenn die Sonne nicht scheint. Vermeide Staunässe.
2. Düngen: Dünge deine Kohlpflanzen regelmäßig mit organischem Gemüsedünger oder Kompost. Beginne etwa 2-3 Wochen nach der Pflanzung und wiederhole die Düngung alle 2-3 Wochen.
3. Schneckenbekämpfung: Kohlpflanzen sind leider sehr beliebt bei Schnecken. Schütze deine Pflanzen mit einem Schneckenzaun oder streue Schneckenkorn um die Töpfe.
4. Kohlweißlingsraupen: Auch Kohlweißlingsraupen können deinen Pflanzen zu schaffen machen. Kontrolliere deine Pflanzen regelmäßig und sammle die Raupen ab. Du kannst auch ein Netz über deine Pflanzen spannen, um die Falter abzuhalten.
5. Sonnenstandort: Kohl braucht viel Sonne, mindestens 6 Stunden täglich. Stelle deine Töpfe an einen sonnigen Platz auf dem Balkon.
6. Bodenpflege: Lockere die Erde regelmäßig auf, um die Belüftung zu verbessern. Entferne Unkraut, das sich in den Töpfen breit macht.
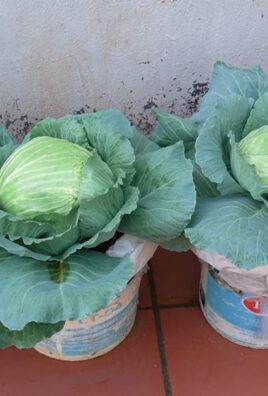
4. Die Ernte:
Endlich ist es soweit! Du kannst deinen eigenen Balkonkohl ernten.
1. Erntezeitpunkt: Der Erntezeitpunkt hängt von der jeweiligen Kohlsorte ab. Blumenkohl und Brokkoli sind erntereif, wenn die Köpfe fest und geschlossen sind. Grünkohl kann nach Bedarf geerntet werden, indem man die äußeren Blätter abzupft. Rosenkohl ist erntereif, wenn die Röschen fest und geschlossen sind. Kopfkohl ist erntereif, wenn der Kopf fest ist.
2. Erntemethode: Schneide die Köpfe oder Röschen mit einem scharfen Messer ab. Bei Grünkohl kannst du einfach die äußeren Blätter abzupfen.
3. Lagerung: Frischer Kohl hält sich im Kühlschrank einige Tage. Du kannst ihn auch einfrieren oder fermentieren, um ihn länger haltbar zu machen.
Zusätzliche Tipps für den erfolgreichen Balkonkohl:
* Fruchtfolge beachten: Baue Kohl nicht jedes Jahr am selben Standort an, um Krankheiten und Schädlingen vorzubeugen.
* Mischkultur
Conclusion
So, there you have it! Growing cabbage on your balcony isn’t just a whimsical dream; it’s a tangible reality within reach, even if you’re short on space. We’ve walked through the essential steps, from selecting the right varieties to warding off common pests, all tailored for the unique environment of a balcony garden. But why should you actually dedicate your precious balcony space to this leafy green?
The answer is multifaceted. Firstly, the taste of homegrown cabbage is simply unparalleled. Forget the bland, mass-produced heads from the supermarket; balcony-grown cabbage offers a crisp, fresh flavor that bursts with vitality. Imagine the satisfaction of harvesting your own ingredients for a vibrant coleslaw or a hearty winter stew. Secondly, growing your own food, even on a small scale, is incredibly empowering. It connects you to the natural world, reduces your reliance on industrial agriculture, and provides a sense of accomplishment that’s hard to replicate. Thirdly, and perhaps most practically, it can save you money! Cabbage is a versatile vegetable, and having a steady supply right outside your door can significantly reduce your grocery bills.
But the benefits extend beyond the practical. Balcony gardening, in general, is a fantastic stress reliever. Tending to your plants, observing their growth, and nurturing them to maturity is a therapeutic activity that can help you unwind and reconnect with nature. And let’s not forget the aesthetic appeal! A thriving cabbage plant, with its broad, textured leaves, can add a touch of rustic charm to your balcony, transforming it into a miniature edible oasis.
Now, let’s talk about variations. While we’ve focused on general cabbage growing, feel free to experiment with different varieties. Red cabbage adds a splash of color to your balcony and your dishes. Savoy cabbage offers a more delicate flavor and crinkled leaves. Napa cabbage is perfect for Asian-inspired cuisine. Don’t be afraid to try different planting techniques, such as succession planting, to ensure a continuous harvest throughout the growing season. Consider companion planting, too. Marigolds, for example, can help deter pests, while dill can attract beneficial insects.
And if you’re feeling adventurous, why not try fermenting your balcony-grown cabbage to make sauerkraut or kimchi? It’s a delicious and healthy way to preserve your harvest and add a probiotic boost to your diet. You can also explore different container options. While we’ve recommended larger pots, you can also use grow bags or even repurposed containers like old buckets or tubs. Just make sure they have adequate drainage.
Ultimately, the key to successful **balcony cabbage growing** is experimentation and observation. Pay attention to your plants’ needs, adjust your watering and fertilizing schedule accordingly, and don’t be afraid to learn from your mistakes. Every balcony is different, so what works for one person may not work for another.
So, what are you waiting for? Grab some seeds or seedlings, find a sunny spot on your balcony, and get growing! We’re confident that you’ll be amazed by the results. And once you’ve harvested your first head of homegrown cabbage, we’d love to hear about your experience. Share your tips, tricks, and photos with us in the comments below. Let’s build a community of balcony cabbage growers and inspire others to embrace the joys of urban gardening! We encourage you to share your successes, your challenges, and your delicious cabbage-based recipes. Happy gardening!
Frequently Asked Questions (FAQ)
1. What kind of cabbage is best for balcony growing?
The best cabbage varieties for balcony growing are typically smaller, more compact types that don’t require as much space. Some excellent choices include:
* **Dwarf varieties:** Look for varieties specifically labeled as “dwarf” or “miniature.” These are bred to stay small and are ideal for container gardening.
* **Early varieties:** Early-maturing varieties, such as ‘Golden Acre’ or ‘Early Jersey Wakefield,’ are a good choice because they have a shorter growing season, allowing you to harvest them before the weather gets too hot.
* **Red cabbage:** Red cabbage varieties tend to be smaller than green cabbage and add a beautiful pop of color to your balcony garden.
* **Savoy cabbage:** Savoy cabbage has a more delicate flavor and crinkled leaves, making it a visually appealing and tasty option.
* **Napa cabbage:** Napa cabbage, also known as Chinese cabbage, is a versatile variety that’s great for salads, stir-fries, and kimchi.
Consider your local climate and growing season when selecting your cabbage variety. Check the seed packet or plant label for information on days to maturity and recommended growing conditions.
2. How much sunlight does cabbage need on a balcony?
Cabbage needs at least 6 hours of direct sunlight per day to thrive. If your balcony doesn’t receive that much sunlight, you can supplement with grow lights. Place the grow lights about 6-12 inches above the plants and keep them on for 12-14 hours per day. Rotate your cabbage plants regularly to ensure that all sides receive adequate sunlight. If your balcony is particularly windy, consider providing some wind protection for your cabbage plants, as strong winds can damage the leaves and stunt their growth.
3. What size pot is needed for growing cabbage on a balcony?
Cabbage needs a relatively large pot to accommodate its root system. A pot that is at least 12 inches in diameter and 12 inches deep is recommended. Larger pots are even better, as they provide more room for the roots to grow and help retain moisture. Make sure the pot has drainage holes to prevent waterlogging, which can lead to root rot. You can also use grow bags, which are a lightweight and breathable alternative to traditional pots.
4. How often should I water cabbage on my balcony?
Cabbage needs consistent moisture to grow well. Water your cabbage plants deeply whenever the top inch of soil feels dry to the touch. Avoid overwatering, as this can lead to root rot. The frequency of watering will depend on the weather conditions, the size of the pot, and the type of soil you’re using. In hot, dry weather, you may need to water your cabbage plants daily. In cooler, wetter weather, you may only need to water them every few days. Check the soil moisture regularly and adjust your watering schedule accordingly.
5. What kind of fertilizer should I use for cabbage on my balcony?
Cabbage is a heavy feeder, meaning it needs a lot of nutrients to grow well. Fertilize your cabbage plants every 2-3 weeks with a balanced fertilizer, such as a 10-10-10 or 20-20-20. You can also use organic fertilizers, such as compost tea or fish emulsion. Follow the instructions on the fertilizer label carefully. Avoid over-fertilizing, as this can burn the roots and damage the plants. Side-dress your cabbage plants with compost or aged manure to provide them with a slow-release source of nutrients.
6. How do I protect my balcony cabbage from pests?
Cabbage is susceptible to a variety of pests, including cabbage worms, aphids, and flea beetles. To protect your cabbage plants from pests, you can use a variety of methods, including:
* **Handpicking:** Regularly inspect your cabbage plants for pests and remove them by hand.
* **Floating row covers:** Cover your cabbage plants with floating row covers to prevent pests from reaching them.
* **Insecticidal soap:** Spray your cabbage plants with insecticidal soap to kill aphids and other soft-bodied pests.
* **Bacillus thuringiensis (Bt):** Bt is a natural bacterium that is toxic to cabbage worms. Spray your cabbage plants with Bt to control cabbage worm infestations.
* **Companion planting:** Plant marigolds, dill, or other pest-repelling plants near your cabbage to deter pests.
7. How do I know when my balcony cabbage is ready to harvest?
Cabbage is ready to harvest when the head is firm and solid. The size of the head will vary depending on the variety. To harvest cabbage, cut the head off at the base of the plant with a sharp knife. Leave the outer leaves intact, as they can continue to produce smaller heads. You can also harvest individual leaves from the plant as needed.
8. Can I grow cabbage on my balcony in the winter?
In many climates, you can grow cabbage on your balcony in the winter. Cabbage is a cool-season crop that can tolerate frost and even light freezes. However, if you live in an area with harsh winters, you may need to provide some protection for your cabbage plants, such as covering them with a blanket or moving them indoors. Choose winter-hardy varieties of cabbage for best results.
9. My cabbage isn’t forming a head. What am I doing wrong?
Several factors can prevent cabbage from forming a head, including:
* **Insufficient sunlight:** Cabbage needs at least 6 hours of direct sunlight per day to form a head.
* **Lack of nutrients:** Cabbage is a heavy feeder and needs plenty of nutrients to grow well.
* **Improper watering:** Cabbage needs consistent moisture to form a head.
* **Pest infestations:** Pests can damage the leaves and stunt the growth of the plant, preventing it from forming a head.
* **Incorrect variety:** Some cabbage varieties are not well-suited for container gardening or may require a longer


Leave a Comment