

Hanging lettuce no water grow – sounds like something out of a sci-fi movie, right? But trust me, it’s a real, and surprisingly simple, way to cultivate fresh, crisp lettuce right at home! Forget about back-breaking weeding and constant watering; this DIY project lets you enjoy a bountiful harvest with minimal effort.
For centuries, humans have sought innovative ways to grow food, adapting to different climates and environments. While traditional gardening methods are tried and true, the concept of vertical gardening, which this hanging lettuce method falls under, has gained immense popularity in recent years, especially in urban settings where space is limited. It’s a modern twist on ancient practices, bringing food production closer to home.
Why do you need this DIY trick? Well, imagine having fresh salad greens readily available, just steps from your kitchen. No more last-minute grocery store runs or wilted lettuce in the fridge! This method is perfect for apartment dwellers, busy individuals, or anyone looking to add a touch of green to their lives. Plus, it’s incredibly satisfying to nurture your own food from seed to table. I’m excited to share this simple method of hanging lettuce no water grow, and I know you’ll love the results!
DIY Hänge-Salatgarten: Frischer Salat ohne Gießen!
Hey Leute! Habt ihr auch genug davon, ständig Salat zu kaufen, der schon nach einem Tag im Kühlschrank schlapp macht? Ich auch! Deshalb habe ich mir eine super einfache und platzsparende Lösung überlegt: einen hängenden Salatgarten, der fast ohne Gießen auskommt. Klingt verrückt? Ist es aber nicht! Und das Beste: Ihr könnt das ganz einfach selbst bauen. Lasst uns loslegen!
Was ihr braucht:
* Eine große Plastikflasche (mindestens 5 Liter, je größer, desto besser)
* Ein scharfes Messer oder eine Schere
* Einen Bohrer oder einen Nagel und Hammer
* Pflanzerde (am besten Bio-Qualität)
* Salatsetzlinge (verschiedene Sorten für mehr Abwechslung!)
* Kokosfaser oder Torfmoos (zur Wasserspeicherung)
* Eine stabile Schnur oder Kette zum Aufhängen
* Optional: Sprühfarbe (um die Flasche zu verschönern)
* Optional: Kleine Steine oder Kies (für die Drainage)
Schritt-für-Schritt Anleitung:
1. Die Flasche vorbereiten
1. Reinigung ist das A und O: Zuerst müsst ihr die Plastikflasche gründlich reinigen. Entfernt alle Etiketten und spült sie mit warmem Wasser und Spülmittel aus. Achtet darauf, dass keine Rückstände mehr vorhanden sind.
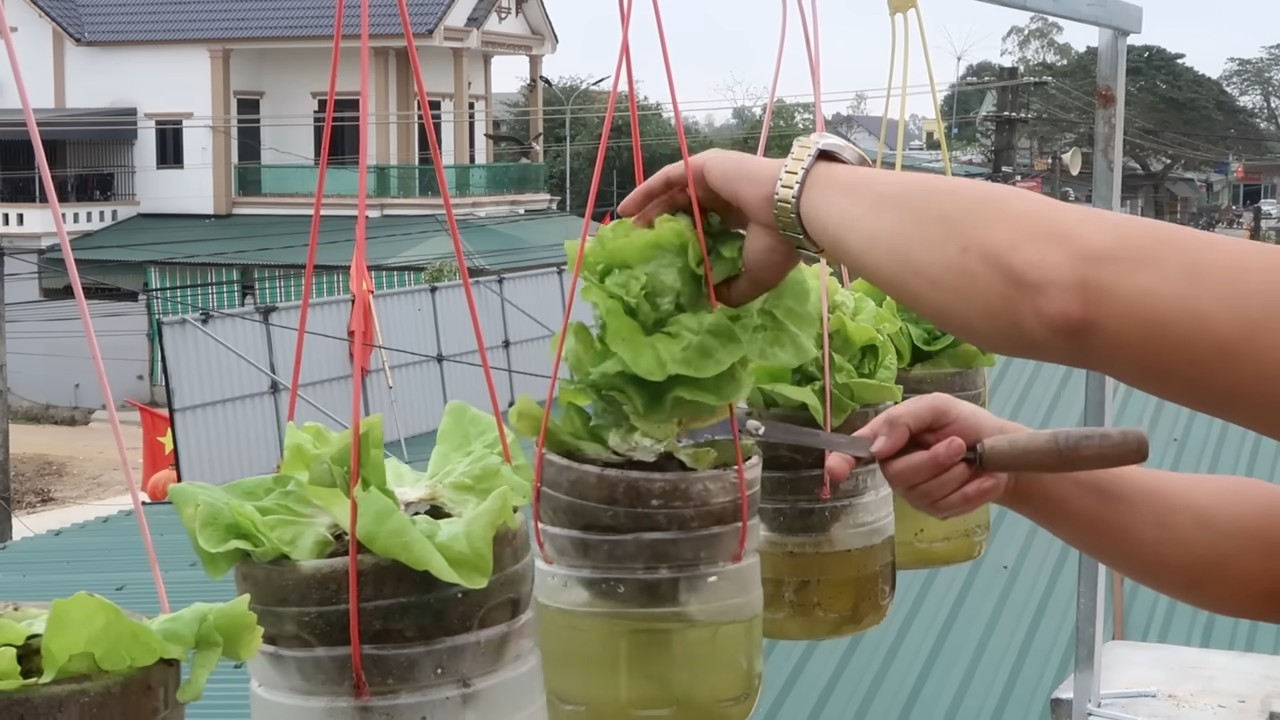
2. Die Schneidearbeiten: Jetzt kommt der spannende Teil! Legt die Flasche horizontal vor euch. Mit dem Messer oder der Schere schneidet ihr ein großes Rechteck aus der Seite der Flasche. Dieses Rechteck wird später die Öffnung sein, durch die ihr den Salat pflanzt. Die Größe des Rechtecks hängt davon ab, wie viele Salatsetzlinge ihr pflanzen wollt. Ich empfehle, es nicht zu groß zu machen, damit die Flasche stabil bleibt. Lasst am besten einen Rand von etwa 5-7 cm an den Seiten und am Boden.
3. Drainagelöcher bohren: Damit das Wasser gut ablaufen kann und eure Salatwurzeln nicht faulen, bohrt ihr mit dem Bohrer oder dem Nagel und Hammer mehrere kleine Löcher in den Boden der Flasche. Achtet darauf, dass die Löcher nicht zu groß sind, damit die Erde nicht herausfällt. Ich mache immer so 5-6 Löcher.
4. Aufhängelöcher anbringen: Jetzt braucht ihr Löcher, um die Flasche aufzuhängen. Bohrt oder schlagt jeweils ein Loch links und rechts oben an der Flasche, nahe am Flaschenhals. Achtet darauf, dass die Löcher stabil genug sind, um das Gewicht der bepflanzten Flasche zu tragen. Verstärkt die Löcher eventuell mit kleinen Metallösen, wenn ihr auf Nummer sicher gehen wollt.
2. Die Flasche bepflanzen
1. Drainage vorbereiten (optional): Wenn ihr wollt, könnt ihr eine Schicht kleine Steine oder Kies auf den Boden der Flasche geben. Das verbessert die Drainage zusätzlich und verhindert Staunässe.
2. Wasserspeicher einbauen: Jetzt kommt der Trick, der das Gießen fast überflüssig macht! Verteilt eine Schicht Kokosfaser oder Torfmoos auf dem Boden der Flasche. Diese Materialien speichern Wasser und geben es langsam an die Erde ab. Das ist besonders praktisch, wenn ihr mal ein paar Tage nicht zu Hause seid.
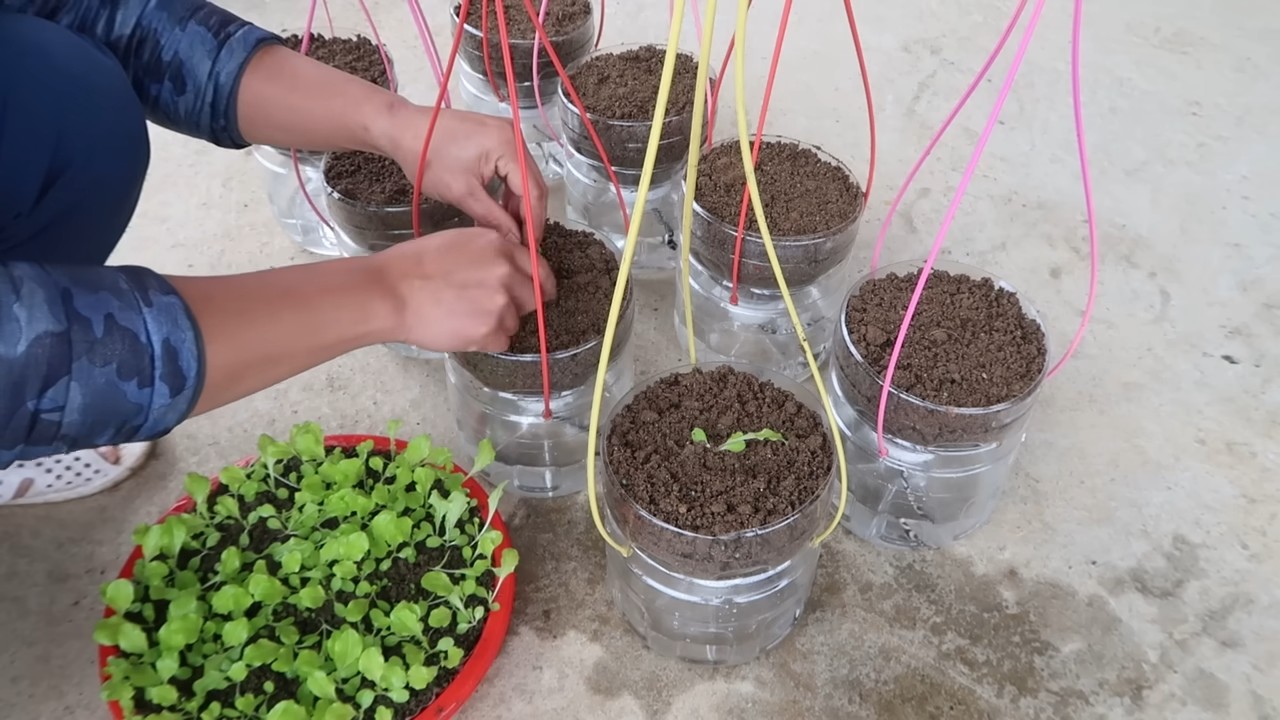
3. Erde einfüllen: Füllt die Flasche mit Pflanzerde. Achtet darauf, dass die Erde locker und luftig ist, damit die Salatwurzeln gut wachsen können. Lasst oben einen Rand von etwa 2-3 cm frei.
4. Salatsetzlinge pflanzen: Nun könnt ihr eure Salatsetzlinge einpflanzen. Nehmt die Setzlinge vorsichtig aus ihren Töpfen und lockert die Wurzeln etwas auf. Pflanzt die Setzlinge in die Erde und drückt sie leicht an. Achtet darauf, dass die Setzlinge genügend Platz haben, um zu wachsen. Ich pflanze
Hey Leute! Habt ihr auch genug davon, ständig Salat zu kaufen, der schon nach einem Tag im Kühlschrank schlapp macht? Ich auch! Deshalb habe ich mir eine super einfache und platzsparende Lösung überlegt: einen hängenden Salatgarten, der fast ohne Gießen auskommt. Klingt verrückt? Ist es aber nicht! Und das Beste: Ihr könnt das ganz einfach selbst bauen. Lasst uns loslegen!
Was ihr braucht:
* Eine große Plastikflasche (mindestens 5 Liter, je größer, desto besser)
* Ein scharfes Messer oder eine Schere
* Einen Bohrer oder einen Nagel und Hammer
* Pflanzerde (am besten Bio-Qualität)
* Salatsetzlinge (verschiedene Sorten für mehr Abwechslung!)
* Kokosfaser oder Torfmoos (zur Wasserspeicherung)
* Eine stabile Schnur oder Kette zum Aufhängen
* Optional: Sprühfarbe (um die Flasche zu verschönern)
* Optional: Kleine Steine oder Kies (für die Drainage)
Schritt-für-Schritt Anleitung:
1. Die Flasche vorbereiten
1. Reinigung ist das A und O: Zuerst müsst ihr die Plastikflasche gründlich reinigen. Entfernt alle Etiketten und spült sie mit warmem Wasser und Spülmittel aus. Achtet darauf, dass keine Rückstände mehr vorhanden sind.
2. Die Schneidearbeiten: Jetzt kommt der spannende Teil! Legt die Flasche horizontal vor euch. Mit dem Messer oder der Schere schneidet ihr ein großes Rechteck aus der Seite der Flasche. Dieses Rechteck wird später die Öffnung sein, durch die ihr den Salat pflanzt. Die Größe des Rechtecks hängt davon ab, wie viele Salatsetzlinge ihr pflanzen wollt. Ich empfehle, es nicht zu groß zu machen, damit die Flasche stabil bleibt. Lasst am besten einen Rand von etwa 5-7 cm an den Seiten und am Boden.
3. Drainagelöcher bohren: Damit das Wasser gut ablaufen kann und eure Salatwurzeln nicht faulen, bohrt ihr mit dem Bohrer oder dem Nagel und Hammer mehrere kleine Löcher in den Boden der Flasche. Achtet darauf, dass die Löcher nicht zu groß sind, damit die Erde nicht herausfällt. Ich mache immer so 5-6 Löcher.
4. Aufhängelöcher anbringen: Jetzt braucht ihr Löcher, um die Flasche aufzuhängen. Bohrt oder schlagt jeweils ein Loch links und rechts oben an der Flasche, nahe am Flaschenhals. Achtet darauf, dass die Löcher stabil genug sind, um das Gewicht der bepflanzten Flasche zu tragen. Verstärkt die Löcher eventuell mit kleinen Metallösen, wenn ihr auf Nummer sicher gehen wollt.
2. Die Flasche bepflanzen
1. Drainage vorbereiten (optional): Wenn ihr wollt, könnt ihr eine Schicht kleine Steine oder Kies auf den Boden der Flasche geben. Das verbessert die Drainage zusätzlich und verhindert Staunässe.
2. Wasserspeicher einbauen: Jetzt kommt der Trick, der das Gießen fast überflüssig macht! Verteilt eine Schicht Kokosfaser oder Torfmoos auf dem Boden der Flasche. Diese Materialien speichern Wasser und geben es langsam an die Erde ab. Das ist besonders praktisch, wenn ihr mal ein paar Tage nicht zu Hause seid.
3. Erde einfüllen: Füllt die Flasche mit Pflanzerde. Achtet darauf, dass die Erde locker und luftig ist, damit die Salatwurzeln gut wachsen können. Lasst oben einen Rand von etwa 2-3 cm frei.
4. Salatsetzlinge pflanzen: Nun könnt ihr eure Salatsetzlinge einpflanzen. Nehmt die Setzlinge vorsichtig aus ihren Töpfen und lockert die Wurzeln etwas auf. Pflanzt die Setzlinge in die Erde und drückt sie leicht an. Achtet darauf, dass die Setzlinge genügend Platz haben, um zu wachsen. Ich pflanze meistens 3-4 Setzlinge in eine Flasche.
5. Angießen: Gießt die Salatsetzlinge nach dem Pflanzen vorsichtig an. Achtet darauf, dass die Erde gut durchfeuchtet ist, aber nicht zu nass.
3. Den hängenden Salatgarten aufhängen
1. Schnur oder Kette befestigen: Fädelt die Schnur oder Kette durch die Aufhängelöcher an der Flasche. Achtet darauf, dass die Schnur oder Kette stabil genug ist, um das Gewicht der bepflanzten Flasche zu tragen. Knotet die Schnur oder Kette gut fest.
2. Den richtigen Platz finden: Sucht euch einen sonnigen Platz für euren hängenden Salatgarten. Der Salat braucht mindestens 6 Stunden Sonne am Tag, um gut zu wachsen. Achtet darauf, dass der Platz windgeschützt ist, damit die Flasche nicht hin und her schwingt.
3. Aufhängen und genießen: Hängt euren hängenden Salatgarten an einem Haken, einem Ast oder einer anderen stabilen Vorrichtung auf. Achtet darauf, dass die Flasche sicher hängt und nicht herunterfallen kann.
Pflegehinweise:
* Gießen: Da ihr Kokosfaser oder Torfmoos verwendet habt, müsst ihr euren Salatgarten nicht so oft gießen. Überprüft die Erde regelmäßig und gießt nur, wenn sie sich trocken anfühlt. Achtet darauf, dass das Wasser gut ablaufen kann.
* Düngen: Um das Wachstum eures Salats zu fördern, könnt ihr ihn regelmäßig düngen. Verwendet am besten einen organischen Flüssigdünger.
* Ernten: Ihr könnt euren Salat ernten, sobald die Blätter groß genug sind. Schneidet die äußeren Blätter ab und lasst die inneren Blätter weiterwachsen. So könnt ihr über einen längeren Zeitraum frischen Salat ernten.
* Schädlinge: Achtet auf Schädlinge wie Schnecken oder Blattläuse. Bei Bedarf könnt ihr biologische Schädlingsbekämpfungsmittel einsetzen.
Optional: Die Flasche verschönern
Wenn ihr wollt, könnt ihr die Plastikflasche vor dem Bepflanzen mit Sprühfarbe verschönern. Wählt eine Farbe, die euch gefällt und die gut zu eurem Garten passt. Achtet darauf, dass die Farbe ungiftig ist und keine schädlichen Stoffe enthält. Lasst die Farbe gut trocknen, bevor ihr die Flasche bepflanzt. Ihr könnt die Flasche auch mit Mustern oder Bildern bemalen. Eurer Kreativität sind keine Grenzen gesetzt!
Warum dieser DIY-Salatgarten so toll ist:
* Platzsparend: Perfekt für kleine Balkone oder Terrassen.
* Weniger Gießen: Dank der Wasserspeicherung durch Kokosfaser oder Torfmoos.
* Frischer Salat: Immer griffbereit und knackig.
* Nachhaltig: Wiederverwendung von Plastikflaschen.
* Individuell: Ihr könnt verschiedene Salatsorten anpflanzen und die Flasche nach euren Wünschen gestalten.
Ich hoffe, diese Anleitung hilft euch dabei, euren eigenen hängenden Salatgarten zu bauen. Es ist wirklich einfach und macht Spaß! Und das Beste: Ihr habt immer frischen Salat zur Hand. Viel Spaß beim Gärtnern!
Conclusion
So, there you have it! The hanging lettuce, no water grow method is more than just a gardening experiment; it’s a game-changer for anyone looking to enjoy fresh, homegrown lettuce with minimal effort and maximum sustainability. We’ve explored how this innovative approach bypasses the common pitfalls of traditional lettuce cultivation – soilborne diseases, pest infestations, and the constant need for watering. By suspending your lettuce roots in the air and providing them with a nutrient-rich mist, you’re creating an environment where they can thrive, producing crisp, flavorful leaves that are far superior to anything you’ll find at the grocery store.
But why is this DIY trick a must-try? Firstly, it’s incredibly space-efficient. Whether you have a sprawling backyard or a tiny balcony, the vertical nature of this method allows you to grow a substantial amount of lettuce in a small footprint. Secondly, it’s remarkably low-maintenance. Once your system is set up, the automated misting takes care of the watering, freeing you from the daily chore of tending to your plants. And thirdly, it’s incredibly rewarding. There’s nothing quite like harvesting your own lettuce, knowing that you’ve grown it yourself using a sustainable and innovative technique.
Looking for suggestions or variations? Consider experimenting with different types of lettuce. Romaine, butterhead, and loose-leaf varieties all thrive in hydroponic systems. You can also adjust the nutrient solution to optimize growth and flavor. Some gardeners add beneficial microbes to the solution to further enhance root health and nutrient uptake. Another variation is to incorporate a timer to control the misting frequency, tailoring it to the specific needs of your lettuce and the climate you live in. You can also add a small fan to provide gentle air circulation, which can help prevent fungal diseases. Think about adding companion plants like basil or chives nearby to naturally deter pests.
We strongly encourage you to give this DIY hanging lettuce, no water grow method a try. It’s a fun, educational, and ultimately delicious way to connect with your food and embrace sustainable gardening practices. Don’t be afraid to experiment and adapt the method to suit your own needs and preferences. The beauty of DIY is that it’s all about learning and creating something unique.
And most importantly, we want to hear about your experience! Share your photos, tips, and challenges in the comments below. Let’s build a community of hanging lettuce enthusiasts and learn from each other. Together, we can revolutionize the way we grow our food and create a more sustainable future. So, grab your supplies, get creative, and start growing your own delicious, homegrown lettuce today! You’ll be amazed at how easy and rewarding it is.
FAQ
What exactly is the “hanging lettuce, no water grow” method?
This method is a form of hydroponics, specifically aeroponics, where lettuce roots are suspended in the air and periodically misted with a nutrient-rich solution. This eliminates the need for soil and traditional watering, reducing the risk of soilborne diseases and pests. It’s a space-saving and efficient way to grow lettuce.
What materials do I need to get started?
You’ll need a container to hold the nutrient solution, a submersible pump, tubing, spray nozzles or misters, a timer (optional but recommended), net pots or similar containers to hold the lettuce seedlings, and a structure to hang the net pots from. You’ll also need a hydroponic nutrient solution specifically formulated for leafy greens. You can often find starter kits online that include most of these components.
What kind of nutrient solution should I use?
Use a hydroponic nutrient solution specifically formulated for leafy greens like lettuce. These solutions contain the essential macro and micronutrients that lettuce needs to thrive. Follow the instructions on the nutrient solution packaging for proper dilution and application rates. It’s crucial to use a balanced solution to avoid nutrient deficiencies or toxicities.
How often should I mist the lettuce roots?
The misting frequency depends on several factors, including the temperature, humidity, and the type of lettuce you’re growing. A good starting point is to mist the roots for a few seconds every 15-30 minutes. Monitor your lettuce closely and adjust the frequency as needed. If the roots appear dry, increase the frequency. If they appear overly wet, decrease it. Using a timer allows for precise control over the misting schedule.
What kind of lighting do I need?
Lettuce needs adequate light to grow properly. If you’re growing indoors, you’ll need to provide artificial lighting. LED grow lights are a good option because they are energy-efficient and provide the full spectrum of light that plants need. Aim for at least 12-14 hours of light per day. If you’re growing outdoors, choose a location that receives at least 6 hours of direct sunlight per day.
How do I prevent algae growth in the nutrient solution?
Algae growth can be a problem in hydroponic systems. To prevent it, keep the nutrient solution container covered and out of direct sunlight. You can also add a small amount of hydrogen peroxide to the solution to help control algae growth. Regularly clean the container and tubing to remove any algae buildup.
What are some common problems I might encounter?
Some common problems include nutrient deficiencies, pest infestations, and fungal diseases. Nutrient deficiencies can be identified by yellowing or browning leaves. Pest infestations can be treated with organic pesticides. Fungal diseases can be prevented by providing good air circulation and avoiding overwatering. Regularly inspect your lettuce for any signs of problems and address them promptly.
Can I grow other plants using this method?
While this method is particularly well-suited for lettuce, you can also grow other leafy greens like spinach, kale, and arugula. You can also experiment with herbs like basil, mint, and parsley. However, different plants have different nutrient requirements, so you may need to adjust the nutrient solution accordingly.
How do I harvest the lettuce?
You can harvest lettuce by cutting off the outer leaves as needed, allowing the plant to continue growing. This is known as “cut-and-come-again” harvesting. Alternatively, you can harvest the entire head of lettuce at once. Harvest when the lettuce is mature and the leaves are crisp and flavorful.
How do I deal with pests?
Pests can be a problem even in hydroponic systems. Regularly inspect your lettuce for any signs of pests, such as aphids, spider mites, or whiteflies. You can treat pest infestations with organic pesticides like neem oil or insecticidal soap. You can also introduce beneficial insects like ladybugs to help control pests. Keeping your growing area clean and free of debris can also help prevent pest infestations.
Leave a Comment