

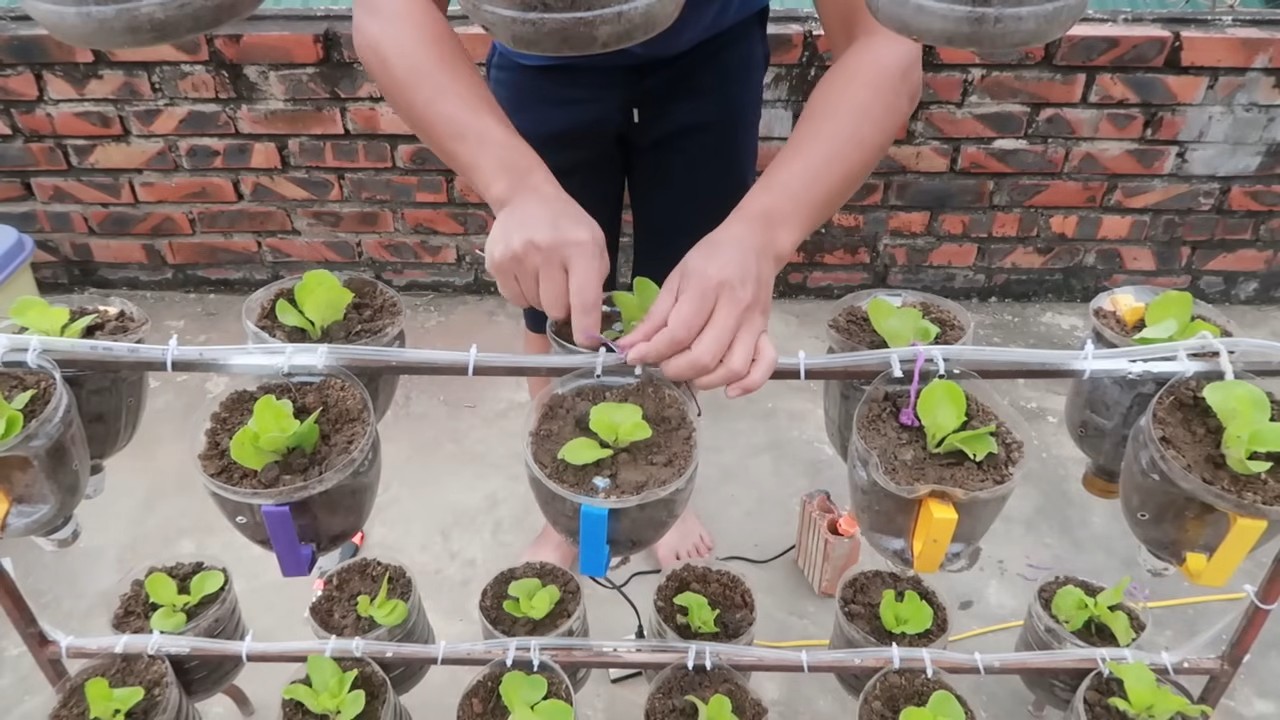
DIY lettuce drip system: sounds intimidating, right? Don’t worry, it’s much simpler than you think! Imagine plump, juicy lettuce heads thriving in your garden, all thanks to a clever, cost-effective watering solution you built yourself. Forget about inconsistent watering, wilting leaves, and wasted water – this DIY project is your ticket to lettuce-growing success.
For centuries, gardeners have sought innovative ways to optimize water usage. From ancient irrigation canals to modern sprinkler systems, the quest for efficient watering is a tale as old as agriculture itself. While we might not be building grand canals, this DIY lettuce drip system taps into that same spirit of ingenuity, bringing a time-tested principle to your backyard.
Why do you need this? Well, let’s be honest, hand-watering lettuce can be a real chore, and often leads to either overwatering (hello, root rot!) or underwatering (goodbye, crisp leaves!). Plus, in many regions, water conservation is more important than ever. This DIY drip system delivers water directly to the roots, minimizing waste and ensuring your lettuce gets exactly what it needs to flourish. I’m excited to share this easy-to-follow guide that will save you time, water, and frustration, all while rewarding you with a bountiful lettuce harvest. Let’s get started!

DIY Tropfbewässerungssystem für Salat: Gieß dir den Stress weg!
Hey Leute! Habt ihr auch genug davon, jeden Tag eure Salate zu gießen? Und dann noch das schlechte Gewissen, wenn man es mal vergisst? Keine Sorge, ich hab da was für euch! Ich zeige euch, wie ihr ganz einfach ein Tropfbewässerungssystem für eure Salate selber bauen könnt. Das ist nicht nur super praktisch, sondern spart auch Wasser und Zeit. Los geht’s!
Was du brauchst: Die Materialliste
Bevor wir loslegen, hier eine Liste mit allen Dingen, die du für dein DIY-Tropfbewässerungssystem brauchst. Keine Angst, das meiste davon hast du vielleicht schon zu Hause rumliegen!
* Ein Wasserbehälter: Ein alter Eimer, eine Regentonne oder sogar eine große Plastikflasche (mindestens 5 Liter) tun es. Je größer, desto seltener musst du nachfüllen.
* Tropfschläuche: Du bekommst sie im Baumarkt oder online. Achte darauf, dass sie für den Garten geeignet sind und die richtige Länge für dein Salatbeet haben. Ich empfehle, lieber etwas mehr zu kaufen, falls du dich verschätzt.
* Verbindungsstücke: Je nachdem, wie du dein System aufbauen möchtest, brauchst du T-Stücke, Winkel oder gerade Verbinder, um die Schläuche miteinander zu verbinden. Auch hier gilt: Lieber ein paar mehr als zu wenig!
* Endstopfen: Um die Enden der Tropfschläuche zu verschließen. So verhinderst du, dass das Wasser einfach rausläuft.
* Ein kleines Stück Gartenschlauch: Um den Tropfschlauch mit dem Wasserbehälter zu verbinden.
* Ein Bohrer: Mit einem kleinen Bohraufsatz, um Löcher in den Wasserbehälter und die Tropfschläuche zu bohren.
* Eine Schere oder ein Messer: Zum Zuschneiden der Schläuche.
* Kabelbinder oder Draht: Um die Schläuche zu befestigen und zu stabilisieren.
* Ein Sieb oder Filter: Um zu verhindern, dass Schmutzpartikel die Tropfer verstopfen.
* Optional: Eine Zeitschaltuhr: Für eine automatische Bewässerung. So musst du dich gar nicht mehr darum kümmern!
* Optional: Ein kleiner Wasserhahn: Um den Wasserfluss zu regulieren.
Schritt-für-Schritt-Anleitung: So baust du dein Tropfbewässerungssystem
Jetzt geht’s ans Eingemachte! Folge einfach diesen Schritten, und schon bald kannst du dich entspannt zurücklehnen, während deine Salate automatisch bewässert werden.
1. Den Wasserbehälter vorbereiten: Zuerst musst du ein Loch in den Wasserbehälter bohren, durch das der Gartenschlauch passt. Das Loch sollte sich möglichst weit unten am Behälter befinden, damit das Wasser auch wirklich komplett genutzt wird. Achte darauf, dass das Loch nicht zu groß ist, damit der Schlauch fest sitzt.
2. Den Gartenschlauch befestigen: Stecke den Gartenschlauch durch das Loch und dichte ihn gegebenenfalls mit etwas Silikon oder Klebeband ab, damit kein Wasser austritt.
3. Den Tropfschlauch zuschneiden: Schneide den Tropfschlauch in die passenden Längen für dein Salatbeet zu. Bedenke dabei, dass der Schlauch idealerweise entlang der Salatreihen verläuft.
4. Die Tropfer anbringen: Jetzt kommt der wichtigste Teil: die Tropfer! Du hast zwei Möglichkeiten: Entweder du kaufst Tropfschläuche mit bereits integrierten Tropfern (die sind etwas teurer, aber sehr praktisch) oder du bohrst selbst kleine Löcher in den Schlauch. Wenn du selbst bohrst, achte darauf, dass die Löcher nicht zu groß sind, sonst läuft das Wasser zu schnell raus. Ich empfehle, die Löcher in einem Abstand von etwa 15-20 cm zu bohren, je nachdem, wie dicht deine Salate stehen.
5. Die Schläuche verbinden: Verbinde die einzelnen Schlauchstücke mit den Verbindungsstücken (T-Stücke, Winkel, etc.) miteinander, um ein zusammenhängendes System zu schaffen. Achte darauf, dass alle Verbindungen fest sitzen, damit kein Wasser verloren geht.
6. Den Tropfschlauch mit dem Gartenschlauch verbinden: Verbinde das Ende des Tropfschlauchs mit dem Gartenschlauch, der aus dem Wasserbehälter kommt.
7. Die Enden verschließen: Verschließe die Enden der Tropfschläuche mit den Endstopfen.
8. Das System testen: Fülle den Wasserbehälter mit Wasser und öffne den Wasserhahn (falls vorhanden) oder den Gartenschlauch. Beobachte, ob das Wasser gleichmäßig aus den Tropfern austritt und ob es irgendwo undicht ist. Falls nötig, kannst du die Löcher mit etwas Klebeband verkleinern oder die Verbindungen fester ziehen.
9. Die Schläuche befestigen: Befestige die Schläuche mit Kabelbindern oder Draht am Boden oder an kleinen Heringen, damit sie nicht verrutschen oder beschädigt werden.
10. Optional: Zeitschaltuhr installieren: Wenn du eine Zeitschaltuhr verwendest, stelle sie so ein, dass sie das System regelmäßig für eine bestimmte Zeit einschaltet. Die Bewässerungsdauer hängt von der Größe deines Salatbeets, der Art des Bodens und dem Wetter ab. Am besten probierst du es am Anfang aus und passt die Einstellungen entsprechend an.
Zusätzliche Tipps und Tricks für dein Tropfbewässerungssystem
Hier noch ein paar zusätzliche Tipps, die dir helfen können, dein Tropfbewässerungssystem noch effektiver zu gestalten:
* Verwende einen Filter: Um zu verhindern, dass Schmutzpartikel die Tropfer verstopfen, solltest du einen Filter zwischen den Wasserbehälter und den Tropfschlauch einbauen. Es gibt spezielle Filter für Tropfbewässerungssysteme, aber du kannst auch einfach ein Stück Stoff oder ein feines Sieb verwenden.
* Reguliere den Wasserfluss: Mit einem kleinen Wasserhahn kannst du den Wasserfluss regulieren und an die Bedürfnisse deiner Salate anpassen. So kannst du zum Beispiel bei heißem Wetter mehr Wasser geben als bei kühlerem Wetter.
* Verwende Regenwasser: Um Wasser zu sparen, kannst du Regenwasser für dein Tropfbewässerungssystem verwenden. Sammle das Regenwasser in einer Regentonne und verbinde diese mit deinem System.
* Mulche dein Salatbeet: Eine Mulchschicht aus Stroh, Holzhackschnitzeln oder Grasschnitt hilft, die Feuchtigkeit im Boden zu halten und das Wachstum von Unkraut zu unterdrücken.
* Reinige die Tropfer regelmäßig: Um sicherzustellen, dass die Tropfer nicht verstopfen, solltest du sie regelmäßig reinigen. Du kannst sie einfach mit einer kleinen Bürste oder einem Zahnstocher säubern.
* Achte auf den pH-Wert des Wassers: Der pH-Wert des Wassers sollte idealerweise zwischen 6 und 7 liegen. Wenn der pH-Wert zu hoch oder zu niedrig ist, kann dies das Wachstum deiner Salate beeinträchtigen. Du kannst den pH-Wert mit einem Teststreifen überprüfen und gegebenenfalls mit Kalk oder Essig anpassen.
* Experimentiere mit verschiedenen Tropferabständen: Je nachdem, wie dicht deine Salate stehen und wie viel Wasser sie benötigen, kannst du mit verschiedenen Tropferabständen experimentieren, um die optimale Bewässerung zu erreichen.
* Beobachte deine Salate: Achte darauf, wie deine Salate auf die Bewässerung reagieren. Wenn sie welk aussehen, bekommen sie möglicherweise zu wenig Wasser. Wenn sie gelb werden, bekommen sie möglicherweise zu viel Wasser. Passe die Bewässerung entsprechend an.
* Winterfest machen: Im Winter solltest du das Tropfbewässerungssystem entleeren und abbauen, um Frostschäden zu vermeiden. Lagere die Schläuche und Verbindungsstücke an einem trockenen Ort.
Noch ein paar Worte zum Schluss
So, das war’s! Mit dieser Anleitung solltest du in der Lage sein, dein eigenes Tropfbewässerungssystem für deine Salate zu bauen. Es ist wirklich nicht schwer und spart dir eine Menge Zeit und Mühe. Und das Beste daran: Du tust auch noch etwas Gutes für die Umwelt, indem du Wasser sparst. Also, worauf wartest du noch? Ran an die Schläuche und los geht’s! Viel Spaß beim Basteln und eine reiche Ernte!
Conclusion
So, there you have it! Creating your own DIY lettuce drip system isn’t just a fun weekend project; it’s a game-changer for your garden and your lettuce harvest. We’ve walked you through the simple steps, highlighting how accessible and cost-effective this method truly is. But why is this DIY trick a must-try?
Firstly, it’s about efficiency. Forget the days of haphazard watering, where some lettuce plants get drenched while others remain parched. A drip system delivers water directly to the roots, minimizing water waste and ensuring each plant receives the hydration it needs to thrive. This targeted approach not only conserves water but also reduces the risk of fungal diseases that can plague lettuce when foliage stays wet for extended periods.
Secondly, it’s about control. You’re in charge of the watering schedule, tailoring it to your specific climate, soil type, and the needs of your lettuce varieties. This level of customization is simply unmatched by traditional watering methods. Plus, you can easily integrate a timer to automate the process, freeing up your time for other gardening tasks or simply enjoying the fruits (or rather, the leaves) of your labor.
Thirdly, it’s about the quality of your lettuce. Consistent and adequate watering leads to healthier, more robust plants. Expect to see larger, crisper leaves with a more vibrant color. You’ll also notice a significant reduction in bolting, the premature flowering that can make lettuce bitter and unpalatable. A well-irrigated lettuce plant is a happy lettuce plant, and a happy lettuce plant yields delicious results.
But don’t stop there! The beauty of this DIY project lies in its adaptability. Consider these variations to further customize your lettuce drip system:
* Vertical Lettuce Garden Drip System: Adapt the system for vertical planters by adjusting the spacing of the emitters. This is perfect for small spaces or balconies.
* Nutrient-Rich Drip System: Integrate a fertilizer injector into your system to deliver liquid fertilizer directly to the roots along with the water. This ensures your lettuce receives a consistent supply of nutrients for optimal growth.
* Solar-Powered Drip System: Connect your system to a solar-powered pump for an eco-friendly and energy-efficient watering solution.
We encourage you to embrace this DIY lettuce drip system and experience the difference it can make in your garden. It’s a simple, effective, and rewarding project that will transform the way you grow lettuce.
Now, we want to hear from you! Share your experiences, modifications, and successes with us. Did you try a different type of tubing? Did you find a creative way to recycle materials for your system? Let us know in the comments below! Your insights can help other gardeners discover the joys of DIY drip irrigation and grow the best lettuce they’ve ever tasted. So, get out there, get creative, and get growing!
Frequently Asked Questions (FAQ)
What type of tubing is best for a DIY lettuce drip system?
The best type of tubing for your DIY lettuce drip system depends on the size of your garden and the layout of your lettuce beds. For smaller gardens, ¼-inch tubing is often sufficient and easier to work with. For larger gardens, ½-inch tubing may be more appropriate as it can handle a higher water flow. Polyethylene tubing is a popular choice due to its durability and flexibility. Drip line tubing, which has emitters pre-installed at regular intervals, is also a convenient option, especially if your lettuce plants are spaced evenly. Consider the pressure rating of the tubing as well, ensuring it’s compatible with your water source.
How often should I water my lettuce with a drip system?
The frequency of watering depends on several factors, including the climate, soil type, and the age of your lettuce plants. As a general rule, lettuce needs consistent moisture to thrive. Check the soil moisture regularly by sticking your finger about an inch into the soil. If it feels dry, it’s time to water. In hot, dry weather, you may need to water daily, while in cooler, wetter weather, watering every other day or even less frequently may be sufficient. A good starting point is to water for about 15-30 minutes each time, adjusting the duration based on your observations. Using a timer can help automate this process and ensure consistent watering.
Can I use a well for my DIY lettuce drip system?
Yes, you can use a well as a water source for your DIY lettuce drip system, but there are a few important considerations. First, ensure that your well water is clean and free of debris that could clog the emitters in your drip system. Installing a filter is highly recommended. Second, check the water pressure from your well. Drip systems typically require a specific pressure range to function correctly. You may need to install a pressure regulator to reduce the pressure if it’s too high. Finally, consider the mineral content of your well water. High levels of certain minerals can build up in the soil over time and affect plant growth. A soil test can help you determine if any amendments are needed.
How do I prevent clogs in my DIY lettuce drip system?
Clogs are a common issue with drip systems, but they can be prevented with a few simple measures. First, always use a filter to remove sediment and debris from the water source. Clean the filter regularly according to the manufacturer’s instructions. Second, flush the system periodically by removing the end caps and allowing water to flow freely for a few minutes. This helps to dislodge any accumulated particles. Third, use high-quality emitters that are less prone to clogging. Finally, avoid using fertilizers or other additives that can solidify and block the emitters. If you do use fertilizers, ensure they are fully dissolved and compatible with drip irrigation systems.
What if my lettuce leaves are turning yellow even with the drip system?
Yellowing lettuce leaves can indicate several issues, even with a drip system in place. Overwatering is a common culprit, as it can lead to root rot. Ensure that your soil is well-draining and that you’re not watering too frequently. Nutrient deficiencies can also cause yellowing. Lettuce needs nitrogen, phosphorus, and potassium to thrive. A soil test can help you identify any deficiencies and determine the appropriate fertilizer to use. Pests, such as aphids or leaf miners, can also damage lettuce leaves and cause them to turn yellow. Inspect your plants regularly for signs of infestation and take appropriate action. Finally, extreme temperatures can stress lettuce plants and lead to yellowing. Provide shade during the hottest part of the day if necessary.
Can I use recycled materials to build my DIY lettuce drip system?
Absolutely! Using recycled materials is a great way to reduce waste and save money on your DIY lettuce drip system. Plastic bottles can be repurposed as water reservoirs or as makeshift emitters. Old garden hoses can be cut and used as tubing. Even discarded buckets can be used to collect rainwater for your system. Just be sure to thoroughly clean any recycled materials before using them to avoid introducing contaminants to your garden. Get creative and see what you can find around your home or community to repurpose for your drip system.
How do I winterize my DIY lettuce drip system?
Winterizing your DIY lettuce drip system is essential to prevent damage from freezing temperatures. Start by disconnecting the system from the water source and draining all the water from the tubing and emitters. This will prevent the water from freezing and expanding, which can crack the tubing and damage the emitters. Store the tubing and emitters in a dry, protected location, such as a garage or shed. If you have a backflow preventer, be sure to drain it as well. In areas with extremely cold winters, you may also want to insulate the water source connection to prevent freezing. Taking these steps will help ensure that your drip system is ready to go when spring arrives.
Leave a Comment