

Growing chili peppers at home can be incredibly rewarding, adding a fiery kick to your meals straight from your own backyard (or balcony!). Have you ever imagined plucking a vibrant red chili, still warm from the sun, and knowing you nurtured it from a tiny seed? This isn’t just a dream; it’s an achievable reality with a few simple tricks and DIY hacks!
Chili peppers have a rich history, dating back thousands of years in South America, where they were not only a food source but also held significant cultural and medicinal value. From ancient Aztec rituals to modern-day culinary masterpieces, chili peppers have always added a spark to human life. Today, they’re a global staple, and growing chili peppers at home allows you to connect with this history while enjoying fresh, flavorful ingredients.
But why bother with the effort? Well, store-bought chilies can sometimes lack the intense flavor and freshness of homegrown varieties. Plus, you have complete control over the growing process, ensuring they’re free from unwanted chemicals. More importantly, learning how to grow your own chilies is a fun and satisfying hobby. In this article, I’m going to share some easy-to-follow DIY tricks and hacks that will help you cultivate a thriving chili pepper garden, no matter your experience level. Get ready to spice up your life!
Chili-Anbau für Anfänger: So ziehst du scharfe Schoten selbst!
Hey Chili-Liebhaber! Du träumst von einer eigenen Chili-Ernte, die deine Gerichte mit ordentlich Feuer aufpeppt? Dann bist du hier genau richtig! Ich zeige dir, wie du ganz einfach zu Hause deine eigenen Chili-Pflanzen ziehen kannst, egal ob du einen Garten, einen Balkon oder nur ein sonniges Fensterbrett hast. Keine Angst, es ist einfacher als du denkst!
Was du für den Chili-Anbau brauchst:
* Chili-Samen: Die Auswahl ist riesig! Überlege dir, welche Schärfe du bevorzugst und welche Sorte dir optisch gefällt. Von milden Jalapeños bis zu feurigen Habaneros ist alles dabei. Achte auf qualitativ hochwertige Samen von einem vertrauenswürdigen Anbieter.
* Anzuchterde: Normale Blumenerde ist oft zu nährstoffreich für die empfindlichen Keimlinge. Anzuchterde ist lockerer und enthält weniger Nährstoffe, was das Wurzelwachstum fördert.
* Anzuchtgefäße: Kleine Töpfe, Anzuchtschalen oder Torfquelltöpfe sind ideal für die Voranzucht.
* Mini-Gewächshaus (optional): Ein Mini-Gewächshaus sorgt für ein feuchtwarmes Klima, das die Keimung beschleunigt. Du kannst aber auch einfach Frischhaltefolie über die Anzuchtgefäße spannen.
* Pikierstab oder Löffel: Zum vorsichtigen Vereinzeln der Keimlinge.
* Töpfe oder Kübel: Für die spätere Bepflanzung der Chili-Pflanzen. Die Größe hängt von der Chilisorte ab.
* Blumenerde: Gute Blumenerde mit ausreichend Nährstoffen für das Wachstum der Pflanzen.
* Dünger: Flüssigdünger oder Langzeitdünger für Chili-Pflanzen.
* Gießkanne oder Sprühflasche: Zum Bewässern der Pflanzen.
* Sonnenlicht: Chili-Pflanzen lieben die Sonne! Ein heller Standort ist entscheidend für eine reiche Ernte.
* Geduld: Chili-Pflanzen brauchen Zeit, um zu wachsen und Früchte zu tragen.
Phase 1: Die Aussaat – Der Start ins Chili-Abenteuer
Die Aussaat ist der erste Schritt zu deiner eigenen Chili-Ernte. Ich empfehle, mit der Aussaat im Februar oder März zu beginnen, damit die Pflanzen genügend Zeit haben, bis zum Sommer groß und stark zu werden.
1. Vorbereitung der Anzuchtgefäße: Fülle die Anzuchtgefäße mit Anzuchterde. Drücke die Erde leicht an und befeuchte sie mit einer Sprühflasche. Die Erde sollte feucht, aber nicht nass sein.
2. Aussaat der Samen: Lege pro Anzuchtgefäß ein bis zwei Chili-Samen auf die Erde. Bedecke die Samen mit einer dünnen Schicht Anzuchterde (ca. 0,5 cm).
3. Befeuchten und Abdecken: Befeuchte die Erde erneut mit der Sprühflasche. Decke die Anzuchtgefäße mit einem Mini-Gewächshaus oder Frischhaltefolie ab, um ein feuchtwarmes Klima zu schaffen.
4. Der richtige Standort: Stelle die Anzuchtgefäße an einen warmen und hellen Ort. Eine Temperatur von 22-28°C ist ideal für die Keimung. Vermeide direkte Sonneneinstrahlung, da die Erde sonst zu schnell austrocknen kann.
5. Geduld ist gefragt: Die Keimung kann je nach Chilisorte und Temperatur 1-3 Wochen dauern. Halte die Erde feucht, aber vermeide Staunässe. Lüfte das Mini-Gewächshaus oder die Frischhaltefolie regelmäßig, um Schimmelbildung zu verhindern.
Phase 2: Pikieren – Den Keimlingen mehr Raum geben
Sobald die Keimlinge ihre ersten richtigen Blätter (nach den Keimblättern) entwickelt haben, ist es Zeit zum Pikieren. Das bedeutet, dass du die kleinen Pflänzchen in größere Töpfe umpflanzt, damit sie mehr Platz zum Wachsen haben.
1. Vorbereitung der Töpfe: Fülle kleine Töpfe (ca. 8-10 cm Durchmesser) mit Blumenerde.
2. Keimlinge vorsichtig ausheben: Befeuchte die Erde in den Anzuchtgefäßen leicht. Löse die Keimlinge vorsichtig mit einem Pikierstab oder Löffel aus der Erde. Achte darauf, die Wurzeln nicht zu beschädigen.
3. Einpflanzen in die Töpfe: Setze jeden Keimling in einen separaten Topf. Die Wurzeln sollten ausreichend Platz haben. Fülle die Töpfe mit Erde auf und drücke sie leicht an.
4. Angießen: Gieße die Keimlinge vorsichtig an.
5. Der richtige Standort: Stelle die pikierten Keimlinge an einen hellen, aber nicht vollsonnigen Ort.
Phase 3: Die Aufzucht – Chili-Pflanzen großziehen
Nach dem Pikieren beginnt die eigentliche Aufzucht der Chili-Pflanzen. Jetzt ist es wichtig, ihnen die richtigen Bedingungen zu bieten, damit sie kräftig wachsen und viele Früchte tragen.
1. Gießen: Gieße die Chili-Pflanzen regelmäßig, aber vermeide Staunässe. Die Erde sollte immer leicht feucht sein. Achte darauf, dass das Wasser gut abfließen kann.
2. Düngen: Beginne ca. 2-3 Wochen nach dem Pikieren mit dem Düngen. Verwende einen Flüssigdünger oder Langzeitdünger für Chili-Pflanzen. Beachte die Dosierungsanleitung des Herstellers.
3. Licht: Chili-Pflanzen brauchen viel Licht. Stelle sie an einen möglichst sonnigen Standort. Wenn du sie im Haus aufziehst, kann eine Pflanzenlampe sinnvoll sein.
4. Temperatur: Die ideale Temperatur für Chili-Pflanzen liegt zwischen 20-25°C. Vermeide extreme Temperaturschwankungen.
5. Regelmäßiges Drehen: Drehe die Töpfe regelmäßig, damit die Pflanzen gleichmäßig wachsen und sich nicht zum Licht hin neigen.
6. Ausgeizen (optional): Bei einigen Chilisorten kann es sinnvoll sein, die Seitentriebe (Geiztriebe) auszugeizen, um die Bildung von Früchten zu fördern. Informiere dich, ob das für deine Chilisorte empfehlenswert ist.
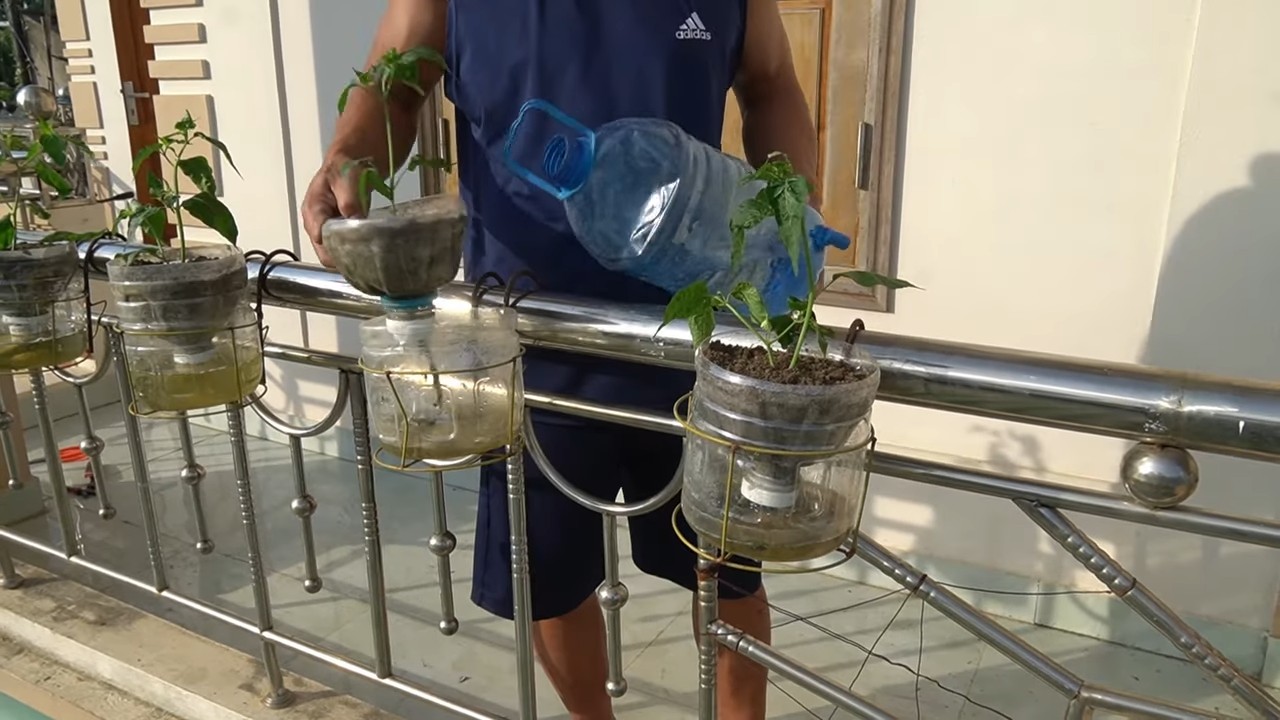
Phase 4: Auspflanzen – Ab ins Freie oder in den Kübel
Sobald die Temperaturen steigen und keine Frostgefahr mehr besteht (meist ab Mitte Mai), kannst du die Chili-Pflanzen ins Freie auspflanzen oder in größere Kübel umtopfen.
1. Abhärten: Bevor du die Chili-Pflanzen ins Freie pflanzt, solltest du sie langsam an die neuen Bedingungen gewöhnen. Stelle sie tagsüber für einige Stunden nach draußen und hole sie abends wieder rein. Steigere die Zeit im Freien jeden Tag, bis sie sich vollständig akklimatisiert haben.
2. Der richtige Standort: Wähle einen sonnigen und windgeschützten Standort für deine Chili-Pflanzen.
3. Auspflanzen ins Beet: Grabe ein Loch, das etwas größer ist als der Wurzelballen der Chili-Pflanze. Setze die Pflanze in das Loch und fülle es mit Erde auf. Drücke die Erde leicht an und gieße die Pflanze gut an.
4. Umtopfen in Kübel: Wähle einen Kübel, der ausreichend groß für die Chilisorte ist. Fülle den Kübel mit Blumenerde. Hebe die Chili-Pflanze vorsichtig aus dem Topf und setze sie in den Kübel. Fülle den Kübel mit Erde auf und drücke sie leicht an. Gieße die Pflanze gut an.
5. Stützen (optional): Einige Chilisorten, insbesondere solche mit vielen Früchten, benötigen eine Stütze, um nicht umzuknicken. Verwende einen Stab oder ein Rankgitter, um die Pflanze zu stützen.
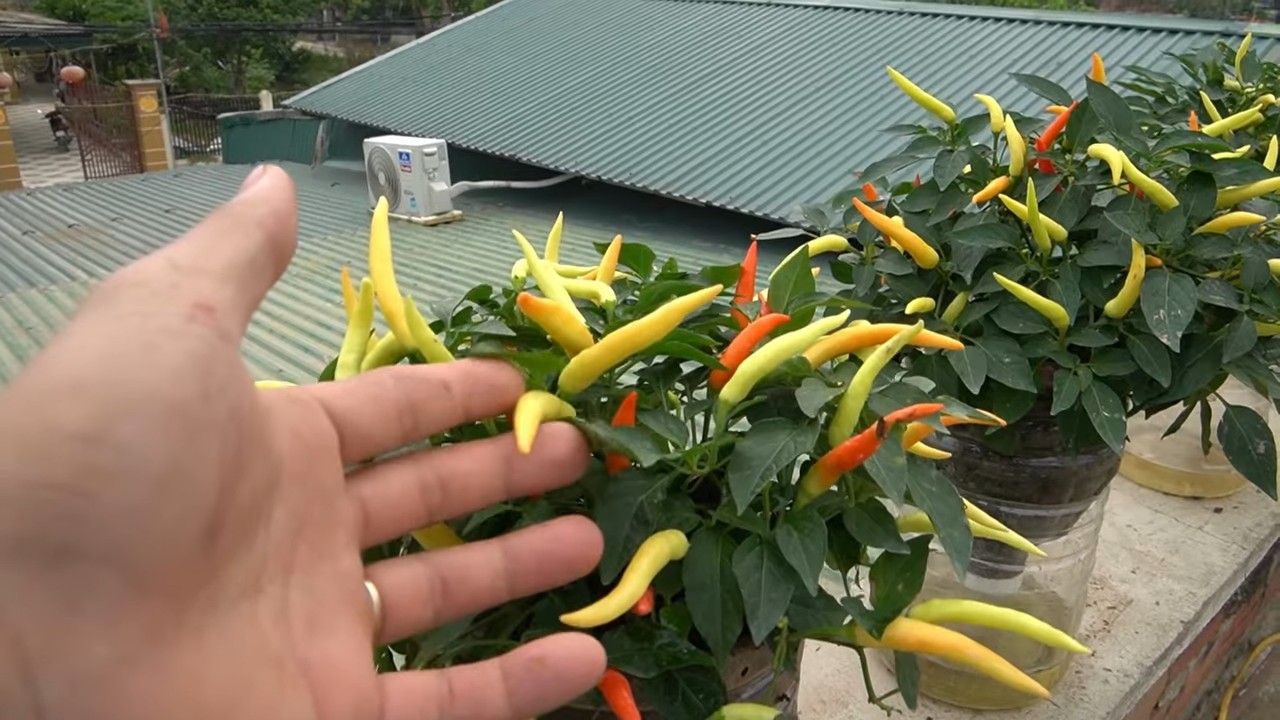
Phase 5: Erntezeit – Die Früchte deiner Arbeit genießen
Je nach Chilisorte und Standort kannst du ab Juli oder August mit der Ernte beginnen. Die Reifezeit kann variieren.
1. Reife erkennen: Die Farbe der Chilis ändert sich, wenn sie re
Conclusion
So, there you have it! Mastering the art of growing chili peppers at home is not only achievable but also incredibly rewarding. We’ve explored the essential steps, from selecting the right seeds and preparing the perfect soil to nurturing your plants and harvesting your fiery bounty. But why is this DIY endeavor a must-try?
Firstly, growing your own chili peppers guarantees unparalleled freshness and flavor. Store-bought peppers simply can’t compare to the vibrant taste and intense heat of a chili pepper plucked straight from your own garden. Imagine the satisfaction of adding a pinch of your homegrown habanero to your favorite salsa or spicing up a stir-fry with a freshly picked jalapeño. The difference is truly remarkable.
Secondly, you have complete control over the growing process. You can choose organic methods, avoiding harmful pesticides and herbicides, ensuring that your chili peppers are not only delicious but also healthy and safe for your family. This is especially important if you plan to use your peppers frequently in your cooking.
Thirdly, growing chili peppers at home is a surprisingly cost-effective way to enjoy these flavorful ingredients. While the initial investment in seeds, soil, and pots may seem daunting, the long-term savings are significant. You’ll no longer need to rely on expensive store-bought peppers, and you’ll have a constant supply of fresh chilies at your fingertips.
But the benefits don’t stop there. Growing chili peppers can also be a therapeutic and enjoyable hobby. Tending to your plants, watching them grow, and harvesting your own peppers can be incredibly satisfying and rewarding. It’s a great way to connect with nature, relieve stress, and learn new skills.
Ready to take your chili pepper growing to the next level? Consider experimenting with different varieties. From the mild poblano to the scorching ghost pepper, there’s a chili pepper out there for every palate. You can also try different growing methods, such as hydroponics or container gardening, to see what works best for you.
Another variation to consider is companion planting. Basil, for example, is known to repel pests and improve the flavor of chili peppers. Marigolds are also a great choice for deterring nematodes.
Don’t be afraid to experiment with different fertilizers and soil amendments. A well-balanced fertilizer can help your plants produce more peppers, while adding compost or other organic matter can improve soil drainage and aeration.
Finally, remember to protect your plants from pests and diseases. Regularly inspect your plants for signs of infestation or disease, and take action promptly to prevent problems from spreading.
We encourage you to embark on this exciting journey of growing chili peppers at home. It’s a rewarding experience that will not only enhance your culinary creations but also bring joy and satisfaction to your life.
So, grab your seeds, prepare your soil, and get ready to experience the thrill of growing your own chili peppers. And don’t forget to share your experiences with us! We’d love to hear about your successes, challenges, and favorite chili pepper varieties. Share your photos and stories on our social media channels using #HomegrownChiliPeppers. Let’s create a community of chili pepper enthusiasts and inspire others to discover the joys of growing their own food. Happy growing!
Frequently Asked Questions (FAQ)
What is the best time of year to start growing chili peppers?
The best time to start growing chili peppers depends on your climate. In general, chili peppers need warm temperatures to thrive, so it’s best to start them indoors 6-8 weeks before the last expected frost. This allows the seedlings to develop a strong root system before being transplanted outdoors. If you live in a warmer climate with a longer growing season, you can start your seeds directly outdoors after the last frost. However, starting indoors is generally recommended for better control over the growing environment and to give your plants a head start. Consider using a heat mat and grow lights to provide optimal conditions for germination and early growth.
What kind of soil is best for growing chili peppers?
Chili peppers prefer well-draining, fertile soil with a slightly acidic pH (around 6.0-6.8). A good potting mix for chili peppers should contain a blend of peat moss, perlite, and vermiculite. You can also amend your soil with compost or other organic matter to improve drainage and fertility. Avoid using heavy clay soils, as they can retain too much water and lead to root rot. When transplanting your seedlings outdoors, make sure to choose a location with well-drained soil and plenty of sunlight. Consider raised beds or containers if your soil is not ideal.
How much sunlight do chili peppers need?
Chili peppers need at least 6-8 hours of direct sunlight per day to thrive. Choose a location in your garden that receives plenty of sunlight throughout the day. If you’re growing your chili peppers indoors, you’ll need to supplement with grow lights. Position the grow lights close to the plants and adjust the height as they grow. Insufficient sunlight can lead to leggy growth, reduced flowering, and smaller peppers.
How often should I water my chili peppers?
Water your chili peppers regularly, especially during hot, dry weather. The soil should be kept consistently moist but not waterlogged. Water deeply when the top inch of soil feels dry to the touch. Avoid overwatering, as this can lead to root rot. Use a watering can or hose to water the base of the plants, avoiding wetting the foliage. Mulching around the plants can help retain moisture and suppress weeds.
What kind of fertilizer should I use for chili peppers?
Chili peppers benefit from regular fertilization, especially during the flowering and fruiting stages. Use a balanced fertilizer with equal amounts of nitrogen, phosphorus, and potassium (e.g., 10-10-10). You can also use a fertilizer specifically formulated for tomatoes or peppers. Follow the instructions on the fertilizer label and avoid over-fertilizing, as this can burn the plants. Consider using organic fertilizers, such as compost tea or fish emulsion, for a more sustainable approach.
How do I protect my chili peppers from pests and diseases?
Chili peppers can be susceptible to various pests and diseases, including aphids, spider mites, whiteflies, and fungal infections. Regularly inspect your plants for signs of infestation or disease. Use insecticidal soap or neem oil to control pests. Ensure good air circulation around the plants to prevent fungal diseases. Remove any infected leaves or plants promptly. Consider using companion planting to deter pests. Marigolds, for example, are known to repel nematodes.
When should I harvest my chili peppers?
The timing of harvest depends on the variety of chili pepper and your personal preference. In general, chili peppers are ready to harvest when they have reached their mature size and color. The color will vary depending on the variety, ranging from green to red, yellow, or orange. You can also harvest chili peppers when they are still green if you prefer a milder flavor. Use pruning shears or scissors to cut the peppers from the plant, leaving a small stem attached.
How do I store my chili peppers?
Fresh chili peppers can be stored in the refrigerator for up to a week. You can also dry, freeze, or pickle your chili peppers for longer storage. To dry chili peppers, string them together and hang them in a well-ventilated area until they are completely dry. To freeze chili peppers, wash and dry them thoroughly, then place them in a freezer bag. To pickle chili peppers, follow a recipe for pickled peppers.
Can I grow chili peppers in containers?
Yes, chili peppers can be grown successfully in containers. Choose a container that is at least 12 inches in diameter and has drainage holes. Use a well-draining potting mix and water regularly. Container-grown chili peppers may need to be fertilized more frequently than those grown in the ground. Place the container in a sunny location that receives at least 6-8 hours of direct sunlight per day.
What are some common mistakes to avoid when growing chili peppers?
Some common mistakes to avoid when growing chili peppers include:
* Overwatering or underwatering
* Insufficient sunlight
* Poor soil drainage
* Over-fertilizing
* Ignoring pests and diseases
* Harvesting too early or too late
* Not providing adequate support for tall or heavy plants
By avoiding these mistakes, you can increase your chances of success and enjoy a bountiful harvest of delicious chili peppers.


Leave a Comment