

Growing Sweet Potatoes in Containers might sound like a challenge, but trust me, it’s a surprisingly rewarding and space-saving way to enjoy this delicious and nutritious root vegetable! Have you ever dreamt of harvesting your own sweet potatoes right from your patio or balcony? Well, dream no more! This DIY guide will unlock the secrets to successfully cultivating these vibrant tubers, even if you’re short on garden space.
Sweet potatoes have a rich history, dating back thousands of years in Central and South America. They’ve been a staple food source for many cultures, prized not only for their taste but also for their nutritional value. Today, they’re enjoyed worldwide in countless dishes, from savory stews to sweet pies. But why rely solely on grocery stores when you can experience the joy of growing your own?
In today’s world, where access to fresh, healthy produce can sometimes be limited or expensive, learning how to grow your own food is more important than ever. Growing Sweet Potatoes in Containers offers a fantastic solution for urban dwellers, apartment residents, or anyone with limited garden space. Plus, it’s a fun and educational activity for the whole family! Imagine the satisfaction of digging into the soil and unearthing your very own homegrown sweet potatoes. This guide will provide you with all the essential tips and tricks to make your container gardening adventure a sweet success!
Süßkartoffeln im Topf anbauen: Dein DIY-Guide für eine reiche Ernte
Hey Gartenfreunde! Habt ihr Lust auf eine süße Herausforderung? Süßkartoffeln sind nicht nur super lecker und gesund, sondern lassen sich auch prima im Topf anbauen. Ich zeige euch, wie ihr mit ein paar einfachen Schritten eure eigenen Süßkartoffeln auf dem Balkon oder der Terrasse ernten könnt. Los geht’s!
Was du brauchst: Die Materialliste
Bevor wir loslegen, hier eine Liste mit allem, was du für dein Süßkartoffel-Projekt benötigst:
* Süßkartoffeln: Am besten Bio-Süßkartoffeln, da diese seltener mit Keimhemmern behandelt wurden.
* Große Töpfe oder Container: Mindestens 30 Liter Volumen pro Pflanze, besser noch größer.
* Hochwertige Blumenerde: Gut durchlässig und nährstoffreich.
* Kompost: Für eine extra Portion Nährstoffe.
* Sand oder Perlit: Um die Drainage zu verbessern.
* Wasser: Zum Gießen, natürlich!
* Messer oder Zahnstocher: Für die Vermehrung.
* Optional: Flüssigdünger für Gemüse.
Phase 1: Süßkartoffel-Setzlinge ziehen (Slips)
Die Vermehrung von Süßkartoffeln ist etwas anders als bei anderen Gemüsesorten. Wir ziehen keine Samen, sondern sogenannte “Slips” – das sind die Triebe, die aus der Süßkartoffel wachsen.
1. Die Süßkartoffel vorbereiten:
* Wähle eine gesunde Süßkartoffel aus.
* Reinige sie vorsichtig mit Wasser, um Schmutz zu entfernen.
* Schneide die Süßkartoffel entweder in der Mitte durch oder lasse sie ganz. Das hängt von der Größe deines Gefäßes ab. Eine halbierte Süßkartoffel produziert tendenziell weniger, aber dafür kräftigere Slips.
2. Die Zahnstocher-Methode:
* Stecke 3-4 Zahnstocher etwa in der Mitte der Süßkartoffel rundherum ein. Sie dienen als Stütze.
* Fülle ein Glas oder eine Schale mit Wasser.
* Platziere die Süßkartoffel so auf dem Glas, dass die untere Hälfte im Wasser hängt. Die obere Hälfte sollte trocken bleiben.
3. Die Erde-Methode (Alternative):
* Fülle einen Topf mit feuchter Blumenerde.
* Lege die Süßkartoffel horizontal auf die Erde und bedecke sie mit einer dünnen Schicht Erde.
* Gieße die Erde leicht an.
4. Der Standort:
* Stelle das Glas oder den Topf an einen warmen, hellen Ort, aber nicht in die pralle Sonne. Ein Fensterbrett ist ideal.
5. Geduld ist gefragt:
* Wechsle das Wasser im Glas alle paar Tage, um Algenbildung zu vermeiden.
* Halte die Erde im Topf feucht, aber nicht nass.
* Nach einigen Wochen (ca. 3-6) sollten sich an der Süßkartoffel Triebe (Slips) bilden.
6. Die Slips ernten:
* Sobald die Slips etwa 15-20 cm lang sind und mehrere Blätter haben, kannst du sie vorsichtig von der Süßkartoffel abbrechen oder abschneiden.
* Entferne die unteren Blätter, damit die Slips besser Wurzeln bilden können.
7. Die Slips bewurzeln:
* Stelle die Slips in ein Glas mit Wasser.
* Nach einigen Tagen sollten sich Wurzeln bilden.
* Sobald die Wurzeln etwa 2-3 cm lang sind, sind die Slips bereit zum Einpflanzen.
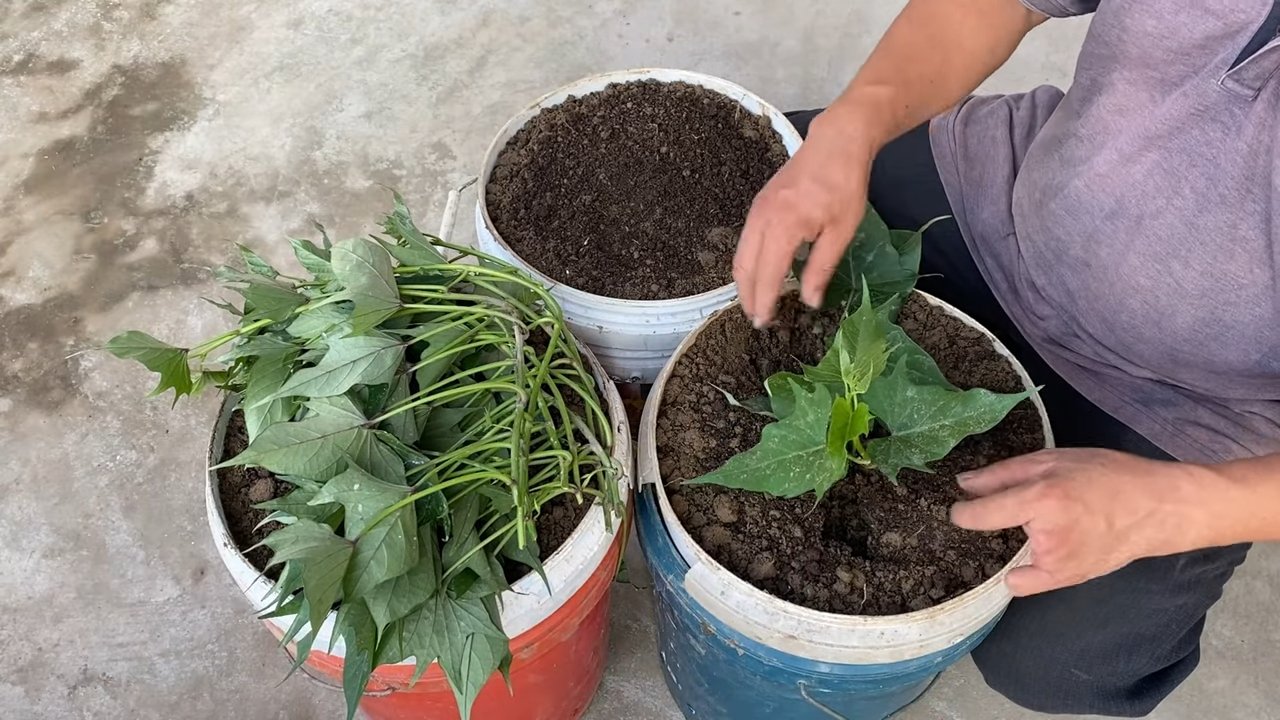
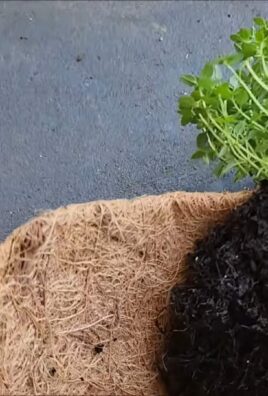
Phase 2: Die Süßkartoffeln einpflanzen
Jetzt, wo wir unsere bewurzelten Slips haben, können wir sie endlich in die Töpfe pflanzen.
1. Die Töpfe vorbereiten:
* Wähle große Töpfe oder Container mit ausreichend Drainage-Löchern.
* Fülle die Töpfe mit einer Mischung aus Blumenerde, Kompost und Sand oder Perlit. Das Verhältnis sollte etwa 2:1:1 sein.
* Lasse oben etwa 5-10 cm Platz.
2. Die Slips einpflanzen:
* Grabe kleine Löcher in die Erde, die groß genug sind, um die Wurzeln der Slips aufzunehmen.
* Setze die Slips vorsichtig in die Löcher und bedecke die Wurzeln mit Erde.
* Drücke die Erde leicht an.
* Pflanze mehrere Slips pro Topf, je nach Größe des Topfes. Achte darauf, dass genügend Platz zwischen den Pflanzen ist.
3. Angießen:
* Gieße die frisch gepflanzten Slips gründlich an.
Phase 3: Pflege und Wachstum
Jetzt beginnt die eigentliche Arbeit: Die Pflege deiner Süßkartoffeln.
1. Der Standort:
* Süßkartoffeln lieben die Sonne! Stelle die Töpfe an einen sonnigen Standort mit mindestens 6-8 Stunden direkter Sonneneinstrahlung pro Tag.
2. Gießen:
* Gieße die Süßkartoffeln regelmäßig, besonders während trockener Perioden. Die Erde sollte immer leicht feucht sein, aber nicht nass. Vermeide Staunässe, da dies zu Wurzelfäule führen kann.
3. Düngen:
* Süßkartoffeln sind Starkzehrer. Dünge sie regelmäßig mit einem Flüssigdünger für Gemüse. Beginne etwa 2-3 Wochen nach dem Einpflanzen.
* Befolge die Anweisungen auf der Düngerpackung.
4. Rankhilfe (Optional):
* Süßkartoffeln bilden lange Ranken. Du kannst ihnen eine Rankhilfe anbieten, damit sie nicht am Boden liegen. Das ist aber nicht unbedingt notwendig.
5. Unkraut entfernen:
* Entferne regelmäßig Unkraut aus den Töpfen, um die Nährstoffkonkurrenz zu reduzieren.
6. Schädlinge und Krankheiten:
* Süßkartoffeln sind relativ robust, aber achte trotzdem auf Schädlinge wie Blattläuse oder Schnecken.
* Bei Bedarf kannst du biologische Schädlingsbekämpfungsmittel einsetzen.
* Achte auf Anzeichen von Krankheiten wie Wurzelfäule. Vermeide Staunässe, um dies zu verhindern.
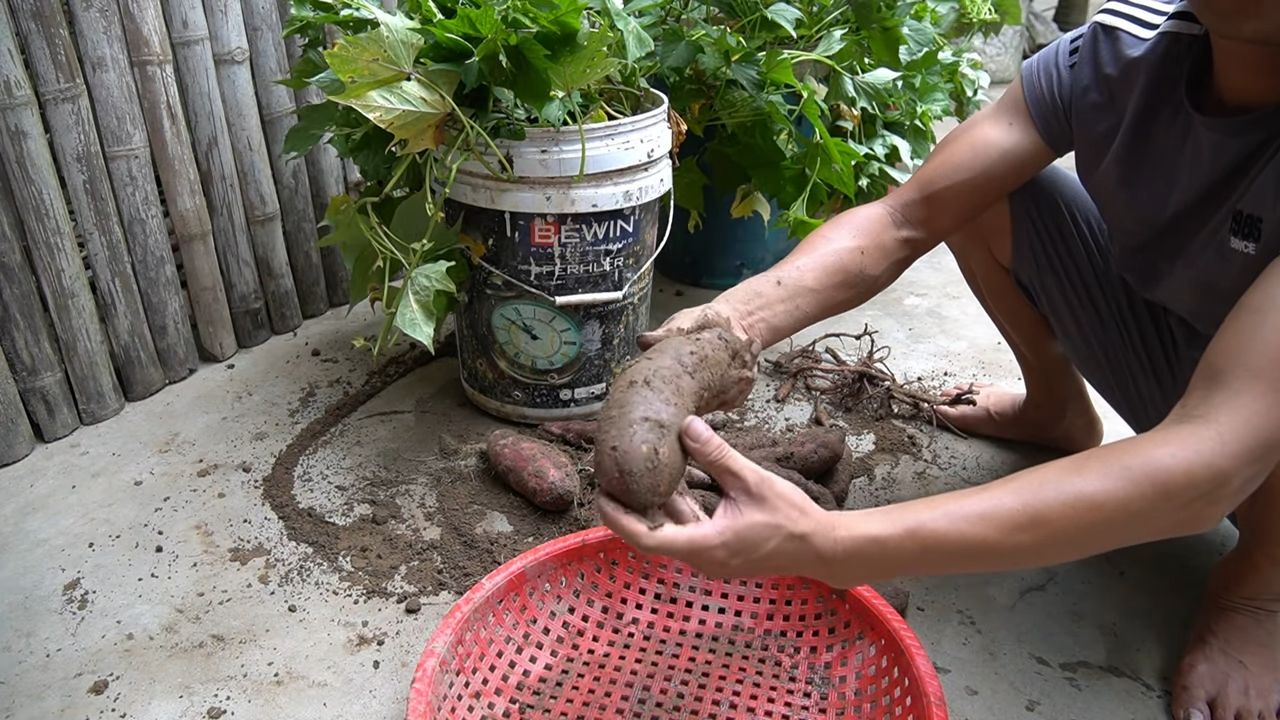
Phase 4: Die Ernte
Die Ernte ist der aufregendste Teil!
1. Der Zeitpunkt:
* Süßkartoffeln sind erntereif, wenn die Blätter gelb werden und absterben. Das ist in der Regel etwa 3-4 Monate nach dem Einpflanzen der Fall.
* Du kannst auch vorsichtig in die Erde graben und eine Süßkartoffel probeweise ernten.
2. Die Ernte:
* Gieße die Erde vor der Ernte leicht an, um sie aufzulockern.
* Kippe den Topf vorsichtig aus und suche nach den Süßkartoffeln.
* Grabe die Süßkartoffeln vorsichtig aus, um sie nicht zu beschädigen.
3. Die Lagerung:
* Lasse die Süßkartoffeln nach der Ernte einige Tage an einem warmen, trockenen Ort trocknen. Dadurch härtet die Schale aus und sie sind länger haltbar.
* Lagere die Süßkartoffeln anschließend an einem kühlen, dunklen und trockenen Ort.
* Sie sollten sich so mehrere Monate halten.
Zusätzliche Tipps und Tricks
* Sortenwahl: Es gibt viele verschiedene Süßkartoffelsorten. Wähle eine Sorte, die für den Anbau im Topf geeignet ist. Informiere dich im Fachhandel oder online.
* Mulchen: Eine Mulchschicht aus Stroh oder Grasschnitt hilft, die Feuchtigkeit im Boden zu halten und Unkraut zu unterdrücken.
* Regelmäßiges Drehen: Drehe die Töpfe regelmäßig, damit die Pflanzen gleichmäßig mit Sonnenlicht versorgt werden.
* Beobachtung: Beobachte deine Pflanzen regelmäßig auf
Conclusion
So, there you have it! Growing sweet potatoes in containers is not only achievable, but it’s also a remarkably rewarding experience. We’ve walked through the entire process, from selecting the right container and soil to nurturing your slips and harvesting your homegrown treasures. But why should you take the plunge and try this DIY trick?
First and foremost, container gardening opens up the possibility of growing sweet potatoes to those who may not have access to a traditional garden plot. Whether you live in an apartment with a balcony, a house with a small patio, or simply want to keep your sweet potato crop contained and manageable, this method provides a fantastic solution.
Beyond accessibility, growing sweet potatoes in containers offers a level of control that’s hard to achieve in the ground. You can easily monitor and adjust the soil conditions, ensuring optimal drainage and nutrient levels. This is particularly beneficial for sweet potatoes, which thrive in well-drained soil and can be susceptible to rot in overly wet conditions. Plus, you have the flexibility to move your containers to the sunniest spot as the seasons change, maximizing sunlight exposure for healthy growth and abundant yields.
But the benefits don’t stop there. Growing your own sweet potatoes allows you to enjoy the unparalleled flavor and freshness of homegrown produce. Forget the bland, mass-produced sweet potatoes from the grocery store. When you harvest your own, you’ll be rewarded with sweet, earthy, and incredibly flavorful tubers that are bursting with nutrients.
And let’s not forget the sheer joy and satisfaction of nurturing a plant from slip to harvest. Watching your sweet potato vines grow and flourish, knowing that you’re providing them with everything they need to thrive, is an incredibly fulfilling experience. It’s a connection to nature that can be deeply grounding and rewarding.
Ready to take your sweet potato game to the next level? Consider experimenting with different varieties of sweet potatoes. Beauregard is a classic choice, known for its orange flesh and sweet flavor, but there are many other options to explore. Try growing Japanese sweet potatoes with their purple skin and creamy white flesh, or go for a more exotic variety like Okinawan sweet potatoes with their vibrant purple flesh and slightly nutty flavor.
You can also experiment with different container sizes and materials. While a 20-gallon container is a good starting point, you may find that larger containers allow for even greater yields. Consider using fabric pots, which promote air pruning and prevent root circling, or try upcycling old buckets or tubs into creative and sustainable planters.
Don’t be afraid to get creative with your soil mix as well. While a well-draining potting mix is essential, you can amend it with compost, aged manure, or other organic materials to boost nutrient levels and improve soil structure.
Most importantly, don’t be discouraged if your first attempt isn’t perfect. Gardening is a learning process, and every season brings new challenges and opportunities. Embrace the journey, learn from your mistakes, and celebrate your successes.
We’re confident that you’ll find growing sweet potatoes in containers to be a rewarding and enjoyable experience. So, grab your containers, gather your slips, and get ready to embark on a sweet potato adventure!
We’d love to hear about your experiences! Share your photos, tips, and tricks in the comments below. Let’s create a community of container sweet potato growers and learn from each other. Happy gardening!
Frequently Asked Questions (FAQ)
What is the best time to start growing sweet potatoes in containers?
The ideal time to start growing sweet potatoes is after the last frost, when the soil has warmed up to at least 65°F (18°C). Sweet potatoes are heat-loving plants and need warm temperatures to thrive. In most regions, this means starting your slips indoors about 6-8 weeks before the last expected frost, and then transplanting them into containers outdoors once the weather has settled. If you live in a warmer climate with a longer growing season, you can start your slips directly in containers outdoors.
How often should I water my container sweet potatoes?
Sweet potatoes need consistent moisture, especially during the early stages of growth. Water deeply whenever the top inch of soil feels dry to the touch. Avoid overwatering, as this can lead to root rot. During hot, dry weather, you may need to water your containers daily. A good rule of thumb is to water thoroughly until water drains out of the bottom of the container. This ensures that the entire root system is adequately moistened. As the sweet potatoes mature and the vines become more established, you can reduce watering slightly.
What kind of fertilizer should I use for container sweet potatoes?
Sweet potatoes are heavy feeders and benefit from regular fertilization. Use a balanced fertilizer with an NPK ratio of 10-10-10 or 14-14-14. Apply the fertilizer according to the package instructions, usually every 2-3 weeks. You can also supplement with organic fertilizers such as compost tea or fish emulsion. Avoid using fertilizers that are high in nitrogen, as this can promote excessive vine growth at the expense of tuber development. A fertilizer slightly higher in phosphorus and potassium will encourage root growth and sweeter potatoes.
How do I know when my sweet potatoes are ready to harvest?
Sweet potatoes are typically ready to harvest about 90-120 days after planting. A good indicator is when the vines start to yellow and die back. You can also gently dig around the edges of the container to check the size of the tubers. If they are large enough for your liking, it’s time to harvest. To harvest, carefully tip the container over and gently remove the soil, being careful not to damage the sweet potatoes. Cure the sweet potatoes for 7-10 days in a warm, humid place to allow the skins to harden and the sugars to develop.
Can I reuse the soil from my sweet potato containers?
Yes, you can reuse the soil from your sweet potato containers, but it’s important to amend it with fresh compost and other organic matter to replenish nutrients. Sweet potatoes are heavy feeders and can deplete the soil of essential nutrients. Before reusing the soil, remove any remaining plant debris and weeds. You can also sterilize the soil by baking it in the oven at 200°F (93°C) for 30 minutes to kill any potential pests or diseases. However, this will also kill beneficial microorganisms, so it’s important to reintroduce them by adding compost or other organic amendments.
My sweet potato vines are growing, but I’m not seeing any tubers. What could be the problem?
There are several reasons why your sweet potato vines might be growing without producing tubers. One common cause is excessive nitrogen in the soil, which promotes vine growth at the expense of tuber development. Make sure you’re using a balanced fertilizer and avoid over-fertilizing. Another possibility is insufficient sunlight. Sweet potatoes need at least 6-8 hours of direct sunlight per day to produce tubers. Make sure your containers are located in a sunny spot. Finally, the growing season may be too short. Sweet potatoes need a long, warm growing season to mature. If you live in a cooler climate, you may need to start your slips indoors earlier and provide supplemental heat to extend the growing season.
Can I grow sweet potatoes from store-bought sweet potatoes?
Yes, you can grow sweet potatoes from store-bought sweet potatoes, but it’s important to choose organic sweet potatoes that haven’t been treated with sprout inhibitors. To sprout a sweet potato, suspend it in a jar of water, with the bottom half submerged. Place the jar in a warm, sunny location. After a few weeks, sprouts will begin to emerge from the sweet potato. Once the sprouts are several inches long, you can carefully twist them off and plant them in water to root. Once the roots are well-developed, you can transplant the slips into containers. Keep in mind that store-bought sweet potatoes may not produce the same quality or yield as certified sweet potato slips.
Are there any pests or diseases that commonly affect container sweet potatoes?
While container gardening generally reduces the risk of pests and diseases, sweet potatoes can still be susceptible to certain problems. Common pests include aphids, spider mites, and sweet potato weevils. Aphids and spider mites can be controlled with insecticidal soap or neem oil. Sweet potato weevils are more difficult to control and may require the use of chemical insecticides. Common diseases include fungal diseases such as fusarium wilt and black rot. These diseases can be prevented by using disease-free slips, providing good drainage, and avoiding overwatering. If you notice any signs of pests or diseases, take action promptly to prevent them from spreading.
How do I store my harvested sweet potatoes?
Proper storage is essential for preserving the flavor and quality of your harvested sweet potatoes. After curing the sweet potatoes for 7-10 days, store them in a cool, dark, and well-ventilated place with a temperature of around 55-60°F (13-16°C) and a humidity level of 80-90%. Avoid storing sweet potatoes in the refrigerator, as this can cause them to develop a hard core and lose their flavor. Under these conditions, sweet potatoes can be stored for several months. Check the sweet potatoes periodically for signs of spoilage, such as soft spots or mold. Discard any sweet potatoes that show signs of spoilage.
Leave a Comment