

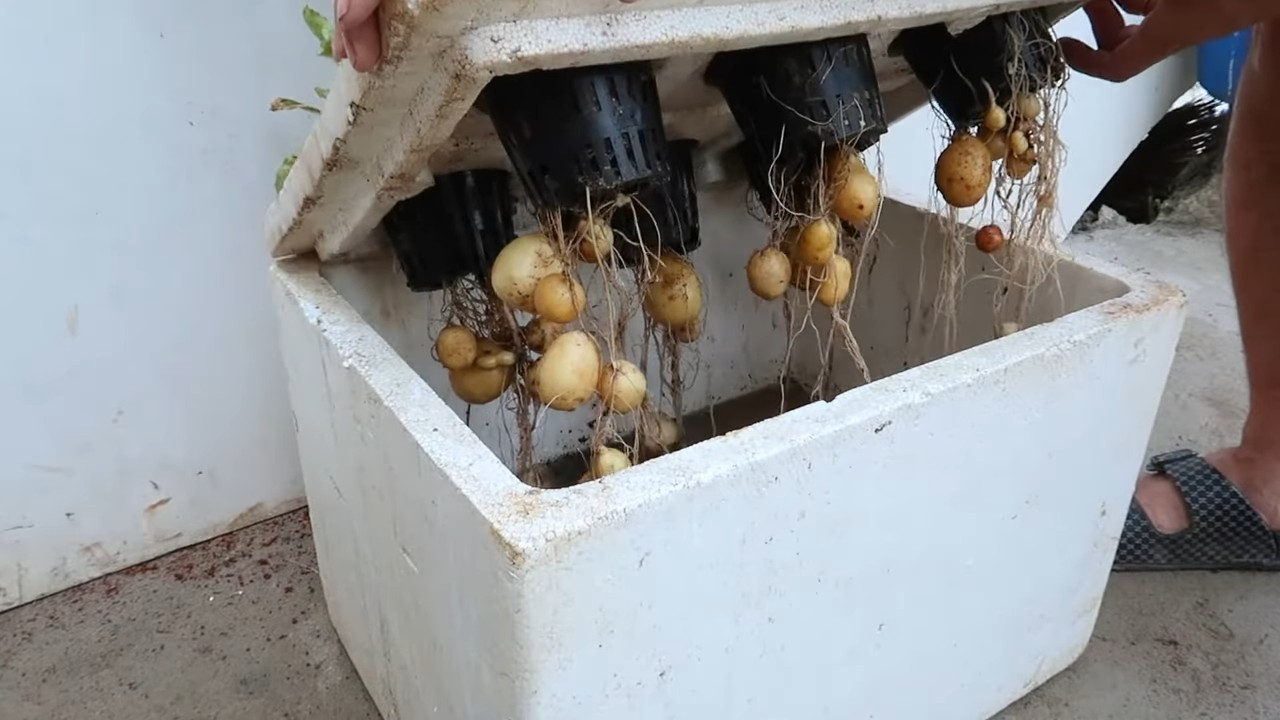
Growing potatoes in water might sound like something out of a science fiction movie, but trust me, it’s a real and surprisingly simple way to cultivate these starchy staples right in your own home! Forget sprawling gardens and endless tilling; we’re diving into the fascinating world of hydroponics, potato-style. For centuries, humans have relied on potatoes as a cornerstone of their diets, with evidence suggesting cultivation dating back as far as 7,000 years ago in the Andes. Now, we’re taking this ancient food source and giving it a modern, space-saving twist.
Have you ever wished you could enjoy the satisfaction of growing your own food, but felt limited by space or a lack of gardening experience? That’s where this DIY trick comes in! Growing potatoes in water eliminates the need for a traditional garden plot, making it perfect for apartment dwellers, urban gardeners, or anyone looking for a fun and educational project. Plus, it’s a fantastic way to observe the entire growth process, from sprouting to harvest, right before your eyes. Get ready to ditch the dirt and discover the magic of water-grown potatoes – I promise, you’ll be amazed at how easy and rewarding it is!
Kartoffeln im Wasser ziehen: Ein einfacher DIY-Leitfaden
Hey Leute! Habt ihr schon mal darüber nachgedacht, Kartoffeln im Wasser zu ziehen? Es ist ein super einfaches und spaßiges DIY-Projekt, das ihr zu Hause ausprobieren könnt. Es ist nicht nur eine tolle Möglichkeit, eure eigenen Kartoffeln zu züchten, sondern auch eine coole wissenschaftliche Aktivität für Kinder. Lasst uns eintauchen!
Was ihr braucht
Bevor wir loslegen, hier eine Liste der Dinge, die ihr benötigt:
* Eine oder mehrere Bio-Kartoffeln (am besten mit “Augen”, also kleinen Trieben)
* Ein sauberes Glas, eine Vase oder ein Behälter
* Zahnstocher (optional)
* Wasser (am besten gefiltert oder abgestanden)
* Ein heller Standort (aber nicht direkt in der prallen Sonne)
Die Vorbereitung: Die Kartoffel zum Sprießen bringen
Bevor wir die Kartoffel ins Wasser setzen, ist es hilfreich, sie zum Sprießen zu bringen. Das beschleunigt den Prozess und erhöht die Erfolgschancen.
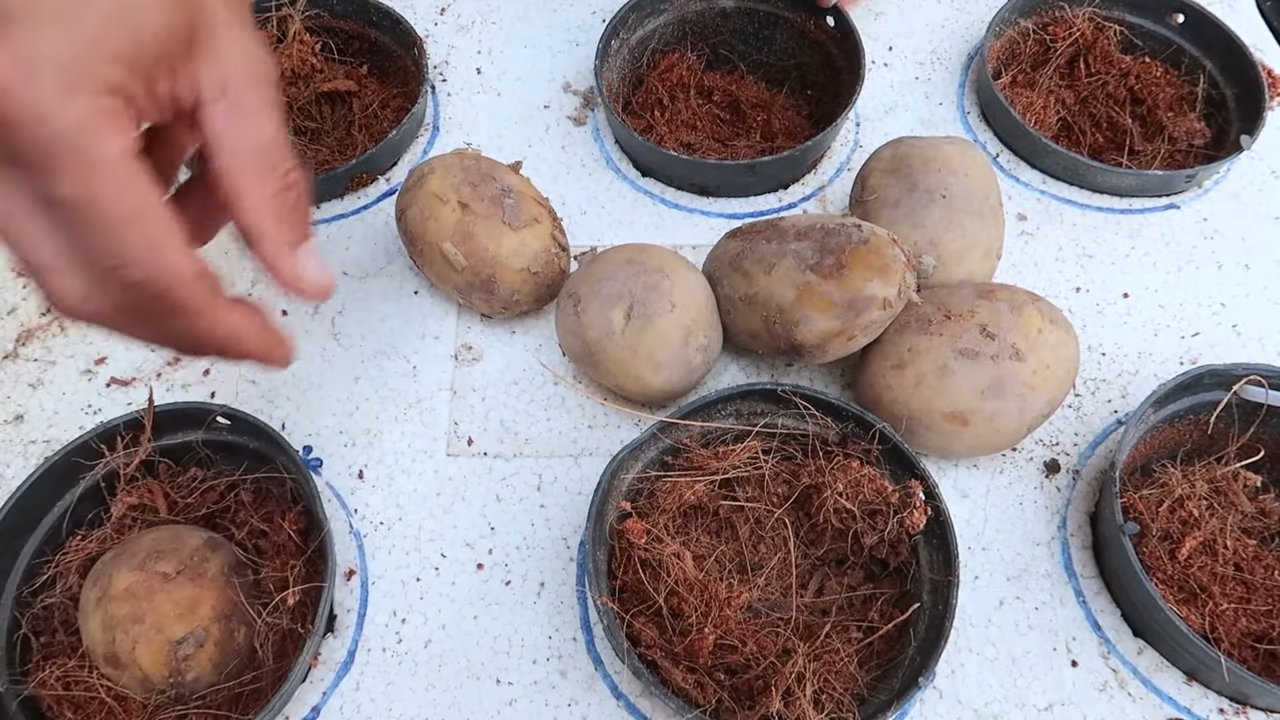
1. Kartoffel auswählen: Wählt eine Bio-Kartoffel mit mehreren “Augen”. Bio ist wichtig, da konventionelle Kartoffeln oft mit Keimhemmern behandelt werden.
2. Kartoffel vorbereiten (optional): Wenn eure Kartoffel sehr groß ist, könnt ihr sie halbieren oder vierteln, sodass jedes Stück mindestens ein oder zwei Augen hat. Das erhöht die Anzahl der Pflanzen, die ihr ziehen könnt. Achtet darauf, dass die Schnittflächen sauber sind.
3. Trocknen lassen: Lasst die geschnittenen Kartoffelstücke (oder die ganze Kartoffel) für 1-2 Tage an einem kühlen, trockenen Ort trocknen. Dadurch bilden sie eine Schutzschicht an den Schnittflächen und verhindern Fäulnis.
Die Kartoffel ins Wasser setzen: Schritt-für-Schritt-Anleitung
Jetzt kommt der spaßige Teil! Wir bringen die Kartoffel ins Wasser und beobachten, wie sie wächst.
1. Behälter vorbereiten: Wählt ein sauberes Glas, eine Vase oder einen anderen Behälter. Die Größe sollte zur Kartoffel passen. Sie sollte nicht komplett untergetaucht sein, sondern nur der untere Teil.
2. Zahnstocher anbringen (optional): Wenn euer Behälter zu breit ist, um die Kartoffel zu halten, könnt ihr Zahnstocher verwenden. Steckt 3-4 Zahnstocher rund um die Kartoffel, sodass sie auf dem Rand des Behälters aufliegen und die Kartoffel teilweise im Wasser hängt. Achtet darauf, dass die “Augen” nach oben zeigen.
3. Wasser einfüllen: Füllt den Behälter mit Wasser, sodass der untere Teil der Kartoffel (etwa 1/3 bis 1/2) bedeckt ist. Achtet darauf, dass die “Augen” nicht im Wasser liegen, da sie sonst faulen können.
4. Standort wählen: Stellt den Behälter an einen hellen Ort, aber nicht direkt in die pralle Sonne. Ein Fensterbrett, das nach Osten oder Westen ausgerichtet ist, ist ideal.
5. Wasser wechseln: Wechselt das Wasser alle 2-3 Tage, um Fäulnis zu verhindern und die Kartoffel mit frischem Sauerstoff zu versorgen.
6. Beobachten und Geduld haben: Jetzt heißt es warten und beobachten! Nach einigen Tagen oder Wochen solltet ihr sehen, wie die “Augen” zu kleinen Trieben und Wurzeln werden.
Pflege und Weiterentwicklung: Was passiert als Nächstes?
Sobald eure Kartoffel Triebe und Wurzeln entwickelt hat, gibt es verschiedene Möglichkeiten, wie ihr weitermachen könnt.
* Weiter im Wasser ziehen: Ihr könnt die Kartoffel einfach im Wasser weiterziehen lassen. Die Triebe werden immer länger und entwickeln Blätter. Es ist faszinierend zu sehen, wie die Pflanze wächst. Allerdings wird die Kartoffel im Wasser keine neuen Kartoffeln produzieren.
* In Erde umpflanzen: Wenn ihr Kartoffeln ernten wollt, müsst ihr die Kartoffel in Erde umpflanzen. Wartet, bis die Triebe etwa 15-20 cm lang sind und die Wurzeln gut entwickelt sind.
Umpflanzen in Erde: So geht’s
1. Topf vorbereiten: Wählt einen großen Topf (mindestens 30 cm Durchmesser und Tiefe) mit Drainagelöchern. Füllt den Topf mit hochwertiger Blumenerde oder einer Mischung aus Gartenerde, Kompost und Sand.
2. Kartoffel einpflanzen: Macht ein Loch in die Erde, das groß genug ist, um die Kartoffel aufzunehmen. Setzt die Kartoffel vorsichtig in das Loch, sodass die Triebe nach oben zeigen. Bedeckt die Kartoffel mit Erde, aber lasst die Spitzen der Triebe frei.
3. Angießen: Gießt die Erde gründlich an.
4. Pflege: Stellt den Topf an einen sonnigen Standort. Gießt regelmäßig, aber vermeidet Staunässe. Düngt die Pflanze alle paar Wochen mit einem organischen Dünger.
5. Anhäufeln: Wenn die Triebe etwa 20-30 cm hoch sind, häufelt ihr Erde um die Stängel an. Dadurch werden mehr Kartoffeln gebildet. Wiederholt das Anhäufeln mehrmals während der Wachstumsperiode.
Ernte: Wann sind die Kartoffeln reif?
Die Erntezeit hängt von der Kartoffelsorte ab. In der Regel sind Kartoffeln reif, wenn die Blätter der Pflanze gelb werden und absterben.
1. Ernte vorbereiten: Stellt sicher, dass die Erde trocken ist, bevor ihr erntet.
2. Kartoffeln ausgraben: Grabt die Kartoffeln vorsichtig aus. Achtet darauf, die Kartoffeln nicht zu beschädigen.
3. Trocknen lassen: Lasst die Kartoffeln einige Stunden oder Tage an einem trockenen, luftigen Ort trocknen.
4. Lagern: Lagert die Kartoffeln an einem kühlen, dunklen und trockenen Ort.
Häufige Probleme und Lösungen
Auch beim Kartoffelziehen im Wasser können Probleme auftreten. Hier sind einige häufige Probleme und wie ihr sie lösen könnt:
* Fäulnis: Wenn die Kartoffel fault, liegt das meist an zu viel Feuchtigkeit oder mangelnder Belüftung. Wechselt das Wasser häufiger und stellt sicher, dass die “Augen” nicht im Wasser liegen.
* Schimmel: Schimmel kann sich auf der Kartoffel bilden, wenn die Luftfeuchtigkeit zu hoch ist. Reinigt die Kartoffel vorsichtig mit einem feuchten Tuch und wechselt das Wasser.
* Schädlinge: Kartoffelpflanzen können von Schädlingen befallen werden. Kontrolliert die Pflanze regelmäßig und entfernt Schädlinge von Hand oder mit einem biologischen Schädlingsbekämpfungsmittel.
* Keine Triebe: Wenn die Kartoffel keine Triebe bildet, kann das an der Kartoffelsorte liegen oder daran, dass die Kartoffel zu alt ist. Versucht es mit einer anderen Kartoffel.
Zusätzliche Tipps und Tricks
* Verschiedene Kartoffelsorten ausprobieren: Es gibt viele verschiedene Kartoffelsorten, die ihr ausprobieren könnt. Jede Sorte hat ihren eigenen Geschmack und ihre eigenen Eigenschaften.
* Kreative Behälter verwenden: Verwendet verschiedene Gläser, Vasen oder Behälter, um eure Kartoffelpflanzen zu präsentieren.
* Kinder einbeziehen: Das Kartoffelziehen im Wasser ist eine tolle Aktivität für Kinder. Sie können den Wachstumsprozess beobachten und lernen, wie Pflanzen wachsen.
* Dokumentieren: Macht Fotos von euren Kartoffelpflanzen, um den Wachstumsprozess zu dokumentieren.
Warum das Ganze? Die Vorteile des Kartoffelziehens im Wasser
Warum solltet ihr euch die Mühe machen, Kartoffeln im Wasser zu ziehen? Hier sind einige Gründe:
* Es ist einfach und spaßig: Es ist ein unkompliziertes DIY-Projekt, das wenig Aufwand erfordert und viel Freude bereitet.
* Es ist lehrreich: Es ist eine tolle Möglichkeit, etwas über Pflanzenwachstum zu lernen.
* Es ist nachhaltig: Ihr könnt eure eigenen Kartoffeln züchten und so euren ökologischen Fußabdruck reduzieren.
* Es ist dekorativ: Kartoffelpflanzen sind dekorativ und können eure Wohnung verschönern.
* Es ist ein tolles Geschenk: Eine Kartoffelpflanze ist ein originelles und persönliches
Conclusion
So, there you have it! Growing potatoes in water isn’t just a quirky gardening experiment; it’s a surprisingly effective and rewarding way to enjoy fresh, homegrown potatoes, even without a traditional garden. This method offers a unique blend of convenience, space-saving efficiency, and educational value, making it a must-try for anyone interested in sustainable living, urban gardening, or simply enjoying the satisfaction of nurturing their own food.
Think about it: no more back-breaking digging, no more battling soil pests, and no more wondering if your potatoes are ready to harvest. With this water-based system, you can literally watch your potatoes grow, monitoring their progress and harvesting them at their peak ripeness. It’s a fantastic way to connect with nature, learn about plant biology, and impress your friends and family with your green thumb (or, in this case, your green bucket!).
But the benefits don’t stop there. This method is incredibly versatile. Feel free to experiment with different potato varieties to discover your favorites. Try using different containers, from repurposed buckets to decorative glass jars, to add a touch of personality to your indoor garden. You can even add a small air pump to oxygenate the water further, potentially boosting growth and yield. Consider adding a diluted liquid fertilizer specifically formulated for hydroponics to provide your potatoes with the nutrients they need to thrive. Remember to change the water regularly to prevent algae growth and maintain a healthy environment for your potatoes.
This DIY potato-growing trick is a game-changer for small spaces and beginner gardeners. It’s a low-maintenance, high-reward activity that can bring a touch of nature into your home and provide you with a delicious and sustainable source of food.
We wholeheartedly encourage you to give growing potatoes in water a try. It’s a fun, educational, and ultimately delicious experience that you won’t regret. Once you’ve harvested your first batch of homegrown potatoes, be sure to share your experience with us! We’d love to hear about your successes, your challenges, and any variations you’ve tried. Share your photos and stories on social media using #WaterPotatoes and let’s inspire others to embrace this innovative and sustainable gardening technique. Happy growing!
Frequently Asked Questions (FAQ)
What kind of potatoes work best for growing in water?
While you can technically grow any potato variety in water, some tend to perform better than others. Varieties like Yukon Gold, Red Pontiac, and fingerling potatoes are known for their relatively quick growth and adaptability to different environments. Seed potatoes are ideal, but you can also use potatoes from the grocery store, provided they haven’t been treated with sprout inhibitors. Look for potatoes with “eyes” (small buds) that are starting to sprout – these are the ones that will readily grow in water. Avoid using potatoes that are overly soft, wrinkled, or show signs of rot.
How often should I change the water?
Maintaining clean water is crucial for the health and growth of your potatoes. Ideally, you should change the water every 1-2 weeks, or more frequently if you notice it becoming cloudy or developing algae. When changing the water, be gentle to avoid damaging the roots. Use dechlorinated water, as chlorine can harm the potatoes. You can dechlorinate tap water by letting it sit out for 24 hours or using a water dechlorinating product available at pet stores.
Do I need to add fertilizer when growing potatoes in water?
While potatoes can grow in water alone, adding a diluted liquid fertilizer can significantly boost their growth and yield. Use a balanced fertilizer specifically formulated for hydroponics or vegetables, following the instructions on the label. Start with a very diluted solution (e.g., half the recommended strength) and gradually increase it as needed. Over-fertilizing can be harmful, so it’s always better to err on the side of caution. Fertilize every 2-3 weeks, or as needed based on the appearance of your potatoes. Yellowing leaves can indicate a nutrient deficiency.
How much light do potatoes need when grown in water?
Potatoes need plenty of light to thrive, whether grown in soil or water. Aim for at least 6-8 hours of direct sunlight per day. If you don’t have access to enough natural light, you can supplement with artificial grow lights. LED grow lights are a good option as they are energy-efficient and provide the full spectrum of light that plants need. Position the grow lights about 12-18 inches above the potatoes.
How long does it take to grow potatoes in water?
The time it takes to grow potatoes in water can vary depending on the variety, environmental conditions, and care. Generally, you can expect to harvest small “new” potatoes within 8-10 weeks. For larger, more mature potatoes, it may take 12-16 weeks. Keep an eye on the size and appearance of the potatoes to determine when they are ready to harvest. You can harvest potatoes gradually as they reach the desired size.
Can I grow potatoes in water indoors year-round?
Yes, you can grow potatoes in water indoors year-round, provided you have adequate light and temperature control. Maintain a consistent temperature between 60-75°F (15-24°C) for optimal growth. Use grow lights to supplement natural light during the winter months. Be mindful of humidity levels, as excessive humidity can promote fungal growth.
What are some common problems when growing potatoes in water and how can I fix them?
Some common problems include algae growth, root rot, and nutrient deficiencies. Algae growth can be prevented by changing the water regularly and keeping the container out of direct sunlight. Root rot can be caused by poor water quality or lack of oxygen. Ensure the water is clean and well-oxygenated. Nutrient deficiencies can be addressed by adding a diluted liquid fertilizer. If you notice pests, such as aphids or spider mites, you can try spraying the potatoes with insecticidal soap or neem oil.
Can I eat the potato leaves?
While potato tubers are a delicious and nutritious food source, the leaves and stems of potato plants contain solanine, a toxic compound that can cause illness if ingested in large quantities. It’s best to avoid eating potato leaves.
How do I harvest the potatoes?
Harvesting potatoes grown in water is easy. Simply reach into the container and gently pull out the potatoes that are ready to harvest. You can harvest them gradually as they reach the desired size. Be careful not to damage the remaining roots or potatoes. After harvesting, rinse the potatoes with water and store them in a cool, dark place.
What do I do with the potato plant after harvesting the potatoes?
After harvesting the potatoes, you can either discard the plant or try to propagate it. To propagate, cut off a stem with several leaves and place it in water. The stem should develop roots within a few weeks. Once the roots are established, you can transplant the stem into soil or continue growing it in water. However, keep in mind that potatoes grown from cuttings may not produce as many tubers as those grown from seed potatoes.
Leave a Comment