

Grow Jalapeno Peppers Easily, even if you think you don’t have a green thumb! Have you ever dreamed of adding a spicy kick to your homemade salsa, or topping your nachos with fresh, vibrant jalapenos straight from your garden? I know I have! There’s something incredibly satisfying about nurturing a plant from seed to harvest, especially when that harvest is packed with flavor.
Jalapenos have a rich history, originating in Mexico, where they’ve been cultivated for centuries. They’re a staple in Mexican cuisine and have since become a beloved ingredient worldwide. But you don’t need to travel to Mexico to enjoy these fiery fruits. With a few simple tricks and DIY hacks, you can cultivate your own thriving jalapeno pepper plants right at home.
Why bother with growing your own? Well, for starters, homegrown jalapenos taste infinitely better than store-bought ones. Plus, you have complete control over the growing process, ensuring they’re free from harmful pesticides and chemicals. And let’s be honest, there’s a certain bragging right that comes with saying, “I grew these myself!” This article is your ultimate guide to grow jalapeno peppers easily, offering practical tips and DIY solutions to overcome common gardening challenges. I’m excited to share my secrets to a bountiful jalapeno harvest, so let’s get started!
Jalapenos kinderleicht selbst anbauen: Dein DIY-Guide für eine scharfe Ernte
Hey Leute! Ihr wolltet schon immer mal eure eigenen Jalapenos anbauen? Ich zeige euch, wie das super einfach geht! Keine Angst, ihr braucht keinen grünen Daumen, nur ein bisschen Geduld und meine Anleitung. Los geht’s!
Was du brauchst: Die Zutaten für deine Jalapeno-Ernte
Bevor wir loslegen, hier eine Liste mit allem, was du für dein Jalapeno-Projekt brauchst. Keine Sorge, das meiste hast du wahrscheinlich schon zu Hause!
* Jalapeno-Samen: Die gibt’s im Gartencenter, online oder vielleicht sogar von einer Jalapeno, die du schon hast (dazu später mehr!).
* Anzuchterde: Spezielle Erde für die Anzucht ist nährstoffarm und locker, perfekt für kleine Pflänzchen.
* Anzuchttöpfe oder -schalen: Kleine Behälter, in denen die Samen keimen können.
* Sprühflasche: Zum Befeuchten der Erde.
* Mini-Gewächshaus (optional): Hilft, die Feuchtigkeit und Wärme zu halten. Eine durchsichtige Plastiktüte tut’s aber auch!
* Größere Töpfe (ca. 15-20 cm Durchmesser): Für die Pflanzen, wenn sie größer werden.
* Blumenerde: Nährstoffreiche Erde für das Wachstum der Pflanzen.
* Dünger: Spezieller Chili-Dünger ist ideal, aber ein Tomatendünger tut’s auch.
* Gießkanne: Zum Bewässern der Pflanzen.
* Sonnenlicht: Jalapenos lieben die Sonne!
* Geduld: Pflanzen brauchen Zeit zum Wachsen!
Phase 1: Die Anzucht – So bringst du deine Jalapenos zum Keimen
Die Anzucht ist der erste und wichtigste Schritt. Hier legen wir den Grundstein für eine reiche Ernte. Ich zeige dir, wie’s geht!
1. Samen vorbereiten (optional, aber empfehlenswert): Um die Keimung zu beschleunigen, kannst du die Samen 24 Stunden in lauwarmem Wasser einweichen. Das weicht die harte Schale auf und erleichtert das Keimen.
2. Anzuchttöpfe vorbereiten: Fülle die Anzuchttöpfe oder -schalen mit Anzuchterde. Drücke die Erde leicht an.
3. Samen säen: Lege pro Topf 2-3 Samen auf die Erde. Bedecke die Samen mit einer dünnen Schicht Erde (ca. 0,5 cm).
4. Bewässern: Befeuchte die Erde vorsichtig mit der Sprühflasche. Die Erde sollte feucht, aber nicht nass sein.
5. Für Wärme und Feuchtigkeit sorgen: Stelle die Töpfe in ein Mini-Gewächshaus oder decke sie mit einer durchsichtigen Plastiktüte ab. Das sorgt für ein feuchtwarmes Klima, das die Keimung fördert.
6. Der richtige Standort: Stelle die Töpfe an einen warmen und hellen Ort. Eine Fensterbank ist ideal. Vermeide direkte Sonneneinstrahlung, da die Erde sonst zu schnell austrocknet.
7. Geduld haben: Jetzt heißt es warten! Die Keimung dauert in der Regel 1-3 Wochen. Halte die Erde feucht, aber vermeide Staunässe. Lüfte das Gewächshaus oder die Plastiktüte regelmäßig, um Schimmelbildung zu vermeiden.
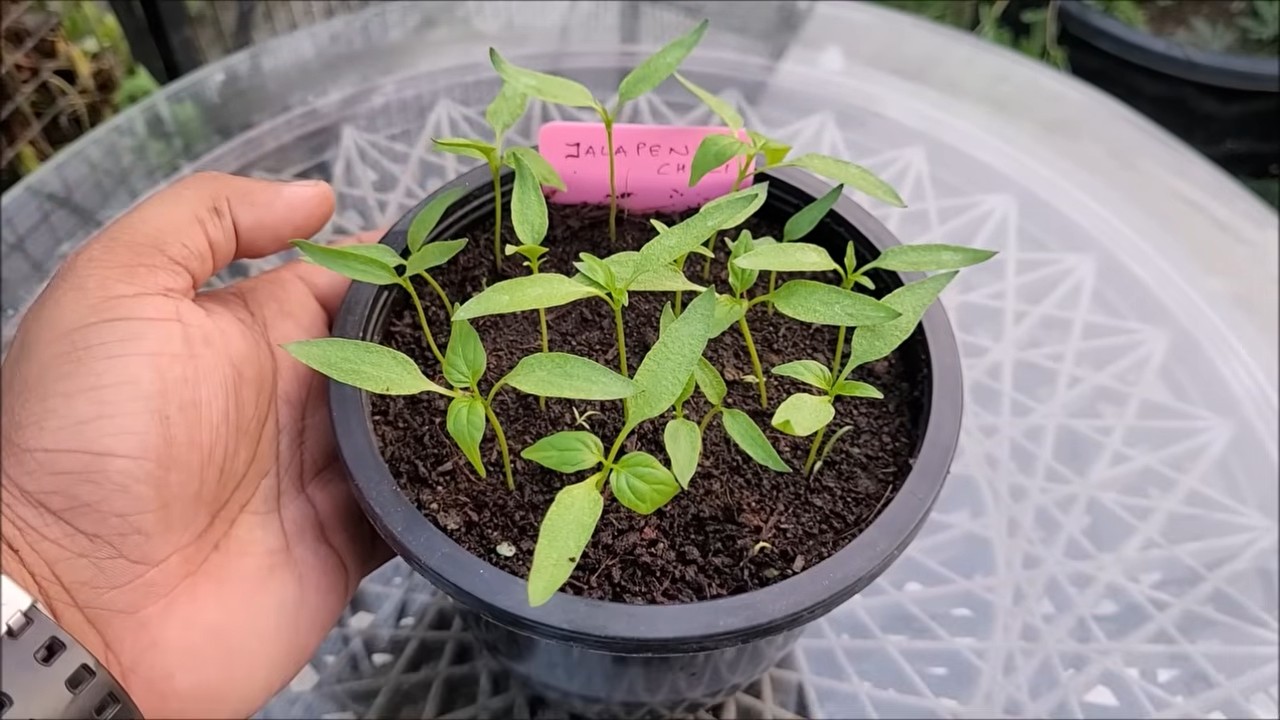
Phase 2: Pikieren – Den kleinen Pflänzchen mehr Platz geben
Sobald die ersten Blätter zu sehen sind, ist es Zeit zum Pikieren. Das bedeutet, dass wir die kleinen Pflänzchen in größere Töpfe umsetzen, damit sie mehr Platz zum Wachsen haben.
1. Warten, bis die ersten “echten” Blätter da sind: Die ersten Blätter, die nach dem Keimen erscheinen, sind die Keimblätter. Warte, bis die Pflänzchen zusätzlich noch 2-4 “echte” Blätter entwickelt haben. Diese sehen anders aus als die Keimblätter und zeigen, dass die Pflanze stark genug ist.
2. Vorbereitung: Fülle die größeren Töpfe mit Blumenerde. Mache in der Mitte jedes Topfes ein kleines Loch.
3. Pikieren: Nimm vorsichtig ein Pflänzchen aus dem Anzuchttopf. Versuche, die Wurzeln so wenig wie möglich zu beschädigen. Du kannst dafür einen Pikierstab oder einen Löffel verwenden.
4. Einsetzen: Setze das Pflänzchen in das Loch im neuen Topf. Achte darauf, dass die Wurzeln nicht geknickt sind. Fülle das Loch mit Erde auf und drücke sie leicht an.
5. Bewässern: Gieße die Pflänzchen vorsichtig an.
6. Der richtige Standort: Stelle die Töpfe an einen hellen Ort, aber vermeide direkte Sonneneinstrahlung in den ersten Tagen.
Phase 3: Pflege – So bleiben deine Jalapenos glücklich und gesund
Jetzt, wo deine Jalapenos in ihren eigenen Töpfen wohnen, ist es wichtig, sie gut zu pflegen. Hier sind meine Tipps für eine erfolgreiche Jalapeno-Zucht:
1. Bewässerung: Gieße die Pflanzen regelmäßig, aber vermeide Staunässe. Die Erde sollte immer leicht feucht sein. Überprüfe die Feuchtigkeit der Erde, indem du deinen Finger ca. 2 cm tief in die Erde steckst. Wenn sie sich trocken anfühlt, ist es Zeit zum Gießen.
2. Düngung: Dünge die Pflanzen alle 2-3 Wochen mit Chili- oder Tomatendünger. Befolge dabei die Anweisungen auf der Packung.
3. Sonnenlicht: Jalapenos lieben die Sonne! Stelle die Töpfe an einen sonnigen Ort, z.B. auf einen Balkon oder eine Terrasse. Achte darauf, dass die Pflanzen mindestens 6 Stunden Sonnenlicht pro Tag bekommen.
4. Schädlinge: Kontrolliere die Pflanzen regelmäßig auf Schädlinge wie Blattläuse oder Spinnmilben. Bei Befall kannst du die Schädlinge mit einem Wasserstrahl abspülen oder ein biologisches Schädlingsbekämpfungsmittel verwenden.
5. Ausgeizen (optional): Bei einigen Chili-Sorten ist es sinnvoll, die Seitentriebe (Geiztriebe) auszugeizen, um die Bildung von Früchten zu fördern. Bei Jalapenos ist das Ausgeizen aber nicht unbedingt notwendig.
6. Unterstützung (optional): Wenn die Pflanzen größer werden und viele Früchte tragen, kann es sinnvoll sein, sie mit einem Stab oder einer Rankhilfe zu unterstützen, damit sie nicht umknicken.
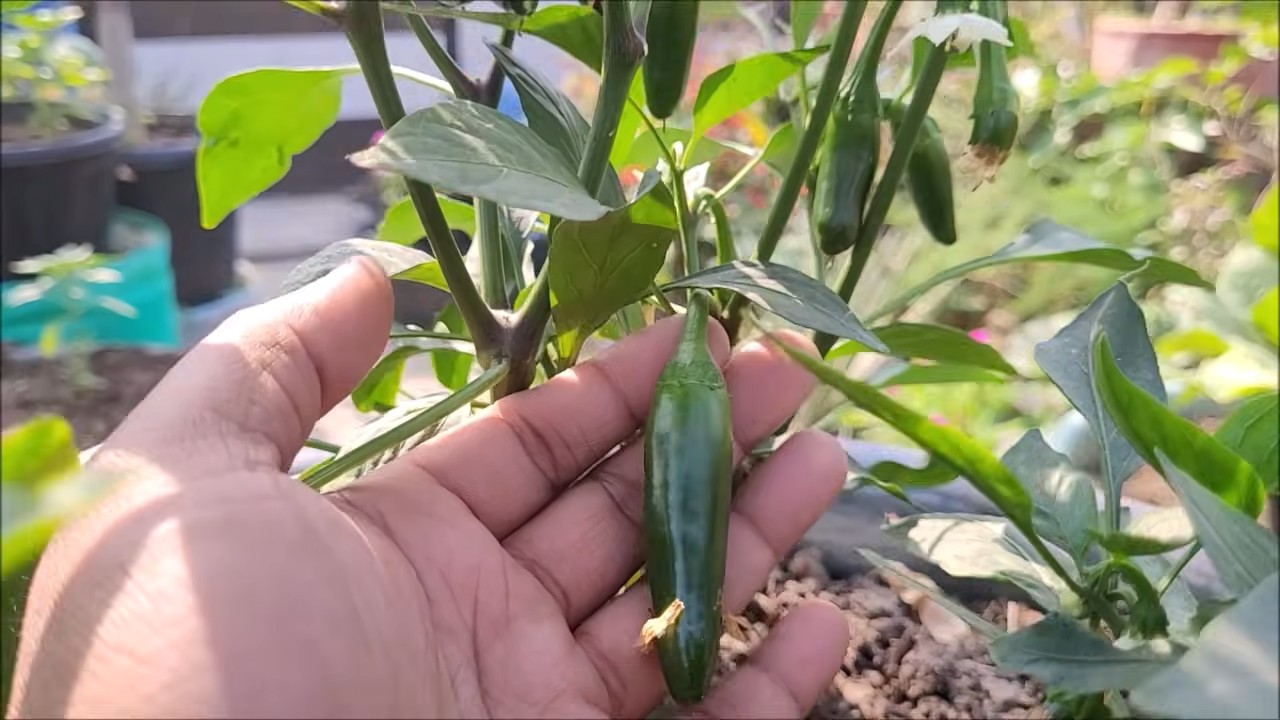
Phase 4: Ernte – Endlich Jalapenos!
Nach einigen Monaten harter Arbeit ist es endlich soweit: Die Jalapenos sind reif und können geerntet werden!
1. Reife erkennen: Jalapenos sind reif, wenn sie eine dunkelgrüne Farbe haben und sich fest anfühlen. Einige Sorten verfärben sich bei voller Reife rot.
2. Ernten: Schneide die Jalapenos mit einem scharfen Messer oder einer Schere ab. Achte darauf, die Pflanze nicht zu beschädigen.
3. Genießen: Jetzt kannst du deine selbstgezogenen Jalapenos genießen! Verwende sie in deinen Lieblingsgerichten, mache eingelegte Jalapenos oder trockne sie für später.
Extra-Tipp: Jalapeno-Samen selbst gewinnen
Du hast eine besonders leckere Jalapeno erwischt und möchtest die Samen für die nächste Saison aufbewahren? Kein Problem!
1. Reife Jalapeno auswählen: Wähle eine vollreife Jalapeno aus, am besten eine, die schon rot geworden ist.
2. Samen entnehmen: Schneide die Jalapeno auf und entferne die Samen.
3. Trocknen: Lege die Samen auf ein Stück Küchenpapier und lasse sie an einem trockenen Ort trocknen. Das kann einige Tage dauern.
4. Aufbewahren: Bewahre die getrockneten Samen in einem luftdichten Behälter an einem kühlen und dunklen Ort auf. So bleiben sie bis zur nächsten Saison keimfähig.
Häufige Probleme und Lösungen
Auch beim Jalapeno-Anbau kann es mal zu Problemen kommen. Hier sind einige häufige Probleme und meine Lösungen:
* Gelbe Blätter: Können ein Zeichen für
Conclusion
So, there you have it! Growing your own jalapeno peppers doesn’t have to be a daunting task reserved for seasoned gardeners. With this simple, effective DIY trick, even those with limited space or a less-than-green thumb can enjoy a bountiful harvest of these fiery delights. We’ve shown you how to bypass some of the common pitfalls and create an environment where your jalapeno plants can truly thrive.
But why is this DIY approach a must-try? Beyond the sheer satisfaction of nurturing your own food, consider the benefits: fresher, more flavorful peppers, free from the potentially harmful pesticides often used in commercial farming. You’ll have complete control over the growing process, ensuring the highest quality and the perfect level of heat to suit your taste. Plus, let’s be honest, there’s a certain bragging right that comes with saying, “I grew these myself!”
Don’t be afraid to experiment! This method is incredibly adaptable. For instance, if you live in a particularly hot climate, consider using a lighter-colored container to reflect some of the sun’s rays and prevent the soil from overheating. Conversely, if you’re in a cooler region, a dark-colored container can help absorb heat and extend your growing season. You can also adjust the type of soil you use based on your local conditions and the specific needs of your plants. Some gardeners swear by adding a bit of bone meal to the soil to promote strong root development, while others prefer a slow-release fertilizer to provide a steady stream of nutrients.
Furthermore, consider the variations you can explore with the peppers themselves. Jalapenos come in a range of heat levels, so research different varieties to find one that matches your spice tolerance. You can also experiment with different growing techniques to influence the flavor and heat of your peppers. For example, some gardeners believe that stressing the plants slightly by withholding water can result in hotter peppers.
The possibilities are endless! The key is to start small, observe your plants closely, and adjust your approach as needed. Remember, gardening is a learning process, and even experienced gardeners encounter challenges along the way. Don’t be discouraged by setbacks; instead, view them as opportunities to learn and improve.
We are confident that this DIY trick will empower you to successfully grow jalapeno peppers easily and enjoy the fruits (or rather, vegetables) of your labor. So, grab your seeds, gather your supplies, and get ready to embark on a rewarding gardening adventure.
We’re eager to hear about your experiences! Share your photos, tips, and challenges in the comments below. Let’s create a community of jalapeno-growing enthusiasts and learn from each other. Happy gardening!
Frequently Asked Questions (FAQ)
What kind of container should I use for growing jalapeno peppers?
The ideal container size is typically between 5 and 10 gallons. This provides enough space for the roots to develop properly. The material of the container is less critical, but consider these factors: terracotta pots are porous and allow for better drainage, but they can dry out quickly. Plastic pots retain moisture better but may not drain as well. Dark-colored containers can absorb heat, which can be beneficial in cooler climates but detrimental in hotter ones. Make sure the container has adequate drainage holes to prevent waterlogging, which can lead to root rot.
What type of soil is best for jalapeno peppers?
Jalapeno peppers thrive in well-draining, nutrient-rich soil. A good potting mix specifically formulated for vegetables is a great starting point. You can also amend your soil with compost or other organic matter to improve its fertility and drainage. Avoid using garden soil directly in containers, as it can become compacted and doesn’t drain well. The ideal pH level for jalapeno peppers is between 6.0 and 6.8.
How often should I water my jalapeno pepper plants?
Watering frequency depends on several factors, including the size of the container, the type of soil, the climate, and the stage of growth. As a general rule, water your plants when the top inch of soil feels dry to the touch. Avoid overwatering, as this can lead to root rot. During hot, dry weather, you may need to water daily. In cooler, wetter weather, you may only need to water every few days. A good way to check is to stick your finger into the soil to feel for moisture.
How much sunlight do jalapeno pepper plants need?
Jalapeno peppers need at least 6-8 hours of direct sunlight per day to thrive. Choose a location that receives plenty of sunlight throughout the day. If you’re growing your plants indoors, you may need to supplement with grow lights. Insufficient sunlight can lead to leggy growth, reduced flowering, and smaller peppers.
When should I fertilize my jalapeno pepper plants?
Start fertilizing your plants a few weeks after transplanting them into their final containers. Use a balanced fertilizer (e.g., 10-10-10) or a fertilizer specifically formulated for vegetables. Follow the instructions on the fertilizer package. You can also use organic fertilizers, such as compost tea or fish emulsion. Fertilize every 2-3 weeks during the growing season. Avoid over-fertilizing, as this can burn the roots.
How do I prevent pests and diseases from affecting my jalapeno pepper plants?
Regularly inspect your plants for signs of pests or diseases. Common pests that affect jalapeno peppers include aphids, spider mites, and whiteflies. You can control these pests with insecticidal soap, neem oil, or by handpicking them off the plants. Common diseases include fungal infections, such as powdery mildew and leaf spot. Prevent these diseases by providing good air circulation, avoiding overwatering, and using a fungicide if necessary. Companion planting with herbs like basil or marigolds can also help deter pests.
How long does it take for jalapeno peppers to mature?
Jalapeno peppers typically take 65-80 days to mature after transplanting. The exact time depends on the variety, the growing conditions, and the climate. The peppers are ready to harvest when they are firm, green, and about 2-3 inches long. You can also let them turn red for a sweeter, slightly milder flavor.
How do I harvest jalapeno peppers?
Use a sharp knife or scissors to cut the peppers from the plant. Be careful not to damage the plant. Wear gloves when harvesting, as the capsaicin in the peppers can irritate your skin. Harvest the peppers regularly to encourage the plant to produce more.
Can I grow jalapeno peppers indoors?
Yes, you can grow jalapeno peppers indoors, but you’ll need to provide them with adequate sunlight or grow lights. Choose a sunny window or use a grow light that provides at least 6-8 hours of light per day. Make sure the container is large enough and has good drainage. Water and fertilize regularly.
What are some common problems when growing jalapeno peppers and how can I fix them?
Some common problems include blossom end rot (caused by calcium deficiency), leaf curl (caused by pests or environmental stress), and stunted growth (caused by insufficient sunlight or nutrients). To prevent blossom end rot, add calcium to the soil. To control leaf curl, identify and treat the underlying cause. To promote healthy growth, provide adequate sunlight, water, and fertilizer.
Leave a Comment