

Growing bitter melon sacks might sound like a quirky gardening experiment, but trust me, it’s a game-changer! Have you ever dreamt of harvesting a bumper crop of bitter melon without battling pests, diseases, or the unpredictable whims of Mother Nature? Well, this DIY trick is your answer! For centuries, bitter melon has been a staple in Asian cuisine and traditional medicine, revered for its unique flavor and health benefits. But let’s be honest, growing it can be a challenge.
That’s where the magic of growing bitter melon sacks comes in. This simple yet effective technique creates a protected microclimate for your precious gourds, shielding them from fruit flies, squash bugs, and other unwelcome visitors. Imagine biting into a perfectly ripe, unblemished bitter melon, bursting with flavor and free from any nasty surprises. This DIY project is not only cost-effective but also incredibly rewarding. I’m excited to share this method with you, as it will help you to maximize your yield and enjoy the fruits (or rather, vegetables!) of your labor. So, grab your gardening gloves, and let’s dive into the world of growing bitter melon sacks!
Bittermelon im Sack anbauen: Eine DIY-Anleitung für eine reiche Ernte
Hallo Gartenfreunde! Habt ihr auch so eine Leidenschaft für ungewöhnliche Gemüsesorten wie ich? Dann seid ihr hier genau richtig! Heute zeige ich euch, wie ihr Bittermelonen (auch bekannt als Bittergurken) ganz einfach in Säcken anbauen könnt. Diese Methode ist ideal für alle, die wenig Platz haben oder einfach mal etwas Neues ausprobieren möchten. Und keine Sorge, es ist einfacher als es klingt!
Warum Bittermelonen im Sack anbauen?
* Platzsparend: Perfekt für Balkone, Terrassen oder kleine Gärten.
* Bessere Drainage: Die Säcke sorgen für eine gute Drainage, was Staunässe verhindert und die Wurzeln gesund hält.
* Einfache Handhabung: Die Säcke sind leicht zu transportieren und zu bewegen.
* Weniger Unkraut: Der Anbau im Sack reduziert das Unkrautwachstum.
* Frühere Ernte: Durch die Erwärmung des Bodens im Sack können die Pflanzen schneller wachsen und früher Früchte tragen.
Was ihr für den Bittermelonen-Sackanbau benötigt:
* Samen oder Jungpflanzen: Bittermelonensamen oder vorgezogene Jungpflanzen. Ich empfehle, mit Jungpflanzen zu beginnen, da sie schneller wachsen.
* Säcke: Stabile Säcke aus Jute, Polypropylen oder speziellem Pflanzsackmaterial. Die Größe sollte mindestens 40 Liter Fassungsvermögen haben.
* Erde: Hochwertige Blumenerde oder eine Mischung aus Gartenerde, Kompost und Sand.
* Kompost: Reifer Kompost zur Verbesserung der Bodenqualität und als Dünger.
* Sand: Grobkörniger Sand zur Verbesserung der Drainage.
* Dünger: Organischer Dünger wie Hornspäne oder Komposttee.
* Rankhilfe: Bambusstäbe, Draht oder ein Rankgitter, an dem die Bittermelonen hochklettern können.
* Gießkanne oder Schlauch: Zum Bewässern der Pflanzen.
* Gartenschere: Zum Beschneiden der Pflanzen.
* Handschuhe: Zum Schutz eurer Hände.
Schritt-für-Schritt-Anleitung: Bittermelonen im Sack anbauen
1. Vorbereitung der Säcke
1. Säcke auswählen: Wählt stabile Säcke mit einem Fassungsvermögen von mindestens 40 Litern. Jutesäcke sind eine gute Wahl, da sie atmungsaktiv sind. Ihr könnt aber auch spezielle Pflanzsäcke verwenden.
2. Drainagelöcher bohren: Bohrt am Boden der Säcke mehrere Drainagelöcher, um Staunässe zu vermeiden. Ich verwende dafür einen Akkuschrauber mit einem kleinen Bohrer.
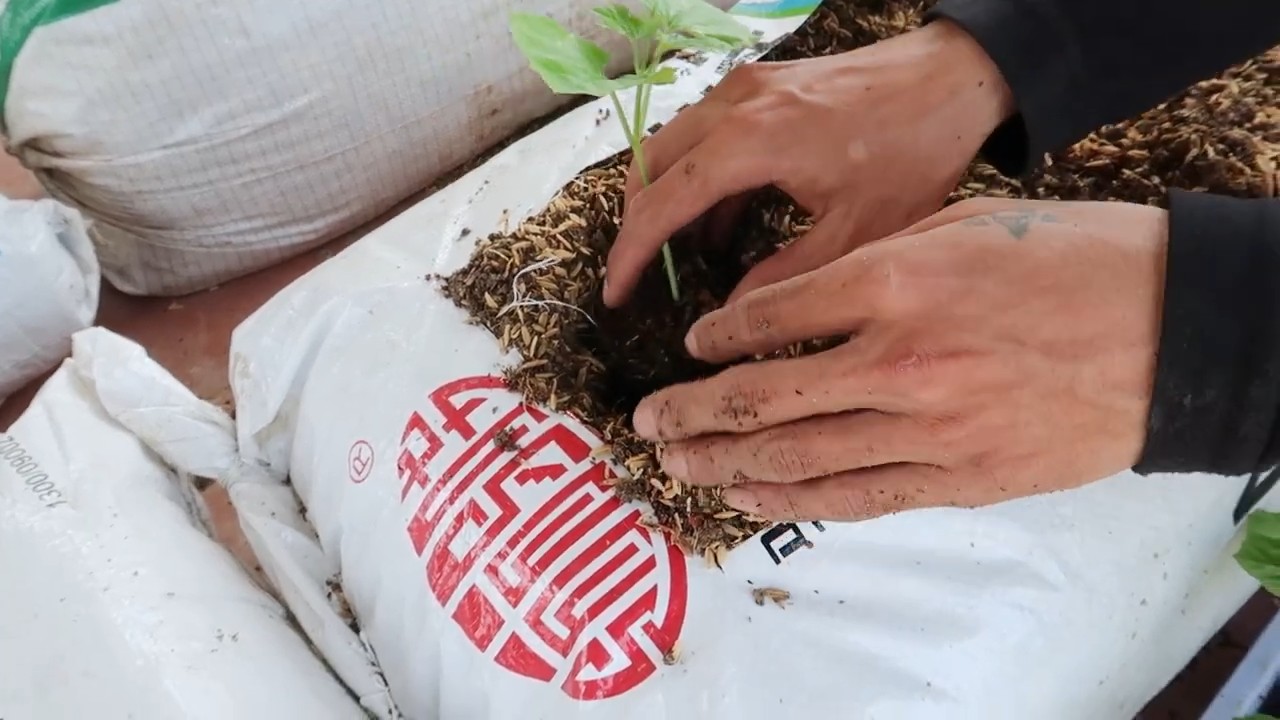
3. Säcke befüllen: Mischt die Erde mit Kompost und Sand. Das Verhältnis sollte etwa 2:1:1 sein. Füllt die Säcke zu etwa zwei Dritteln mit der Erdmischung.
2. Pflanzen der Bittermelonen
1. Pflanzlöcher vorbereiten: Macht in der Mitte der Säcke kleine Pflanzlöcher.
2. Pflanzen einsetzen: Setzt die Bittermelonen-Jungpflanzen vorsichtig in die Pflanzlöcher ein. Achtet darauf, dass die Wurzeln nicht beschädigt werden. Wenn ihr Samen verwendet, legt 2-3 Samen pro Pflanzloch in die Erde.
3. Erde auffüllen: Füllt die Pflanzlöcher mit Erde auf und drückt sie leicht an.
4. Angießen: Gießt die Pflanzen oder Samen gründlich an.
3. Anbringen der Rankhilfe
1. Rankhilfe installieren: Steckt Bambusstäbe oder ein Rankgitter in die Säcke, um den Bittermelonen eine Klettermöglichkeit zu bieten. Die Rankhilfe sollte stabil sein und ausreichend Platz für das Wachstum der Pflanzen bieten. Ich habe gute Erfahrungen mit einem einfachen Rankgitter aus Draht gemacht.
2. Pflanzen anbinden: Bindet die jungen Triebe der Bittermelonen vorsichtig an die Rankhilfe an. So lernen sie, in die richtige Richtung zu wachsen.
4. Pflege der Bittermelonen
1. Bewässerung: Gießt die Bittermelonen regelmäßig, besonders an heißen Tagen. Die Erde sollte immer leicht feucht sein, aber nicht nass. Achtet darauf, dass das Wasser gut ablaufen kann, um Staunässe zu vermeiden.
2. Düngung: Düngt die Bittermelonen alle 2-3 Wochen mit organischem Dünger wie Hornspäne oder Komposttee. Das fördert das Wachstum und die Fruchtbildung.
3. Beschneiden: Beschneidet die Bittermelonen regelmäßig, um das Wachstum zu fördern und die Fruchtbildung anzuregen. Entfernt überflüssige Triebe und Blätter.
4. Schutz vor Schädlingen: Kontrolliert die Pflanzen regelmäßig auf Schädlinge wie Blattläuse oder Spinnmilben. Bei Bedarf könnt ihr biologische Schädlingsbekämpfungsmittel einsetzen.
5. Standort: Stellt die Säcke an einen sonnigen und warmen Standort. Bittermelonen lieben die Sonne!
Zusätzliche Tipps für eine erfolgreiche Ernte
* Vorkultur: Wenn ihr mit Samen beginnt, könnt ihr die Bittermelonen in Töpfen vorziehen, bevor ihr sie in die Säcke pflanzt. Das verkürzt die Wachstumszeit und erhöht die Erfolgschancen.
* Mulchen: Mulcht die Erde in den Säcken mit Stroh oder Rasenschnitt, um die Feuchtigkeit zu halten und das Unkrautwachstum zu reduzieren.
* Bestäubung: Bittermelonen sind einhäusig, das heißt, sie haben männliche und weibliche Blüten auf derselben Pflanze. Manchmal kann es jedoch zu Bestäubungsproblemen kommen. In diesem Fall könnt ihr die Blüten von Hand bestäuben, indem ihr mit einem Pinsel den Pollen von den männlichen auf die weiblichen Blüten übertragt.
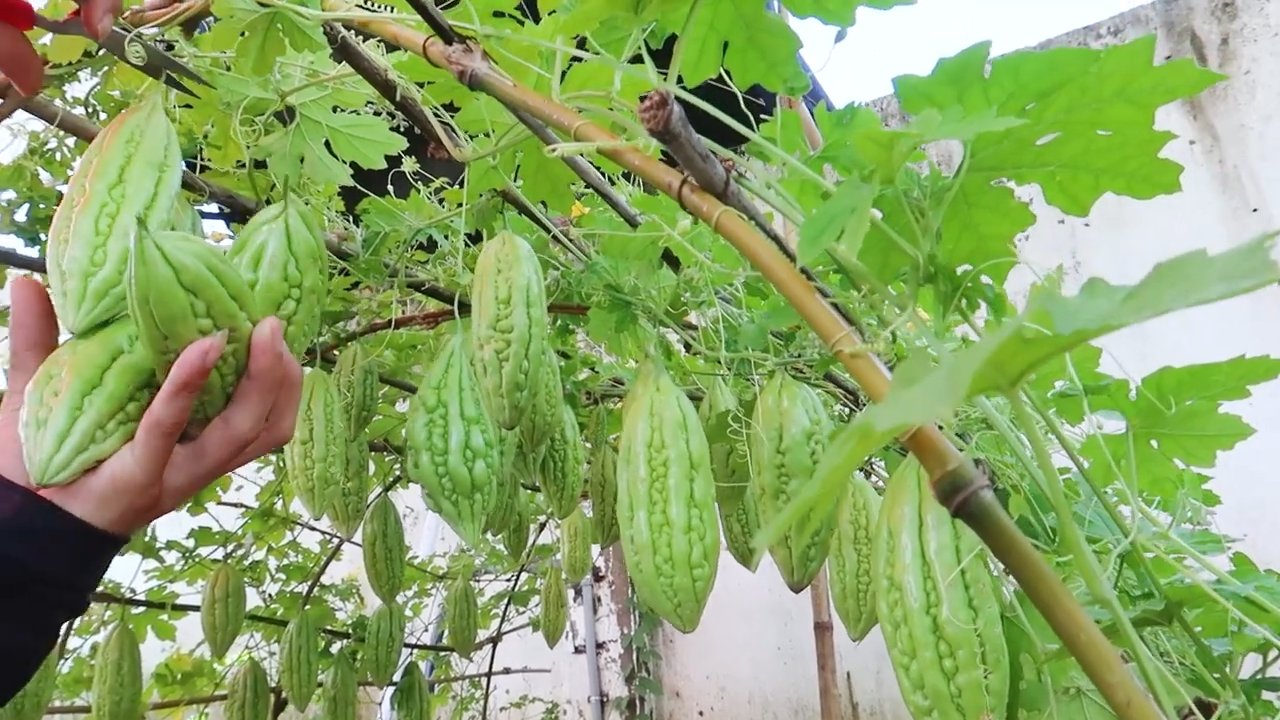
* Ernte: Erntet die Bittermelonen, wenn sie noch grün und fest sind. Je nach Sorte können sie auch gelblich oder orange werden. Die Erntezeit hängt von der Sorte und den Anbaubedingungen ab.
Häufige Probleme und Lösungen
* Gelbe Blätter: Gelbe Blätter können ein Zeichen für Nährstoffmangel oder Überwässerung sein. Überprüft die Bewässerung und düngt die Pflanzen bei Bedarf.
* Keine Früchte: Wenn die Bittermelonen keine Früchte tragen, kann das an mangelnder Bestäubung oder Nährstoffmangel liegen. Bestäubt die Blüten von Hand und düngt die Pflanzen regelmäßig.
* Schädlinge: Bei Schädlingsbefall könnt ihr biologische Schädlingsbekämpfungsmittel einsetzen oder die Schädlinge von Hand entfernen.
Erntezeit und Lagerung
Die Erntezeit für Bittermelonen beginnt in der Regel etwa 2-3 Monate nach dem Pflanzen. Die Früchte sind reif, wenn sie ihre typische Farbe erreicht haben und sich fest anfühlen. Erntet die Bittermelonen regelmäßig, um die Fruchtbildung anzuregen.
Bittermelonen sind nicht lange haltbar. Im Kühlschrank können sie etwa eine Woche aufbewahrt werden. Ihr könnt sie auch einfrieren oder einlegen, um sie länger haltbar zu machen.
Verwendung der Bittermelonen
Bittermelonen sind in der asiatischen Küche sehr beliebt. Sie haben einen bitteren Geschmack, der jedoch durch Blanchieren oder Einlegen reduziert werden kann. Bittermelonen können gebraten, gekocht, gedünstet oder gefüllt werden. Sie sind reich an Vitaminen und Mineralstoffen und gelten als sehr gesund.
Ich hoffe, diese Anleitung hat euch geholfen, eure eigenen Bittermelonen im Sack anzubauen. Viel Erfolg und eine reiche Ernte! Lasst mich wissen, wie es bei euch läuft!
Conclusion
So, there you have it! Growing bitter melon sacks doesn’t have to be a daunting task. By implementing this simple DIY trick, you’re not just simplifying the process; you’re actively creating an environment that encourages healthier, more abundant growth. Think of it as giving your bitter melons a little spa day, every day!
Why is this a must-try? Because it addresses several key challenges simultaneously. It provides crucial support, preventing the fruit from dragging on the ground and becoming susceptible to pests and diseases. It improves air circulation, reducing the risk of fungal infections. And perhaps most importantly, it allows for even ripening, ensuring a consistent and delicious flavor profile in every single bitter melon you harvest.
But don’t stop there! Feel free to experiment with different materials for your sacks. Burlap offers excellent breathability, while repurposed netting from old produce bags is a fantastic eco-friendly option. You can even try using old t-shirts, cut and sewn into the appropriate size. The key is to ensure the material is strong enough to support the weight of the growing melon and allows for adequate air circulation.
Consider the size of your sacks as well. For smaller varieties of bitter melon, a smaller sack will suffice. However, for larger varieties, you’ll need to ensure the sack is large enough to accommodate the fruit as it matures. You might even want to create sacks with adjustable closures, allowing you to tighten or loosen them as needed.
Another variation to explore is the addition of drainage holes. While the breathable material should provide adequate drainage, adding a few small holes at the bottom of the sack can further prevent water from accumulating and potentially causing rot.
And remember, this technique isn’t limited to just bitter melons! You can adapt it for other vining crops like cucumbers, small pumpkins, or even certain types of squash. The principle remains the same: providing support, improving air circulation, and promoting even ripening.
This DIY trick is a game-changer for anyone serious about growing bitter melon. It’s cost-effective, environmentally friendly, and incredibly rewarding. Imagine the satisfaction of harvesting perfectly formed, blemish-free bitter melons, knowing that you played an active role in their success.
We wholeheartedly encourage you to give this DIY trick a try. It’s a simple yet effective way to elevate your gardening game and enjoy a more bountiful harvest. And most importantly, we want to hear about your experience! Share your photos, tips, and variations in the comments below. Let’s create a community of bitter melon enthusiasts, all learning and growing together. Your insights could be invaluable to other gardeners, and we’re eager to see what creative solutions you come up with. Don’t be shy – share your bitter melon success stories!
Frequently Asked Questions (FAQ)
What type of material is best for making the bitter melon sacks?
The best material for your bitter melon sacks depends on your priorities and what you have readily available. Burlap is a popular choice due to its excellent breathability and natural fibers. It allows for good air circulation, which is crucial for preventing fungal diseases. However, burlap can be a bit rough and may require some softening before use.
Repurposed netting, such as that from old produce bags or onion sacks, is an excellent eco-friendly option. It’s lightweight, breathable, and readily available. Just make sure the netting is strong enough to support the weight of the growing bitter melon.
Old t-shirts, especially those made from cotton or a cotton blend, can also be used. Cut the t-shirt into the desired size and sew the edges to create a sack. T-shirts are soft and gentle on the fruit, but they may not be as breathable as burlap or netting.
Ultimately, the best material is one that is strong, breathable, and readily available to you. Experiment with different materials to see what works best in your specific climate and growing conditions.
How do I attach the bitter melon sacks to the trellis or support structure?
There are several ways to attach the bitter melon sacks to your trellis or support structure. The simplest method is to use twine or zip ties. Simply tie the sack to the trellis, ensuring it’s securely fastened and can support the weight of the growing melon.
Another option is to use S-hooks. These hooks can be easily attached to the trellis and then hooked onto the top of the sack. S-hooks are particularly useful if you want to be able to easily remove or adjust the sacks.
You can also create loops at the top of the sack when you’re sewing it. These loops can then be used to hang the sack from the trellis using twine, zip ties, or S-hooks.
Regardless of the method you choose, make sure the sack is securely attached and can withstand wind and other environmental factors. Regularly check the attachment points to ensure they haven’t become loose or damaged.
How often should I check the bitter melon sacks?
It’s a good idea to check your bitter melon sacks at least once a week, or even more frequently during periods of rapid growth. This allows you to monitor the development of the fruit, ensure the sack is providing adequate support, and identify any potential problems early on.
When checking the sacks, look for signs of pests or diseases, such as discoloration, spots, or insect activity. Also, check the sack itself for any tears or damage. If you notice any problems, address them immediately to prevent them from escalating.
As the bitter melon grows, you may need to adjust the sack to accommodate its increasing size. You may also need to tighten or loosen the attachment points to ensure the sack remains securely fastened to the trellis.
Can I reuse the bitter melon sacks?
Yes, you can definitely reuse the bitter melon sacks! In fact, reusing them is a great way to save money and reduce waste. However, before reusing the sacks, it’s important to thoroughly clean and disinfect them to prevent the spread of diseases.
Wash the sacks with soap and water, and then rinse them thoroughly. You can also soak them in a solution of bleach and water (1 part bleach to 9 parts water) for about 30 minutes to kill any remaining pathogens. After soaking, rinse the sacks thoroughly and allow them to dry completely before storing them.
If the sacks are made of a material that is prone to mildew, such as burlap, make sure they are completely dry before storing them. You can also store them in a dry, well-ventilated area to prevent mildew from forming.
By properly cleaning and storing your bitter melon sacks, you can reuse them for many seasons to come.
What if the bitter melon outgrows the sack?
If your bitter melon outgrows the sack, you have a few options. First, you can try to gently stretch the sack to accommodate the larger fruit. However, be careful not to tear the sack in the process.
If stretching the sack isn’t an option, you can create a larger sack using the same materials and techniques. Simply cut a larger piece of material and sew it into a sack that is big enough to accommodate the growing bitter melon.
Another option is to remove the bitter melon from the sack altogether. However, if you choose to do this, you’ll need to provide some other form of support to prevent the fruit from dragging on the ground. You can use a sling made of cloth or netting, or you can simply place the fruit on a bed of straw or mulch.
Regardless of the option you choose, make sure the bitter melon is adequately supported and protected from pests and diseases.


Leave a Comment