

Grow Purple Basil from Seed and unlock a world of vibrant color and aromatic delight right in your own backyard! Have you ever dreamed of adding a touch of regal beauty to your garden and your culinary creations? Well, dream no more! This DIY guide will take you step-by-step through the surprisingly simple process of cultivating your very own purple basil plants from seed.
Basil, in general, boasts a rich history, revered for centuries in various cultures for its medicinal properties and culinary uses. From ancient Greece, where it symbolized love and mourning, to India, where it’s considered a sacred herb, basil has always held a special place in human history. Now, imagine taking that historical significance and adding a splash of deep, captivating purple!
Why should you learn to grow purple basil from seed? Because it’s not just about having a pretty plant. It’s about adding a unique flavor profile to your dishes, attracting beneficial pollinators to your garden, and enjoying the immense satisfaction of nurturing life from a tiny seed. Plus, let’s be honest, store-bought purple basil can be expensive and often lacks the vibrant flavor of homegrown. I’m going to show you how to bypass all that and have a thriving purple basil patch that will be the envy of all your gardening friends. Get ready to get your hands dirty and embark on this rewarding gardening adventure with me!
Lila Basilikum aus Samen ziehen: Mein DIY-Leitfaden für eine farbenfrohe Ernte
Ich liebe Basilikum! Und noch mehr liebe ich lila Basilikum. Es ist nicht nur unglaublich aromatisch, sondern auch ein echter Hingucker in jedem Garten und auf jedem Teller. Ich habe schon oft lila Basilikum aus Samen gezogen und möchte meine Erfahrungen und Tipps mit dir teilen, damit auch du bald eine prächtige Ernte einfahren kannst. Keine Angst, es ist einfacher als du denkst!
Was du brauchst: Deine Einkaufsliste
Bevor wir loslegen, solltest du sicherstellen, dass du alles parat hast. Hier ist eine Liste der Dinge, die du benötigst:
* Lila Basilikumsamen: Achte auf eine gute Qualität. Ich kaufe meine Samen meistens online oder in einem gut sortierten Gartencenter.
* Anzuchterde: Normale Blumenerde ist oft zu nährstoffreich für junge Keimlinge. Anzuchterde ist feiner und enthält weniger Nährstoffe, was das Wurzelwachstum fördert.
* Anzuchttöpfe oder -schalen: Du kannst kleine Plastiktöpfe, Torfquelltöpfe oder sogar Eierkartons verwenden. Hauptsache, sie haben Löcher im Boden, damit überschüssiges Wasser ablaufen kann.
* Sprühflasche: Zum Befeuchten der Erde.
* Mini-Gewächshaus oder Frischhaltefolie: Um die Luftfeuchtigkeit hoch zu halten.
* Pflanzschilder: Damit du nicht vergisst, was du wo gesät hast.
* Gießkanne: Für späteres Gießen.
* Helle Fensterbank oder Pflanzenlampe: Basilikum braucht viel Licht zum Keimen und Wachsen.
Phase 1: Die Aussaat – Der Grundstein für deine lila Pracht
Die Aussaat ist der erste und wichtigste Schritt. Hier zeige ich dir, wie ich vorgehe:
1. Vorbereitung der Anzuchttöpfe: Fülle die Anzuchttöpfe oder -schalen mit Anzuchterde. Drücke die Erde leicht an, aber nicht zu fest. Sie sollte locker und luftig bleiben.
2. Aussaat der Samen: Verteile die Samen gleichmäßig auf der Erde. Ich säe meistens 2-3 Samen pro Topf, um sicherzustellen, dass mindestens einer keimt. Die Samen sind sehr klein, also sei vorsichtig.
3. Bedecken der Samen: Bedecke die Samen mit einer dünnen Schicht Anzuchterde. Die Schicht sollte nicht dicker als 0,5 cm sein, da Basilikum Lichtkeimer ist. Das bedeutet, dass die Samen Licht zum Keimen benötigen.
4. Befeuchten der Erde: Befeuchte die Erde vorsichtig mit einer Sprühflasche. Achte darauf, dass die Erde gut durchfeuchtet ist, aber nicht zu nass. Vermeide es, die Samen wegzuspülen.
5. Schaffen eines Mini-Gewächshauses: Decke die Anzuchttöpfe mit einem Mini-Gewächshaus oder Frischhaltefolie ab. Das erhöht die Luftfeuchtigkeit und fördert die Keimung. Vergiss nicht, regelmäßig zu lüften, um Schimmelbildung zu vermeiden. Ich lüfte meistens einmal täglich für etwa 15-20 Minuten.
6. Platzierung am hellen Standort: Stelle die Anzuchttöpfe an einen hellen und warmen Ort. Eine helle Fensterbank ist ideal. Wenn du keine helle Fensterbank hast, kannst du auch eine Pflanzenlampe verwenden. Die ideale Keimtemperatur liegt zwischen 20 und 25 Grad Celsius.
Phase 2: Die Keimung – Geduld ist gefragt
Die Keimung kann je nach Sorte und Bedingungen zwischen 5 und 14 Tagen dauern. Sei geduldig und gib nicht auf!
1. Regelmäßige Kontrolle: Kontrolliere die Erde täglich und halte sie feucht. Besprühe sie bei Bedarf mit der Sprühflasche.
2. Lüften: Lüfte das Mini-Gewächshaus oder die Frischhaltefolie regelmäßig, um Schimmelbildung zu vermeiden.
3. Beobachtung: Beobachte die Samen genau. Sobald die ersten Keimlinge erscheinen, kannst du das Mini-Gewächshaus oder die Frischhaltefolie entfernen.
Phase 3: Die Aufzucht – Pflege für kräftige Pflanzen
Sobald die Keimlinge erschienen sind, beginnt die Aufzuchtphase. Jetzt ist es wichtig, die jungen Pflanzen gut zu pflegen, damit sie kräftig und gesund wachsen.
1. Ausdünnen: Wenn mehrere Samen in einem Topf gekeimt sind, solltest du die schwächsten Keimlinge entfernen, damit die stärksten Pflanzen genügend Platz und Nährstoffe haben. Ich schneide die schwächeren Keimlinge mit einer kleinen Schere direkt über der Erde ab, um die Wurzeln der verbleibenden Pflanze nicht zu beschädigen.
2. Gießen: Gieße die jungen Pflanzen regelmäßig, aber nicht zu viel. Die Erde sollte immer leicht feucht sein, aber nicht nass. Vermeide Staunässe, da dies zu Wurzelfäule führen kann. Ich gieße meistens von unten, indem ich die Töpfe in eine Schale mit Wasser stelle und sie das Wasser aufsaugen lasse.
3. Licht: Stelle sicher, dass die Pflanzen genügend Licht bekommen. Wenn du keine helle Fensterbank hast, verwende eine Pflanzenlampe. Die Pflanzen sollten mindestens 6 Stunden Licht pro Tag bekommen.
4. Düngen: Beginne nach etwa 2-3 Wochen mit dem Düngen. Verwende einen milden Flüssigdünger für Kräuter und Gemüse. Dünge die Pflanzen einmal pro Woche. Ich verwende am liebsten organischen Dünger.
5. Umpflanzen: Sobald die Pflanzen groß genug sind (etwa 5-10 cm hoch), kannst du sie in größere Töpfe oder ins Freiland umpflanzen.
Phase 4: Das Umpflanzen – Ab in den Garten oder größere Töpfe
Das Umpflanzen ist ein wichtiger Schritt, um den Pflanzen mehr Platz zum Wachsen zu geben.
1. Vorbereitung: Bereite die neuen Töpfe oder das Beet im Garten vor. Die Erde sollte locker und humusreich sein.
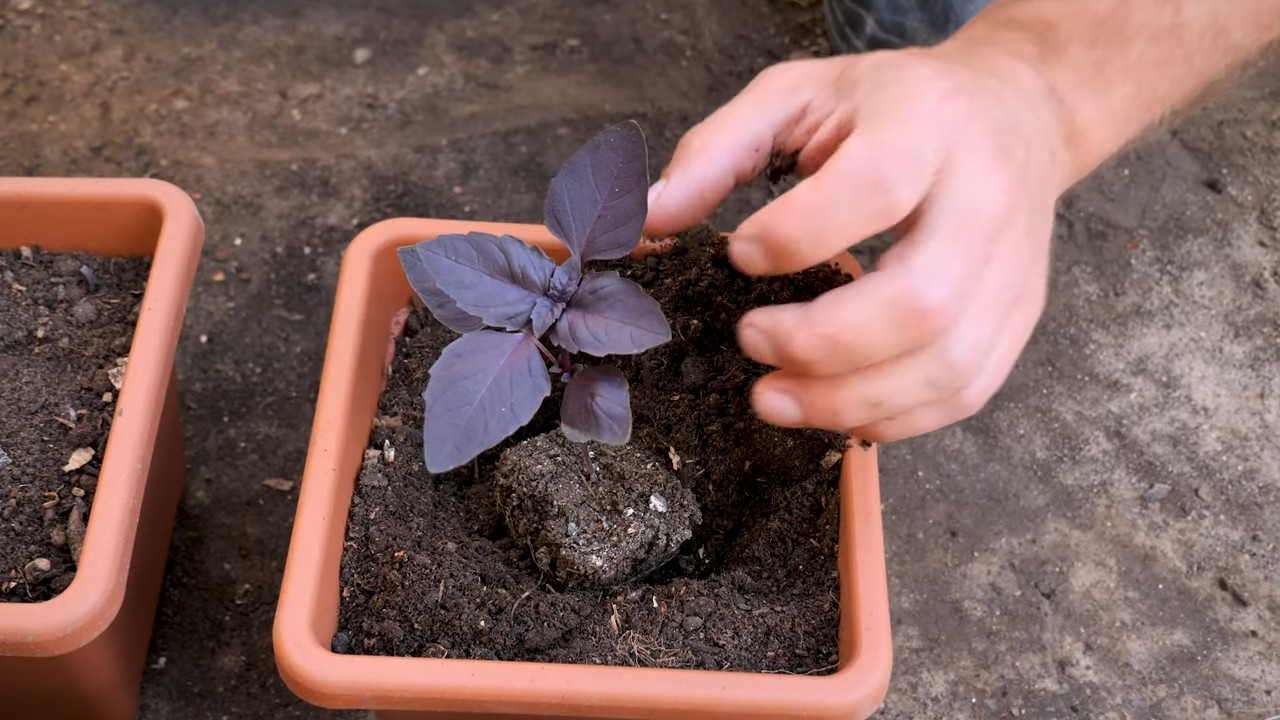
2. Umpflanzen: Hebe die Pflanzen vorsichtig aus den Anzuchttöpfen. Achte darauf, die Wurzeln nicht zu beschädigen.
3. Einsetzen: Setze die Pflanzen in die neuen Töpfe oder ins Beet. Der Abstand zwischen den Pflanzen sollte etwa 20-30 cm betragen.
4. Angießen: Gieße die Pflanzen nach dem Umpflanzen gut an.
Phase 5: Die Pflege im Freiland oder im Topf – Damit dein Basilikum prächtig gedeiht
Auch nach dem Umpflanzen brauchen die Pflanzen weiterhin Pflege.
1. Gießen: Gieße die Pflanzen regelmäßig, besonders bei trockenem Wetter.
2. Düngen: Dünge die Pflanzen alle 2-3 Wochen mit einem milden Flüssigdünger.
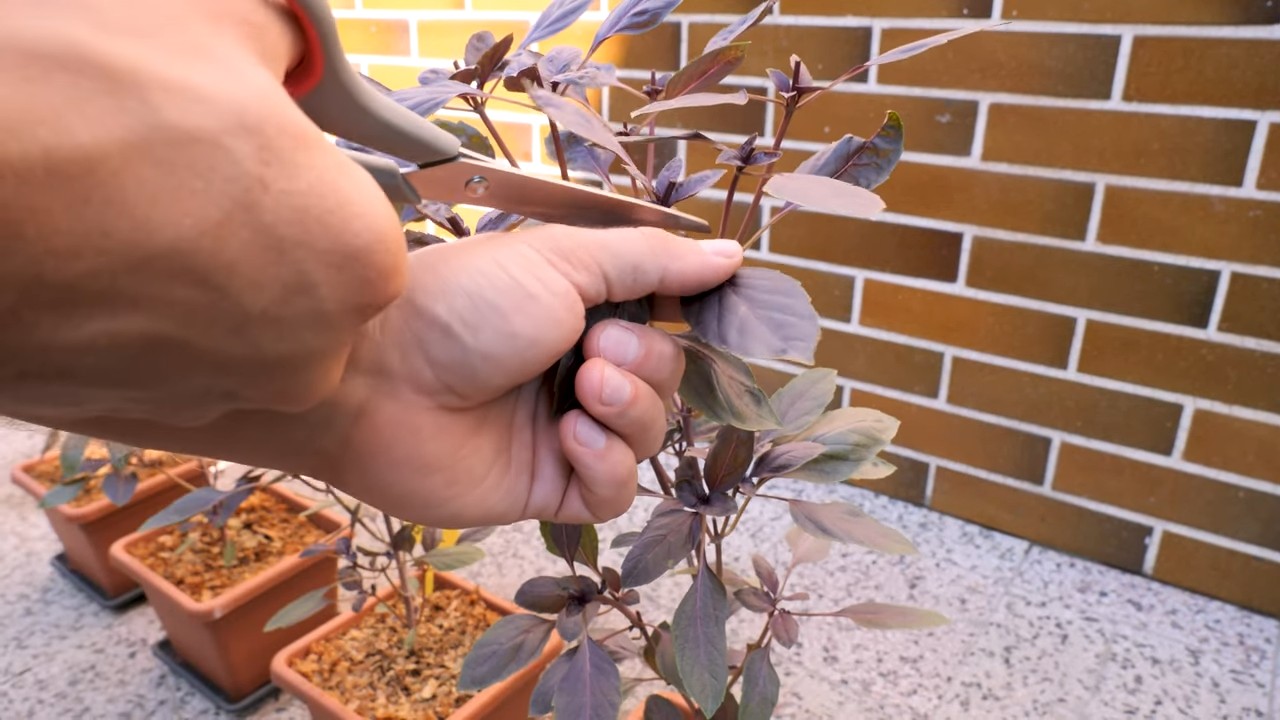
3. Schneiden: Schneide die Triebspitzen regelmäßig ab, um das Wachstum zu fördern und die Pflanze buschiger zu machen. Das Abschneiden der Blütenstände verhindert, dass die Pflanze ihre Energie in die Samenbildung steckt und fördert das Wachstum der Blätter.
4. Schutz vor Schädlingen: Kontrolliere die Pflanzen regelmäßig auf Schädlinge wie Blattläuse oder Schnecken. Bei Bedarf kannst du biologische Schädlingsbekämpfungsmittel einsetzen.
Zusätzliche Tipps für den Erfolg
* Wähle den richtigen Standort: Lila Basilikum liebt die Sonne. Wähle einen sonnigen Standort mit mindestens 6 Stunden Sonne pro Tag.
* Achte auf den Boden: Der Boden sollte locker, humusreich und gut durchlässig sein.
* Vermeide Staunässe: Staunässe kann zu Wurzelfäule führen. Achte darauf, dass das Wasser gut ablaufen kann.
* Schneide regelmäßig: Durch regelmäßiges Schneiden der Triebspitzen förderst du das Wachstum und die Verzweigung der Pflanze.
* Ernte die Blätter: Ernte die Blätter regelmäßig, um die Pflanze zu stimulieren und das Wachstum neuer Blätter zu fördern.
Häufige Fehler und wie du sie vermeidest
* Zu viel Gießen: Zu viel Gießen ist einer der häufigsten Fehler. Achte darauf, dass die
Conclusion
So, there you have it! Growing purple basil from seed isn’t just a gardening project; it’s an investment in flavor, beauty, and a touch of culinary magic. We’ve walked through the steps, from selecting the right seeds to nurturing those tiny sprouts into vibrant, purple-hued plants. Why is this a must-try? Because store-bought purple basil simply can’t compare to the intense aroma and robust flavor you’ll achieve with your own homegrown variety. Plus, the sheer satisfaction of watching something so beautiful and useful grow from a tiny seed is an experience that’s hard to beat.
Beyond the basic method, there are countless ways to personalize your purple basil growing experience. Consider experimenting with different soil types to see which yields the most vibrant color and intense flavor. Try succession planting – sowing new seeds every few weeks – to ensure a continuous harvest throughout the growing season. You could even explore different varieties of purple basil, such as ‘Dark Opal’ for its deep, almost black foliage, or ‘Red Rubin’ for its slightly sweeter flavor.
Don’t be afraid to get creative with your harvest, too! Purple basil isn’t just for pesto. Its striking color and unique flavor make it a fantastic addition to salads, cocktails, and even desserts. Infuse it into olive oil for a beautiful and flavorful finishing touch, or use it to garnish grilled meats and vegetables. The possibilities are truly endless.
Ultimately, the key to success with growing purple basil from seed is patience and observation. Pay attention to your plants’ needs, adjust your watering and feeding accordingly, and don’t be discouraged by the occasional setback. Gardening is a learning process, and every mistake is an opportunity to grow (pun intended!).
We wholeheartedly encourage you to embark on this rewarding journey. Imagine the pride you’ll feel when you harvest your first batch of fragrant, purple leaves. Picture the vibrant color and intense flavor you’ll be adding to your meals. Think of the joy of sharing your homegrown purple basil with friends and family.
So, grab your seeds, prepare your soil, and get ready to experience the magic of growing purple basil from seed. And most importantly, don’t forget to share your experiences with us! We’d love to hear about your successes, your challenges, and your creative uses for your homegrown purple basil. Share your photos, tips, and recipes in the comments below. Let’s create a community of purple basil enthusiasts and inspire others to discover the joy of growing their own food. Happy gardening!
Frequently Asked Questions (FAQ)
What is the best time of year to start growing purple basil from seed?
The best time to start growing purple basil from seed depends on your climate. In general, you should start seeds indoors 6-8 weeks before the last expected frost. This allows the seedlings to develop a strong root system before being transplanted outdoors. If you live in a warmer climate with a longer growing season, you can sow seeds directly into the garden after the last frost has passed and the soil has warmed up. Aim for soil temperatures consistently above 60°F (15°C) for optimal germination.
How much sunlight does purple basil need?
Purple basil thrives in full sun, which means it needs at least 6-8 hours of direct sunlight per day. Insufficient sunlight can result in leggy growth, pale foliage, and a less intense flavor. If you’re growing purple basil indoors, place it near a sunny window or use grow lights to supplement natural light. When transplanting seedlings outdoors, choose a location that receives plenty of sunlight throughout the day.
What kind of soil is best for growing purple basil?
Purple basil prefers well-draining soil that is rich in organic matter. A slightly acidic to neutral pH (around 6.0-7.0) is ideal. Before planting, amend the soil with compost or other organic matter to improve drainage and fertility. Avoid heavy clay soils, as they can become waterlogged and lead to root rot. You can also grow purple basil in containers using a high-quality potting mix.
How often should I water purple basil?
Water purple basil regularly, especially during hot and dry weather. The soil should be kept consistently moist, but not waterlogged. Check the soil moisture by sticking your finger about an inch deep. If the soil feels dry, it’s time to water. Avoid overhead watering, as this can promote fungal diseases. Instead, water at the base of the plant. During cooler weather, you may need to water less frequently.
How often should I fertilize purple basil?
Purple basil benefits from regular fertilization, especially during the growing season. Use a balanced fertilizer or a fertilizer specifically formulated for herbs. Follow the instructions on the fertilizer package for application rates. Avoid over-fertilizing, as this can lead to excessive foliage growth at the expense of flavor. You can also amend the soil with compost or other organic matter to provide a slow-release source of nutrients.
How do I harvest purple basil?
Harvest purple basil leaves as needed throughout the growing season. Pinch off the top leaves and stems to encourage bushier growth. Regular harvesting will also prevent the plant from flowering, which can diminish the flavor of the leaves. If you want to harvest a large quantity of purple basil, you can cut the entire plant back to a few inches above the ground. It will quickly regrow.
How do I prevent pests and diseases from affecting my purple basil?
Purple basil is generally resistant to pests and diseases, but it can be susceptible to certain problems, such as aphids, spider mites, and fungal diseases. To prevent these problems, keep the plants well-ventilated, avoid overhead watering, and inspect the leaves regularly for signs of infestation or disease. If you notice any problems, treat them promptly with an appropriate insecticide or fungicide. Organic options, such as neem oil or insecticidal soap, are often effective.
Can I grow purple basil indoors?
Yes, you can grow purple basil indoors, provided you give it enough light and warmth. Place the plant near a sunny window or use grow lights to supplement natural light. Use a well-draining potting mix and water regularly. Indoor-grown purple basil may not be as productive as outdoor-grown purple basil, but it can still provide you with a steady supply of fresh leaves.
How do I store purple basil?
Freshly harvested purple basil leaves can be stored in the refrigerator for a few days. Wrap the leaves in a damp paper towel and place them in a plastic bag. You can also freeze purple basil leaves for longer storage. Wash and dry the leaves, then chop them and place them in ice cube trays with water or olive oil. Once frozen, transfer the cubes to a freezer bag. Alternatively, you can dry purple basil leaves by hanging them upside down in a cool, dry place. Once the leaves are completely dry, store them in an airtight container.
Why is my purple basil turning green?
Several factors can cause purple basil to turn green. Insufficient sunlight is a common cause, as the plant needs plenty of light to produce the pigments that give it its purple color. Over-fertilizing with nitrogen can also cause the plant to produce more chlorophyll, which can mask the purple color. Additionally, some varieties of purple basil are more prone to turning green than others. If your purple basil is turning green, try moving it to a sunnier location and reducing the amount of nitrogen fertilizer you use.

Leave a Comment