

Mogra Jasmine Propagation: Ever dreamt of filling your garden with the intoxicating fragrance of Mogra Jasmine? Imagine stepping outside and being greeted by the sweet, heady scent that instantly transports you to a tranquil paradise. Well, you can make that dream a reality, and it’s easier than you think! This isn’t just about growing a plant; it’s about cultivating a piece of fragrant history.
Jasmine, particularly Mogra, holds a special place in many cultures, often associated with love, purity, and beauty. In India, it’s a staple in religious ceremonies, weddings, and even hair adornments. Its captivating aroma has been cherished for centuries, and now, you can bring that same magic into your own backyard.
But why bother with Mogra Jasmine Propagation yourself? Let’s face it, buying mature Mogra plants can be expensive, and sometimes, they don’t thrive in their new environment. This DIY guide will empower you to create new Mogra plants from existing ones, saving you money and giving you the satisfaction of nurturing life from scratch. Plus, you’ll learn valuable gardening skills that you can apply to other plants as well. I’m going to show you simple, step-by-step techniques that even a complete beginner can master. Get ready to unleash your inner gardener and fill your world with the enchanting fragrance of Mogra Jasmine!
Mogra Jasmin Vermehrung: Dein DIY-Leitfaden für duftende Blüten
Hallo Pflanzenfreunde! Ich freue mich riesig, euch heute zu zeigen, wie ihr eure eigenen Mogra Jasmin Pflanzen vermehren könnt. Mogra Jasmin, auch bekannt als Arabischer Jasmin, ist nicht nur wunderschön, sondern verströmt auch einen betörenden Duft. Stellt euch vor, ihr habt bald eine ganze Sammlung dieser duftenden Schönheiten! Keine Sorge, es ist einfacher als ihr denkt. Ich führe euch Schritt für Schritt durch den Prozess.
Was du für die Mogra Jasmin Vermehrung brauchst
Bevor wir loslegen, hier eine Liste der Dinge, die ihr benötigt:
* Gesunde Mogra Jasmin Mutterpflanze: Wählt eine Pflanze, die kräftig wächst und keine Anzeichen von Krankheiten oder Schädlingen aufweist.
* Scharfe und saubere Gartenschere oder Messer: Hygiene ist wichtig, um Infektionen zu vermeiden.
* Bewurzelungshormon (optional, aber empfohlen): Fördert die Wurzelbildung und erhöht die Erfolgsrate.
* Kleine Töpfe oder Anzuchtschalen: Für die jungen Stecklinge.
* Anzuchterde oder eine Mischung aus Torfmoos und Perlit: Sorgt für gute Drainage und Belüftung.
* Plastiktüten oder eine Mini-Gewächshaus: Um die Luftfeuchtigkeit hoch zu halten.
* Sprühflasche mit Wasser: Zum Befeuchten der Stecklinge.
* Geduld: Die Wurzelbildung kann einige Wochen dauern.
Die beste Zeit für die Vermehrung
Der beste Zeitpunkt für die Mogra Jasmin Vermehrung ist im Frühjahr oder Frühsommer, wenn die Pflanze aktiv wächst. Zu dieser Zeit sind die Stecklinge am wahrscheinlichsten, Wurzeln zu schlagen.
Stecklinge schneiden: Der erste Schritt zum Erfolg
1. Auswahl der Stecklinge: Sucht nach gesunden, nicht blühenden Trieben an eurer Mutterpflanze. Die Triebe sollten etwa 10-15 cm lang sein und mindestens 3-4 Blattknoten haben.
2. Schneiden der Stecklinge: Mit eurer scharfen und sauberen Gartenschere oder dem Messer schneidet ihr die Triebe direkt unterhalb eines Blattknotens ab. Ein sauberer Schnitt ist wichtig, um Fäulnis zu vermeiden.
3. Vorbereitung der Stecklinge: Entfernt die unteren Blätter von den Stecklingen, so dass nur noch die oberen 2-3 Blätter übrig bleiben. Dies reduziert die Verdunstung und konzentriert die Energie der Pflanze auf die Wurzelbildung. Wenn die verbleibenden Blätter sehr groß sind, könnt ihr sie halbieren, um die Verdunstung weiter zu reduzieren.
Bewurzelung der Stecklinge: So klappt’s garantiert
1. Bewurzelungshormon auftragen (optional): Taucht das untere Ende des Stecklings in Bewurzelungshormon. Dies fördert die Wurzelbildung und schützt vor Pilzbefall. Achtet darauf, nicht zu viel Hormon zu verwenden, da dies die Wurzelbildung hemmen kann.
2. Stecklinge einpflanzen: Füllt eure Töpfe oder Anzuchtschalen mit Anzuchterde. Macht mit einem Bleistift oder einem ähnlichen Gegenstand ein Loch in die Erde. Steckt die Stecklinge vorsichtig in die Löcher, so dass die unteren Blattknoten unter der Erde liegen. Drückt die Erde um die Stecklinge herum leicht an.
3. Bewässern der Stecklinge: Gießt die Stecklinge vorsichtig, bis die Erde feucht, aber nicht nass ist. Vermeidet Staunässe, da dies zu Fäulnis führen kann.
4. Luftfeuchtigkeit erhöhen: Stellt die Töpfe mit den Stecklingen in Plastiktüten oder ein Mini-Gewächshaus. Dies erhöht die Luftfeuchtigkeit und hilft den Stecklingen, nicht auszutrocknen. Achtet darauf, dass die Plastiktüten die Blätter der Stecklinge nicht berühren.
5. Standort wählen: Stellt die Stecklinge an einen hellen, aber nicht direkten Sonnenplatz. Direkte Sonneneinstrahlung kann die Stecklinge verbrennen.
6. Regelmäßige Pflege: Kontrolliert die Stecklinge regelmäßig und besprüht sie bei Bedarf mit Wasser, um die Luftfeuchtigkeit hoch zu halten. Lüftet die Plastiktüten oder das Mini-Gewächshaus täglich, um Schimmelbildung zu vermeiden.
Geduld ist gefragt: Die Wurzelbildung abwarten
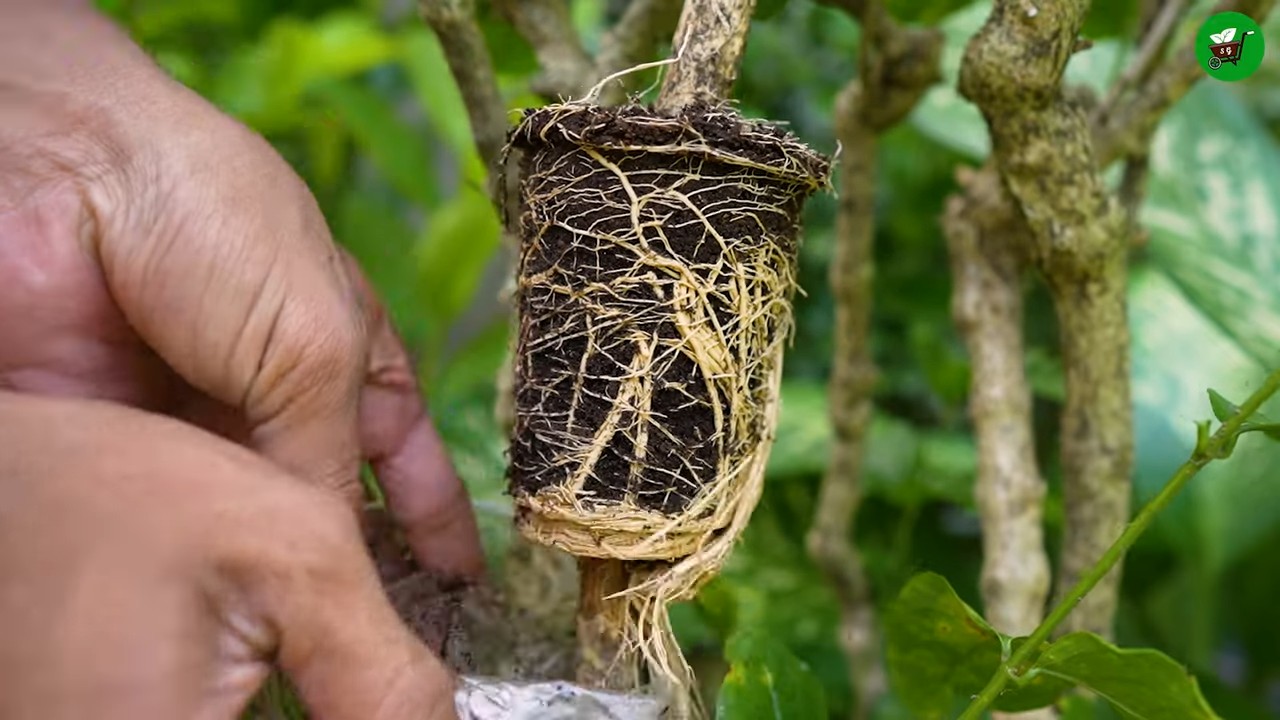
Die Wurzelbildung kann je nach Bedingungen und Sorte 4-8 Wochen dauern. Ihr könnt vorsichtig an den Stecklingen ziehen, um zu prüfen, ob sie Wurzeln gebildet haben. Wenn ihr Widerstand spürt, haben sich Wurzeln gebildet.
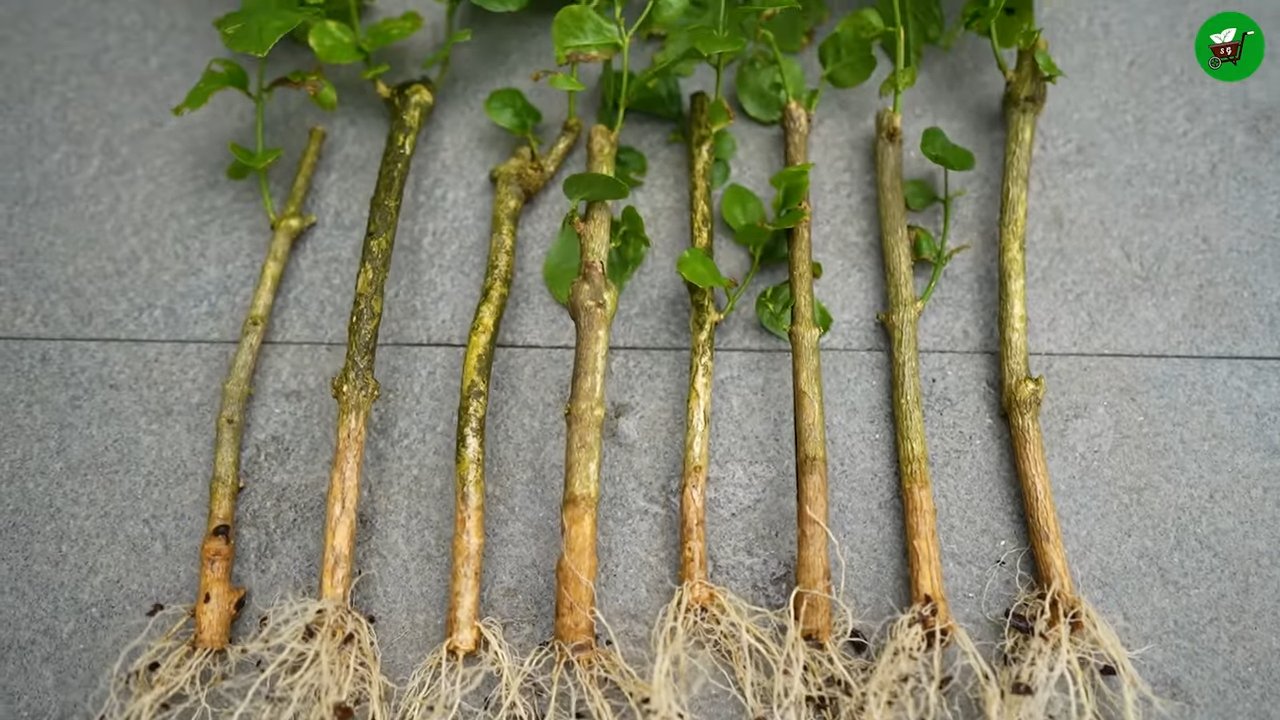
Umpflanzen der jungen Pflanzen: Ein neues Zuhause
1. Vorbereitung: Sobald die Stecklinge ausreichend Wurzeln gebildet haben, könnt ihr sie in größere Töpfe mit Blumenerde umpflanzen. Wählt Töpfe, die etwas größer sind als die Anzuchttöpfe.
2. Umpflanzen: Nehmt die jungen Pflanzen vorsichtig aus den Anzuchttöpfen und pflanzt sie in die neuen Töpfe. Achtet darauf, die Wurzeln nicht zu beschädigen. Füllt die Töpfe mit Blumenerde auf und drückt die Erde leicht an.
3. Bewässern: Gießt die jungen Pflanzen nach dem Umpflanzen gründlich.
4. Pflege: Stellt die jungen Pflanzen an einen hellen, aber nicht direkten Sonnenplatz. Gießt sie regelmäßig, aber vermeidet Staunässe. Düngt sie während der Wachstumsperiode alle 2-4 Wochen mit einem Flüssigdünger für blühende Pflanzen.
Zusätzliche Tipps für den Erfolg
* Verwendet saubere Werkzeuge: Reinigt eure Gartenschere oder das Messer vor dem Schneiden der Stecklinge mit Alkohol, um Infektionen zu vermeiden.
* Wählt die richtige Erde: Anzuchterde oder eine Mischung aus Torfmoos und Perlit sorgt für gute Drainage und Belüftung, was für die Wurzelbildung wichtig ist.
* Achtet auf die Luftfeuchtigkeit: Eine hohe Luftfeuchtigkeit ist entscheidend für den Erfolg der Vermehrung.
* Vermeidet Staunässe: Staunässe kann zu Fäulnis führen. Gießt die Stecklinge nur, wenn die Erde trocken ist.
* Habt Geduld: Die Wurzelbildung kann einige Wochen dauern. Gebt nicht auf, wenn ihr nicht sofort Ergebnisse seht.
Häufige Probleme und Lösungen
* Stecklinge faulen: Dies kann durch Staunässe oder mangelnde Hygiene verursacht werden. Verwendet saubere Werkzeuge und sorgt für gute Drainage.
* Stecklinge bilden keine Wurzeln: Dies kann durch mangelnde Luftfeuchtigkeit, zu wenig Licht oder die Verwendung von ungeeigneten Stecklingen verursacht werden. Erhöht die Luftfeuchtigkeit, stellt die Stecklinge an einen helleren Standort und verwendet gesunde, nicht blühende Triebe.
* Stecklinge werden gelb: Dies kann durch zu viel Sonne oder zu wenig Nährstoffe verursacht werden. Stellt die Stecklinge an einen schattigeren Standort und düngt sie bei Bedarf.
Abschließende Gedanken
Die Vermehrung von Mogra Jasmin ist eine lohnende Erfahrung. Mit etwas Geduld und Sorgfalt könnt ihr eure eigene Sammlung dieser duftenden Schönheiten aufbauen. Ich hoffe, dieser Leitfaden hat euch geholfen. Viel Erfolg bei eurer Vermehrung! Und vergesst nicht, mir eure Erfolge zu zeigen! Ich freue mich darauf, eure duftenden Jasmin-Gärten zu sehen.
Conclusion
If you’ve ever been captivated by the intoxicating fragrance of Mogra jasmine and dreamed of filling your garden with its exquisite blooms, mastering the art of Mogra jasmine propagation is your gateway to that fragrant paradise. This isn’t just about saving money on nursery plants; it’s about connecting with nature, nurturing new life, and experiencing the profound satisfaction of creating something beautiful with your own hands.
Why is this DIY propagation method a must-try? Because it’s surprisingly simple, cost-effective, and yields impressive results. Forget complicated grafting techniques or expensive rooting hormones (though you can use them if you wish!). This method focuses on creating the ideal environment for your cuttings to thrive, mimicking the natural conditions that encourage root development. You’ll be amazed at how quickly and easily you can transform a few simple cuttings into thriving new jasmine plants.
But the beauty of this method lies not only in its simplicity but also in its adaptability. Feel free to experiment with different types of rooting mediums. While we’ve highlighted the effectiveness of a well-draining potting mix, you can also try using perlite, vermiculite, or even a combination of these. Some gardeners swear by dipping the cuttings in honey before planting, claiming it acts as a natural rooting hormone and antifungal agent. Others prefer using willow water, which contains salicylic acid, a natural rooting stimulant.
Consider these variations to tailor the propagation process to your specific environment and preferences:
* Humidity Control: If you live in a dry climate, maintaining high humidity around your cuttings is crucial. You can achieve this by using a humidity dome, a plastic bag placed over the pot, or even misting the cuttings regularly.
* Light Exposure: While direct sunlight can scorch young cuttings, they still need adequate light for photosynthesis. Aim for bright, indirect light or filtered sunlight.
* Cutting Selection: Experiment with different types of cuttings. Semi-hardwood cuttings, taken from the current season’s growth, generally root more easily than hardwood cuttings.
* Potting Up: Once your cuttings have developed a strong root system, gradually acclimate them to outdoor conditions before transplanting them into larger pots or directly into your garden.
The key to successful Mogra jasmine propagation is patience and observation. Don’t be discouraged if some of your cuttings don’t take root. It’s all part of the learning process. Keep a close eye on your cuttings, monitor their moisture levels, and adjust your approach as needed.
We wholeheartedly encourage you to embark on this rewarding journey of Mogra jasmine propagation. It’s a chance to connect with nature, expand your gardening skills, and fill your life with the intoxicating fragrance of jasmine. Once you’ve successfully propagated your own Mogra jasmine plants, we’d love to hear about your experience! Share your tips, tricks, and photos in the comments below. Let’s create a community of jasmine enthusiasts and help each other cultivate thriving gardens filled with these fragrant beauties. Your success story could inspire others to try their hand at this fulfilling DIY project. So, grab your pruning shears, prepare your rooting medium, and get ready to experience the magic of Mogra jasmine propagation!
Frequently Asked Questions (FAQ)
What is the best time of year to propagate Mogra jasmine?
The ideal time to propagate Mogra jasmine is during the spring or early summer. This is when the plant is actively growing, and the cuttings are more likely to root successfully. The warmer temperatures and longer daylight hours provide the optimal conditions for root development. However, you can also attempt propagation during other times of the year, but the success rate may be lower. Avoid propagating during the dormant winter months.
What type of cutting should I use for propagation?
Semi-hardwood cuttings are generally the most successful for Mogra jasmine propagation. These cuttings are taken from the current season’s growth and are partially matured. They should be about 4-6 inches long and have several leaves. Remove the lower leaves to prevent them from rotting in the rooting medium. Avoid using very young, soft cuttings or very old, woody cuttings, as they are less likely to root.
What is the best rooting medium for Mogra jasmine cuttings?
A well-draining rooting medium is essential for successful Mogra jasmine propagation. A mixture of perlite and vermiculite is a popular choice, as it provides excellent drainage and aeration. You can also use a commercial potting mix specifically designed for cuttings. Avoid using garden soil, as it can be too heavy and may contain pathogens that can harm the cuttings. The key is to ensure that the rooting medium retains moisture without becoming waterlogged.
How often should I water the cuttings?
The frequency of watering depends on the humidity and temperature of your environment. Generally, you should water the cuttings whenever the top inch of the rooting medium feels dry to the touch. Avoid overwatering, as this can lead to root rot. It’s also helpful to mist the cuttings regularly to maintain high humidity. A humidity dome or plastic bag can also help retain moisture.
How long does it take for Mogra jasmine cuttings to root?
It typically takes 4-8 weeks for Mogra jasmine cuttings to root. The exact time will depend on the environmental conditions and the type of cutting used. You can check for root development by gently tugging on the cutting. If you feel resistance, it means that roots have formed. You can also carefully remove the cutting from the rooting medium to inspect the roots.
What do I do after the cuttings have rooted?
Once the cuttings have developed a strong root system, you can transplant them into individual pots filled with a well-draining potting mix. Gradually acclimate the young plants to outdoor conditions before planting them in your garden. Start by placing them in a sheltered location with indirect sunlight for a few hours each day, gradually increasing the amount of sunlight over a week or two.
Can I use rooting hormone to propagate Mogra jasmine?
Yes, using rooting hormone can increase the success rate of Mogra jasmine propagation. Rooting hormone contains auxins, which are plant hormones that stimulate root development. Dip the cut end of the cutting in rooting hormone powder or liquid before planting it in the rooting medium. Follow the instructions on the rooting hormone package for proper application. While not strictly necessary, rooting hormone can be particularly helpful if you’re having difficulty getting your cuttings to root.
What are some common problems I might encounter during Mogra jasmine propagation?
Some common problems include root rot, fungal infections, and pest infestations. Root rot is caused by overwatering and poor drainage. To prevent root rot, use a well-draining rooting medium and avoid overwatering. Fungal infections can be prevented by using sterile tools and a clean rooting medium. Pest infestations can be controlled by regularly inspecting the cuttings and treating them with an appropriate insecticide or fungicide if necessary.
How much sunlight do Mogra jasmine cuttings need?
Mogra jasmine cuttings need bright, indirect light to thrive. Avoid exposing them to direct sunlight, as this can scorch the leaves. A location near a window with filtered sunlight is ideal. You can also use artificial lighting, such as fluorescent grow lights, to supplement natural light.
How do I know if my Mogra jasmine cuttings have failed to root?
If your Mogra jasmine cuttings turn brown or black, wilt, or develop signs of rot, it’s likely that they have failed to root. Gently tug on the cutting. If it comes out of the rooting medium easily without any resistance, it means that roots have not formed. Don’t be discouraged! Propagation can be a bit of a trial-and-error process. Simply try again with fresh cuttings and a new rooting medium.
Leave a Comment