

Growing Hibiscus Sabdariffa, also known as Roselle, might sound exotic, but trust me, it’s more achievable than you think! Have you ever dreamt of sipping on homemade hibiscus tea, bursting with vibrant color and tangy flavor, all sourced directly from your own backyard? Well, stop dreaming and start doing! This DIY guide is your passport to cultivating this beautiful and beneficial plant right at home.
Hibiscus Sabdariffa boasts a rich history, deeply intertwined with cultures across the globe. From its origins in West Africa, where it was prized for its medicinal properties and culinary uses, to its adoption in Southeast Asia and the Americas, this plant has been a staple for centuries. Imagine, you’re not just growing a plant; you’re connecting with a global heritage!
But why should *you* bother with growing Hibiscus Sabdariffa? In today’s world, where we’re increasingly conscious of what we consume, having control over our food sources is more important than ever. Plus, store-bought hibiscus tea often lacks the freshness and potency of the homemade variety. This DIY project empowers you to create a sustainable source of delicious tea, jams, and even natural dyes, all while adding a touch of tropical beauty to your garden. Let’s dive in and unlock the secrets to successfully cultivating this amazing plant!
Hibiskus Sabdariffa selbst anbauen: Ein umfassender DIY-Leitfaden
Hallo Gartenfreunde! Ich freue mich riesig, euch heute mitzunehmen auf eine Reise, bei der wir gemeinsam Hibiskus Sabdariffa, auch bekannt als Roselle oder Afrikanische Malve, anbauen. Diese wunderschöne Pflanze ist nicht nur ein echter Hingucker im Garten, sondern liefert auch die Grundlage für leckeren Hibiskustee und andere Köstlichkeiten. Keine Angst, es ist einfacher als ihr denkt! Lasst uns loslegen!
Was du für den Anbau von Hibiskus Sabdariffa brauchst:
* Hibiskus Sabdariffa Samen: Am besten von einer vertrauenswürdigen Quelle beziehen.
* Anzuchttöpfe oder -schalen: Für die Vorkultur.
* Anzuchterde: Leicht und nährstoffarm.
* Gartenerde: Für das spätere Umpflanzen.
* Kompost oder organischer Dünger: Für eine gute Nährstoffversorgung.
* Gießkanne oder Sprühflasche: Zum Bewässern.
* Standort: Ein sonniger und warmer Platz im Garten oder auf dem Balkon.
* Geduld: Denn gute Dinge brauchen Zeit!
Die Vorbereitung: Der Schlüssel zum Erfolg
Bevor wir mit dem eigentlichen Anbau beginnen, ist eine gute Vorbereitung das A und O. Hier sind die Schritte, die du beachten solltest:
1. Samen auswählen: Achte darauf, dass du qualitativ hochwertige Samen von Hibiskus Sabdariffa kaufst. Sie sollten frisch und keimfähig sein.
2. Standort bestimmen: Hibiskus Sabdariffa liebt die Sonne! Wähle einen Standort, der mindestens 6 Stunden direkte Sonneneinstrahlung pro Tag erhält. Ein warmer, windgeschützter Platz ist ideal.
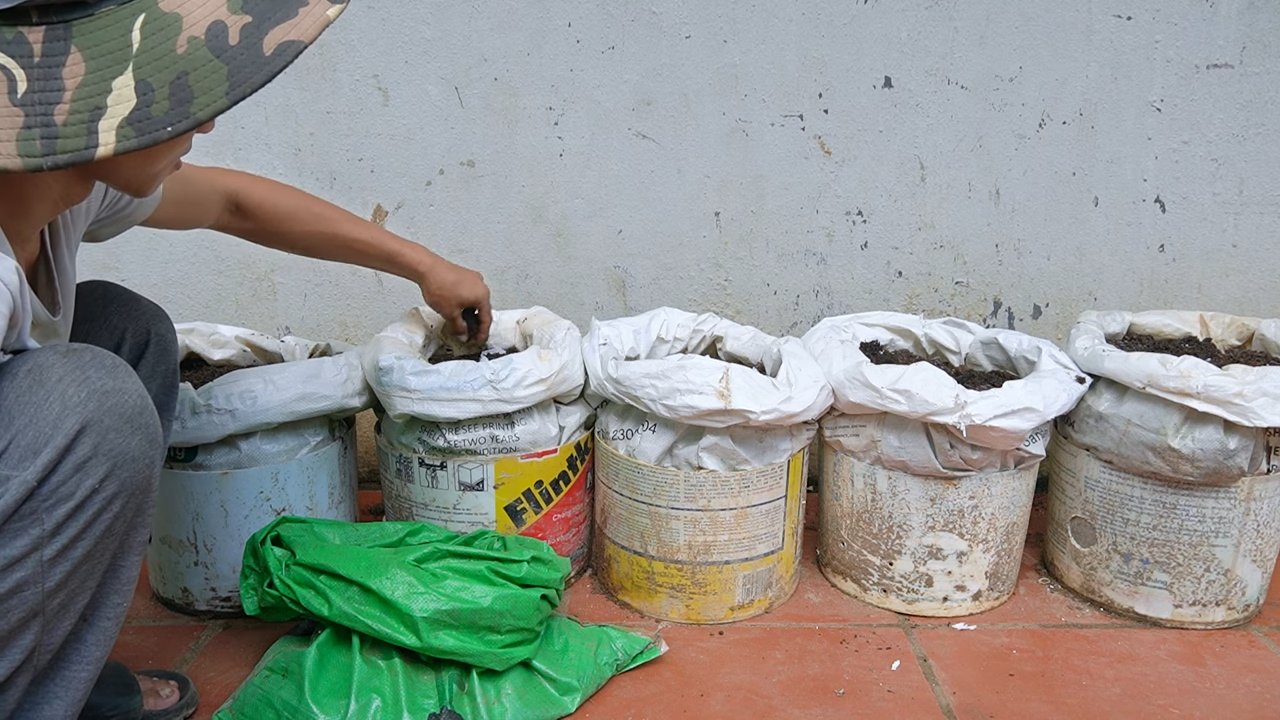
3. Boden vorbereiten: Der Boden sollte gut durchlässig und nährstoffreich sein. Lockere den Boden gründlich auf und mische Kompost oder organischen Dünger unter.
Aussaat und Vorkultur: Der Start ins Leben
Die Vorkultur ist besonders wichtig, wenn du in einer Region mit kürzeren Sommern lebst. So gibst du deinen Hibiskuspflanzen einen Vorsprung.
1. Anzuchttöpfe vorbereiten: Fülle die Anzuchttöpfe oder -schalen mit Anzuchterde.
2. Samen aussäen: Lege die Samen etwa 1 cm tief in die Erde und bedecke sie leicht mit Erde.
3. Bewässern: Befeuchte die Erde vorsichtig mit einer Sprühflasche. Sie sollte feucht, aber nicht nass sein.
4. Warm stellen: Stelle die Anzuchttöpfe an einen warmen Ort (ca. 20-25°C). Ein Mini-Gewächshaus oder eine Fensterbank über der Heizung sind ideal.
5. Feucht halten: Halte die Erde gleichmäßig feucht, aber vermeide Staunässe.
6. Geduld haben: Die Keimung kann 1-3 Wochen dauern. Sobald die ersten Keimlinge erscheinen, stelle die Töpfe an einen helleren Ort.
Umpflanzen: Raus in die Freiheit!
Sobald die jungen Hibiskuspflanzen kräftig genug sind (ca. 10-15 cm hoch), können sie ins Freie umgepflanzt werden.
1. Abhärten: Bevor du die Pflanzen ins Freie pflanzt, solltest du sie einige Tage lang abhärten. Stelle sie tagsüber für ein paar Stunden nach draußen und hole sie abends wieder rein. So gewöhnen sie sich langsam an die neuen Bedingungen.
2. Pflanzloch vorbereiten: Grabe ein ausreichend großes Pflanzloch, das doppelt so breit und tief ist wie der Wurzelballen.
3. Pflanzen einsetzen: Setze die Hibiskuspflanzen vorsichtig in die Pflanzlöcher und fülle sie mit Gartenerde auf.
4. Angießen: Gieße die Pflanzen gründlich an.
5. Abstand halten: Achte darauf, dass die Pflanzen genügend Platz haben, um sich zu entwickeln. Ein Abstand von 60-90 cm ist ideal.
Pflege: Damit dein Hibiskus prächtig gedeiht
Die richtige Pflege ist entscheidend für eine reiche Ernte. Hier sind einige Tipps:
* Bewässerung: Hibiskus Sabdariffa benötigt regelmäßige Bewässerung, besonders während der Blütezeit. Achte darauf, dass die Erde immer leicht feucht ist, aber vermeide Staunässe.
* Düngung: Dünge die Pflanzen regelmäßig mit einem organischen Dünger oder Kompost. So erhalten sie alle wichtigen Nährstoffe.
* Schnitt: Ein regelmäßiger Schnitt fördert das Wachstum und die Blütenbildung. Entferne regelmäßig verwelkte Blüten und trockene Blätter.
* Schutz vor Schädlingen: Kontrolliere die Pflanzen regelmäßig auf Schädlinge wie Blattläuse oder Spinnmilben. Bei Bedarf kannst du natürliche Schädlingsbekämpfungsmittel einsetzen.
* Überwinterung: Hibiskus Sabdariffa ist nicht winterhart. Wenn du in einer Region mit kalten Wintern lebst, solltest du die Pflanzen im Herbst in Töpfe umpflanzen und an einem hellen, kühlen Ort überwintern.
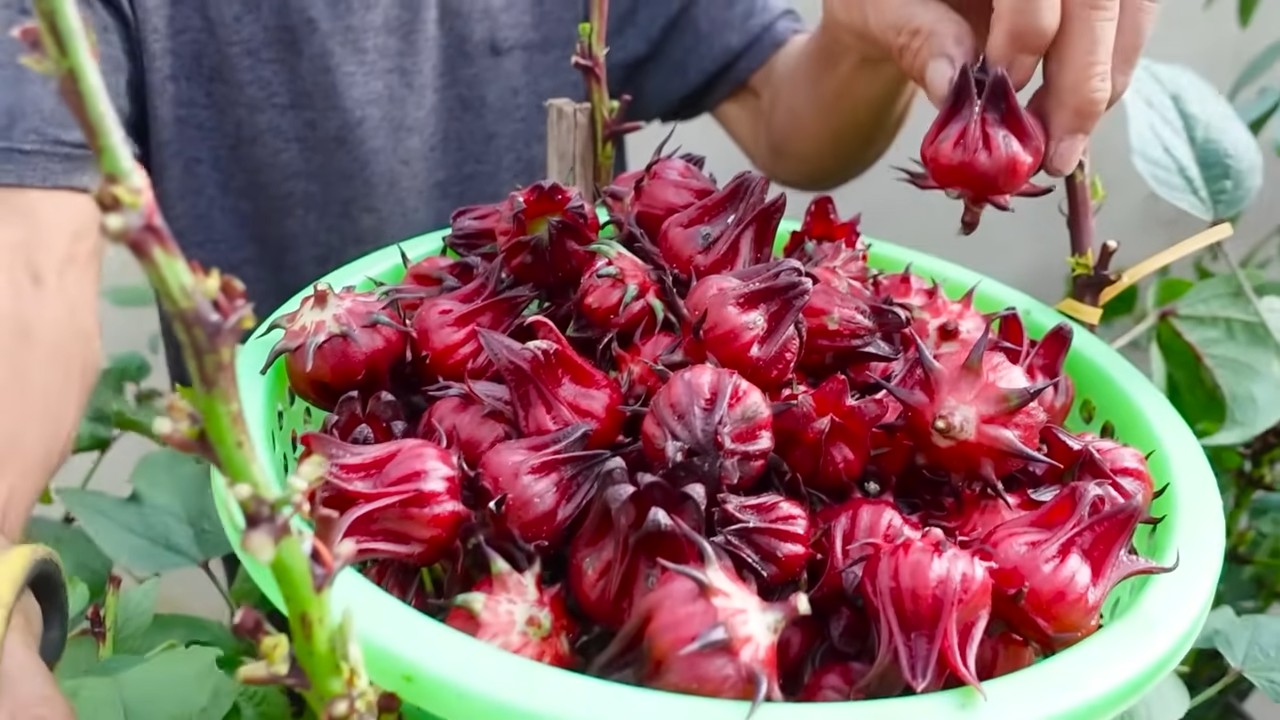
Die Ernte: Der Lohn deiner Mühe
Die Erntezeit beginnt in der Regel im Spätsommer oder Herbst, wenn die Blütenstände (Kelche) rot und fleischig geworden sind.
1. Erntezeitpunkt bestimmen: Die Kelche sind reif, wenn sie sich leicht vom Stiel lösen lassen.
2. Kelche ernten: Schneide die Kelche vorsichtig mit einer Schere ab.
3. Verarbeitung: Die Kelche können frisch verwendet oder getrocknet werden. Für Hibiskustee werden sie in der Regel getrocknet.
Verwendung: Vielseitig und lecker
Hibiskus Sabdariffa ist unglaublich vielseitig und kann für verschiedene Zwecke verwendet werden:
* Hibiskustee: Die getrockneten Kelche sind die Grundlage für einen erfrischenden und gesunden Hibiskustee.
* Marmelade: Aus den frischen Kelchen lässt sich eine leckere Marmelade herstellen.
* Sirup: Hibiskussirup ist eine tolle Zutat für Cocktails und Desserts.
* Salate: Die jungen Blätter können roh in Salaten verwendet werden.
* Kulinarische Gerichte: In einigen Ländern werden die Kelche auch in herzhaften Gerichten verwendet.
Zusätzliche Tipps für den erfolgreichen Anbau:
* Boden testen: Ein Bodentest kann dir helfen, den pH-Wert und den Nährstoffgehalt deines Bodens zu bestimmen. So kannst du den Boden optimal vorbereiten.
* Mulchen: Eine Mulchschicht aus Stroh oder Rindenmulch hilft, die Feuchtigkeit im Boden zu halten und Unkraut zu unterdrücken.
* Windschutz: Wenn dein Garten sehr windig ist, solltest du die Hibiskuspflanzen mit einem Windschutz schützen.
* Regelmäßige Kontrolle: Kontrolliere die Pflanzen regelmäßig auf Anzeichen von Krankheiten oder Schädlingen. Je früher du Probleme erkennst, desto einfacher lassen sie sich beheben.
* Dokumentation: Führe ein Gartentagebuch, in dem du deine Erfahrungen mit dem Anbau von Hibiskus Sabdariffa festhältst. So kannst du von Jahr zu Jahr dazulernen.
Häufige Probleme und Lösungen:
* Gelbe Blätter: Können auf Nährstoffmangel oder Überwässerung hindeuten. Dünge die Pflanzen und achte auf eine gute Drainage.
* Blattläuse: Bekämpfe Blattläuse mit natürlichen Schädlingsbekämpfungsmitteln wie Neemöl oder Schmierseifenlösung.
* Spinnmilben: Spinnmilben lieben trockene Luft. Erhöhe die Luftfeuchtigkeit und bekämpfe sie mit Raubmilben oder Neemöl.
* Keine Blüten: Könnte an zu wenig Sonne oder Nährstoffmangel liegen. Stelle die Pflanzen an einen sonnigeren Standort und dünge sie regelmäßig.
Fazit: Ein lohnendes Projekt
Der Anbau von Hibiskus Sabdariffa ist ein lohnendes Projekt, das nicht nur deinen Garten verschönert, sondern
Conclusion
So, there you have it! Growing Hibiscus Sabdariffa, also known as Roselle, at home is not only achievable but also incredibly rewarding. From the vibrant crimson calyces that promise a tangy, refreshing tea to the sheer joy of nurturing a plant from seed to harvest, this DIY project offers a unique connection to nature and a sustainable source of deliciousness.
Why is this a must-try? Because it empowers you to control the quality of your Roselle. You know exactly what goes into your plants – no hidden pesticides or questionable farming practices. Plus, the flavor of homegrown Roselle is simply unmatched. It’s fresher, more vibrant, and bursting with the unique terroir of your garden. Imagine the satisfaction of serving a homemade hibiscus tea to your friends and family, knowing you cultivated every ingredient yourself.
Beyond the classic hibiscus tea, the possibilities are endless. Experiment with Roselle jam, adding its tartness to sweeten your morning toast. Infuse it into syrups for cocktails or mocktails, creating a signature drink that’s both beautiful and delicious. Dry the calyces and grind them into a powder to add a vibrant color and flavor boost to baked goods. You can even use the young leaves in salads or as a cooked green, adding a slightly acidic note to your meals.
Consider these variations to tailor your Roselle growing experience:
* Container Gardening: If you have limited space, Roselle thrives in large containers. Choose a pot at least 15 gallons in size and ensure it has excellent drainage. This allows you to move the plant indoors during colder months in regions with harsh winters.
* Companion Planting: Roselle benefits from companion planting. Basil, marigolds, and nasturtiums can help deter pests and attract beneficial insects.
* Soil Amendments: While Roselle isn’t overly fussy about soil, amending it with compost or well-rotted manure will provide essential nutrients and improve drainage.
* Different Varieties: Explore different varieties of Hibiscus Sabdariffa. Some are known for their larger calyces, while others have a more intense flavor. Experiment to find your favorite!
Don’t be intimidated by the prospect of growing your own Roselle. It’s a relatively low-maintenance plant that rewards your efforts with an abundance of flavorful calyces. The key is to provide it with plenty of sunlight, well-drained soil, and consistent watering.
We wholeheartedly encourage you to embark on this DIY adventure. Start small, learn as you go, and don’t be afraid to experiment. The rewards are well worth the effort.
And most importantly, we want to hear about your experience! Share your photos, tips, and challenges in the comments below. Let’s create a community of Roselle growers and learn from each other. What varieties did you try? What recipes did you create? What challenges did you overcome? Your insights will help others succeed in their own Roselle growing journey. Let’s cultivate a world filled with the vibrant color and tangy flavor of homegrown Hibiscus Sabdariffa!
Frequently Asked Questions (FAQ)
What is the best time of year to plant Hibiscus Sabdariffa?
The ideal time to plant Hibiscus Sabdariffa is in the spring, after the last frost has passed and the soil has warmed up. Roselle thrives in warm weather and requires a long growing season to produce a bountiful harvest. If you live in a region with a short growing season, you can start the seeds indoors 6-8 weeks before the last frost and transplant them outdoors once the weather is suitable.
How much sunlight does Roselle need?
Hibiscus Sabdariffa requires at least 6-8 hours of direct sunlight per day to thrive. Insufficient sunlight can result in leggy growth, reduced flowering, and smaller calyces. Choose a location in your garden that receives ample sunlight throughout the day. If you are growing Roselle in containers, you can move the plants to follow the sun.
What type of soil is best for growing Roselle?
Roselle prefers well-drained soil that is rich in organic matter. The ideal soil pH is between 6.0 and 6.5. Before planting, amend the soil with compost or well-rotted manure to improve drainage and fertility. Avoid heavy clay soils, as they can become waterlogged and lead to root rot. If you have clay soil, consider growing Roselle in raised beds or containers.
How often should I water my Roselle plants?
Water Roselle plants regularly, especially during hot and dry weather. The soil should be kept consistently moist but not waterlogged. Water deeply, allowing the water to penetrate the root zone. Avoid overhead watering, as it can promote fungal diseases. Mulching around the plants can help retain moisture and suppress weeds.
How do I fertilize my Roselle plants?
Roselle benefits from regular fertilization, especially during the growing season. Use a balanced fertilizer with equal amounts of nitrogen, phosphorus, and potassium. Apply the fertilizer according to the package instructions. You can also use organic fertilizers, such as compost tea or fish emulsion. Avoid over-fertilizing, as it can lead to excessive vegetative growth and reduced flowering.
When is the best time to harvest Roselle calyces?
The best time to harvest Roselle calyces is when they are plump, firm, and bright red. This typically occurs 5-6 months after planting. Harvest the calyces before they become dry and woody. Use sharp scissors or pruning shears to cut the calyces from the plant. Leave a small portion of the stem attached to the calyx.
How do I dry Roselle calyces?
To dry Roselle calyces, spread them out in a single layer on a clean, dry surface. Place them in a well-ventilated area, away from direct sunlight. You can also use a dehydrator to dry the calyces. The drying process typically takes 1-2 weeks, depending on the humidity and temperature. The calyces are dry when they are brittle and snap easily. Store the dried calyces in an airtight container in a cool, dark place.
Are there any pests or diseases that affect Roselle?
Roselle is generally resistant to pests and diseases, but it can be susceptible to aphids, whiteflies, and root rot. Aphids and whiteflies can be controlled with insecticidal soap or neem oil. Root rot can be prevented by planting Roselle in well-drained soil and avoiding overwatering. Regularly inspect your plants for signs of pests or diseases and take action promptly to prevent them from spreading.
Can I grow Roselle indoors?
While Roselle prefers to be outdoors, it can be grown indoors if you provide it with enough light and warmth. Place the plant near a sunny window or use grow lights to supplement the natural light. Ensure the plant receives at least 6-8 hours of light per day. Keep the soil consistently moist but not waterlogged. Provide good air circulation to prevent fungal diseases.
Is Hibiscus Sabdariffa safe to consume?
Hibiscus Sabdariffa is generally safe to consume in moderation. However, some people may experience side effects, such as stomach upset or allergic reactions. If you have any concerns, consult with your doctor before consuming Roselle. Pregnant and breastfeeding women should also consult with their doctor before consuming Roselle.

Leave a Comment