

Growing peppers at home can seem daunting, but trust me, it’s easier than you think! Imagine plucking vibrant, sun-ripened peppers straight from your garden to spice up your favorite dishes. That’s the joy of home gardening, and it’s totally achievable, even if you don’t have a sprawling backyard.
For centuries, peppers have added zest to cuisines around the globe. Originating in South America, they’ve traveled the world, becoming a staple in everything from fiery curries to zesty salsas. But you don’t need to rely on grocery store produce when you can cultivate your own delicious peppers right at home.
Why should you try growing peppers at home? Well, for starters, you control the quality! No more worrying about pesticides or questionable growing practices. Plus, homegrown peppers taste incredible – fresher and more flavorful than anything you can buy. In this article, I’m going to share some simple, DIY tricks and hacks that will help you successfully grow peppers, even if you’re a complete beginner. Get ready to unleash your inner gardener and enjoy a bountiful harvest!
Growing Peppers Like a Pro: My Foolproof DIY Guide
Hey there, fellow gardening enthusiasts! I’m so excited to share my tried-and-true method for growing peppers at home. Forget those bland, store-bought peppers – we’re talking about vibrant, flavorful peppers bursting with sunshine and homegrown goodness. Whether you’re a seasoned gardener or just starting out, this guide will walk you through every step, from seed to salsa!
Choosing Your Pepper Varieties
Before we get our hands dirty, let’s talk peppers! The world of peppers is vast and exciting, so choosing the right varieties is key. Consider your taste preferences and growing conditions.
* **Sweet Peppers:** Bell peppers (red, yellow, orange, green), banana peppers, and pimento peppers are great for salads, stuffing, and roasting.
* **Mildly Spicy Peppers:** Poblano, Anaheim, and jalapeño peppers offer a gentle kick and are perfect for adding flavor to dishes.
* **Hot Peppers:** Serrano, cayenne, habanero, and ghost peppers are for the adventurous! Be careful when handling these, and always wear gloves.
Think about the size of your garden or container. Some pepper plants grow larger than others. Read the seed packet or plant label for information on mature size. Also, consider your local climate. Some peppers thrive in warmer climates, while others are more tolerant of cooler temperatures.
Getting Started: Seed Starting or Seedlings?
You have two options for starting your pepper plants: starting from seed or buying seedlings from a nursery. Both have their pros and cons.
* **Starting from Seed:** This is the more economical option and gives you a wider variety to choose from. However, it requires more time and effort. Pepper seeds need a warm environment to germinate, so you’ll need to start them indoors 6-8 weeks before the last expected frost.
* **Buying Seedlings:** This is the easier option, especially for beginners. You’ll get a head start on the growing season, but you’ll have fewer varieties to choose from, and it can be more expensive.
I personally prefer starting from seed because I love the satisfaction of watching those tiny sprouts emerge! But if you’re short on time or space, seedlings are a great option.
Starting Peppers from Seed: A Step-by-Step Guide
Okay, let’s dive into the nitty-gritty of starting peppers from seed.
1. **Gather Your Supplies:** You’ll need:
* Pepper seeds
* Seed starting trays or small pots
* Seed starting mix (a lightweight, sterile potting mix)
* A spray bottle
* A heat mat (optional, but highly recommended)
* A grow light (optional, but helps prevent leggy seedlings)
* A humidity dome (or plastic wrap)
2. **Prepare Your Seed Starting Trays:** Fill your seed starting trays or pots with seed starting mix. Gently tap the trays to settle the mix.
3. Sow the Seeds: Make a small indentation (about ¼ inch deep) in the center of each cell or pot. Place 2-3 seeds in each indentation. Cover the seeds with a thin layer of seed starting mix.
4. **Water Gently:** Use a spray bottle to gently moisten the soil. Avoid overwatering, as this can lead to damping off (a fungal disease that kills seedlings).
5. **Provide Warmth and Humidity:** Place the seed starting trays on a heat mat and cover them with a humidity dome or plastic wrap. This will create a warm, humid environment that is ideal for germination.
6. **Provide Light:** Place the seed starting trays under a grow light or in a sunny window. If using a sunny window, rotate the trays regularly to prevent the seedlings from leaning towards the light.
7. **Monitor and Water:** Check the soil moisture daily. Keep the soil consistently moist, but not soggy. Remove the humidity dome or plastic wrap once the seeds have germinated.
8. **Thin the Seedlings:** Once the seedlings have developed their first true leaves (the second set of leaves), thin them to one seedling per cell or pot. Choose the strongest, healthiest seedling and snip off the others at the soil line.
9. **Harden Off the Seedlings:** Before transplanting the seedlings outdoors, you’ll need to harden them off. This means gradually exposing them to outdoor conditions over a period of 1-2 weeks. Start by placing the seedlings outdoors in a sheltered location for a few hours each day, gradually increasing the amount of time they spend outdoors.
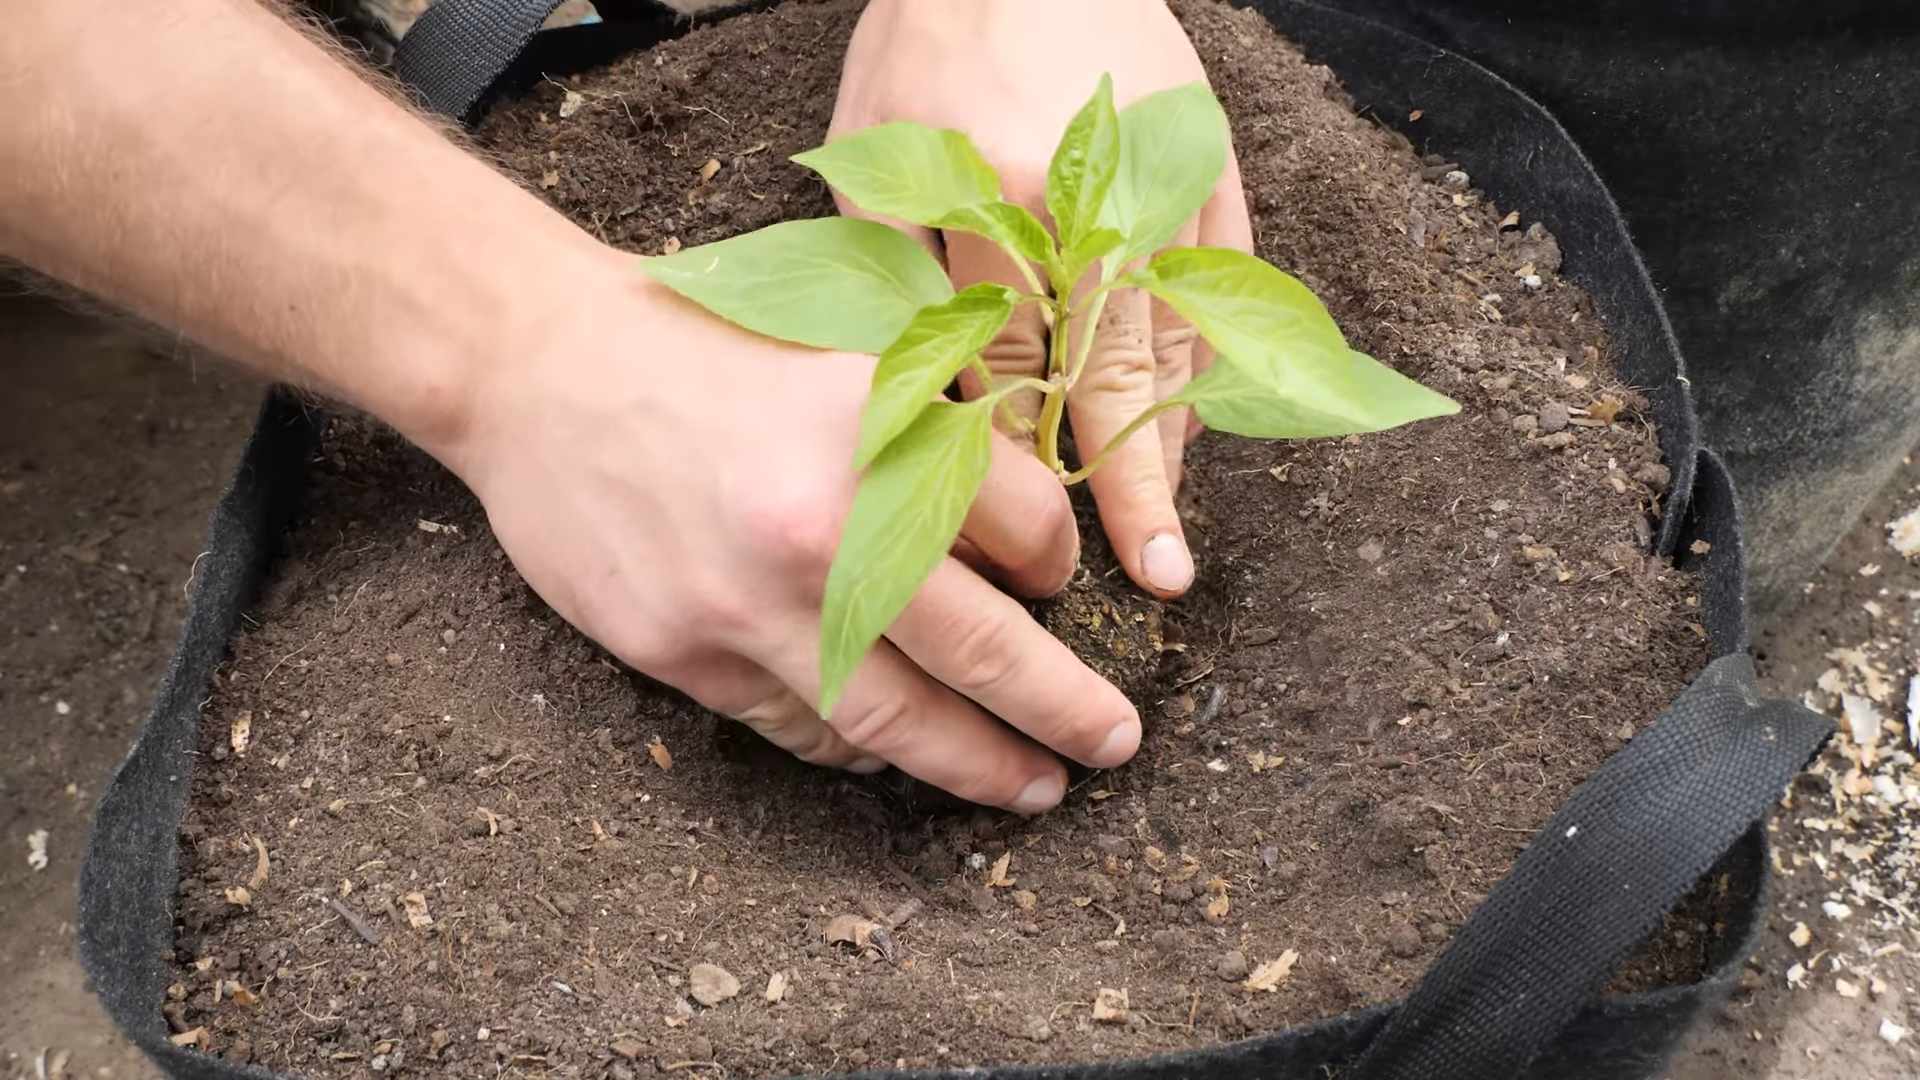
Transplanting Your Pepper Plants
Once your pepper plants are hardened off and the danger of frost has passed, it’s time to transplant them into your garden or containers.
1. **Choose a Sunny Location:** Peppers need at least 6-8 hours of sunlight per day. Choose a location that receives plenty of sun.
2. **Prepare the Soil:** Peppers prefer well-drained soil that is rich in organic matter. Amend the soil with compost or aged manure before planting.
3. **Dig the Holes:** Dig holes that are slightly larger than the root balls of your pepper plants. Space the plants 18-24 inches apart.
4. **Plant the Peppers:** Gently remove the pepper plants from their containers and loosen the root balls. Place the plants in the holes and backfill with soil.
5. **Water Thoroughly:** Water the pepper plants thoroughly after planting.
6. **Mulch:** Apply a layer of mulch around the pepper plants to help retain moisture, suppress weeds, and regulate soil temperature. I like to use straw or shredded bark.
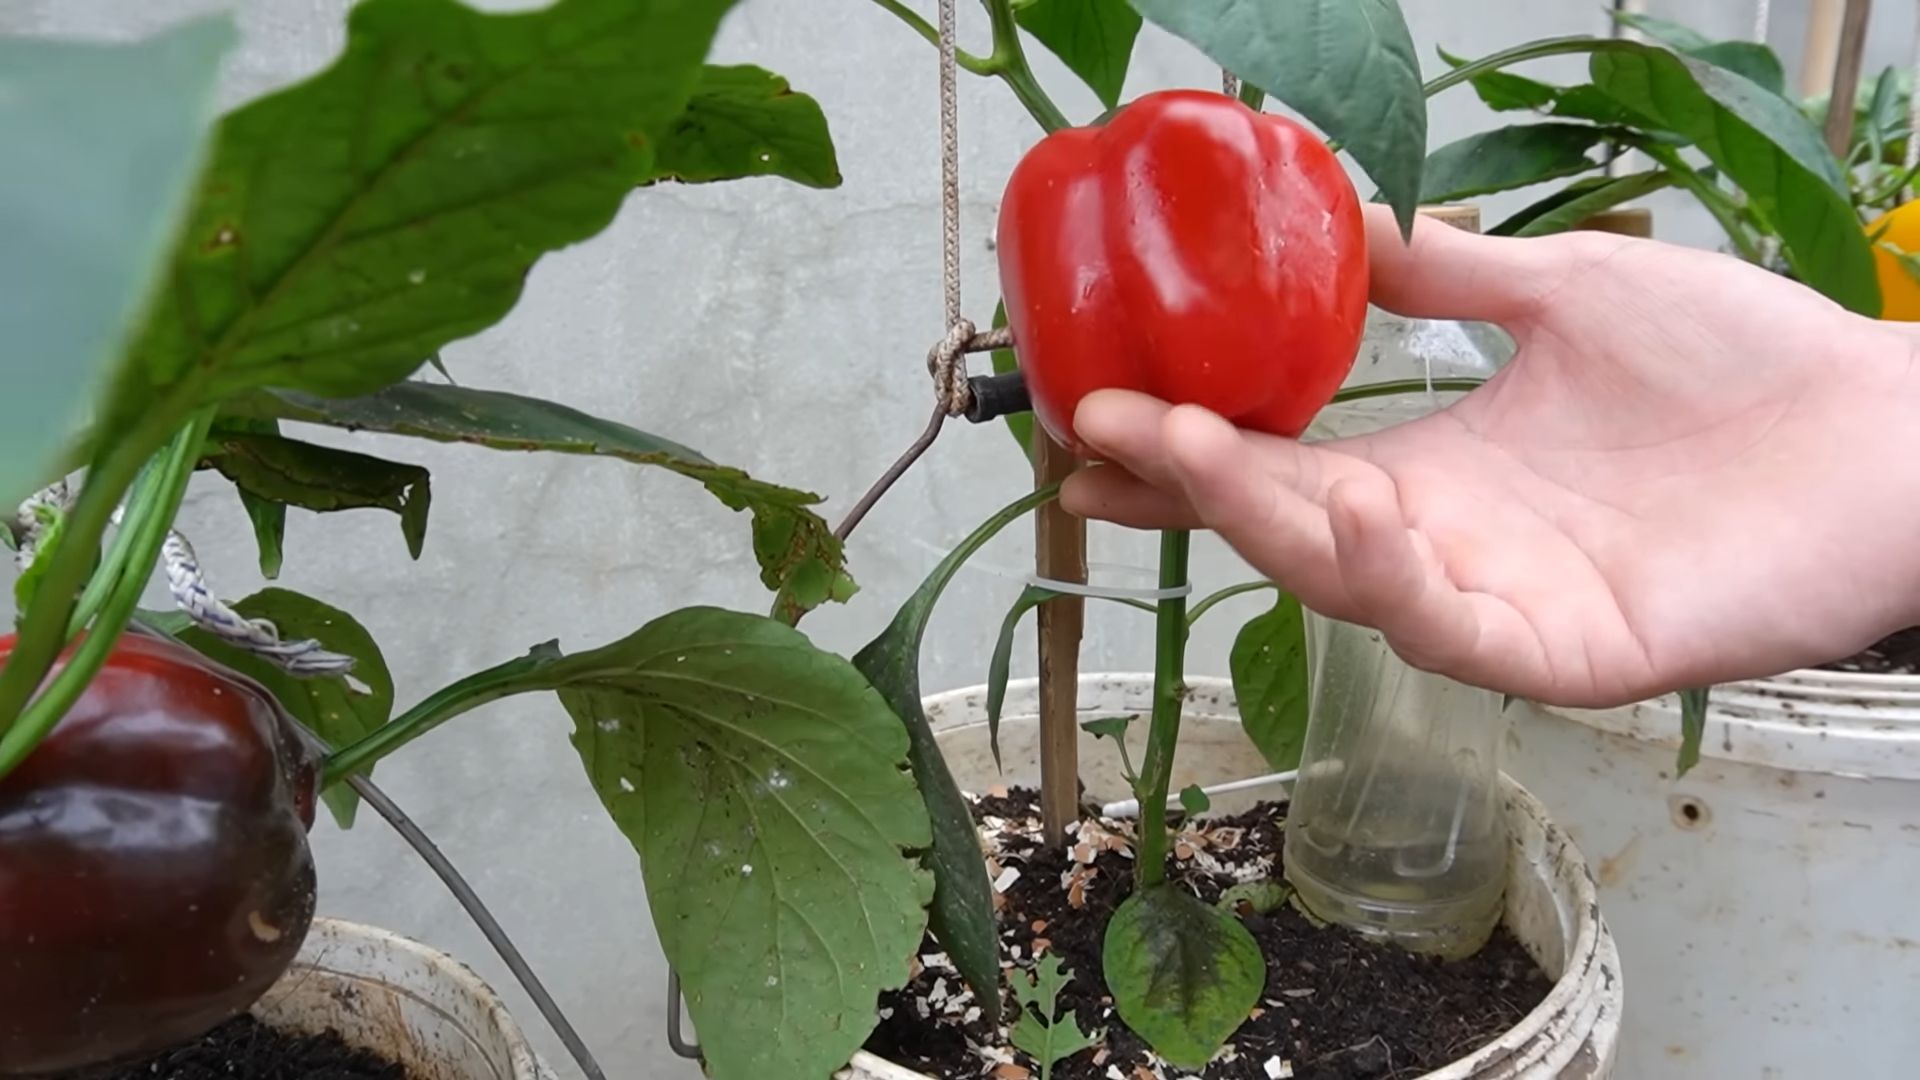
7. Stake or Cage (Optional): Depending on the variety of pepper you’re growing, you may need to stake or cage the plants to provide support. This is especially important for taller varieties or those that produce heavy fruits.
Caring for Your Pepper Plants
Now that your pepper plants are in the ground, it’s time to provide them with the care they need to thrive.
1. **Watering:** Water your pepper plants regularly, especially during hot, dry weather. Aim to keep the soil consistently moist, but not soggy. Water deeply and less frequently, rather than shallowly and more often.
2. **Fertilizing:** Peppers are heavy feeders and benefit from regular fertilization. Use a balanced fertilizer (e.g., 10-10-10) or a fertilizer specifically formulated for peppers and tomatoes. Follow the instructions on the fertilizer label. I like to fertilize every 2-3 weeks.
3. **Pruning:** Pruning pepper plants can help improve air circulation and encourage fruit production. Remove any suckers (small shoots that grow from the base of the plant) and any yellowing or diseased leaves.
4. **Pest and Disease Control:** Keep an eye out for pests and diseases. Common pepper pests include aphids, flea beetles, and spider mites. Common pepper diseases include blossom end rot, powdery mildew, and bacterial leaf spot. Treat any problems promptly with appropriate organic or chemical controls.
5. Blossom End Rot Prevention: Blossom end rot, characterized by a dark, sunken spot on the bottom of the pepper, is caused by a calcium deficiency. To prevent this, ensure your soil has adequate calcium and water consistently. You can also add crushed eggshells to the soil around your plants.
Harvesting Your Peppers
The moment we’ve all been waiting for! Harvesting your homegrown peppers is one of the most rewarding parts of gardening.
1. **When to Harvest:** The timing of your harvest will depend on the variety of pepper you’re growing and your personal preferences. Sweet peppers are typically harvested when they are fully colored and firm to the touch. Hot peppers can be harvested when they are green or when they have turned their mature color (e.g., red, orange, yellow).
2. **How to Harvest:** Use a sharp knife or pruning shears to cut the peppers from the plant. Leave a small piece of stem attached to the pepper.
3. **Storage:** Freshly harvested peppers can be stored in the refrigerator for up to a week. For longer storage, you can freeze, dry, or pickle your peppers.
Troubleshooting Common Pepper Problems
Even with the best care, you may encounter some problems while growing peppers. Here are a few common issues and how to address them:
* **Yellowing Leaves:** This can be caused by a variety of factors, including nutrient deficiencies, overwatering, or underwatering. Check the soil moisture and fertilize if necessary.
* **Blossom Drop:** This is when the pepper flowers fall off the plant without producing fruit. It can be caused by temperature fluctuations, lack of pollination, or stress. Ensure consistent watering and try hand-pollinating the flowers.
* **Pest Infestations:** As mentioned earlier, keep an eye out for common pepper pests and treat them promptly.
* Lack of Fruit Production:** This can be caused by a variety of factors, including lack of sunlight, poor soil, or inadequate pollination. Ensure your plants are getting enough sunlight, amend the soil with compost, and try hand-pollinating the flowers.
Enjoying Your Homegrown Peppers
Congratulations! You’ve successfully grown your own peppers. Now it’s time
Conclusion
So, there you have it! Growing peppers at home, especially with this simple DIY trick, is more than just a gardening project; it’s an investment in flavor, freshness, and a deeper connection to your food. We’ve walked you through a method that’s not only cost-effective but also empowers you to cultivate a thriving pepper patch, regardless of your gardening experience.
Why is this DIY approach a must-try? Because it bypasses the common pitfalls of pepper cultivation, giving you a significant head start. By creating the optimal environment for germination and early growth, you’re setting your pepper plants up for success from day one. Think about it: no more leggy seedlings struggling for light, no more worrying about inconsistent watering, and no more battling early pests that can decimate a young pepper crop. This method streamlines the process, making it accessible and rewarding for everyone.
But the beauty of gardening lies in its adaptability. Feel free to experiment with different pepper varieties. From the fiery heat of habaneros to the sweet crunch of bell peppers, the possibilities are endless. Consider trying different soil mixes to see what works best in your local climate. You could even explore companion planting, pairing your peppers with herbs like basil or marigolds to deter pests and enhance growth.
For those seeking an extra boost, try adding a diluted seaweed extract to your watering routine. Seaweed extract is packed with micronutrients that can promote vigorous growth and increase pepper production. Another variation involves using recycled materials for your DIY setup. Empty yogurt containers or plastic bottles can be repurposed as mini-greenhouses, reducing waste and saving you money.
We understand that gardening can sometimes feel daunting, but we encourage you to embrace the challenge and give this DIY pepper-growing trick a try. The satisfaction of harvesting your own homegrown peppers is unparalleled. Imagine the vibrant colors and intense flavors adding a special touch to your meals. Picture yourself sharing your bounty with friends and family, knowing that you nurtured these peppers from seed to table.
Don’t just take our word for it. We want to hear about your experiences! Share your photos, tips, and stories in the comments below. Let us know which pepper varieties you’re growing, what challenges you’ve encountered, and what successes you’ve celebrated. Your feedback will not only inspire others but also help us refine and improve this DIY method for future gardeners.
Growing peppers at home is a journey, and we’re excited to be a part of yours. So, grab your seeds, gather your supplies, and get ready to experience the joy of homegrown peppers. Happy gardening!
Frequently Asked Questions (FAQ)
What type of peppers are best suited for this DIY method?
This DIY method is versatile and works well for a wide range of pepper varieties, from sweet bell peppers to hot chili peppers. However, some peppers, like bell peppers, may require a longer growing season, so starting them indoors using this method is particularly beneficial. Consider your local climate and the length of your growing season when selecting pepper varieties. For beginners, we recommend starting with easier-to-grow varieties like jalapenos or banana peppers. These peppers are generally more resilient and forgiving, making them a great choice for learning the ropes of pepper cultivation.
How often should I water my pepper seedlings?
Watering frequency depends on several factors, including the type of soil you’re using, the temperature, and the humidity levels. Generally, you want to keep the soil consistently moist but not waterlogged. Check the soil moisture by sticking your finger about an inch deep into the soil. If it feels dry, it’s time to water. When watering, water deeply until you see water draining from the bottom of the container. Avoid overhead watering, as this can lead to fungal diseases. As the seedlings grow larger, they will require more water.
What kind of lighting is required for pepper seedlings?
Pepper seedlings need plenty of light to grow strong and healthy. If you’re growing them indoors, you’ll need to provide supplemental lighting. Fluorescent grow lights or LED grow lights are excellent options. Position the lights a few inches above the seedlings and keep them on for 14-16 hours per day. As the seedlings grow, you may need to adjust the height of the lights to maintain the optimal distance. If you’re growing your seedlings in a sunny window, rotate the plants regularly to ensure that they receive even light exposure on all sides.
When should I transplant my pepper seedlings outdoors?
Transplant your pepper seedlings outdoors when the danger of frost has passed and the soil has warmed up to at least 60°F (15°C). Before transplanting, harden off the seedlings by gradually exposing them to outdoor conditions for a week or two. Start by placing them in a sheltered location for a few hours each day, gradually increasing the amount of time they spend outdoors. This will help them acclimate to the sun, wind, and temperature changes. When transplanting, choose a sunny location with well-drained soil. Space the plants according to the recommendations for the specific pepper variety you’re growing.
What are some common pests and diseases that affect pepper plants, and how can I prevent them?
Common pests that affect pepper plants include aphids, spider mites, and whiteflies. These pests can be controlled with insecticidal soap or neem oil. Diseases that can affect pepper plants include blossom end rot, fungal leaf spot, and wilt. Blossom end rot is caused by a calcium deficiency and can be prevented by adding calcium to the soil. Fungal leaf spot and wilt can be prevented by providing good air circulation and avoiding overhead watering. Regularly inspect your plants for signs of pests or diseases and take action promptly to prevent them from spreading. Companion planting with herbs like basil or marigolds can also help deter pests.
Can I grow peppers in containers using this method?
Absolutely! Growing peppers in containers is a great option, especially if you have limited space or poor soil conditions. Choose a container that is at least 12 inches in diameter and has drainage holes. Use a high-quality potting mix that is well-draining. When growing peppers in containers, you may need to water them more frequently, especially during hot weather. Fertilize regularly with a balanced fertilizer. Container-grown peppers can be easily moved to a sheltered location during periods of extreme weather.
How long does it take for peppers to mature and be ready for harvest?
The time it takes for peppers to mature depends on the variety. Some peppers, like jalapenos, can be ready to harvest in as little as 60 days, while others, like bell peppers, may take 80 days or more. Check the seed packet or plant tag for specific information on the maturity time for the pepper variety you’re growing. Peppers are typically ready to harvest when they have reached their mature size and color. For hot peppers, the heat level will also increase as they mature.
What are some tips for maximizing pepper production?
To maximize pepper production, provide your plants with plenty of sunlight, water, and nutrients. Fertilize regularly with a balanced fertilizer. Prune your plants to encourage branching and fruit production. Remove any suckers that grow from the base of the plant. Support your plants with stakes or cages to prevent them from falling over. Harvest your peppers regularly to encourage the plant to produce more fruit.
What if my pepper seedlings are leggy?
Leggy seedlings are often a sign of insufficient light. If your seedlings are stretching towards the light source and have long, thin stems, they need more light. Move them closer to the light source or provide supplemental lighting. You can also try gently brushing the seedlings with your hand a few times a day. This will help to strengthen the stems. When transplanting leggy seedlings, you can bury the stems deeper in the soil to provide additional support.
Leave a Comment