

Growing Heuchera From Seed might seem daunting, but trust me, it’s a rewarding journey that unlocks a world of vibrant colors and textures in your garden! For centuries, gardeners have propagated plants from seed, a practice deeply rooted in our connection to nature and a testament to our ability to nurture life. Think about it – every majestic oak started as a tiny acorn, and every breathtaking rose from a humble seed.
But why bother with seeds when you can buy established plants? Well, for starters, it’s incredibly cost-effective! Heucheras, with their stunning foliage, can sometimes be pricey at garden centers. Growing Heuchera From Seed allows you to cultivate a diverse collection without breaking the bank. Plus, there’s an unparalleled satisfaction in watching a tiny seed sprout and flourish into a beautiful plant, knowing you played a vital role in its creation.
This DIY guide is your key to unlocking the secrets of successful Heuchera propagation. I’ll walk you through each step, from selecting the right seeds to nurturing your seedlings, ensuring you have a thriving patch of these gorgeous plants in no time. So, grab your gardening gloves, and let’s embark on this exciting adventure together! You’ll be amazed at how easy and fulfilling it is to bring these colorful beauties to life from the very beginning.
Growing Heuchera From Seed: A Comprehensive Guide
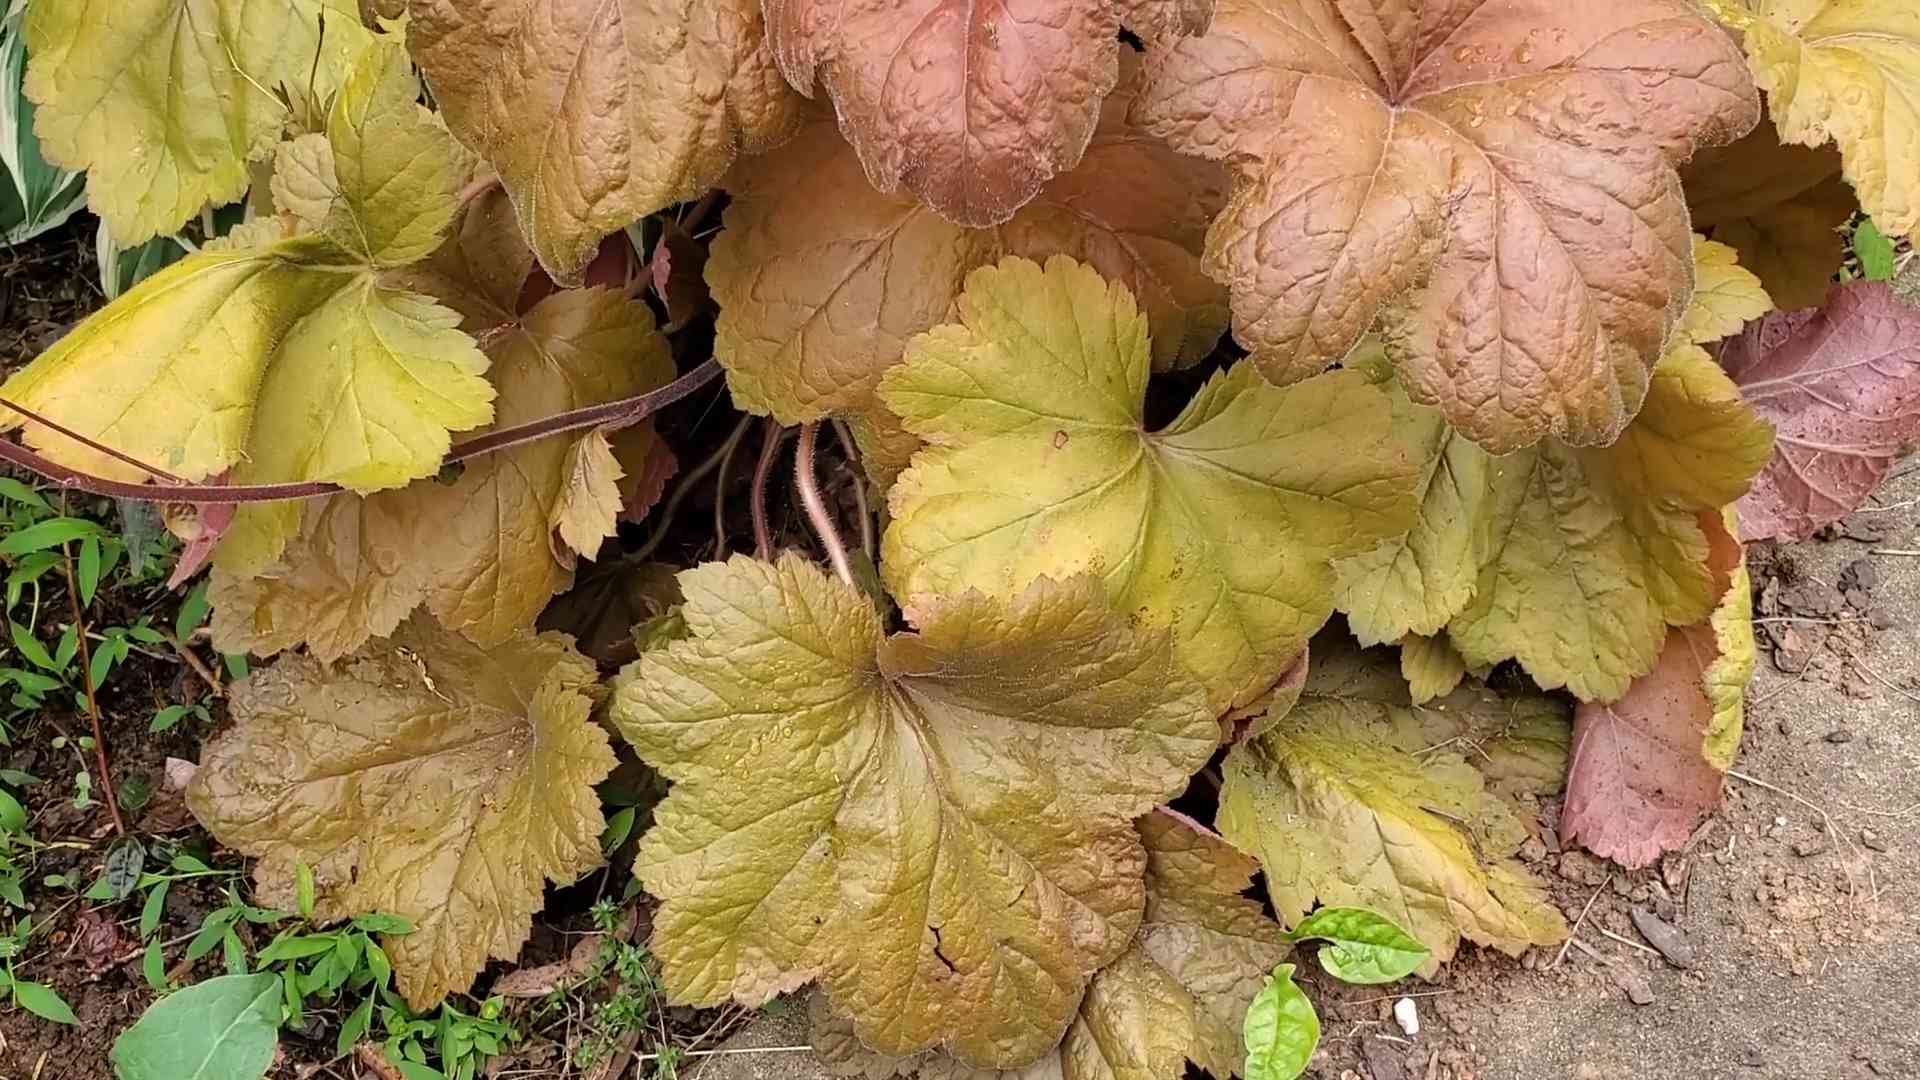
Hey there, fellow gardening enthusiasts! I’m so excited to share my experience with growing Heuchera, also known as Coral Bells, from seed. It might seem a little daunting at first, but trust me, it’s incredibly rewarding to watch these beauties sprout from tiny specks. This guide will walk you through every step, from preparing your seeds to transplanting your vibrant new Heuchera into your garden. Let’s get started!
Understanding Heuchera Seeds
Before we dive in, let’s talk a little about Heuchera seeds. They are incredibly small – almost like dust! This means they need special care and attention to germinate successfully. Don’t be discouraged if your first attempt isn’t perfect; even experienced gardeners face challenges with these tiny seeds.
* Seed Viability: Heuchera seeds don’t have a very long shelf life. It’s best to use fresh seeds, ideally from the current or previous year.
* Light Germination: Heuchera seeds require light to germinate, so we won’t be burying them deep in the soil.
* Moisture is Key: Consistent moisture is crucial for successful germination. We’ll need to keep the soil surface consistently damp, but not waterlogged.
Materials You’ll Need
Here’s a list of everything you’ll need to embark on this Heuchera-growing adventure:
* Heuchera seeds (choose your favorite varieties!)
* Seed starting trays or small pots
* Seed starting mix (fine-textured and well-draining)
* Spray bottle filled with water
* Clear plastic wrap or a humidity dome
* Grow lights (optional, but highly recommended)
* Heat mat (optional, but helpful for germination)
* Small labels and a marker
* Tweezers (for handling the tiny seeds)
* Well-draining potting mix for transplanting
Phase 1: Preparing for Planting
This phase is all about setting the stage for successful germination. A little preparation goes a long way!
1. Choose Your Seed Starting Medium: I highly recommend using a seed starting mix. These mixes are specifically formulated to be fine-textured, well-draining, and sterile, which is essential for preventing fungal diseases that can harm delicate seedlings. Avoid using garden soil, as it can be too heavy and may contain pathogens.
2. Moisten the Seed Starting Mix: Before filling your seed starting trays or pots, thoroughly moisten the seed starting mix. You want it to be damp, but not soggy. I usually put the mix in a bucket and add water gradually, mixing it with my hands until it reaches the right consistency.
3. Fill Your Seed Starting Trays or Pots: Gently fill your seed starting trays or pots with the moistened seed starting mix. Don’t pack it down too tightly, as this can hinder drainage. Leave about half an inch of space at the top of the container.
4. Label Your Containers: This is a crucial step! Label each tray or pot with the variety of Heuchera you’re planting and the date. Trust me, you’ll thank yourself later when you have a tray full of seedlings and can’t remember which is which.
Phase 2: Sowing the Seeds
Now comes the exciting part – planting the seeds! Remember, these seeds are tiny, so patience and a steady hand are your best friends.
1. Sowing the Seeds: This is where the tweezers come in handy. Because the seeds are so small, it’s difficult to sow them evenly. I like to use tweezers to pick up a few seeds at a time and gently sprinkle them across the surface of the soil. Aim for a light, even distribution. Don’t worry about burying them; remember, they need light to germinate.
2. Gently Press the Seeds: After sowing the seeds, gently press them into the surface of the soil. You can use your finger or a small piece of cardboard. This helps ensure good contact between the seeds and the moist soil.
3. Mist with Water: Use a spray bottle to gently mist the surface of the soil. Be careful not to dislodge the seeds. The goal is to keep the soil surface consistently damp.
4. Cover with Plastic Wrap or a Humidity Dome: To maintain high humidity, cover the seed starting trays or pots with clear plastic wrap or a humidity dome. This will help prevent the soil from drying out. Make sure the plastic wrap isn’t touching the soil surface. You can use small sticks or skewers to prop it up if needed.
Phase 3: Germination and Early Growth
This is the waiting game! But don’t worry, there are things we can do to optimize the germination process.
1. Provide Light: Heuchera seeds need light to germinate, so place your seed starting trays or pots under grow lights or in a bright, indirect light location. If you’re using grow lights, position them a few inches above the soil surface. I usually keep my grow lights on for 14-16 hours a day.
2. Maintain Warmth: Heuchera seeds germinate best at temperatures between 65-75°F (18-24°C). If your home is cooler than this, consider using a heat mat to warm the soil.
3. Monitor Moisture Levels: Check the soil moisture levels daily. The soil surface should be consistently damp, but not waterlogged. If the soil starts to dry out, mist it gently with water. If you’re using plastic wrap or a humidity dome, you may need to remove it briefly to allow for air circulation and prevent fungal growth.
4. Be Patient: Germination can take anywhere from 10 to 21 days, or even longer, depending on the variety and environmental conditions. Don’t give up if you don’t see sprouts right away. Just keep providing light, warmth, and moisture, and eventually, you should see tiny green seedlings emerging.
Phase 4: Caring for Seedlings
Once your Heuchera seedlings have emerged, it’s time to provide them with the care they need to grow strong and healthy.
1. Gradually Acclimate to Lower Humidity: If you’ve been using plastic wrap or a humidity dome, gradually acclimate the seedlings to lower humidity levels. Start by removing the cover for a few hours each day, gradually increasing the amount of time until it’s completely removed. This will help prevent fungal diseases.
2. Provide Adequate Light: Continue to provide your seedlings with plenty of light. If you’re using grow lights, adjust the height as the seedlings grow to keep them a few inches away from the light source.
3. Water Carefully: Water your seedlings carefully, allowing the soil surface to dry out slightly between waterings. Avoid overwatering, as this can lead to root rot. I like to water from the bottom by placing the seed starting trays in a shallow tray of water and allowing the soil to absorb the water from below.
4. Fertilize Sparingly: Once your seedlings have developed a few sets of true leaves (the leaves that look like miniature versions of the adult leaves), you can start fertilizing them with a diluted liquid fertilizer. Use a balanced fertilizer (e.g., 10-10-10) diluted to half strength. Fertilize every two weeks.
5. Thin Seedlings (If Necessary): If you have multiple seedlings growing in the same cell or pot, you may need to thin them out to give them enough space to grow. Use small scissors to snip off the weaker seedlings at the soil line, leaving the strongest seedling in each cell or pot.
Phase 5: Transplanting
Once your Heuchera seedlings have grown large enough and the weather is right, it’s time to transplant them into larger pots or directly into your garden.
1. Harden Off Seedlings: Before transplanting your seedlings outdoors, you’ll need to harden them off. This means gradually acclimating them to outdoor conditions. Start by placing them outdoors in a sheltered location for a few hours each day, gradually increasing the amount of time they spend outdoors over the course of a week or two. Protect them from direct sunlight and strong winds.
2. Choose a Location: Heuchera prefer partial shade, although some varieties can tolerate more sun. Choose a location in your garden that receives morning sun and afternoon shade. The soil should be well-draining and rich in organic matter.
3. Prepare the Soil: Before transplanting, amend the soil with compost or other organic matter. This will improve drainage and provide your Heuchera with the nutrients they need to thrive.
4. Transplant Carefully: Gently remove the seedlings from their seed starting trays or pots. Be careful not to damage the roots. Dig a hole in the soil that is slightly larger than the root ball. Place the seedling in the hole and backfill with soil. Gently firm the soil around the base of the plant.
5. Water Thoroughly: After transplanting, water the seedlings thoroughly. This will help settle the soil and encourage root growth.
6

Conclusion
So, there you have it! Growing Heuchera from seed might seem a little daunting at first, but with a little patience and the right approach, you can cultivate a vibrant collection of these stunning foliage plants right in your own backyard. This DIY trick, while requiring a bit more time and attention than purchasing established plants, offers unparalleled rewards. Think about it: you gain access to a wider variety of Heuchera cultivars, often unavailable at local nurseries, and you get the immense satisfaction of nurturing life from its very beginning. Plus, it’s significantly more budget-friendly, especially if you’re looking to fill a large garden space with these colorful beauties.
The real beauty of growing Heuchera from seed lies in the experimentation. Don’t be afraid to try different seed starting mixes. Some gardeners swear by a fine, peat-based mix, while others prefer a soilless option like vermiculite or perlite. You can also experiment with different light levels during germination. While bright, indirect light is generally recommended, some varieties might benefit from slightly more or less light.
Consider these variations to personalize your Heuchera growing experience:
* Color Blends: Mix seeds from different Heuchera varieties to create a unique blend of foliage colors and textures in your garden. Imagine the stunning combinations you can achieve!
* Container Gardening: Start your Heuchera seeds specifically for container gardening. Choose compact varieties and create eye-catching container arrangements with complementary plants.
* Gifting: Once your Heuchera seedlings are established, pot them up and gift them to friends and family. It’s a thoughtful and personalized present that will bring joy for years to come.
Ultimately, the success of growing Heuchera from seed hinges on consistent moisture, adequate light, and a little bit of love. Don’t get discouraged if your first attempt isn’t perfect. Gardening is a learning process, and every seed you sow is a step towards becoming a more skilled and knowledgeable gardener.
We wholeheartedly encourage you to try this DIY trick for growing Heuchera from seed. It’s a rewarding experience that will not only enhance your garden but also deepen your connection with nature. Once you’ve embarked on this journey, we’d love to hear about your experiences! Share your tips, successes, and even your challenges in the comments below. Let’s create a community of Heuchera enthusiasts and learn from each other. Happy gardening!
Frequently Asked Questions (FAQ)
What is the best time of year to start Heuchera seeds?
The ideal time to start Heuchera seeds is late winter or early spring, typically February or March. This allows the seedlings ample time to grow and develop before being transplanted outdoors in the spring or early summer. Starting seeds indoors during this period provides the necessary warmth and controlled environment for successful germination and early growth. However, if you have access to a greenhouse or a very well-lit indoor space, you can potentially start seeds a bit earlier.
How long does it take for Heuchera seeds to germinate?
Heuchera seeds can be a bit slow to germinate. You can generally expect germination to occur within 14 to 21 days, but it can sometimes take longer, even up to a month, depending on the variety and environmental conditions. Maintaining consistent moisture and a warm temperature (around 65-70°F or 18-21°C) is crucial for successful germination. Be patient and avoid disturbing the seeds during this period.
What kind of soil is best for starting Heuchera seeds?
A fine, well-draining seed starting mix is essential for germinating Heuchera seeds. Avoid using garden soil, as it can be too heavy and may contain pathogens that can harm the delicate seedlings. A peat-based mix or a soilless mix containing vermiculite and perlite are excellent choices. These mixes provide good aeration and drainage, which are crucial for preventing damping-off, a fungal disease that can affect young seedlings. You can also sterilize your seed starting mix by baking it in the oven at 180°F (82°C) for 30 minutes to kill any potential pathogens.
How much light do Heuchera seedlings need?
Heuchera seedlings require bright, indirect light. Avoid placing them in direct sunlight, as this can scorch their delicate leaves. A sunny windowsill that receives filtered light or the use of grow lights are both excellent options. If using grow lights, position them a few inches above the seedlings and provide approximately 14-16 hours of light per day. As the seedlings grow, you can gradually increase the light intensity.
When can I transplant Heuchera seedlings outdoors?
You can transplant Heuchera seedlings outdoors once they have developed several sets of true leaves and the danger of frost has passed. Before transplanting, it’s essential to harden off the seedlings by gradually exposing them to outdoor conditions over a period of 7-10 days. Start by placing them in a sheltered location for a few hours each day, gradually increasing the amount of time they spend outdoors. Choose a planting location that receives partial shade, especially during the hottest part of the day. Heuchera prefer well-draining soil that is rich in organic matter.
Are there any specific Heuchera varieties that are easier to grow from seed?
While all Heuchera varieties can be grown from seed, some are known to be more vigorous and easier to germinate than others. Varieties with larger seeds tend to be easier to handle and germinate. Some popular and relatively easy-to-grow Heuchera varieties include ‘Palace Purple,’ ‘Crimson Curls,’ and ‘Amethyst Mist.’ However, don’t be afraid to experiment with other varieties as well.
How do I prevent damping-off in Heuchera seedlings?
Damping-off is a common fungal disease that can affect young seedlings, causing them to collapse and die. To prevent damping-off, use a sterile seed starting mix, avoid overwatering, and provide good air circulation. You can also sprinkle a thin layer of horticultural charcoal on the surface of the soil to help absorb excess moisture. If you notice any signs of damping-off, such as wilting or discoloration, remove the affected seedlings immediately to prevent the disease from spreading.
Do Heuchera seeds need stratification?
While not always necessary, some Heuchera varieties benefit from stratification, a process that involves exposing the seeds to a period of cold, moist conditions to break dormancy. To stratify Heuchera seeds, place them in a damp paper towel or coffee filter, seal them in a plastic bag, and refrigerate them for 4-6 weeks. After stratification, sow the seeds as usual. Check the seed packet for specific stratification recommendations for the variety you are growing.
How often should I water Heuchera seedlings?
Heuchera seedlings need consistent moisture, but avoid overwatering, which can lead to damping-off. Water the seedlings when the top inch of soil feels dry to the touch. Use a gentle watering can or spray bottle to avoid disturbing the delicate seedlings. Ensure that the container has good drainage to prevent water from accumulating at the bottom.
Can I collect seeds from my own Heuchera plants?
Yes, you can collect seeds from your own Heuchera plants, but keep in mind that the resulting seedlings may not be true to type, meaning they may not look exactly like the parent plant. This is because Heuchera are often hybrids, and their seeds can produce offspring with different characteristics. To collect seeds, allow the flower stalks to dry completely on the plant. Once the seed pods are dry and brown, carefully cut them off and extract the seeds. Store the seeds in a cool, dry place until you are ready to sow them.
Leave a Comment