

Growing Purple Bush Beans might sound like something only seasoned gardeners can achieve, but trust me, it’s easier than you think! Have you ever dreamt of strolling through your own backyard, plucking vibrant, jewel-toned beans straight from the vine for a fresh summer salad? Well, that dream can become a reality, and this DIY guide is your ticket to making it happen.
Beans, in general, have a rich history, dating back thousands of years and playing a vital role in diets across the globe. But purple bush beans? They add a touch of whimsy and visual appeal to your garden and plate. Beyond their beauty, they’re packed with nutrients and offer a delightful, slightly sweeter flavor compared to their green counterparts.
Why should you try this DIY project? Because growing purple bush beans is incredibly rewarding! Not only will you enjoy fresh, healthy produce, but you’ll also experience the satisfaction of nurturing something from seed to harvest. Plus, these beans are relatively low-maintenance, making them perfect for beginner gardeners or anyone with limited space. I’m going to show you simple tricks and hacks that will ensure a bountiful harvest, even if you don’t have a green thumb (yet!). Get ready to impress your friends and family with your homegrown purple bean bounty!
Growing Purple Bush Beans: A DIY Guide to a Vibrant Harvest
Okay, let’s dive into growing purple bush beans! I’ve found these beans to be not only delicious but also a real showstopper in the garden. Their vibrant purple color adds a unique touch, and they’re surprisingly easy to grow. This guide will walk you through everything you need to know, from preparing your soil to harvesting your beautiful purple bounty.
Choosing Your Purple Bush Bean Variety
First things first, let’s talk varieties. There are a few different types of purple bush beans you can choose from, each with its own unique characteristics.
* Royal Burgundy: This is probably the most popular variety. It’s known for its deep purple color, excellent flavor, and high yields. Plus, the beans turn green when cooked, which is a fun little surprise!
* Purple Queen: Another great option, Purple Queen beans are slightly longer and more slender than Royal Burgundy. They also have a slightly sweeter flavor.
* Amethyst: If you’re looking for something a little different, Amethyst beans are a good choice. They have a slightly more rounded shape and a slightly milder flavor.
I personally prefer Royal Burgundy because of its consistent performance and vibrant color, but feel free to experiment and find your favorite!
Preparing Your Garden Bed
Proper soil preparation is crucial for growing healthy and productive purple bush beans. They need well-drained soil that’s rich in organic matter.
1. Choose a Sunny Location: Purple bush beans need at least 6-8 hours of sunlight per day. Pick a spot in your garden that gets plenty of sunshine.
2. Test Your Soil: Before you start planting, it’s a good idea to test your soil’s pH. Purple bush beans prefer a slightly acidic to neutral pH of around 6.0 to 7.0. You can buy a soil testing kit at most garden centers.
3. Amend the Soil: Based on your soil test results, you may need to amend your soil. If your soil is too acidic, add some lime to raise the pH. If it’s too alkaline, add some sulfur to lower the pH.
4. Add Organic Matter: Regardless of your soil’s pH, it’s always a good idea to add organic matter. This will improve drainage, aeration, and nutrient content. You can add compost, well-rotted manure, or other organic materials. I usually add a generous layer of compost to my garden bed before planting.
5. Till the Soil: Once you’ve amended the soil, till it to a depth of about 6-8 inches. This will help to loosen the soil and incorporate the amendments.
6. Rake the Soil: After tilling, rake the soil smooth to create a level planting surface.
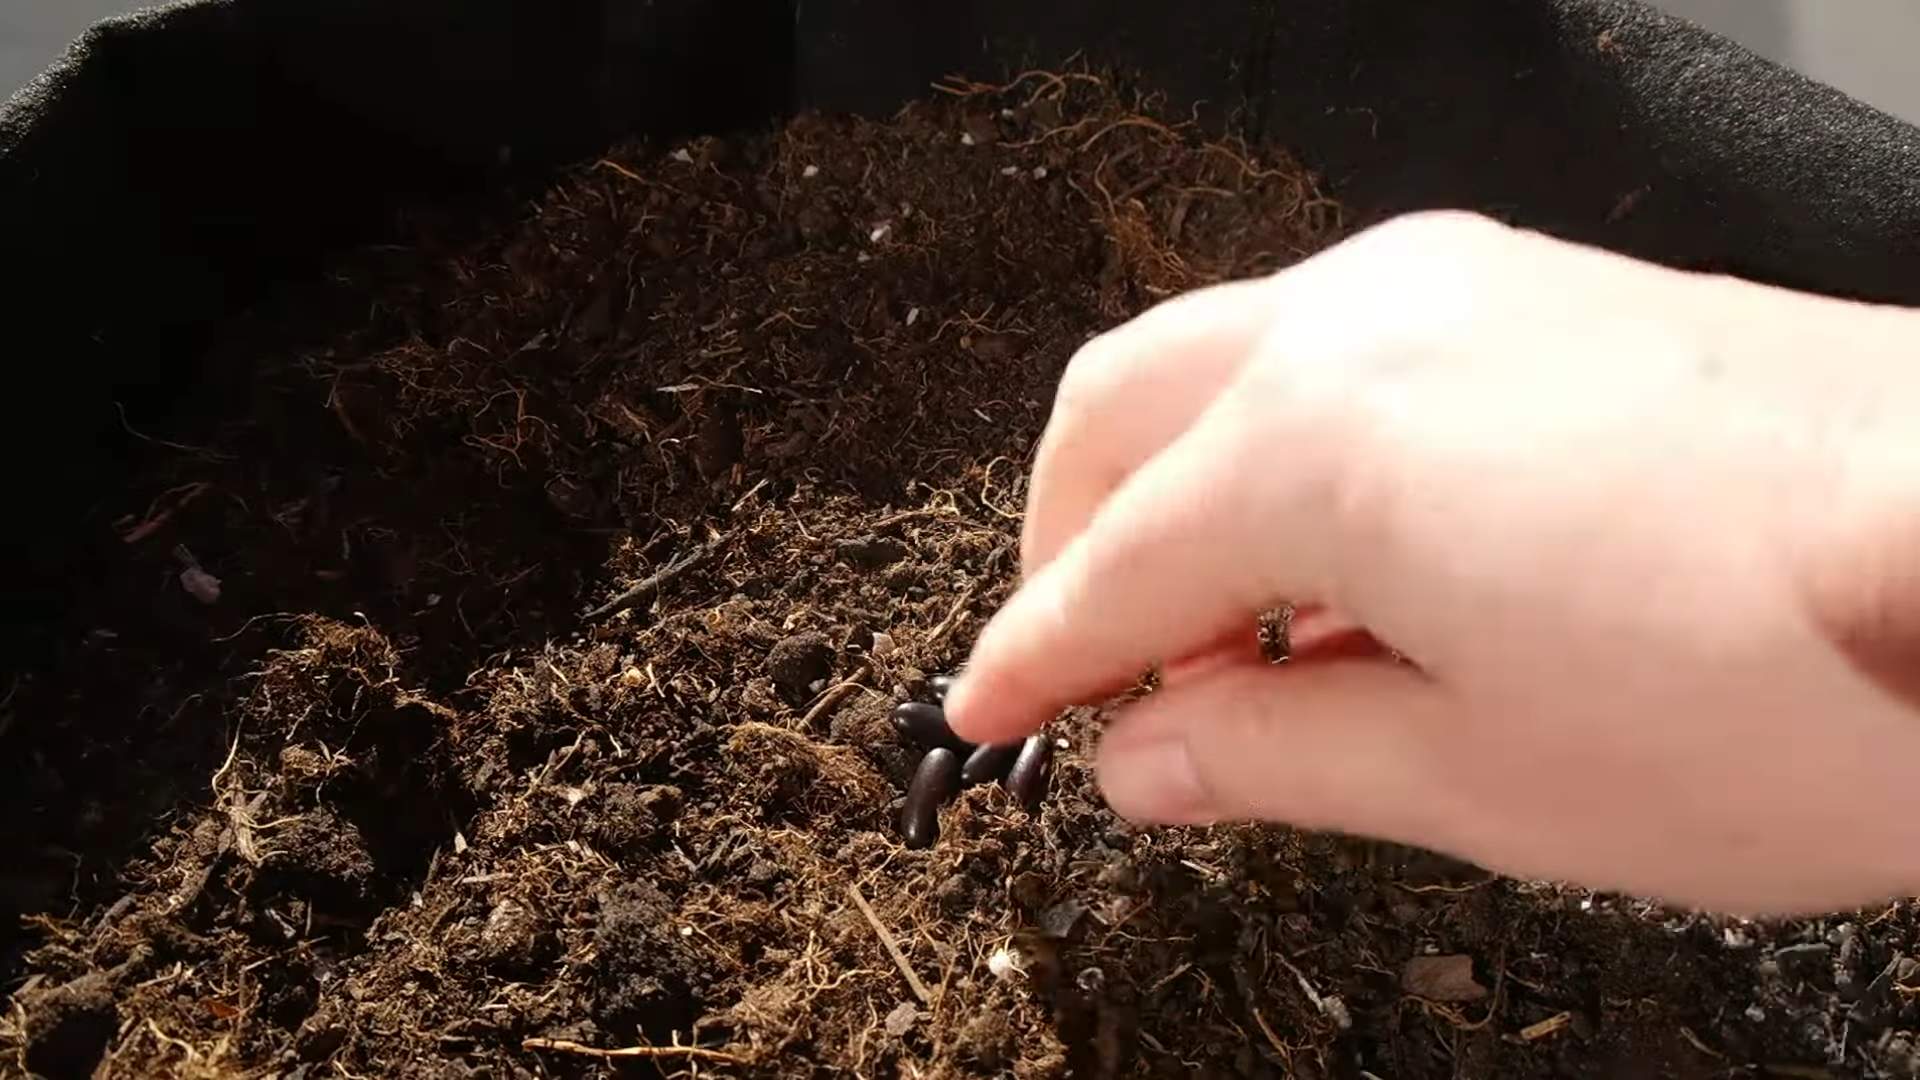
Planting Your Purple Bush Beans
Now for the fun part – planting! Purple bush beans are relatively easy to plant, but there are a few things to keep in mind.
1. Wait for Warm Weather: Purple bush beans are warm-season crops, so you’ll need to wait until the soil has warmed up to at least 60°F (15°C) before planting. This is usually a couple of weeks after the last frost.
2. Direct Sow the Seeds: Purple bush beans are best direct sown, meaning you plant the seeds directly into the garden bed. They don’t transplant well, so starting them indoors is generally not recommended.
3. Planting Depth: Plant the seeds about 1 inch deep and 2-3 inches apart.
4. Row Spacing: Space the rows about 18-24 inches apart.
5. Water Thoroughly: After planting, water the seeds thoroughly. Keep the soil moist until the seeds germinate, which usually takes about 7-10 days.
Caring for Your Purple Bush Beans
Once your purple bush beans have sprouted, it’s important to provide them with proper care to ensure a healthy and productive harvest.
1. Watering: Water your purple bush beans regularly, especially during dry periods. They need about 1 inch of water per week. Water deeply and infrequently, rather than shallowly and frequently. This will encourage deep root growth.
2. Weeding: Keep your garden bed free of weeds. Weeds compete with your purple bush beans for water, nutrients, and sunlight. Hand-pull weeds regularly or use a hoe to cultivate the soil.
3. Fertilizing: Purple bush beans don’t require a lot of fertilizer, but a light feeding can help to boost growth and yields. Use a balanced fertilizer, such as 10-10-10, and apply it according to the package directions. I usually side-dress my beans with compost tea every few weeks.
4. Pest Control: Purple bush beans are relatively pest-resistant, but they can be susceptible to certain pests, such as aphids, bean beetles, and spider mites. Inspect your plants regularly for signs of pests and take action if necessary. You can use insecticidal soap, neem oil, or other organic pest control methods.
5. Disease Control: Purple bush beans can also be susceptible to certain diseases, such as powdery mildew and bean rust. To prevent diseases, provide good air circulation, avoid overhead watering, and remove any infected leaves. You can also use a fungicide if necessary.
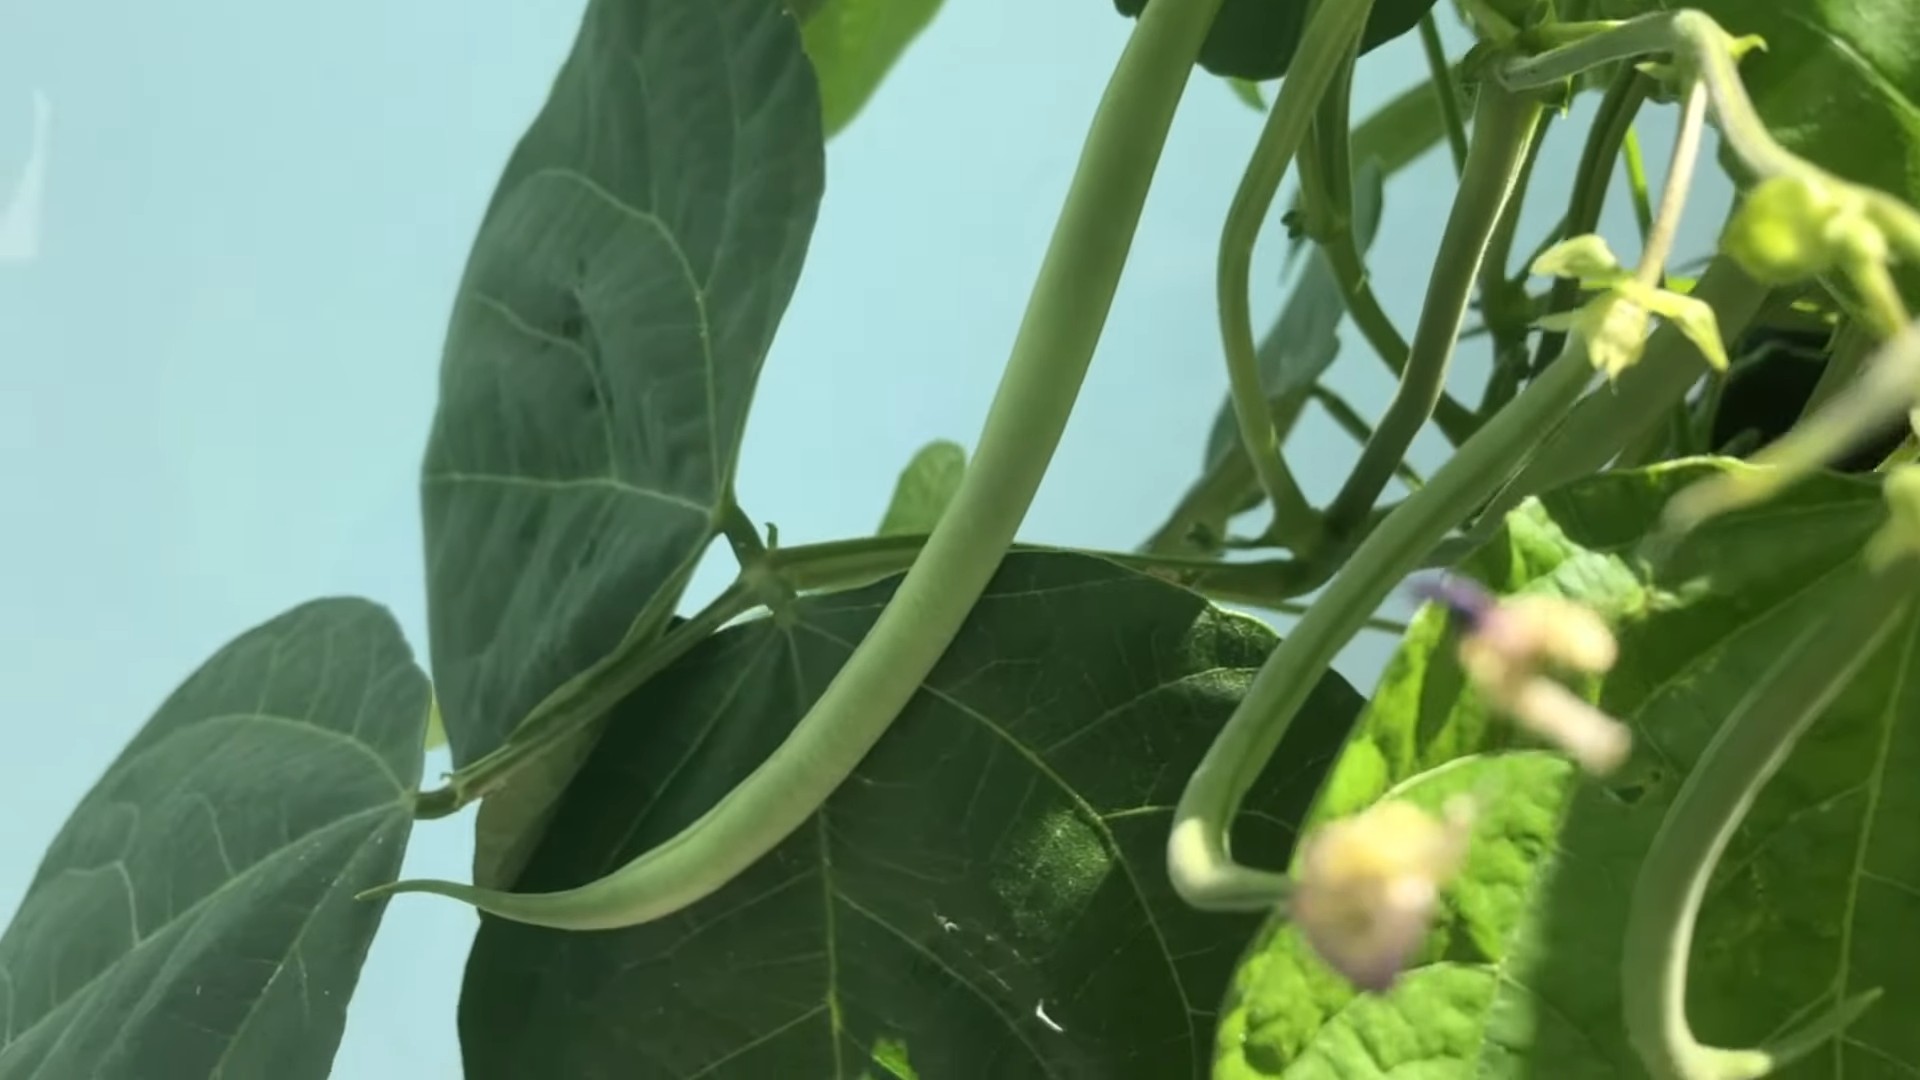
Harvesting Your Purple Bush Beans
Harvesting is the most rewarding part of growing purple bush beans! You’ll know your beans are ready to harvest when they are about 4-6 inches long and the pods are firm and plump.
1. Harvest Time: Purple bush beans are usually ready to harvest about 50-60 days after planting.
Okay, let’s dive into growing purple bush beans! I’ve found these beans to be not only delicious but also a real showstopper in the garden. Their vibrant purple color adds a unique touch, and they’re surprisingly easy to grow. This guide will walk you through everything you need to know, from preparing your soil to harvesting your beautiful purple bounty.
Choosing Your Purple Bush Bean Variety
First things first, let’s talk varieties. There are a few different types of purple bush beans you can choose from, each with its own unique characteristics.
* Royal Burgundy: This is probably the most popular variety. It’s known for its deep purple color, excellent flavor, and high yields. Plus, the beans turn green when cooked, which is a fun little surprise!
* Purple Queen: Another great option, Purple Queen beans are slightly longer and more slender than Royal Burgundy. They also have a slightly sweeter flavor.
* Amethyst: If you’re looking for something a little different, Amethyst beans are a good choice. They have a slightly more rounded shape and a slightly milder flavor.
I personally prefer Royal Burgundy because of its consistent performance and vibrant color, but feel free to experiment and find your favorite!
Preparing Your Garden Bed
Proper soil preparation is crucial for growing healthy and productive purple bush beans. They need well-drained soil that’s rich in organic matter.
1. Choose a Sunny Location: Purple bush beans need at least 6-8 hours of sunlight per day. Pick a spot in your garden that gets plenty of sunshine.
2. Test Your Soil: Before you start planting, it’s a good idea to test your soil’s pH. Purple bush beans prefer a slightly acidic to neutral pH of around 6.0 to 7.0. You can buy a soil testing kit at most garden centers.
3. Amend the Soil: Based on your soil test results, you may need to amend your soil. If your soil is too acidic, add some lime to raise the pH. If it’s too alkaline, add some sulfur to lower the pH.
4. Add Organic Matter: Regardless of your soil’s pH, it’s always a good idea to add organic matter. This will improve drainage, aeration, and nutrient content. You can add compost, well-rotted manure, or other organic materials. I usually add a generous layer of compost to my garden bed before planting.
5. Till the Soil: Once you’ve amended the soil, till it to a depth of about 6-8 inches. This will help to loosen the soil and incorporate the amendments.
6. Rake the Soil: After tilling, rake the soil smooth to create a level planting surface.
Planting Your Purple Bush Beans
Now for the fun part – planting! Purple bush beans are relatively easy to plant, but there are a few things to keep in mind.
1. Wait for Warm Weather: Purple bush beans are warm-season crops, so you’ll need to wait until the soil has warmed up to at least 60°F (15°C) before planting. This is usually a couple of weeks after the last frost.
2. Direct Sow the Seeds: Purple bush beans are best direct sown, meaning you plant the seeds directly into the garden bed. They don’t transplant well, so starting them indoors is generally not recommended.
3. Planting Depth: Plant the seeds about 1 inch deep and 2-3 inches apart.
4. Row Spacing: Space the rows about 18-24 inches apart.
5. Water Thoroughly: After planting, water the seeds thoroughly. Keep the soil moist until the seeds germinate, which usually takes about 7-10 days.
Caring for Your Purple Bush Beans
Once your purple bush beans have sprouted, it’s important to provide them with proper care to ensure a healthy and productive harvest.
1. Watering: Water your purple bush beans regularly, especially during dry periods. They need about 1 inch of water per week. Water deeply and infrequently, rather than shallowly and frequently. This will encourage deep root growth.
2. Weeding: Keep your garden bed free of weeds. Weeds compete with your purple bush beans for water, nutrients, and sunlight. Hand-pull weeds regularly or use a hoe to cultivate the soil.
3. Fertilizing: Purple bush beans don’t require a lot of fertilizer, but a light feeding can help to boost growth and yields. Use a balanced fertilizer, such as 10-10-10, and apply it according to the package directions. I usually side-dress my beans with compost tea every few weeks.
4. Pest Control: Purple bush beans are relatively pest-resistant, but they can be susceptible to certain pests, such as aphids, bean beetles, and spider mites. Inspect your plants regularly for signs of pests and take action if necessary. You can use insecticidal soap, neem oil, or other organic pest control methods.
5. Disease Control: Purple bush beans can also be susceptible to certain diseases, such as powdery mildew and bean rust. To prevent diseases, provide good air circulation, avoid overhead watering, and remove any infected leaves. You can also use a fungicide if necessary.
Harvesting Your Purple Bush Beans
Harvesting is the most rewarding part of growing purple bush beans! You’ll know your beans are ready to harvest when they are about 4-6 inches long and the pods are firm and plump.
1. Harvest Time: Purple bush beans are usually ready to harvest about 50-60 days after planting.
2. Harvesting Technique: To harvest your beans, gently snap them off the plant. Be careful not to damage the plant.
3. Harvest Regularly: Harvest your beans regularly to encourage continued production. The more you harvest, the more beans your plants will produce.
4. Enjoy Your Harvest: Purple bush beans are delicious fresh, steamed, sautéed, or added to soups and stews. They can also be frozen or canned for later use. Remember they turn green when cooked!
Troubleshooting Common Problems
Even with the best care, you may encounter some problems when growing purple bush beans. Here are a few common issues and how to address them:
* Poor Germination: If your seeds aren’t germinating, it could be due to cold soil, poor quality seeds, or overwatering. Make sure the soil is warm enough before planting, use fresh seeds, and avoid overwatering.
* Yellowing Leaves: Yellowing leaves can be a sign of nutrient deficiency, overwatering, or disease. Check your soil’s pH and nutrient levels, avoid overwatering, and treat any diseases promptly.
* Pest Infestations: If you notice pests on your plants, take action immediately. Use insecticidal soap, neem oil, or other organic pest control methods.
* Disease Problems: If you notice signs of disease, such as powdery mildew or bean rust, remove any infected leaves and treat the plants with a fungicide if necessary.
Extending Your Harvest
Want to keep those purple beans coming? Here are a few tips for extending your harvest:
* Succession Planting: Plant a new batch of seeds every 2-3 weeks to ensure a continuous harvest throughout the growing season.
* Choose Heat-Tolerant Varieties: If you live in a hot climate, choose heat-tolerant varieties of purple bush beans.
* Provide Shade: During the hottest part of the day, provide your plants with some shade. You can use shade cloth or plant them near taller plants that will provide some afternoon shade.
* Water Deeply: Water your plants deeply and infrequently to encourage deep root growth. This will help them to withstand heat and drought.
Saving Seeds for Next Year
If you want to save seeds from your purple bush beans for next year, here’s how:
1. Choose Healthy Plants: Select healthy plants that produce high-quality beans.
2. Allow Beans to Dry on the Plant: Allow some of the beans to dry completely on the plant. The pods should turn brown and brittle.
3. Harvest the Dried Pods: Once the pods are dry, harvest them and remove the seeds.
4. Dry the Seeds: Spread the seeds out on a screen or tray and allow them to dry completely.
5. Store the Seeds: Store the dried seeds in an airtight container in a cool, dry place. They should be viable for several years.
Enjoying Your Purple Bush Bean Harvest
Growing purple bush beans is a rewarding experience. Not only will you have a beautiful and productive garden, but you’ll also have a delicious and nutritious crop to enjoy. So get out there and start planting! I promise, you won’t regret it. And remember, even if you encounter a few bumps along the way, don’t give up. Gardening is a learning process, and every season brings
Conclusion
So, there you have it! Growing your own purple bush beans is not just a rewarding gardening experience; it’s a gateway to fresher, more flavorful meals and a deeper connection with the food you eat. This DIY trick, focusing on the ease and efficiency of cultivating these vibrant vegetables, is a must-try for any home gardener, regardless of experience level.
Why is it a must-try? Because unlike some finicky garden vegetables, purple bush beans are remarkably resilient and productive. They offer a stunning visual appeal to your garden with their deep purple pods, which then transform into a beautiful green when cooked. Imagine the delight of harvesting your own colorful beans, knowing exactly where they came from and how they were grown. The taste is undeniably superior to store-bought varieties, boasting a crisp texture and a slightly sweeter, more nuanced flavor.
Beyond the basic method, there’s plenty of room for experimentation. Consider companion planting your purple bush beans with herbs like rosemary or thyme to naturally deter pests. You could also try succession planting, sowing new seeds every few weeks, to ensure a continuous harvest throughout the growing season. For those with limited space, container gardening is an excellent option. Choose a large pot with good drainage and follow the same planting instructions as you would for a garden bed.
Don’t be afraid to experiment with different varieties of purple bush beans! Some popular choices include ‘Royal Burgundy,’ known for its exceptional flavor, and ‘Purple Queen,’ prized for its high yields. Each variety offers a slightly different taste and texture, so finding your favorite is part of the fun.
But the real magic happens when you bring your homegrown purple bush beans into the kitchen. Sauté them with garlic and olive oil for a simple yet elegant side dish. Add them to salads for a pop of color and a boost of nutrients. Or, blanch and freeze them for enjoyment throughout the winter months. The possibilities are endless!
We wholeheartedly encourage you to give this DIY trick a try. It’s a simple, satisfying, and delicious way to enhance your gardening skills and elevate your meals. And most importantly, we want to hear about your experience! Share your photos, tips, and recipes with us in the comments below. Let’s build a community of purple bush bean enthusiasts and inspire others to embrace the joy of homegrown goodness. Happy gardening!
Frequently Asked Questions (FAQ)
What are the best conditions for growing purple bush beans?
Purple bush beans thrive in warm weather and require at least six hours of sunlight per day. The ideal soil temperature for germination is between 60°F and 70°F (15°C and 21°C). Ensure your soil is well-draining and rich in organic matter. Amend heavy clay soils with compost or other organic materials to improve drainage and aeration. Before planting, consider conducting a soil test to determine if any nutrient deficiencies need to be addressed. A slightly acidic to neutral pH (around 6.0 to 7.0) is optimal for bean growth.
How often should I water my purple bush beans?
Water your purple bush beans regularly, especially during dry periods. Aim to keep the soil consistently moist but not waterlogged. Water deeply at the base of the plants, avoiding wetting the foliage, which can increase the risk of fungal diseases. A good rule of thumb is to water when the top inch of soil feels dry to the touch. Mulching around the plants can help retain moisture and suppress weed growth. During periods of heavy rainfall, you may need to reduce watering frequency.
What are common pests and diseases that affect purple bush beans, and how can I prevent them?
Common pests that can affect purple bush beans include aphids, bean beetles, and spider mites. Regularly inspect your plants for signs of infestation, such as distorted leaves, sticky residue, or webbing. Handpicking pests or using insecticidal soap can help control minor infestations. For more severe infestations, consider using organic pesticides specifically formulated for vegetable gardens.
Common diseases that can affect purple bush beans include bean rust, powdery mildew, and anthracnose. To prevent these diseases, ensure good air circulation around your plants by spacing them adequately. Avoid overhead watering and water early in the day to allow the foliage to dry before nightfall. Remove any infected leaves or plants promptly to prevent the spread of disease. Crop rotation can also help reduce the risk of soilborne diseases.
When and how should I harvest my purple bush beans?
Purple bush beans are typically ready for harvest about 50 to 60 days after planting. Harvest the beans when they are firm, plump, and about the thickness of a pencil. The pods should snap easily from the plant. Regular harvesting encourages continued production. Overripe beans will become tough and stringy. To harvest, gently snap the beans off the plant, being careful not to damage the stems or surrounding foliage.
Can I grow purple bush beans in containers?
Yes, purple bush beans can be successfully grown in containers. Choose a large pot with good drainage, at least 12 inches in diameter and depth. Use a high-quality potting mix that is well-draining and rich in organic matter. Follow the same planting instructions as you would for a garden bed. Container-grown beans may require more frequent watering and fertilization than those grown in the ground. Place the container in a sunny location that receives at least six hours of sunlight per day.
How do I store purple bush beans after harvesting?
Freshly harvested purple bush beans can be stored in the refrigerator for up to a week. Place them in a plastic bag or container to prevent them from drying out. For longer storage, you can blanch and freeze the beans. To blanch, boil the beans for 2-3 minutes, then immediately plunge them into ice water to stop the cooking process. Drain the beans thoroughly and pack them into freezer bags or containers. Frozen beans can be stored for up to 8-12 months. You can also pickle or can purple bush beans for long-term storage.
What are some good companion plants for purple bush beans?
Companion planting can help improve the growth and health of your purple bush beans. Some good companion plants include:
* **Marigolds:** Repel bean beetles and other pests.
* **Nasturtiums:** Attract aphids away from the beans.
* **Rosemary and Thyme:** Deter bean beetles and other pests.
* **Carrots:** Improve soil structure and deter bean flies.
* **Cucumbers:** Provide shade and support for the beans.
* **Corn:** Provides support for climbing bean varieties (though purple bush beans are bush varieties).
Avoid planting purple bush beans near onions or garlic, as they can inhibit bean growth.
Are purple bush beans nutritious?
Yes, purple bush beans are a nutritious addition to your diet. They are a good source of vitamins A and C, as well as fiber and antioxidants. They are also low in calories and fat. The purple color of the beans is due to anthocyanins, which are powerful antioxidants that have been linked to various health benefits.
Can I save seeds from my purple bush beans for next year?
Yes, you can save seeds from your purple bush beans, but only if they are open-pollinated varieties. Hybrid varieties will not produce true-to-type seeds. To save seeds, allow some of the bean pods to dry completely on the plant. Once the pods are dry and brittle, shell the beans and store them in an airtight container in a cool, dry place. Label the container with the variety and date. Before planting the saved seeds, test their germination rate by planting a few seeds in a damp paper towel. If most of the seeds germinate, they are viable for planting.

Leave a Comment