

Bathroom freshness hack: Let’s face it, nobody enjoys a stale-smelling bathroom. It’s the one room in the house where unpleasant odors can linger, no matter how diligent you are with cleaning. But what if I told you there’s a simple, DIY solution that’s not only effective but also incredibly budget-friendly?
For centuries, people have sought ways to naturally freshen their homes. From ancient Egyptians using fragrant oils to the Victorian era’s potpourri bowls, the desire for a pleasant-smelling living space is deeply ingrained in our history. Today, we’re bombarded with chemical-laden air fresheners, but many of us are searching for healthier, more sustainable alternatives. That’s where this bathroom freshness hack comes in!
This isn’t just about masking odors; it’s about creating a welcoming and refreshing atmosphere. Imagine stepping into your bathroom and being greeted by a subtle, natural fragrance instead of that artificial, overpowering scent. This DIY trick is perfect for anyone who wants to eliminate unpleasant smells, save money, and reduce their exposure to harsh chemicals. Plus, it’s so easy to make, you’ll wonder why you didn’t try it sooner! So, let’s dive in and discover how to transform your bathroom into a fragrant oasis with this simple yet effective hack.
DIY Bathroom Freshness Hack: The Ultimate Guide to a Sparkling Scent!
Okay, let’s face it, bathrooms can sometimes be…challenging in the freshness department. But fear not! I’m going to share my absolute favorite DIY bathroom freshness hack that will leave your bathroom smelling amazing without breaking the bank or using harsh chemicals. This isn’t just a quick fix; it’s a long-lasting solution that’s super easy to implement. Get ready to say goodbye to stale odors and hello to a spa-like atmosphere!
What You’ll Need: The Essential Supplies
Before we dive in, let’s gather our supplies. This is a pretty straightforward project, so you probably already have most of these items on hand.
* A small glass jar or container (think mason jar, repurposed candle jar, or even a cute little ceramic bowl).
* Baking soda (the ultimate odor absorber!).
* Essential oils (choose your favorite scents – lavender, eucalyptus, lemon, and tea tree are all great choices for bathrooms).
* Distilled water (tap water works too, but distilled is best for longevity).
* Gelatin powder (unflavored, this is what will solidify the mixture).
* Food coloring (optional, for a pop of color!).
* A small saucepan.
* A whisk or spoon.
* Decorative elements (optional, like dried flowers, small pebbles, or glitter).
Step-by-Step Instructions: Creating Your Odor-Absorbing Gel
This is where the magic happens! Follow these steps carefully, and you’ll have a beautiful and fragrant odor absorber in no time.
1. Prepare Your Jar: First things first, make sure your jar or container is clean and dry. This will prevent any unwanted bacteria from growing in your gel. If you’re using a repurposed jar, give it a good scrub with soap and hot water.
2. Bloom the Gelatin: In a small bowl, combine 1 tablespoon of gelatin powder with 1/4 cup of cold distilled water. Stir it well to ensure all the gelatin is moistened. Let it sit for about 5 minutes to “bloom.” This process allows the gelatin to absorb the water and create a smooth, even consistency.
3. Heat the Water: Pour 1 cup of distilled water into your small saucepan. Place the saucepan over medium heat and bring the water to a simmer. You don’t want it to boil, just gently simmer.
4. Dissolve the Gelatin: Once the water is simmering, add the bloomed gelatin mixture to the saucepan. Whisk constantly until the gelatin is completely dissolved and the mixture is clear. This usually takes about 2-3 minutes. Make sure there are no lumps!
5. Add Baking Soda: Now for the odor-fighting power! Remove the saucepan from the heat and carefully stir in 2 tablespoons of baking soda. The mixture might fizz a little, so be prepared. Stir until the baking soda is fully dissolved.
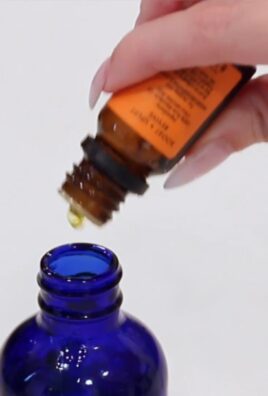
6. Incorporate Essential Oils: This is where you get to customize the scent! Add 15-20 drops of your favorite essential oils to the mixture. I personally love a combination of lavender and eucalyptus for a relaxing and refreshing bathroom scent. Experiment with different blends to find what you like best. Remember, a little goes a long way!
7. Add Food Coloring (Optional): If you want to add a pop of color to your gel, now’s the time! Add a few drops of food coloring and stir until you achieve your desired shade. Be careful not to add too much, as it can stain.
8. Pour into Jar: Carefully pour the mixture into your prepared jar or container.
9. Add Decorative Elements (Optional): If you’re feeling creative, you can add decorative elements to the top of the gel while it’s still liquid. Dried flowers, small pebbles, or even a sprinkle of glitter can add a personal touch.
10. Let it Set: Now comes the hardest part: waiting! Place the jar in the refrigerator for at least 3-4 hours, or preferably overnight, to allow the gel to fully set.
Placement and Maintenance: Keeping Your Bathroom Fresh
Now that you’ve created your amazing odor-absorbing gel, let’s talk about placement and maintenance to ensure it works its magic for as long as possible.
* Strategic Placement: Place your gel in a well-ventilated area of your bathroom, away from direct sunlight and heat. A shelf, countertop, or even the back of the toilet are all good options.
* Refrigeration Boost: If you notice the scent fading, you can pop the jar back into the refrigerator for a few hours. The cold temperature will help to reactivate the essential oils and refresh the scent.
* Re-Scenting: Over time, the essential oils will evaporate, and the scent will fade. When this happens, you can simply add a few more drops of essential oils to the top of the gel.
* Replacing the Gel: Eventually, the baking soda will become saturated, and the gel will lose its effectiveness. When this happens (usually after a few weeks or months, depending on the humidity and usage of your bathroom), it’s time to make a new batch!
Troubleshooting: Common Issues and Solutions
Sometimes things don’t go exactly as planned. Here are a few common issues you might encounter and how to fix them:
* Gel Doesn’t Set: If your gel doesn’t set properly, it could be due to a few reasons. Make sure you’re using the correct ratio of gelatin to water. Also, ensure that the gelatin is fully dissolved before adding the baking soda. If you’re still having trouble, try adding a little more gelatin to your next batch.
* Scent is Too Weak: If the scent isn’t strong enough, you can add more essential oils. Start with a few extra drops and see if that makes a difference. You can also try using a stronger essential oil blend.
* Gel is Cloudy: A cloudy gel can be caused by using tap water instead of distilled water. Tap water contains minerals that can cloud the mixture. Distilled water is always the best option for a clear gel.
* Mold Growth: While unlikely, mold can sometimes grow on the gel, especially in humid environments. To prevent this, make sure your jar is clean and dry before adding the mixture. You can also add a few drops of tea tree essential oil, which has antifungal properties. If you do see mold growth, discard the gel and make a fresh batch.
Essential Oil Blends: My Favorite Bathroom Scents
Choosing the right essential oil blend can make all the difference in creating the perfect bathroom atmosphere. Here are a few of my favorite combinations:
* Relaxing Spa: Lavender and eucalyptus. This classic combination is perfect for creating a calming and relaxing atmosphere.
* Citrus Burst: Lemon, grapefruit, and orange. This blend is bright, uplifting, and energizing.
* Clean and Fresh: Tea tree and peppermint. This combination is antibacterial and refreshing, perfect for keeping your bathroom clean and smelling great.
* Woodsy Retreat: Cedarwood and pine. This blend creates a warm and inviting atmosphere, reminiscent of a forest retreat.
* Floral Delight: Rose and geranium. This combination is romantic and luxurious, perfect for creating a spa-like experience.
Alternative Methods: Other Ways to Freshen Your Bathroom
While this DIY gel is my go-to solution, here are a few other quick and easy ways to freshen up your bathroom:
* Essential Oil Diffuser: An essential oil diffuser is a great way to disperse fragrance throughout your bathroom. Simply add a few drops of your favorite essential oils to the diffuser and let it work its magic.
* Potpourri: A bowl of potpourri is a classic way to add fragrance to any room. You can buy pre-made potpourri or create your own using dried flowers, herbs, and spices.
* Scented Candles: Scented candles are a great way to create a warm and inviting atmosphere. Just be sure to never leave a burning candle unattended.
* Baking Soda in a Dish: A simple dish of baking soda can help to absorb odors in your bathroom. Replace the baking soda every few weeks for best results.
* Ventilation: Make sure your bathroom is well-ventilated by opening a window or using the exhaust fan after showering or bathing. This will help to prevent moisture buildup and reduce the risk of mold and mildew growth.
Final Thoughts: Enjoy Your Fresh Bathroom!
And there you have it! My ultimate DIY bathroom freshness hack. I hope you enjoy creating your own odor-absorbing gel and transforming your bathroom into a fragrant oasis. Remember to experiment with different essential oil blends to find your perfect scent. Happy freshening!
Conclusion
So, there you have it! This simple, yet incredibly effective, bathroom freshness hack is a game-changer for anyone looking to elevate their bathroom experience without breaking the bank or resorting to harsh chemicals. We’ve shown you how to transform readily available ingredients into a powerful odor eliminator and air freshener that not only masks unpleasant smells but actively neutralizes them, leaving your bathroom smelling clean and inviting.
Why is this DIY trick a must-try? Because it’s cost-effective, eco-friendly, and completely customizable. Forget those expensive store-bought air fresheners filled with artificial fragrances and potentially harmful chemicals. With this method, you control exactly what goes into your bathroom’s air, ensuring a safe and pleasant environment for you and your family. Plus, the satisfaction of creating something yourself that works so well is an added bonus!
But the beauty of this bathroom freshness hack lies in its versatility. Feel free to experiment with different essential oil combinations to create your signature scent. Love the invigorating aroma of citrus? Combine lemon, grapefruit, and orange essential oils. Prefer a calming and relaxing atmosphere? Lavender, chamomile, and sandalwood are your go-to choices. You can even add a touch of spice with cinnamon or clove for a warm and inviting fragrance, especially during the colder months.
Consider the container you use as well. While a simple glass jar works perfectly, you can get creative with decorative containers that complement your bathroom’s aesthetic. Repurpose old candle jars, mason jars, or even small ceramic bowls. Just make sure the container is heat-resistant if you plan on using a candle warmer.
For a longer-lasting effect, try adding a tablespoon of baking soda to the mixture. Baking soda is a natural odor absorber and will help to keep your bathroom smelling fresh for longer periods. You can also experiment with adding dried flowers or herbs to the mixture for a visually appealing touch and a subtle fragrance boost.
Don’t be afraid to adjust the amount of water or essential oils to suit your preferences. The key is to find a balance that creates a fragrance that is pleasant and not overpowering. Start with a small amount of essential oils and gradually add more until you achieve the desired scent strength.
We are confident that once you try this bathroom freshness hack, you’ll never go back to store-bought air fresheners. It’s a simple, effective, and affordable way to keep your bathroom smelling fresh and clean, naturally.
So, what are you waiting for? Gather your ingredients, follow the simple steps, and prepare to be amazed by the results. We encourage you to try this DIY bathroom freshness hack and share your experience with us in the comments below. Let us know what essential oil combinations you tried, what containers you used, and any other variations you came up with. We can’t wait to hear your success stories and learn from your creative ideas! Let’s create a community of fresh-smelling bathrooms, one DIY project at a time!
Frequently Asked Questions (FAQ)
Q: How long will this DIY bathroom air freshener last?
A: The longevity of your DIY air freshener depends on several factors, including the amount of essential oils used, the size of the container, and the ventilation in your bathroom. Generally, you can expect it to last anywhere from 2 to 4 weeks. You’ll know it’s time to refresh the mixture when the fragrance starts to fade or the water evaporates significantly. Adding baking soda can also extend the life of the freshener.
Q: Can I use fragrance oils instead of essential oils?
A: While you can use fragrance oils, we highly recommend using essential oils for a few key reasons. Essential oils are derived from natural plant sources and offer therapeutic benefits in addition to their fragrance. Fragrance oils, on the other hand, are often synthetic and may contain chemicals that can be irritating or harmful. Essential oils also tend to have a more complex and nuanced scent profile compared to fragrance oils. However, if you choose to use fragrance oils, ensure they are specifically designed for use in air fresheners and are safe for inhalation.
Q: Is this DIY air freshener safe for pets and children?
A: While this DIY air freshener is generally safer than commercial alternatives, it’s still important to exercise caution, especially if you have pets or young children. Some essential oils can be toxic to pets, so it’s crucial to research the safety of each oil before using it. Common essential oils that are toxic to pets include tea tree oil, peppermint oil, and cinnamon oil. Keep the air freshener out of reach of children and pets to prevent accidental ingestion. If you are concerned about the safety of essential oils, consider using milder options like lavender or chamomile, or consult with a veterinarian or healthcare professional.
Q: Can I use this air freshener in other rooms of my house?
A: Absolutely! This DIY air freshener is not limited to just the bathroom. You can use it in any room of your house that needs a little freshening up. Consider placing it in your living room, bedroom, or even your car. Just be mindful of the scent strength and adjust the amount of essential oils accordingly. For larger rooms, you may need to use multiple air fresheners or a larger container.
Q: What if I don’t have a candle warmer? Can I still make this air freshener?
A: Yes, you can definitely still make this air freshener without a candle warmer. The candle warmer simply helps to gently diffuse the fragrance into the air. If you don’t have one, you can simply place the mixture in a well-ventilated area of your bathroom. The natural evaporation of the water will still release the fragrance, although it may not be as strong or consistent as with a candle warmer. You can also try placing the mixture near a heat source, such as a radiator, to encourage evaporation.
Q: My bathroom is very small. Will this air freshener be too overpowering?
A: If your bathroom is small, it’s important to use a smaller container and fewer essential oils to avoid creating an overpowering scent. Start with just a few drops of essential oil and gradually add more until you achieve the desired fragrance strength. You can also try diluting the mixture with more water. Another option is to use a less potent essential oil, such as lavender or chamomile.
Q: Can I use tap water to make this air freshener?
A: While you can use tap water, we recommend using distilled water for the best results. Distilled water is free of minerals and impurities that can affect the fragrance and clarity of the mixture. It will also help to prevent the buildup of residue in your container. If you don’t have distilled water, you can use filtered water as a substitute.
Q: How do I clean the container after the air freshener is used up?
A: Cleaning the container is easy. Simply discard any remaining liquid and rinse the container with warm, soapy water. If there is any residue buildup, you can use a scrub brush or sponge to remove it. For stubborn residue, try soaking the container in a solution of baking soda and water for a few hours before scrubbing. Make sure to thoroughly dry the container before reusing it.
Q: Can I add other ingredients to this air freshener, like herbs or spices?
A: Absolutely! Feel free to experiment with adding other natural ingredients to your air freshener to customize the scent and appearance. Dried herbs like lavender, rosemary, or mint can add a subtle fragrance and visual appeal. Spices like cinnamon, cloves, or star anise can create a warm and inviting aroma, especially during the fall and winter months. Just be sure to use dried ingredients to prevent mold growth.
Leave a Comment