

Grow Endive Indoors? Absolutely! Imagine fresh, slightly bitter, and delightfully crunchy endive gracing your salads, all year round, without ever stepping foot outside. Sounds like a dream, right? Well, it’s a dream you can easily make a reality with a few simple tricks and a little DIY spirit!
Endive, with its intriguing history tracing back to 17th-century Belgium (legend has it a farmer accidentally discovered its blanched goodness!), has long been a culinary treasure. But traditionally, growing it involved a somewhat complex process of forcing the chicons (the edible part) in dark cellars. Thankfully, we’re bringing this process into the light – or rather, into the controlled environment of your home!
Why bother learning how to grow endive indoors? Because fresh, high-quality endive can be expensive and sometimes hard to find at the grocery store. Plus, there’s immense satisfaction in nurturing your own food from seed to table. This DIY guide will empower you to bypass the store and cultivate your own supply of this nutritious and delicious leafy green. We’ll break down the process into easy-to-follow steps, ensuring even beginners can enjoy the rewards of homegrown endive. Get ready to transform your indoor space into a mini-endive farm!

Growing Endive Indoors: A Beginner’s Guide
Hey there, fellow plant enthusiasts! Ever thought about growing your own endive indoors? It’s easier than you might think, and the slightly bitter, crisp leaves are a fantastic addition to salads, sandwiches, or even grilled as a side dish. I’m going to walk you through the whole process, from choosing the right variety to harvesting your delicious homegrown endive. Let’s get started!
Choosing Your Endive Variety
First things first, you need to pick the right endive variety for indoor growing. Some varieties are better suited for forcing (growing in the dark to produce blanched heads) than others. Here are a few popular choices:
* ‘Zoom F1’: This is a widely available and reliable variety known for its good forcing ability. It produces tight, compact heads.
* ‘Wallonne’: Another excellent choice for forcing, ‘Wallonne’ is known for its slightly milder flavor.
* ‘Brussels Whitloof’: This is a classic forcing variety, producing tightly packed, elongated heads.
You can usually find endive seeds at your local garden center or online. Make sure to check the seed packet for specific instructions and days to maturity.
Getting Started: Sowing Your Endive Seeds
Now that you’ve chosen your variety, it’s time to sow those seeds!
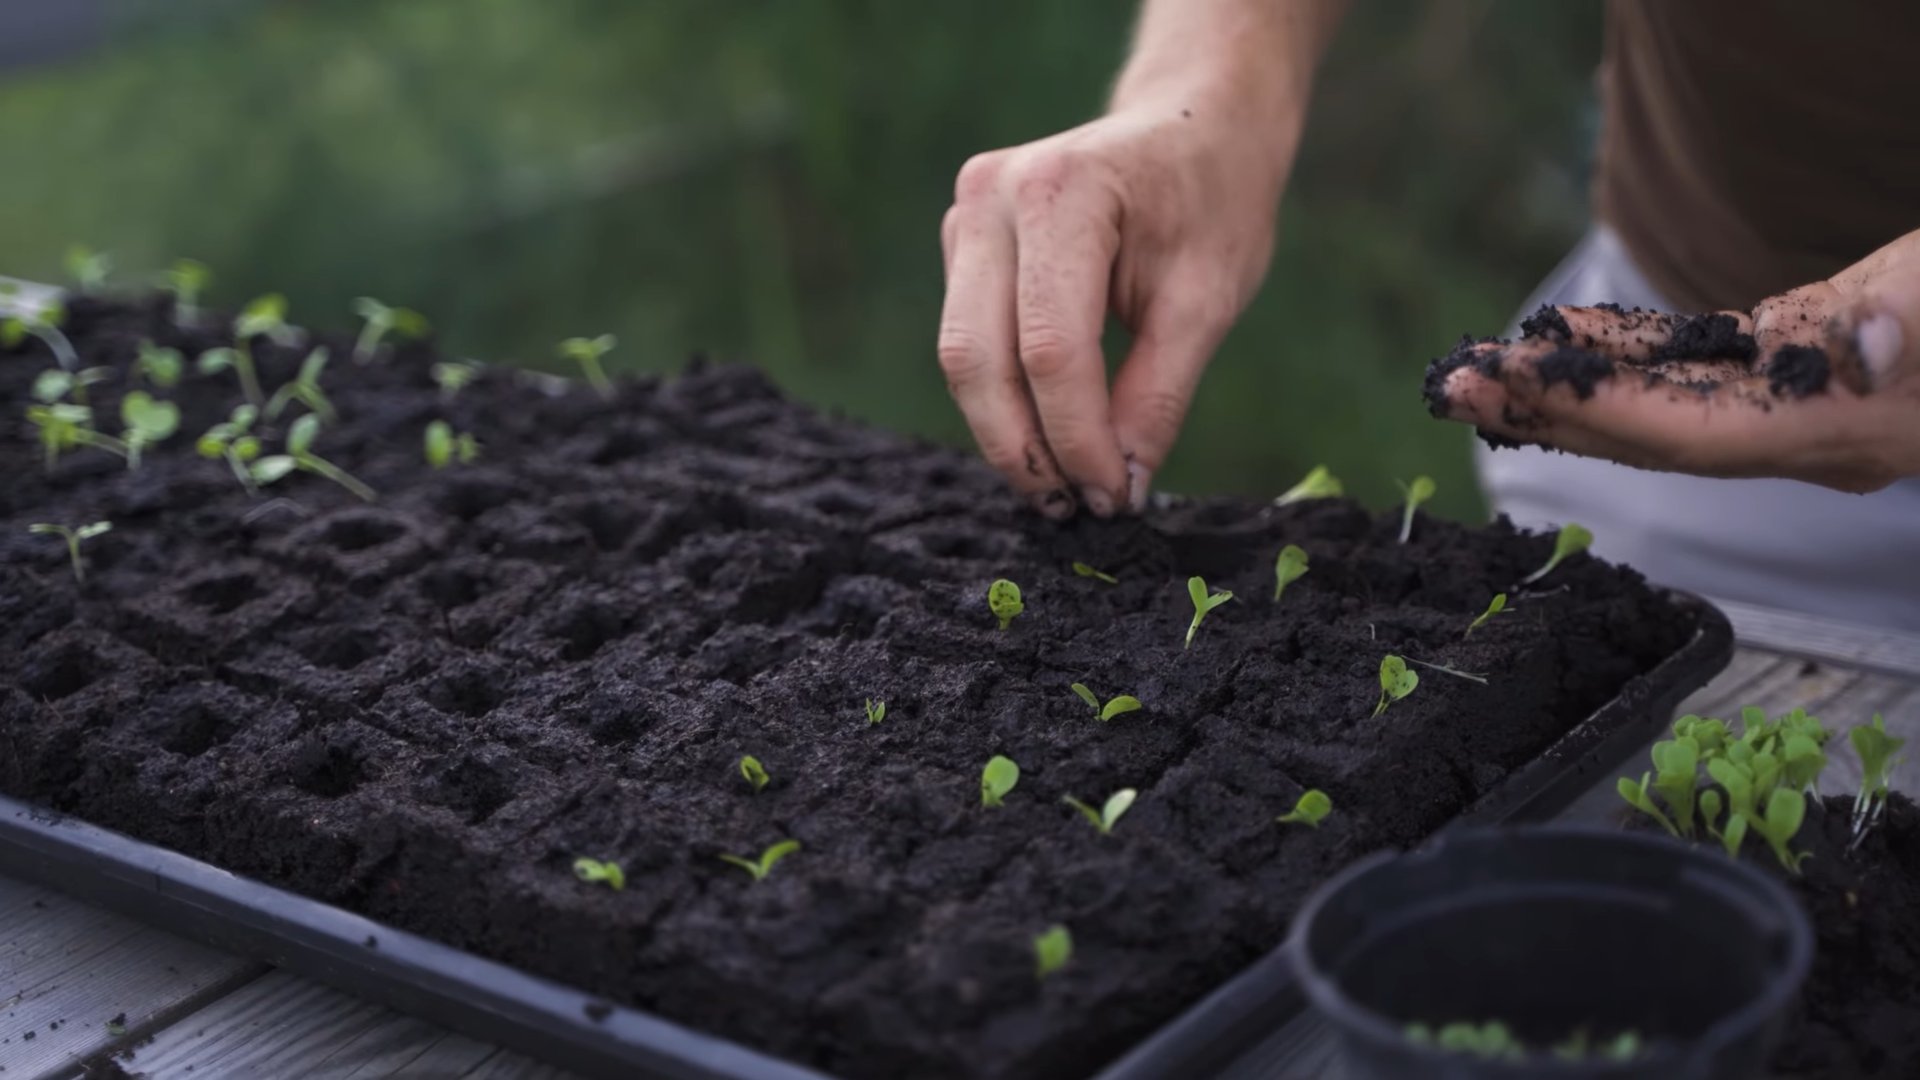
1. Prepare Your Seed Starting Mix: I like to use a well-draining seed starting mix. You can buy a pre-made mix or make your own by combining equal parts peat moss (or coco coir), perlite, and vermiculite. Moisten the mix thoroughly before planting.
2. Choose Your Seed Starting Containers: You can use seed trays, small pots, or even recycled containers like yogurt cups. Just make sure they have drainage holes.
3. Sow the Seeds: Sow the seeds about ¼ inch deep and about an inch apart. Gently cover them with the seed starting mix and water lightly.
4. Provide Warmth and Light: Endive seeds need warmth to germinate. Aim for a temperature of around 65-75°F (18-24°C). You can use a heat mat to help speed up germination. Place the seed trays or pots in a bright location, but avoid direct sunlight, which can scorch the seedlings. A grow light works wonders if you don’t have a naturally bright spot.
5. Keep the Soil Moist: Keep the soil consistently moist, but not soggy. Water gently with a spray bottle or watering can to avoid disturbing the seeds.
Transplanting Your Endive Seedlings
Once your seedlings have developed a few sets of true leaves (usually after about 4-6 weeks), it’s time to transplant them into larger containers.
1. Prepare Your Growing Containers: Choose containers that are at least 6-8 inches in diameter. I prefer using pots made of terracotta or plastic.
2. Prepare Your Potting Mix: Use a well-draining potting mix that’s rich in organic matter. You can amend your potting mix with compost or aged manure.
3. Carefully Remove the Seedlings: Gently loosen the soil around the seedlings and carefully lift them out of the seed starting containers. Be careful not to damage the roots.
4. Transplant the Seedlings: Plant each seedling in its own container, making sure the top of the root ball is level with the soil surface. Space them about 6-8 inches apart if you’re planting multiple seedlings in a larger container.
5. Water Thoroughly: Water the transplanted seedlings thoroughly and allow the excess water to drain out.
Caring for Your Endive Plants
Now that your endive plants are in their permanent containers, it’s time to provide them with the care they need to thrive.
1. Light: Endive needs at least 6 hours of bright, indirect light per day. If you don’t have a sunny window, you can use a grow light.
2. Watering: Water your endive plants regularly, keeping the soil consistently moist but not soggy. Avoid overwatering, which can lead to root rot. Check the soil moisture by sticking your finger about an inch into the soil. If it feels dry, it’s time to water.
3. Fertilizing: Feed your endive plants every 2-3 weeks with a balanced liquid fertilizer. Follow the instructions on the fertilizer label.
4. Temperature: Endive prefers cooler temperatures, ideally between 60-70°F (15-21°C). Avoid exposing your plants to extreme temperatures.
5. Pest Control: Keep an eye out for common pests like aphids and slugs. You can control aphids with insecticidal soap or neem oil. Slugs can be handpicked or trapped.
6. Air Circulation: Good air circulation is important to prevent fungal diseases. Make sure your plants are not overcrowded and that there is adequate airflow around them. A small fan can help.
Forcing Endive for Blanched Heads
This is where the magic happens! Forcing endive involves growing it in the dark to produce blanched, less bitter heads. This is a traditional method that results in a unique flavor and texture.
1. Harvest the Roots: After about 120-150 days from sowing, your endive plants should have developed mature roots. Carefully dig up the plants and trim the leaves back to about 1-2 inches above the crown.
2. Prepare the Roots: Gently wash the roots to remove any soil. Let them dry for a few days in a cool, dry place.
3. Plant the Roots in a Forcing Container: Choose a container that is deep enough to accommodate the roots. Fill the container with moist sand or potting mix. Plant the roots close together, but not touching, with the crowns exposed.
4. Darken the Environment: The key to forcing endive is to provide complete darkness. You can cover the container with a dark plastic bag, a bucket, or place it in a dark room or basement.
5. Maintain Moisture: Keep the sand or potting mix consistently moist, but not soggy.
6. Monitor the Growth: Check the plants regularly for growth. The blanched heads should start to appear in about 3-4 weeks.
7. Harvest the Blanched Heads: Once the heads are about 4-6 inches long, they are ready to harvest. Cut them off at the base with a sharp knife.
Harvesting Your Endive
Whether you’re growing your endive for blanched heads or just for the green leaves, harvesting is the final step!
1. Harvesting Green Leaves: You can start harvesting the outer leaves of your endive plants once they are large enough to use. Simply cut off the leaves at the base with a sharp knife.
2. Harvesting Blanched Heads: As mentioned above, harvest the blanched heads when they are about 4-6 inches long.
3. Storage: Store your harvested endive in the refrigerator in a plastic bag. It will keep for several days.
Troubleshooting Common Problems
Even with the best care, you might encounter some problems while growing endive indoors. Here are a few common issues and how to address them:
* Yellowing Leaves: This can be caused by overwatering, underwatering, or nutrient deficiencies. Adjust your watering schedule and fertilize your plants regularly.
* Leggy Growth: This is usually caused by insufficient light. Provide more light, either with a grow light or by moving your plants to a sunnier location.
* Root Rot: This is caused by overwatering. Make sure your containers have good drainage and avoid overwatering.
* Pests: Keep an eye out for common pests like aphids and slugs. Control them with insecticidal soap, neem oil, or by handpicking.
Enjoying Your Homegrown Endive
Congratulations! You’ve successfully grown your own endive indoors. Now it’s time to enjoy the fruits (or rather, leaves) of your labor. Endive is a versatile vegetable that can be used in a variety of dishes. Here are a few ideas:
* Salads: Endive adds a slightly bitter, crisp flavor to salads.
* Sandwiches: Use endive leaves as a crunchy and flavorful addition to sandwiches.
* Grilled: Grill endive halves with a drizzle of olive oil and balsamic vinegar for a delicious side dish.
* Braised: Braise endive with butter and herbs for a tender and flavorful vegetable dish.
* Gratins: Add endive to gratins for a unique and slightly bitter flavor.
I hope this guide has inspired you to try growing your own endive indoors. It’s a rewarding experience that will provide you with fresh, delicious vegetables all year round. Happy gardening!
Conclusion
So, there you have it! Growing endive indoors isn’t just a quirky gardening experiment; it’s a genuinely rewarding experience that brings fresh, slightly bitter greens right to your kitchen counter. Forget those wilted, overpriced heads at the grocery store. With a little patience and this straightforward DIY trick, you can cultivate your own supply of crisp, flavorful endive whenever you crave it.
Why is this a must-try? Because it puts you in control. You control the growing environment, ensuring optimal conditions for healthy, vibrant endive. You control the harvest, picking only what you need when you need it, minimizing waste and maximizing freshness. And perhaps most importantly, you experience the satisfaction of nurturing something from start to finish, a connection to nature that’s often missing in our modern lives.
But the beauty of this DIY trick lies in its adaptability. Feel free to experiment with different varieties of endive. Belgian endive, with its tightly packed, pale leaves, is a classic choice, but consider trying broader-leaved varieties like Frisee for a slightly different texture and flavor profile. You can also play around with the blanching process. Some gardeners prefer to completely exclude light during blanching for a milder flavor, while others allow a little indirect light for a slightly more pronounced bitterness.
Consider using different containers. While we’ve focused on using readily available materials like buckets or bins, you could also repurpose old drawers or even build a custom growing box. Just ensure it’s light-tight and well-draining.
Another variation to explore is hydroponic endive growing. While this requires a slightly more involved setup, it can result in faster growth and higher yields. You’ll need a hydroponic system, nutrient solution, and grow lights, but the results can be truly impressive.
Don’t be afraid to get creative with your endive harvest! Use it in salads, braise it as a side dish, or even grill it for a smoky, caramelized flavor. Endive pairs beautifully with citrus, nuts, cheese, and vinaigrettes. The possibilities are endless!
We wholeheartedly encourage you to give this DIY trick a try. It’s a simple, cost-effective, and incredibly satisfying way to enjoy fresh, homegrown endive. And most importantly, we want to hear about your experience! Share your photos, tips, and challenges in the comments below. Let’s build a community of indoor endive growers and learn from each other. What worked for you? What didn’t? What creative variations did you try? Your feedback will help others succeed and inspire even more people to discover the joys of growing their own food. So, grab your seeds, gather your supplies, and get ready to embark on your endive-growing adventure! You’ll be amazed at how easy and rewarding it is to cultivate this delicious and nutritious green right in your own home. Remember, the key to success is patience, observation, and a willingness to experiment. Happy growing!
Frequently Asked Questions (FAQ)
What exactly is endive, and what does it taste like?
Endive is a leafy vegetable belonging to the chicory family. It’s characterized by its slightly bitter, crisp leaves. The bitterness can vary depending on the variety and how it’s grown, with blanched endive generally being milder. It’s often used in salads, braised dishes, or as a scoop for appetizers.
How long does it take to grow endive indoors using this DIY trick?
The entire process, from sowing seeds to harvesting blanched endive, typically takes around 12-16 weeks. The initial growing phase, where you nurture the plants to maturity, takes about 8-10 weeks. The blanching phase, where you exclude light to produce the pale, tender leaves, takes an additional 4-6 weeks.
What kind of soil is best for growing endive indoors?
Endive prefers well-draining soil that’s rich in organic matter. A good mix would be equal parts potting soil, compost, and perlite or vermiculite. This combination provides the necessary nutrients, drainage, and aeration for healthy root development. Avoid heavy clay soils, as they can become waterlogged and hinder growth.
How much light does endive need before blanching?
Before blanching, endive needs plenty of bright, indirect light. Aim for at least 6-8 hours of sunlight per day. If you don’t have enough natural light, you can supplement with grow lights. Position the grow lights a few inches above the plants and adjust as they grow.
How do I know when my endive is ready to be blanched?
The endive plants are ready for blanching when they have formed a dense rosette of leaves and the roots are well-established. The plants should be a good size, typically around 6-8 inches in diameter. You can gently tug on the plants to check if the roots are firmly anchored in the soil.
What’s the best way to blanch endive indoors?
The key to successful blanching is to completely exclude light. You can achieve this by covering the plants with a light-tight container, such as a bucket, bin, or even a cardboard box. Make sure the container is tall enough to accommodate the plants as they grow. You can also wrap the individual heads with newspaper or foil, but this can be more time-consuming.
How often should I water endive during the blanching process?
Water sparingly during the blanching process. The soil should be kept slightly moist, but not waterlogged. Overwatering can lead to rot and other problems. Check the soil moisture regularly and water only when the top inch feels dry to the touch.
Can I use grow lights during the blanching process?
No, grow lights should not be used during the blanching process. The purpose of blanching is to exclude light, which encourages the plants to produce pale, tender leaves. Exposing the plants to light during this phase will result in bitter, green leaves.
How do I harvest endive after blanching?
Once the blanching process is complete, carefully remove the container and harvest the endive heads. Use a sharp knife to cut the heads at the base, just above the soil line. Gently remove any loose or damaged outer leaves.
How long will harvested endive last?
Harvested endive can be stored in the refrigerator for up to a week. Wrap the heads in a damp paper towel and place them in a plastic bag or container. This will help to keep them crisp and fresh.
Can I regrow endive from the root?
Yes, you can often regrow endive from the root after harvesting the head. Leave about an inch of the stem attached to the root and replant it in fresh soil. Keep the soil moist and provide bright, indirect light. You may get a smaller second harvest, but it’s worth a try!
What are some common problems when growing endive indoors, and how can I prevent them?
Some common problems include pests (like aphids), diseases (like rot), and bolting (premature flowering). To prevent pests, inspect your plants regularly and treat any infestations promptly with insecticidal soap or neem oil. To prevent diseases, ensure good air circulation and avoid overwatering. To prevent bolting, keep the plants cool and well-watered.
Is growing endive indoors with this DIY trick organic?
Whether your endive is organic depends on the materials and methods you use. If you use organic potting soil, organic fertilizer, and avoid synthetic pesticides, then your endive can be considered organic.
Can I grow endive indoors year-round?
Yes, one of the great advantages of growing endive indoors is that you can do it year-round, regardless of the weather outside. Just ensure you provide the necessary light, water, and temperature conditions.
What if my endive tastes too bitter?
If your endive tastes too bitter, there are a few things you can try. First, make sure you’re blanching it properly to exclude light. Second, try soaking the leaves in cold water for 30 minutes before using them. Third, pair the endive with sweet or acidic ingredients, such as citrus fruits, nuts, or vinaigrettes, to balance the bitterness.


Leave a Comment