

Harvesting Bush Beans: There’s nothing quite like the satisfaction of growing your own food, and when it comes to easy and rewarding crops, bush beans are a fantastic choice! But knowing *when* and *how* to harvest them can be the difference between a bountiful harvest and a disappointing one. Have you ever wondered if you’re picking your beans too early, or letting them get too tough on the vine? I know I have!
Bush beans have been a staple in gardens and on dinner tables for centuries, with roots tracing back to Central and South America. They’ve nourished communities and provided a reliable source of protein and vitamins. Today, growing your own bush beans is more than just a way to save money; it’s a connection to nature, a chance to enjoy fresh, flavorful produce, and a way to reduce your environmental footprint.
That’s why I’m so excited to share these simple yet effective DIY tricks for harvesting bush beans at their peak of perfection. We’ll cover everything from identifying the ideal bean size and texture to the best time of day to harvest. Plus, I’ll share some insider tips to extend your harvest season and maximize your yield. Trust me, with these hacks, you’ll be enjoying delicious, homegrown bush beans all summer long!
Harvesting Bush Beans Like a Pro: A DIY Guide
Hey there, fellow gardeners! I’m so excited to share my tried-and-true method for harvesting bush beans. There’s nothing quite like the taste of fresh, homegrown beans, and knowing exactly when and how to pick them is key to maximizing your harvest. Let’s dive in!
Understanding Bush Bean Growth and Maturity
Before we get our hands dirty, let’s quickly cover the basics. Bush beans, unlike pole beans, grow in a compact, bushy form. They typically mature faster, offering a concentrated harvest over a few weeks. Knowing when they’re ready is crucial.
Key Indicators of Bean Maturity:
* Size: Beans should be plump and well-filled, but not bulging. Overripe beans become tough and less flavorful.
* Texture: The pods should be firm and snap easily when bent. If they’re rubbery or bend without snapping, they’re not quite ready.
* Color: The color should be vibrant and consistent with the variety you’re growing.
* Seed Development: You want the seeds inside to be developed but not overly large. If you can easily feel large, hard seeds through the pod, it’s likely past its prime.
Tools You’ll Need
Luckily, harvesting bush beans doesn’t require a ton of fancy equipment. Here’s what I usually grab:
* Gardening Gloves: Protect your hands from dirt and any potential irritants.
* Harvesting Basket or Bucket: To collect your bounty.
* Sharp Scissors or Pruning Shears (Optional): Sometimes, the beans are attached quite firmly, and using these can prevent damage to the plant.
* A Comfortable Stool or Kneeling Pad (Optional): If you have a lot of plants, this can save your back and knees!
The Harvesting Process: Step-by-Step
Alright, let’s get to the fun part! Here’s my step-by-step guide to harvesting bush beans:
1. Timing is Everything: The best time to harvest is in the morning, after the dew has dried. The beans will be crisper and less prone to damage. I usually aim to harvest every 2-3 days once the beans start maturing. This encourages the plant to keep producing.
2. Inspect Your Plants Carefully: Take a good look at your bean plants. Check for beans that meet the maturity indicators we discussed earlier. Don’t just grab the first bean you see! Look closely at the entire plant.
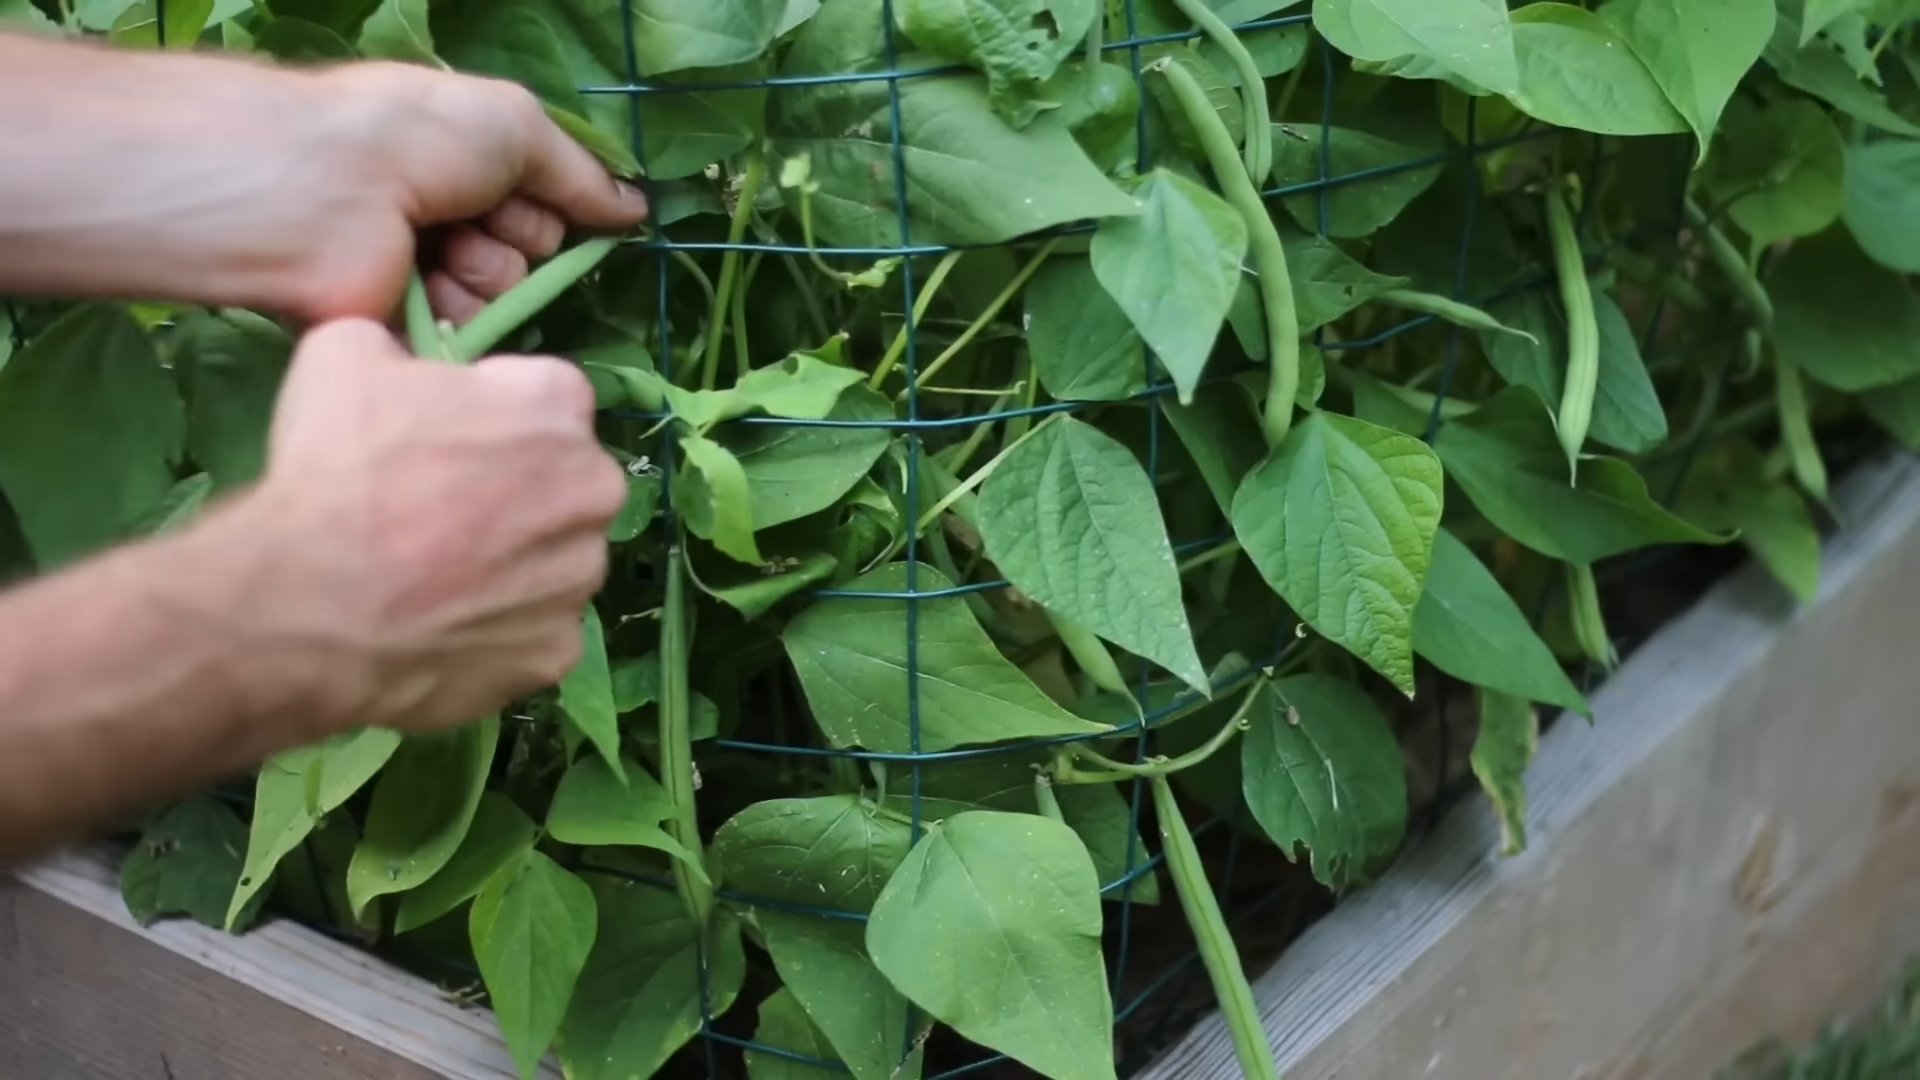
3. Gently Grasp the Bean: Hold the bean pod gently but firmly near the stem.
4. Harvesting by Hand: With your other hand, hold the stem of the plant just above where the bean is attached. Gently pull the bean away from the plant. If it comes off easily, great! If not, move on to the next step.
5. Using Scissors or Pruning Shears (If Needed): If the bean is stubbornly attached, use your scissors or pruning shears to snip the stem just above the bean. Be careful not to damage the plant itself. I find this especially helpful with some varieties that have tougher stems.
6. Place the Harvested Beans in Your Basket: Carefully place the harvested beans in your basket or bucket. Avoid piling them too high, as this can bruise them.
7. Repeat the Process: Continue inspecting and harvesting beans from all of your plants. Remember to check underneath the leaves, as beans can sometimes hide there.
8. Don’t Forget the Small Ones: Even if some beans are a little smaller than others, go ahead and pick them. They’ll still be delicious, and harvesting them will encourage the plant to produce more.
9. Discard Damaged or Diseased Beans: If you find any beans that are damaged, diseased, or infested with pests, discard them immediately. Don’t put them in your compost pile, as this could spread the problem.
10. Water After Harvesting: After you’ve finished harvesting, give your bean plants a good watering. This will help them recover and continue producing.
Troubleshooting Common Harvesting Issues
Sometimes, things don’t go exactly as planned. Here are a few common issues I’ve encountered and how I deal with them:
* Beans are Too Tough: This usually means you’ve waited too long to harvest. The beans are overripe and the seeds inside have become too large and hard. While you can still eat them, they won’t be as tender or flavorful. Try to harvest more frequently to avoid this.
* Beans are Too Small: This could be due to a number of factors, such as poor soil, lack of water, or pests. Make sure your plants are getting enough water and nutrients, and check them regularly for pests.
* Plants Aren’t Producing: If your plants aren’t producing beans, it could be due to a lack of pollination, hot weather, or poor soil. Make sure your plants are getting enough sunlight and water, and consider adding some fertilizer to the soil.
* Damaged Plants During Harvest: If you accidentally damage a plant while harvesting, don’t worry too much. Just try to be more careful next time. You can also prune off any damaged leaves or stems.
Extending Your Bush Bean Harvest
Want to keep those beans coming? Here are a few tips for extending your bush bean harvest:
* Succession Planting: Plant new seeds every 2-3 weeks to ensure a continuous supply of beans throughout the growing season.
* Regular Harvesting: As I mentioned earlier, harvesting beans regularly encourages the plant to produce more.
* Proper Watering and Fertilizing: Make sure your plants are getting enough water and nutrients.
* Pest and Disease Control: Keep an eye out for pests and diseases, and take action to control them if necessary.
Storing Your Freshly Harvested Bush Beans
Now that you’ve got a basket full of beautiful bush beans, it’s time to think about storage. Here are a few options:
* Refrigerating: Store unwashed beans in a plastic bag in the refrigerator for up to a week.
* Freezing: Blanch the beans in boiling water for 2-3 minutes, then plunge them into ice water to stop the cooking process. Drain well and freeze in freezer bags or containers. They’ll keep for up to a year.
* Canning: You can also can bush beans for long-term storage. Follow a safe canning recipe and process them according to the instructions.
Enjoying Your Homegrown Bush Beans
The best part of harvesting bush beans is, of course, eating them! There are so many delicious ways to enjoy your homegrown bounty. Here are a few of my favorites:
* Steamed or Boiled: Simply steam or boil the beans until tender-crisp. Serve with a little butter, salt, and pepper.
* Sautéed: Sauté the beans in a pan with olive oil, garlic, and your favorite herbs.
* Roasted: Toss the beans with olive oil, salt, and pepper, and roast them in the oven until tender and slightly browned.
* In Salads: Add cooked beans to salads for a healthy and flavorful boost.
* Pickled: Pickle your beans for a tangy and delicious treat.
Conclusion
Harvesting bush beans is a rewarding experience that allows you to enjoy the fruits (or rather, vegetables!) of your labor. By following these tips and tricks, you can maximize your harvest and enjoy fresh, homegrown beans all season long. Happy gardening!
Conclusion
So, there you have it! Mastering the art of harvesting bush beans doesn’t require any fancy equipment or specialized knowledge. It’s a simple, rewarding process that connects you directly to the source of your food and ensures you’re enjoying the freshest, most flavorful beans possible. We’ve walked you through the key indicators of ripeness, the gentle harvesting technique, and the importance of consistent picking to maximize your yield.
But why is this DIY approach a must-try? Beyond the obvious benefit of fresh, delicious beans, harvesting your own bush beans offers a level of control you simply can’t achieve with store-bought varieties. You get to choose the exact moment of ripeness, ensuring peak flavor and texture. You also minimize the time between harvest and consumption, preserving vital nutrients and preventing the beans from becoming tough or starchy. Plus, there’s an undeniable satisfaction that comes from nurturing a plant from seed to table. It’s a tangible connection to nature and a reminder of the simple pleasures in life.
This is more than just a recipe; it’s a gateway to a more sustainable and flavorful way of eating.
Now, let’s talk variations and suggestions. While we’ve focused on the general principles of harvesting bush beans, remember that different varieties may have slightly different ripening times and characteristics. Experiment with different cultivars to discover your favorites. Consider succession planting – planting new seeds every few weeks – to ensure a continuous harvest throughout the growing season. And don’t be afraid to get creative with your bean dishes! From classic green bean casseroles to vibrant salads and hearty stews, the possibilities are endless.
Think about adding companion plants to your bush bean patch. Marigolds can deter pests, while herbs like rosemary and thyme can enhance the flavor of your beans. You can also use the spent bean plants as a green manure, chopping them up and incorporating them into the soil to enrich it for future plantings.
Furthermore, consider preserving your harvest. Blanching and freezing bush beans is a great way to enjoy them throughout the winter months. You can also pickle them for a tangy and flavorful treat. Or, if you’re feeling adventurous, try drying them for use in soups and stews.
Ultimately, the best way to learn is by doing. So, grab your gardening gloves, head out to your bush bean patch, and start harvesting! Don’t be afraid to experiment, make mistakes, and learn from your experiences. The more you practice, the better you’ll become at identifying the perfect moment to pick your beans.
We are confident that you will find this guide helpful for **harvesting bush beans**.
We encourage you to try this DIY trick and share your experiences with us. What varieties of bush beans are you growing? What are your favorite ways to prepare them? Do you have any tips or tricks to share? Let us know in the comments below! We can’t wait to hear from you and learn from your experiences. Together, we can create a community of passionate gardeners and food lovers who are dedicated to growing and enjoying the freshest, most flavorful food possible. Happy harvesting!
Frequently Asked Questions (FAQ)
Q: How do I know when my bush beans are ready to harvest?
A: This is the most crucial question! Bush beans are typically ready to harvest about 50-60 days after planting, but the best indicator is the appearance of the pods themselves. Look for pods that are firm, plump, and smooth, with a vibrant color that is characteristic of the variety you’re growing. They should be easily snapped off the plant without excessive force. Avoid harvesting beans that are overly large, bulging, or have visible seeds protruding through the pod, as these are likely to be tough and less flavorful. The ideal size varies by variety, so consult your seed packet or plant tag for specific recommendations. Generally, aim for a length of 4-6 inches.
Q: What happens if I leave the beans on the plant too long?
A: Leaving beans on the plant too long can have several negative consequences. First, the pods will become tough and fibrous, making them less palatable. Second, the plant will stop producing new beans, as it will focus its energy on maturing the existing ones. Finally, the beans inside the pods will become larger and harder, which can also affect the flavor and texture. Regular harvesting encourages the plant to continue producing new pods, resulting in a larger and more prolonged harvest.
Q: How often should I harvest my bush beans?
A: Bush beans should be harvested every 2-3 days, especially during peak season. This frequent harvesting encourages the plant to continue producing new pods. Check your plants regularly and pick any beans that are ready, even if you don’t need them immediately. You can always blanch and freeze them for later use.
Q: What’s the best way to store harvested bush beans?
A: Freshly harvested bush beans are best stored in the refrigerator. Place them in a plastic bag or container lined with a paper towel to absorb excess moisture. They should last for about 5-7 days. For longer storage, blanch them in boiling water for 2-3 minutes, then immediately plunge them into ice water to stop the cooking process. Drain them well and freeze them in freezer-safe bags or containers. Blanched and frozen bush beans can last for up to 8-12 months.
Q: My bush bean plants are producing lots of leaves but not many beans. What could be the problem?
A: There are several reasons why your bush bean plants might be producing lots of leaves but not many beans. One possibility is that the soil is too rich in nitrogen. Nitrogen promotes leafy growth, but it can inhibit flowering and bean production. Avoid using fertilizers that are high in nitrogen. Another possibility is that the plants are not getting enough sunlight. Bush beans need at least 6-8 hours of sunlight per day to produce a good crop. Make sure your plants are not shaded by other plants or structures. Overwatering can also be a problem, as it can lead to root rot and other diseases. Water your plants deeply but infrequently, allowing the soil to dry out slightly between waterings. Finally, pests and diseases can also affect bean production. Inspect your plants regularly for signs of pests or diseases and take appropriate action if necessary.
Q: Can I save seeds from my bush beans to plant next year?
A: Yes, you can save seeds from your bush beans to plant next year, but it’s important to choose open-pollinated varieties, as hybrid varieties may not produce true-to-type seeds. To save seeds, allow some of the pods to mature completely on the plant until they are dry and brown. Remove the seeds from the pods and spread them out on a tray to dry completely. Store the dried seeds in an airtight container in a cool, dark, and dry place. They should remain viable for several years.
Q: What are some common pests and diseases that affect bush beans?
A: Some common pests that affect bush beans include aphids, bean beetles, and spider mites. Aphids are small, soft-bodied insects that suck sap from the plants. Bean beetles are small, orange beetles that feed on the leaves and pods. Spider mites are tiny, spider-like creatures that also suck sap from the plants. Common diseases that affect bush beans include powdery mildew, bean rust, and anthracnose. Powdery mildew is a fungal disease that causes a white, powdery coating on the leaves. Bean rust is another fungal disease that causes reddish-brown pustules on the leaves. Anthracnose is a fungal disease that causes dark, sunken lesions on the pods and leaves.
Q: How can I prevent pests and diseases from affecting my bush bean plants?
A: There are several things you can do to prevent pests and diseases from affecting your bush bean plants. Choose disease-resistant varieties whenever possible. Practice crop rotation to prevent the buildup of pests and diseases in the soil. Provide adequate spacing between plants to improve air circulation. Water your plants at the base to avoid wetting the foliage, which can promote fungal diseases. Inspect your plants regularly for signs of pests or diseases and take appropriate action if necessary. Use organic pest control methods, such as insecticidal soap or neem oil, to control pests. Remove and destroy any infected plants to prevent the spread of disease.
Q: Can I grow bush beans in containers?
A: Yes, bush beans can be grown successfully in containers. Choose a container that is at least 12 inches deep and wide to provide enough room for the roots to grow. Use a well-draining potting mix and make sure the container has drainage holes. Place the container in a sunny location that receives at least 6-8 hours of sunlight per day. Water the plants regularly, especially during hot, dry weather. Fertilize the plants every few weeks with a balanced fertilizer.

Leave a Comment