

Grow Chili Peppers like a pro, even if you think you have a “brown thumb”! Have you ever dreamed of adding a fiery kick to your meals with homegrown chili peppers, but felt intimidated by the process? Well, dream no more! This isn’t just another gardening guide; it’s your secret weapon to unlocking a bountiful harvest of vibrant, flavorful chili peppers, right in your own backyard (or balcony!).
For centuries, chili peppers have been more than just a spice; they’ve been a symbol of warmth, passion, and even prosperity in many cultures. From ancient Mesoamerica, where they were first cultivated, to the bustling markets of Asia, chili peppers have added zest to cuisines and traditions worldwide. But you don’t need to travel the globe to experience the joy of these fiery fruits.
I know what you’re thinking: “Gardening is hard!” And sometimes it can be. But with a few clever DIY tricks and hacks, growing your own chili peppers can be surprisingly easy and incredibly rewarding. Imagine the satisfaction of plucking a ripe chili pepper from your plant, knowing you nurtured it from seed to spice. Plus, store-bought chili peppers can be expensive and sometimes lack the intense flavor of homegrown varieties. So, why not take control and grow chili peppers yourself? I’m here to guide you through simple, effective techniques that will transform you from a gardening novice to a chili pepper champion. Let’s get started!
Growing Fiery Chili Peppers: A DIY Guide to Spice Up Your Life!
Hey there, fellow spice enthusiasts! Ever dreamt of harvesting your own vibrant, flavorful chili peppers? Well, dream no more! I’m going to walk you through everything you need to know to cultivate these fiery gems right in your own backyard (or balcony!). Trust me, there’s nothing quite like the satisfaction of adding your homegrown heat to your favorite dishes.
What You’ll Need: The Chili Pepper Arsenal
Before we dive in, let’s gather our supplies. Here’s a checklist to make sure you’re ready to go:
* Chili Pepper Seeds: Choose your adventure! From mild Jalapeños to scorching Habaneros, the pepper world is your oyster. I recommend starting with a variety pack to experiment.
* Seed Starting Tray or Small Pots: These will be your seedlings’ first homes.
* Seed Starting Mix: This is a light, airy soil mix specifically designed for delicate seedlings.
* Larger Pots (for transplanting): Once your seedlings outgrow their initial containers, they’ll need more space. Choose pots that are at least 5 gallons in size.
* Potting Soil: A good quality potting mix is crucial for healthy pepper plants.
* Fertilizer: A balanced fertilizer (like 10-10-10) or one specifically formulated for tomatoes and peppers will provide essential nutrients.
* Watering Can or Hose: For keeping your plants hydrated.
* Grow Lights (optional): If you’re starting seeds indoors, grow lights will ensure strong, healthy seedlings.
* Gloves: Trust me, you’ll want these when handling hot peppers!
* Gardening Tools: A small trowel, pruners, and maybe some plant labels.
Phase 1: Seed Starting – The Genesis of Heat
This is where the magic begins! Starting your seeds indoors gives them a head start, especially if you live in a region with a shorter growing season.
1. Prepare Your Seed Starting Tray: Fill your seed starting tray or small pots with seed starting mix. Gently tamp it down to remove any air pockets.
2. Sow the Seeds: Plant 2-3 seeds per cell or pot, about ¼ inch deep.
3. Water Gently: Moisten the soil with a gentle spray of water. You don’t want to flood the seeds.
4. Provide Warmth and Light: Chili pepper seeds need warmth to germinate. Aim for a temperature of 75-85°F (24-29°C). A heat mat can be helpful. Place the tray under grow lights or in a sunny windowsill. If using a windowsill, rotate the tray regularly to prevent the seedlings from leaning towards the light.
5. Maintain Moisture: Keep the soil consistently moist, but not soggy. You can cover the tray with a clear plastic dome or plastic wrap to help retain moisture. Remove the cover once the seedlings emerge.
6. Be Patient: Germination can take anywhere from 1-3 weeks, depending on the variety of pepper and the temperature.
Phase 2: Transplanting – Giving Them Room to Grow
Once your seedlings have developed a few sets of true leaves (the leaves that look like miniature versions of the adult plant’s leaves), it’s time to transplant them into larger pots.
1. Prepare the Larger Pots: Fill your larger pots with potting soil.
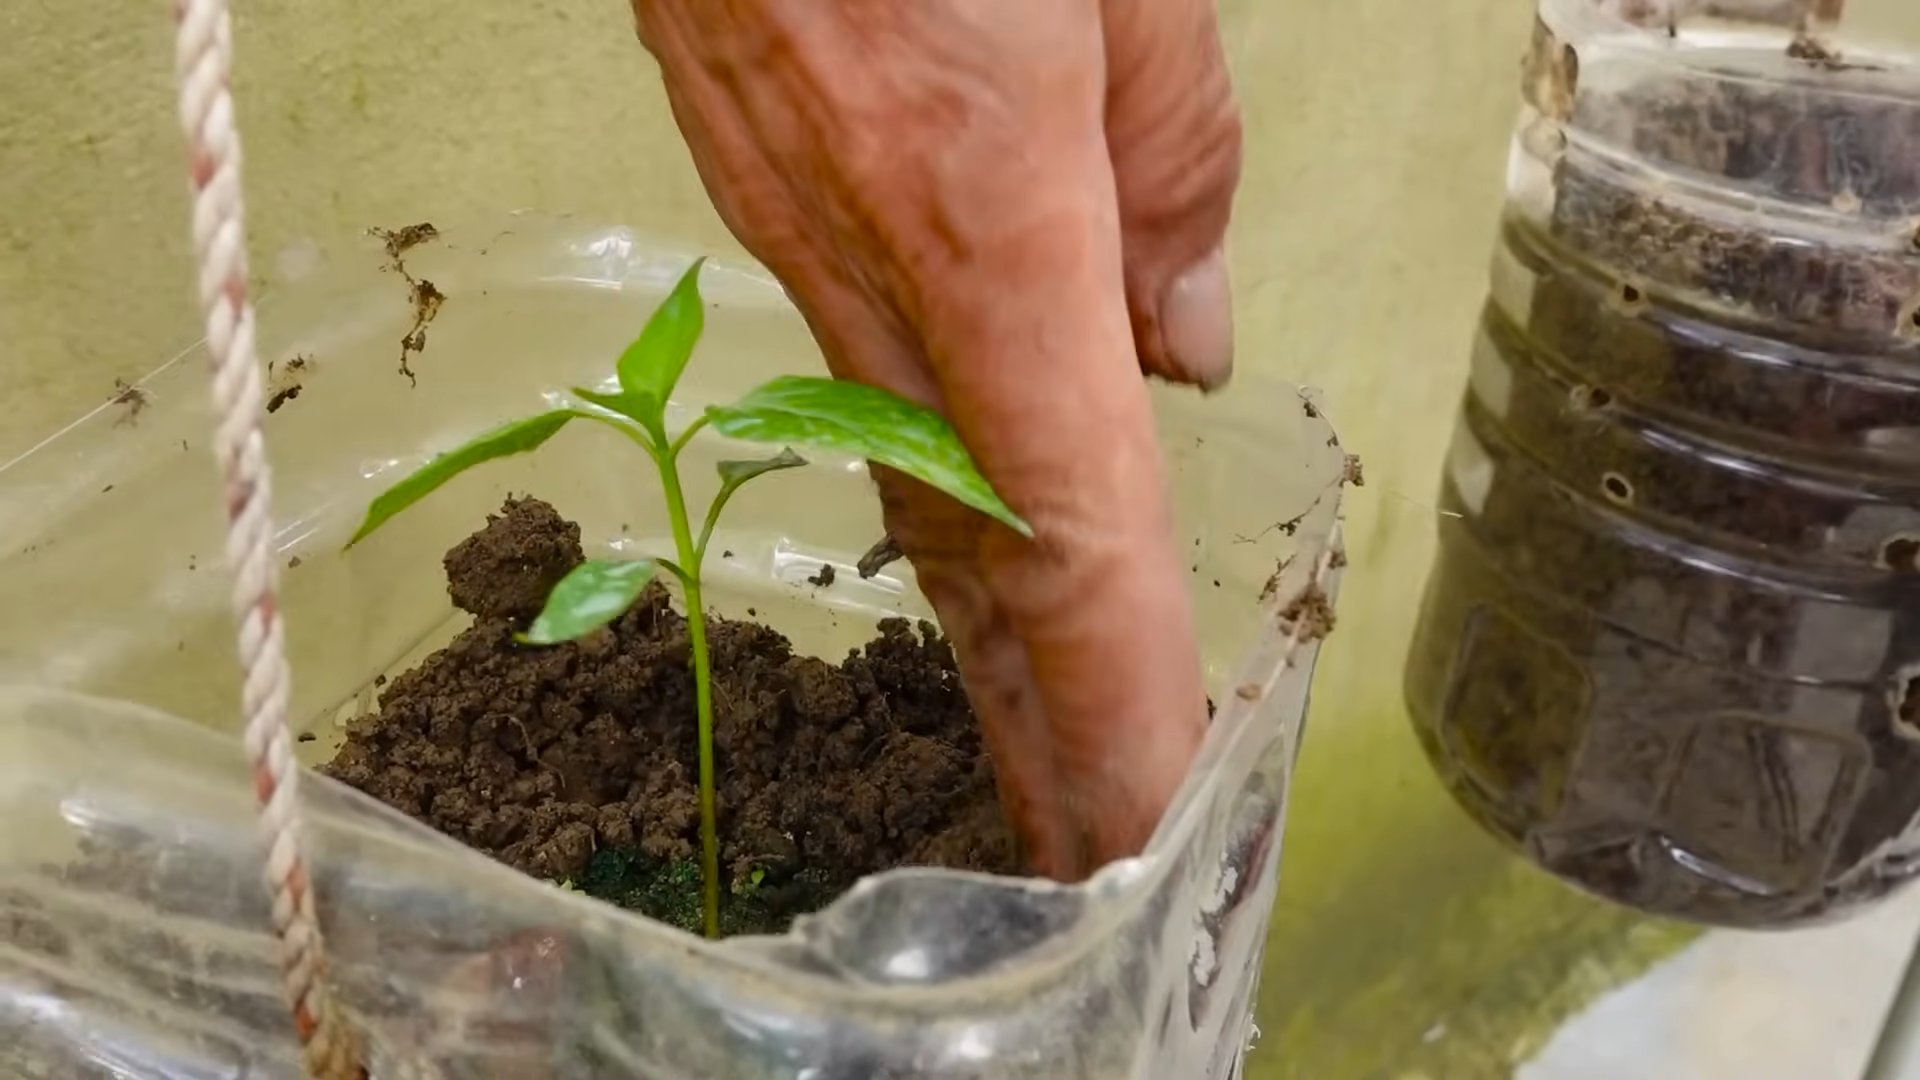
2. Gently Remove the Seedlings: Carefully remove the seedlings from their seed starting tray or small pots. Be gentle to avoid damaging the roots. If the roots are tightly bound, gently loosen them with your fingers.
3. Plant the Seedlings: Dig a hole in the potting soil large enough to accommodate the seedling’s root ball. Place the seedling in the hole and gently backfill with soil.
4. Water Thoroughly: Water the transplanted seedlings thoroughly.
5. Provide Support (Optional): If you’re growing taller varieties of chili peppers, you may want to provide support with a stake or tomato cage.
Phase 3: Outdoor Planting – Embracing the Sun
If you live in a warm climate, you can transplant your chili pepper plants directly into the ground. However, in cooler climates, it’s best to wait until the danger of frost has passed and the soil has warmed up.
1. Harden Off the Seedlings: Before transplanting your seedlings outdoors, you need to “harden them off.” This means gradually exposing them to outdoor conditions over a period of 1-2 weeks. Start by placing them in a sheltered location for a few hours each day, gradually increasing the amount of time they spend outdoors.
2. Choose a Sunny Location: Chili peppers need at least 6-8 hours of sunlight per day.
3. Prepare the Soil: Amend the soil with compost or other organic matter to improve drainage and fertility.
4. Plant the Seedlings: Dig a hole in the ground large enough to accommodate the seedling’s root ball. Place the seedling in the hole and gently backfill with soil. Space the plants about 18-24 inches apart.
5. Water Thoroughly: Water the transplanted seedlings thoroughly.
6. Mulch: Apply a layer of mulch around the plants to help retain moisture and suppress weeds.
Phase 4: Care and Maintenance – Nurturing the Heat
Now that your chili pepper plants are established, it’s time to provide them with the care they need to thrive.
1. Watering: Water your chili pepper plants regularly, especially during hot, dry weather. Allow the soil to dry out slightly between waterings. Avoid overwatering, as this can lead to root rot.
2. Fertilizing: Fertilize your chili pepper plants every 2-3 weeks with a balanced fertilizer or one specifically formulated for tomatoes and peppers. Follow the instructions on the fertilizer label.
3. Pruning: Pruning can help to improve air circulation and encourage bushier growth. Remove any suckers (small shoots that grow from the base of the plant) and any yellowing or diseased leaves.
4. Pest and Disease Control: Keep an eye out for pests and diseases. Common pests of chili peppers include aphids, spider mites, and whiteflies. Common diseases include blossom end rot and fungal infections. Treat any infestations or diseases promptly with appropriate organic or chemical controls.
5. Support: As the plants grow and the peppers develop, they may need additional support. Use stakes or tomato cages to prevent the plants from falling over.
Phase 5: Harvesting – The Fiery Reward
The moment you’ve been waiting for! Harvesting your own chili peppers is incredibly rewarding.
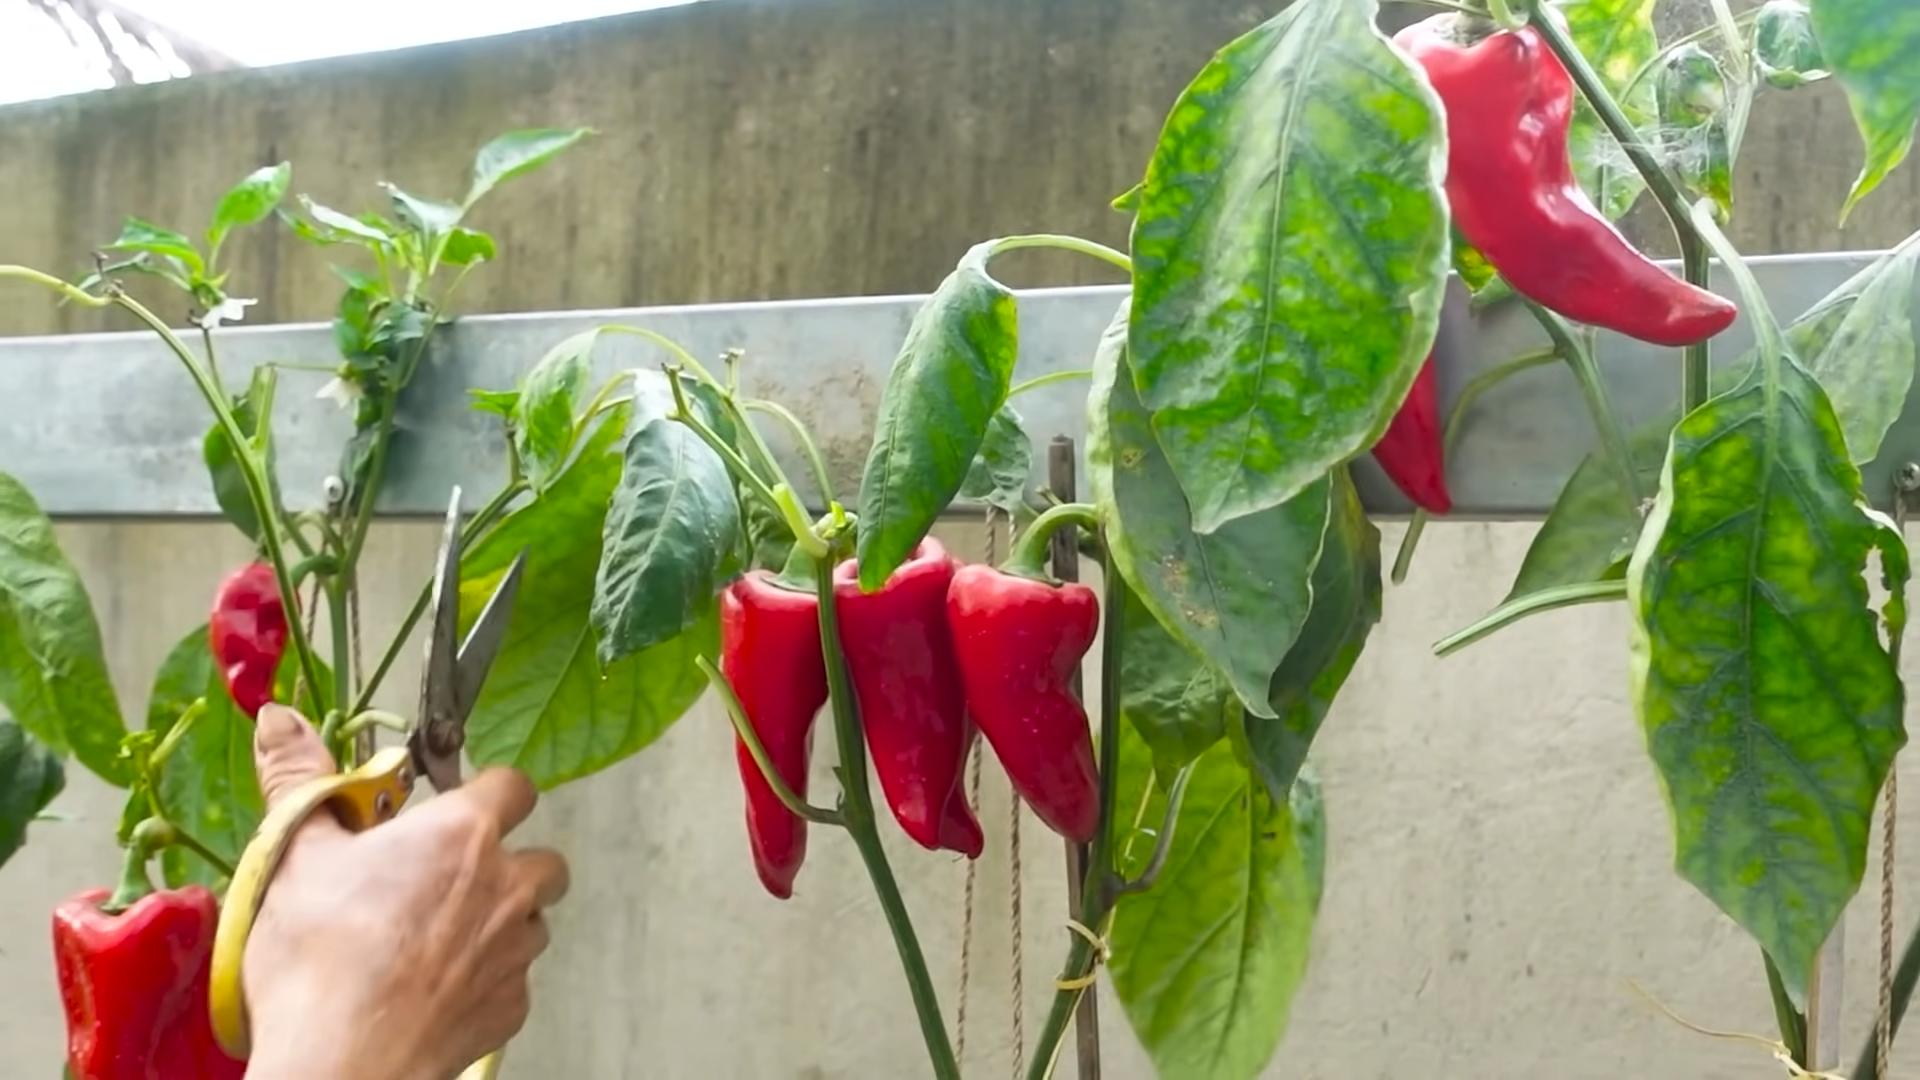
1. When to Harvest: The best time to harvest chili peppers depends on the variety and your personal preference. Generally, peppers are ready to harvest when they have reached their mature size and color.
2. How to Harvest: Use pruners or scissors to cut the peppers from the plant. Be careful not to damage the plant.
3. Handling Hot Peppers: Wear gloves when handling hot peppers to avoid skin irritation. Avoid touching your eyes or face after handling hot peppers.
4. Storing Chili Peppers: Fresh chili peppers can be stored in the refrigerator for up to a week. You can also dry, freeze, or pickle them for longer storage.
Troubleshooting: Common Chili Pepper Problems
Even with the best care, you may encounter some problems along the way. Here are a few common issues and how to address them:
* Blossom End Rot: This is a calcium deficiency that causes the bottom of the peppers to rot. To prevent blossom end rot, ensure that your soil is well-drained and that your plants are receiving adequate calcium. You can also add calcium to the soil by using bone meal or eggshells.
* Aphids: These tiny insects suck the sap from plants, causing them to weaken and become distorted. To control aphids, you can spray your plants with insecticidal soap or neem oil.
* Spider Mites: These tiny pests create webs on plants and suck the sap from the leaves. To control spider mites, you can spray your plants with insecticidal soap or neem oil.
* Fungal Infections: Fungal infections can cause spots on the leaves and stems of chili pepper plants. To prevent fungal infections, ensure that your plants have good air circulation and avoid overwatering. Treat any infections with a fungicide.
Spice Up Your Life!
Growing your own chili peppers is a fun and rewarding experience. With a little care and attention, you can enjoy a bountiful harvest of these fiery fruits. So, get out there and start planting! And remember, don’t be afraid to experiment with different varieties to find your favorites. Happy growing!
Conclusion
So, there you have it! Growing chili peppers at home, while it might seem daunting at first, is incredibly rewarding and surprisingly simple with this DIY trick. We’ve walked you through the process, highlighting the key steps to ensure your success, from seed selection to providing the optimal growing environment. But why is this DIY approach a must-try?
Firstly, it gives you complete control over the process. You know exactly what goes into nurturing your plants, avoiding harmful pesticides and ensuring the freshest, most flavorful chili peppers possible. Store-bought peppers, while convenient, often lack the vibrant taste and intense heat that homegrown varieties offer. This DIY method allows you to cultivate peppers that are bursting with flavor and perfectly suited to your culinary preferences.
Secondly, it’s incredibly cost-effective. Once you’ve invested in the initial supplies – seeds, soil, and containers – the ongoing costs are minimal. Compare that to constantly purchasing chili peppers from the grocery store, and you’ll quickly see the savings add up. Plus, you’ll have a continuous supply of fresh peppers right at your fingertips.
Thirdly, and perhaps most importantly, it’s an incredibly satisfying experience. There’s something truly special about nurturing a plant from seed to harvest, watching it grow and thrive under your care. The sense of accomplishment you’ll feel when you finally pluck those ripe, fiery chili peppers from your plant is unparalleled.
But don’t stop there! This DIY trick is just the starting point. Feel free to experiment with different varieties of chili peppers. Try growing milder varieties like Anaheim or Poblano alongside the scorching Habaneros or Ghost Peppers. You can also experiment with different growing mediums, such as coco coir or perlite, to see what works best for your environment. Consider adding companion plants like basil or marigolds to deter pests and improve the overall health of your chili pepper plants.
Another variation to consider is hydroponic growing. While it requires a slightly larger initial investment, hydroponics can significantly increase your yield and reduce the risk of soilborne diseases. You can even try growing your chili peppers indoors using grow lights, allowing you to enjoy fresh peppers year-round, regardless of the weather outside.
We encourage you to embrace this DIY trick and embark on your own chili pepper growing adventure. Don’t be afraid to experiment, learn from your mistakes, and most importantly, have fun! The rewards are well worth the effort.
And now, we want to hear from you! Have you tried growing chili peppers at home using this DIY method? What were your results? What challenges did you face, and how did you overcome them? Share your experiences, tips, and tricks in the comments below. Let’s create a community of chili pepper enthusiasts and learn from each other. Your insights could be invaluable to someone just starting out. So, get growing, get sharing, and get ready to enjoy the fiery fruits of your labor! Remember, mastering the art of how to grow chili peppers is a journey, not a destination. Enjoy the process!
Frequently Asked Questions (FAQ)
What is the best time of year to start growing chili peppers?
The best time to start growing chili peppers depends on your climate. In general, chili peppers need warm temperatures to germinate and thrive. If you live in a region with a long growing season, you can start your seeds directly outdoors after the last frost. However, if you live in a colder climate, it’s best to start your seeds indoors 6-8 weeks before the last expected frost. This will give your seedlings a head start and ensure they have enough time to mature and produce peppers before the weather turns cold. You can use a heat mat to speed up germination and grow lights to provide supplemental light for your seedlings.
What kind of soil is best for growing chili peppers?
Chili peppers prefer well-draining soil that is rich in organic matter. A good potting mix for chili peppers should contain a blend of peat moss, perlite, and vermiculite. You can also amend your soil with compost or aged manure to improve its fertility and drainage. Avoid using heavy clay soil, as it can become waterlogged and suffocate the roots of your chili pepper plants. The ideal pH for chili pepper soil is between 6.0 and 7.0. You can test your soil pH using a soil testing kit and adjust it accordingly using lime or sulfur.
How much sunlight do chili peppers need?
Chili peppers need at least 6-8 hours of direct sunlight per day to thrive. If you are growing your chili peppers indoors, you will need to provide them with supplemental light using grow lights. Choose grow lights that emit a full spectrum of light, including both blue and red wavelengths. Blue light is important for vegetative growth, while red light is important for flowering and fruiting. Position your grow lights close to your chili pepper plants, but not so close that they burn the leaves.
How often should I water my chili pepper plants?
Water your chili pepper plants regularly, especially during hot, dry weather. The soil should be kept consistently moist, but not waterlogged. Water deeply, allowing the water to soak into the soil and reach the roots. Avoid watering the foliage, as this can promote fungal diseases. Check the soil moisture regularly by sticking your finger into the soil. If the top inch of soil is dry, it’s time to water.
What are some common pests and diseases that affect chili peppers?
Chili peppers are susceptible to a variety of pests and diseases, including aphids, spider mites, whiteflies, and fungal diseases like powdery mildew and blossom end rot. To prevent pest and disease problems, keep your chili pepper plants healthy and well-nourished. Inspect your plants regularly for signs of pests or diseases and take action promptly if you notice any problems. You can use organic pesticides and fungicides to control pests and diseases, but be sure to follow the instructions carefully. Good air circulation and proper watering practices can also help prevent fungal diseases.
How do I know when my chili peppers are ripe?
The color of a ripe chili pepper depends on the variety. Some chili peppers turn red when they are ripe, while others turn yellow, orange, or brown. The best way to tell if a chili pepper is ripe is to check its color and firmness. Ripe chili peppers should be brightly colored and firm to the touch. You can also gently squeeze the pepper to see if it gives slightly. If the pepper is still green or feels hard, it is not yet ripe.
How do I store chili peppers?
Fresh chili peppers can be stored in the refrigerator for up to a week. To store them for longer, you can dry them, freeze them, or pickle them. To dry chili peppers, simply string them together and hang them in a warm, dry place until they are completely dry. To freeze chili peppers, wash them, dry them, and then place them in a freezer bag. To pickle chili peppers, follow a recipe for pickled peppers.
Can I grow chili peppers in containers?
Yes, chili peppers can be grown successfully in containers. Choose a container that is at least 12 inches in diameter and has drainage holes. Use a well-draining potting mix and water your chili pepper plants regularly. Fertilize your chili pepper plants every 2-3 weeks with a balanced fertilizer. Place your containers in a sunny location that receives at least 6-8 hours of direct sunlight per day.
How do I increase the heat of my chili peppers?
The heat of a chili pepper is determined by its genetics and the growing conditions. To increase the heat of your chili peppers, you can stress the plants by withholding water or fertilizer. This will cause the plants to produce more capsaicin, the compound that gives chili peppers their heat. However, be careful not to stress the plants too much, as this can reduce their yield. You can also choose to grow hotter varieties of chili peppers, such as Habaneros or Ghost Peppers.
What can I do with my homegrown chili peppers?
The possibilities are endless! You can use your homegrown chili peppers to make salsa, hot sauce, chili, stews, and many other dishes. You can also dry them and grind them into chili powder. Or, you can simply enjoy them fresh, adding them to your favorite meals for a burst of flavor and heat. Don’t forget to share your bounty with friends and family!

Leave a Comment