

Growing Kale in Plastic Bottle: Sounds a little unconventional, right? But trust me, it’s a game-changer for anyone looking to maximize their garden space and enjoy fresh, homegrown kale all year round! For centuries, humans have cultivated kale, tracing its roots back to wild cabbage varieties. It’s been a staple in diets across Europe and beyond, prized for its nutritional power and versatility. But let’s face it, not everyone has a sprawling backyard to dedicate to this leafy green.
That’s where this DIY trick comes in! I’m going to show you how to transform ordinary plastic bottles into mini-kale gardens. Why is this so important? Well, think about it: apartment dwellers, balcony gardeners, or anyone with limited space can now enjoy the satisfaction of harvesting their own kale. Plus, it’s a fantastic way to recycle those plastic bottles and reduce waste. This method is not only space-saving and eco-friendly, but it also allows for better control over soil conditions and pest management. So, are you ready to ditch the store-bought kale and embark on a fun, rewarding gardening adventure? Let’s get started and explore the magic of growing kale in plastic bottle!
DIY Vertical Kale Garden: Upcycling Plastic Bottles
Hey there, fellow gardening enthusiasts! I’m super excited to share a fantastic and eco-friendly project with you: creating a vertical kale garden using recycled plastic bottles. Not only is this a great way to grow your own delicious and nutritious kale, but it’s also a fantastic way to reduce plastic waste. Plus, it’s a space-saver, perfect for balconies, patios, or even small indoor spaces. Let’s get started!
What You’ll Need
Before we dive in, let’s gather all the necessary materials. Trust me, having everything ready beforehand will make the process much smoother and more enjoyable.
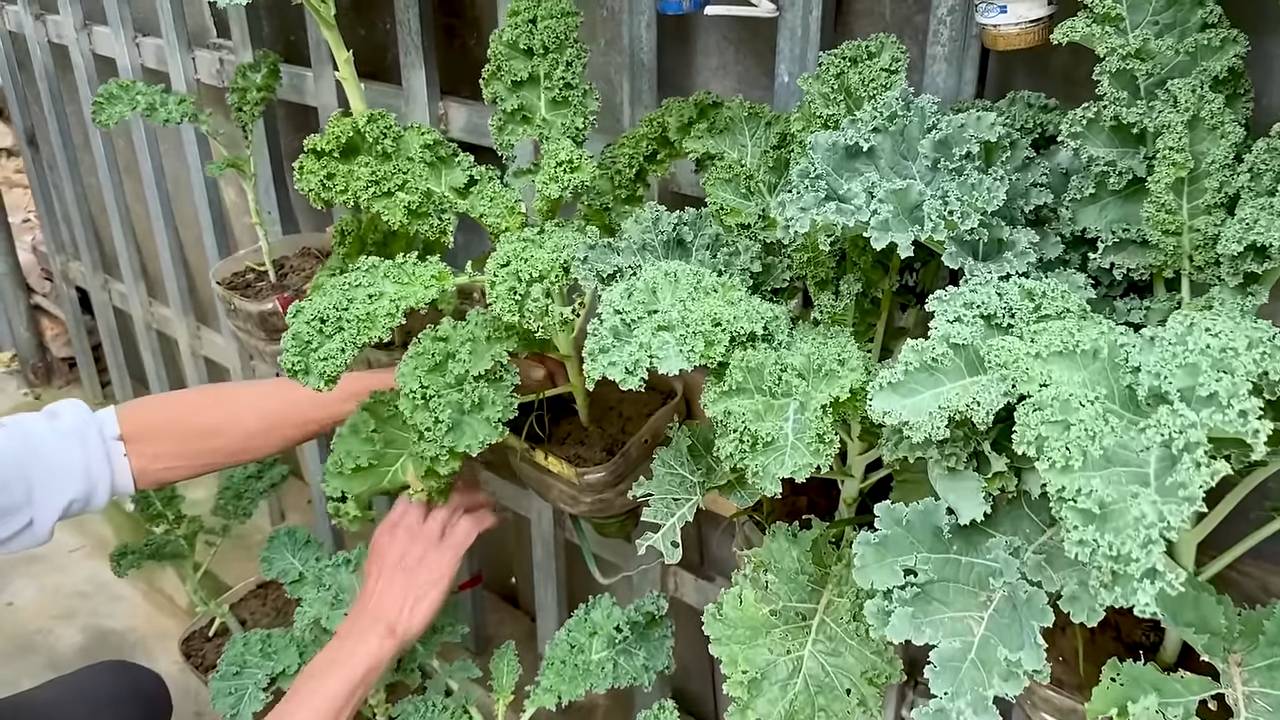
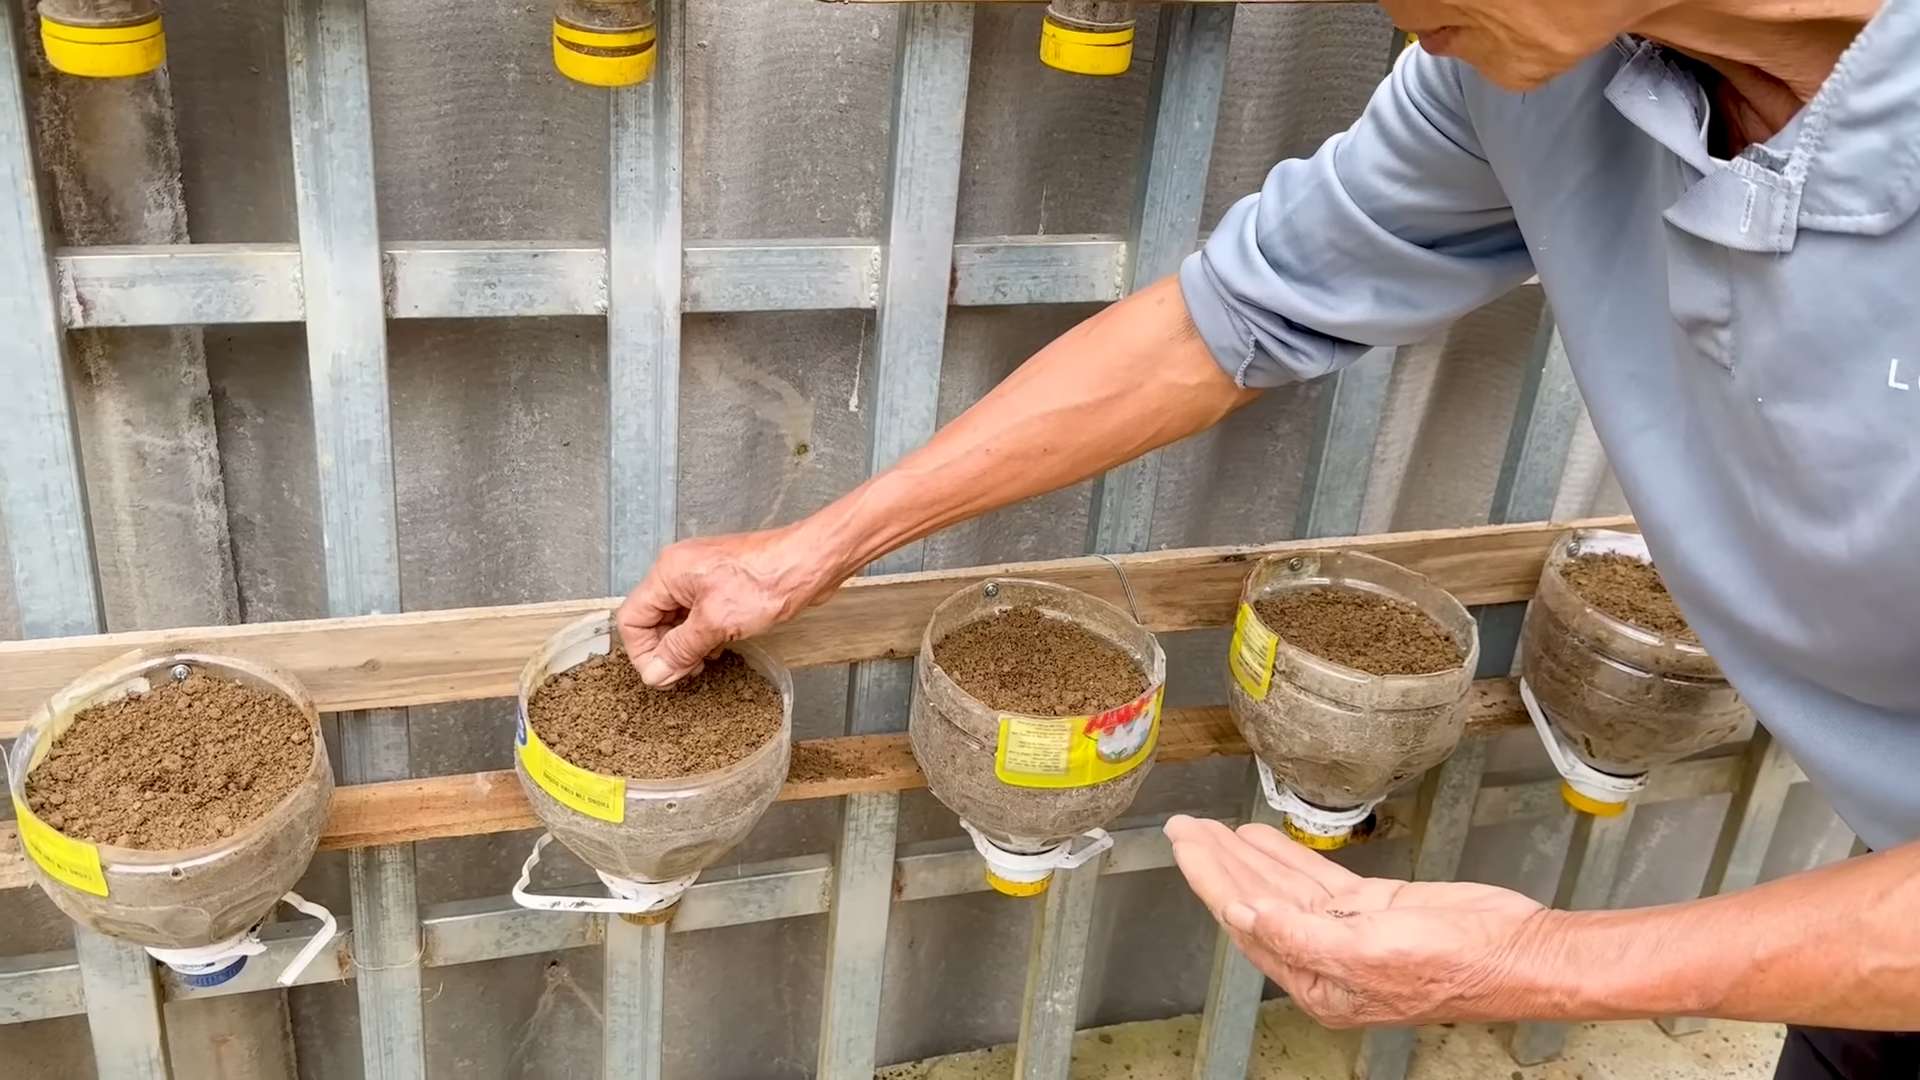
* Plastic Bottles: The star of the show! You’ll need several plastic bottles (2-liter soda bottles or similar work great). The number depends on how tall you want your vertical garden to be. I usually aim for at least 5-6 bottles for a decent-sized garden. Make sure they are clean and dry.
* Potting Soil: Good quality potting soil is crucial for healthy kale growth. Avoid using garden soil directly, as it can be too dense and may not drain well.
* Kale Seeds or Seedlings: Choose your favorite kale variety! I personally love curly kale and Tuscan kale (also known as Lacinato or Dinosaur kale). You can start from seeds or buy seedlings from your local nursery.
* Scissors or Utility Knife: For cutting the plastic bottles. Be careful!
* Drill or Awl: To create drainage holes and hanging points.
* Rope, Twine, or Zip Ties: For hanging the bottles. I prefer using sturdy rope for a more rustic look.
* Measuring Tape or Ruler: To ensure consistent spacing.
* Permanent Marker: For marking cutting lines.
* Watering Can or Spray Bottle: For watering your kale.
* Gloves (Optional): To keep your hands clean.
* Small Rocks or Gravel (Optional): To improve drainage at the bottom of each bottle.
Preparing the Bottles
This is where we transform those ordinary plastic bottles into miniature kale havens.
1. Cleaning the Bottles: Start by thoroughly cleaning the plastic bottles with soap and water. Remove any labels and sticky residue. Rinse them well and let them dry completely. This is important to prevent any contamination that could harm your kale.
2. Cutting the Bottles: This is a crucial step, so pay close attention.
* Using your measuring tape and permanent marker, mark a rectangular opening on the side of each bottle. The opening should be large enough to allow you to easily plant and harvest your kale. I usually make mine about 4 inches wide and 6 inches long.
* Carefully cut along the marked lines using your scissors or utility knife. Be extra cautious when using a utility knife, and always cut away from yourself.
* Repeat this process for all the bottles you plan to use.
3. Creating Drainage Holes: Proper drainage is essential to prevent waterlogging and root rot.
* Using your drill or awl, create several small drainage holes at the bottom of each bottle. I usually make about 4-5 holes.
* If you’re using rocks or gravel, add a layer of about an inch at the bottom of each bottle to further improve drainage.
4. Creating Hanging Points: Now, we need to create a way to hang the bottles.
* Drill or poke two holes near the top of each bottle, on opposite sides. These holes should be large enough to thread your rope, twine, or zip ties through.
* Make sure the holes are strong enough to support the weight of the soil and kale plants.
Planting Your Kale
Time to get our hands dirty and plant some kale!
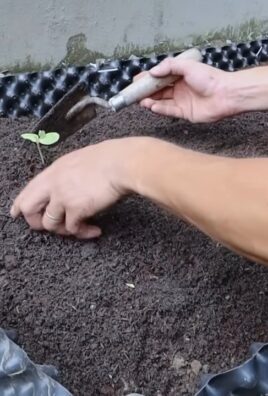
1. Filling the Bottles with Soil: Carefully fill each bottle with potting soil, leaving about an inch of space at the top. Gently pat down the soil to remove any air pockets.
2. Planting Seeds or Seedlings:
* From Seeds: Sprinkle kale seeds evenly over the surface of the soil. Cover them with a thin layer of soil (about ¼ inch). Gently water the soil using a spray bottle.
* From Seedlings: Carefully remove the kale seedlings from their containers. Gently loosen the roots and plant them in the center of each bottle. Fill in around the seedlings with soil and gently pat it down.
3. Watering: After planting, thoroughly water the soil until it is moist but not soggy. Avoid overwatering, as this can lead to root rot.
Assembling the Vertical Garden
Now for the fun part – putting it all together!
1. Hanging the Bottles:
* Thread your rope, twine, or zip ties through the hanging holes you created earlier.
* Hang the bottles in a vertical arrangement, one below the other. Make sure the bottles are securely attached and can support the weight of the soil and plants.
* You can hang the bottles from a balcony railing, a fence, a wall, or even a sturdy branch.
2. Spacing: Ensure there’s enough space between the bottles for the kale plants to grow and receive adequate sunlight. I usually leave about 6-8 inches between each bottle.
3. Securing the Structure: If you’re using rope or twine, make sure to tie secure knots. If you’re using zip ties, tighten them firmly. You want to ensure your vertical garden is stable and won’t collapse.
Caring for Your Kale
Maintaining your vertical kale garden is key to a bountiful harvest.
1. Watering: Water your kale regularly, especially during hot and dry weather. Check the soil moisture by sticking your finger into the soil. If it feels dry, it’s time to water. Avoid watering the leaves directly, as this can promote fungal diseases.
2. Sunlight: Kale needs at least 6 hours of sunlight per day. Place your vertical garden in a sunny location. If you’re growing kale indoors, you may need to supplement with grow lights.
3. Fertilizing: Feed your kale with a balanced liquid fertilizer every 2-3 weeks. Follow the instructions on the fertilizer packaging.
4. Pest Control: Keep an eye out for pests such as aphids, cabbage worms, and slugs. You can control these pests by handpicking them off the plants, using insecticidal soap, or introducing beneficial insects like ladybugs.
5. Harvesting: You can start harvesting kale leaves when they are about 4-6 inches long. Simply cut off the outer leaves, leaving the inner leaves to continue growing. This will encourage continuous production.
Troubleshooting
Even with the best planning, sometimes things don’t go exactly as expected. Here are a few common issues and how to address them:
* Yellowing Leaves: This could be a sign of overwatering, underwatering, or nutrient deficiency. Check the soil moisture and adjust your watering schedule accordingly. Fertilize your kale with a balanced fertilizer.
* Slow Growth: This could be due to insufficient sunlight, poor soil, or pests. Make sure your kale is getting enough sunlight. Amend the soil with compost or other organic matter. Check for pests and take appropriate action.
* Root Rot: This is caused by overwatering and poor drainage. Ensure your bottles have adequate drainage holes. Avoid overwatering. If root rot is severe, you may need to transplant your kale into fresh soil.
* Pest Infestation: Regularly inspect your kale for pests. Handpick them off the plants, use insecticidal soap, or introduce beneficial insects.
Extra Tips and Tricks
* Bottle Size Matters: While 2-liter bottles are common, experiment with different sizes. Larger bottles can accommodate more soil and larger plants.
* Paint Your Bottles: Get creative and paint your bottles! This can add a pop of color to your garden and make it more visually appealing. Use outdoor-rated paint to withstand the elements.
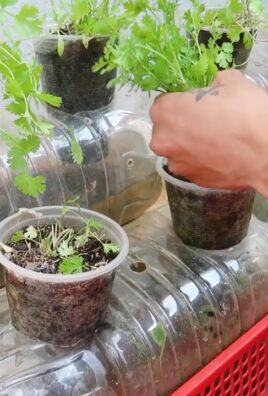
* Mix and Match: Don’t just grow kale! You can also grow other leafy greens like lettuce, spinach, and herbs in your vertical garden.
* Winter Protection: If you live in a cold climate, you may need to protect your kale from frost. You can cover the bottles with burlap or move them indoors.
* Successive Planting: To ensure a continuous harvest, plant new kale seeds or seedlings every few weeks.
I hope you found this guide helpful and inspiring! Growing your own kale in a vertical plastic bottle garden is a rewarding and sustainable way to enjoy fresh, healthy greens. Happy gardening!
Conclusion
So, there you have it! Growing kale in plastic bottles isn’t just a quirky gardening experiment; it’s a genuinely effective and rewarding way to cultivate fresh, nutritious greens, even if you’re short on space or resources. We’ve explored the step-by-step process, from preparing your bottles to harvesting your bountiful kale crop.
Why is this DIY trick a must-try? Because it’s incredibly accessible. It transforms readily available waste – plastic bottles – into productive growing containers, reducing your environmental footprint while simultaneously providing you with delicious, homegrown kale. It’s also remarkably space-efficient, making it ideal for apartment dwellers, balcony gardeners, or anyone with limited yard space. Plus, the vertical nature of bottle gardens can help deter pests and diseases, leading to healthier, more robust kale plants.
But the benefits don’t stop there. This method allows for better drainage and aeration compared to traditional container gardening, promoting stronger root development and ultimately, more vigorous kale growth. The individual bottle containers also make it easier to manage each plant’s specific needs, such as watering and fertilization.
Looking for variations? Absolutely! Consider experimenting with different types of plastic bottles. Larger bottles can accommodate more mature kale plants, while smaller bottles are perfect for starting seedlings. You can also paint the bottles to add a splash of color to your garden or to help regulate soil temperature. For example, painting the bottles white can reflect sunlight and keep the soil cooler in hot climates.
Another variation is to incorporate a self-watering system. By adding a wick made of cotton rope or felt that extends from a water reservoir at the bottom of the bottle to the soil above, you can create a passive watering system that keeps your kale consistently hydrated. This is especially helpful if you tend to forget to water your plants regularly.
Furthermore, you can adapt this technique to grow other leafy greens and herbs. Spinach, lettuce, and even certain varieties of herbs like basil and mint can thrive in plastic bottle gardens. Just be sure to adjust the soil mix and watering schedule to suit the specific needs of each plant.
The possibilities are truly endless! The key is to be creative, experiment, and adapt the technique to your specific environment and preferences.
We wholeheartedly encourage you to give this DIY trick a try. It’s a fun, sustainable, and rewarding way to enjoy fresh, homegrown kale. Once you’ve harvested your first crop, we’d love to hear about your experience! Share your photos, tips, and any variations you’ve tried in the comments section below. Let’s build a community of bottle gardeners and inspire others to embrace this innovative and eco-friendly approach to growing their own food. Remember, even small steps can make a big difference in creating a more sustainable and healthy lifestyle. So, grab those plastic bottles and get growing! This method of growing kale in plastic bottles is a game changer.
Frequently Asked Questions (FAQ)
What type of plastic bottles are best for growing kale?
Ideally, you should use food-grade plastic bottles, such as those used for water, juice, or soda. These are generally considered safe for growing edible plants. Avoid using bottles that have contained harsh chemicals or cleaning products, as these could contaminate the soil and potentially harm your plants. PET (Polyethylene Terephthalate) bottles, commonly used for water and soda, are a good choice. Make sure to thoroughly clean and sanitize the bottles before using them.
How often should I water my kale plants in plastic bottles?
The frequency of watering depends on several factors, including the size of the bottle, the type of soil, the climate, and the age of the plant. Generally, you should water your kale plants when the top inch of soil feels dry to the touch. In hot, sunny weather, you may need to water them daily, while in cooler, more humid conditions, you may only need to water them every few days. Be careful not to overwater, as this can lead to root rot. Ensure the bottles have adequate drainage holes to prevent waterlogging. A good rule of thumb is to water deeply until you see water draining from the bottom of the bottle.
What type of soil is best for growing kale in plastic bottles?
A well-draining potting mix is essential for growing healthy kale in plastic bottles. Avoid using garden soil, as it can be too heavy and compact, hindering root growth and drainage. A good potting mix should contain a blend of peat moss, perlite, and vermiculite. You can also add compost to enrich the soil and provide essential nutrients. Consider using a slightly acidic soil with a pH between 6.0 and 7.0 for optimal kale growth. You can purchase pre-made potting mixes specifically formulated for vegetables or create your own by combining equal parts peat moss, perlite, and compost.
How much sunlight does kale need when grown in plastic bottles?
Kale thrives in full sun, meaning it needs at least 6-8 hours of direct sunlight per day. If you’re growing your kale indoors or in a shaded area, you may need to supplement with artificial lighting, such as grow lights. Insufficient sunlight can lead to leggy, weak plants with poor leaf development. Position your plastic bottle gardens in a sunny location, such as a south-facing window or balcony. If you live in a particularly hot climate, you may need to provide some afternoon shade to prevent the leaves from scorching.
How do I fertilize kale plants grown in plastic bottles?
Kale is a heavy feeder, meaning it requires a consistent supply of nutrients to grow well. You can fertilize your kale plants with a balanced liquid fertilizer, such as a 10-10-10 or 20-20-20 formula, diluted to half strength. Apply the fertilizer every 2-3 weeks during the growing season. You can also use organic fertilizers, such as compost tea or fish emulsion. Avoid over-fertilizing, as this can lead to excessive leaf growth and reduced nutrient uptake. Always follow the instructions on the fertilizer label.
How do I protect my kale plants from pests and diseases?
While growing kale in plastic bottles can help deter some pests, it’s still important to monitor your plants regularly for signs of infestation or disease. Common kale pests include aphids, cabbage worms, and flea beetles. You can control these pests with insecticidal soap, neem oil, or by handpicking them off the plants. To prevent diseases, ensure good air circulation around the plants and avoid overwatering. If you notice any signs of disease, such as yellowing leaves or fungal spots, remove the affected leaves immediately and treat the plants with a fungicide if necessary.
When and how do I harvest kale from my plastic bottle garden?
You can start harvesting kale leaves when they are about 4-6 inches long. Harvest the outer leaves first, leaving the inner leaves to continue growing. This will encourage the plant to produce more leaves. To harvest, simply cut the leaves off at the base of the stem with a sharp knife or scissors. Avoid tearing the leaves, as this can damage the plant. You can harvest kale throughout the growing season, even into the winter in mild climates.
Can I grow different varieties of kale in plastic bottles?
Yes, you can grow different varieties of kale in plastic bottles. Some popular varieties include Curly Kale, Lacinato Kale (also known as Dinosaur Kale), and Red Russian Kale. Each variety has its own unique flavor and texture. Experiment with different varieties to find your favorites. Keep in mind that some varieties may grow larger than others, so choose bottle sizes accordingly.
What do I do with the plastic bottles after I’m done growing kale?
One of the great things about this method is its sustainability. After you’ve finished growing kale, you can reuse the plastic bottles for other gardening projects, such as starting seedlings or growing other herbs and vegetables. If the bottles are no longer usable, you can recycle them according to your local recycling guidelines. You can also cut them up and use them as mulch around other plants to help retain moisture and suppress weeds.
Is growing kale in plastic bottles organic?
Growing kale in plastic bottles can be organic if you use organic potting mix, organic fertilizers, and organic pest control methods. Avoid using synthetic fertilizers and pesticides, as these can contaminate the soil and potentially harm your plants. Look for potting mixes and fertilizers that are certified organic by a reputable organization. By using organic methods, you can ensure that your kale is healthy, nutritious, and free from harmful chemicals.
Leave a Comment