

Grow Rosemary Indoors? Absolutely! Imagine stepping into your kitchen and snipping fresh, fragrant rosemary to season your favorite dishes, all without leaving the comfort of your home. Sounds dreamy, right? Well, it’s totally achievable, even if you don’t have a sprawling garden. For centuries, rosemary has been cherished not only for its culinary uses but also for its medicinal properties and symbolic significance, representing remembrance and love in various cultures.
But let’s be honest, sometimes keeping those delicate herbs alive indoors can feel like a Herculean task. That’s where these simple, yet effective, DIY tricks come in! I’m going to share my tried-and-true methods for successfully grow rosemary indoors, ensuring you have a thriving, aromatic plant year-round. Forget those sad, wilted herb pots you’ve struggled with in the past.
This guide is packed with practical tips and hacks that will empower you to create the perfect indoor environment for your rosemary to flourish. From choosing the right pot and soil to mastering watering techniques and providing adequate sunlight, I’ve got you covered. So, ditch the expensive store-bought herbs and get ready to enjoy the satisfaction of harvesting your own homegrown rosemary!
Growing Rosemary Indoors: A Comprehensive DIY Guide
Hey there, fellow plant enthusiasts! Ever dreamed of having fresh, fragrant rosemary right at your fingertips, no matter the season? Well, you’re in the right place! I’m going to walk you through everything you need to know to successfully grow rosemary indoors. It’s easier than you might think, and the reward of having your own homegrown herbs is totally worth it.
Choosing the Right Rosemary Variety
Not all rosemary varieties are created equal, especially when it comes to indoor growing. Some are more compact and better suited for containers. Here are a few of my favorites:
* ‘Blue Boy’: This is a compact variety that stays relatively small, making it perfect for indoor pots. It has beautiful blue flowers and a strong, classic rosemary scent.
* ‘Roman Beauty’: Another great choice for containers, ‘Roman Beauty’ has a slightly trailing habit, which can look really lovely cascading over the edge of a pot.
* ‘Arp’: This variety is known for its cold hardiness, but it also does well indoors. It has a slightly lemon-y scent compared to other rosemary types.
Gathering Your Supplies
Before we dive into the planting process, let’s make sure you have everything you need. Trust me, having all your supplies ready beforehand will make the whole experience much smoother.
* Rosemary Plant or Cuttings: You can either buy a small rosemary plant from a nursery or propagate your own from cuttings (more on that later!).
* Pot: Choose a pot that’s at least 6 inches in diameter. Make sure it has drainage holes! Rosemary hates sitting in soggy soil. Terracotta pots are a great option because they allow the soil to breathe.
* Well-Draining Potting Mix: Rosemary needs well-draining soil to thrive. A mix specifically formulated for herbs or cacti/succulents works well. You can also amend regular potting mix with perlite or sand to improve drainage.
* Grow Light (Optional but Recommended): Rosemary needs a lot of sunlight, and sometimes indoor light just isn’t enough. A grow light can supplement natural light, especially during the winter months.
* Watering Can or Spray Bottle: For watering your rosemary.
* Pruning Shears or Scissors: For trimming and harvesting.
* Fertilizer (Optional): A balanced liquid fertilizer can help boost growth, but it’s not essential.
Planting Your Rosemary
Alright, let’s get our hands dirty! This is where the magic happens.
1. Prepare the Pot: Fill your pot with the well-draining potting mix, leaving about an inch of space at the top.
2. Plant the Rosemary: Gently remove the rosemary plant from its nursery container. Loosen the roots a bit with your fingers to encourage them to spread out. Place the rosemary plant in the center of the pot.
3. Add More Soil: Fill in the remaining space around the plant with potting mix, gently pressing down to secure it.
4. Water Thoroughly: Water the rosemary plant thoroughly until water drains out of the drainage holes. This helps settle the soil and ensures the roots are well-hydrated.
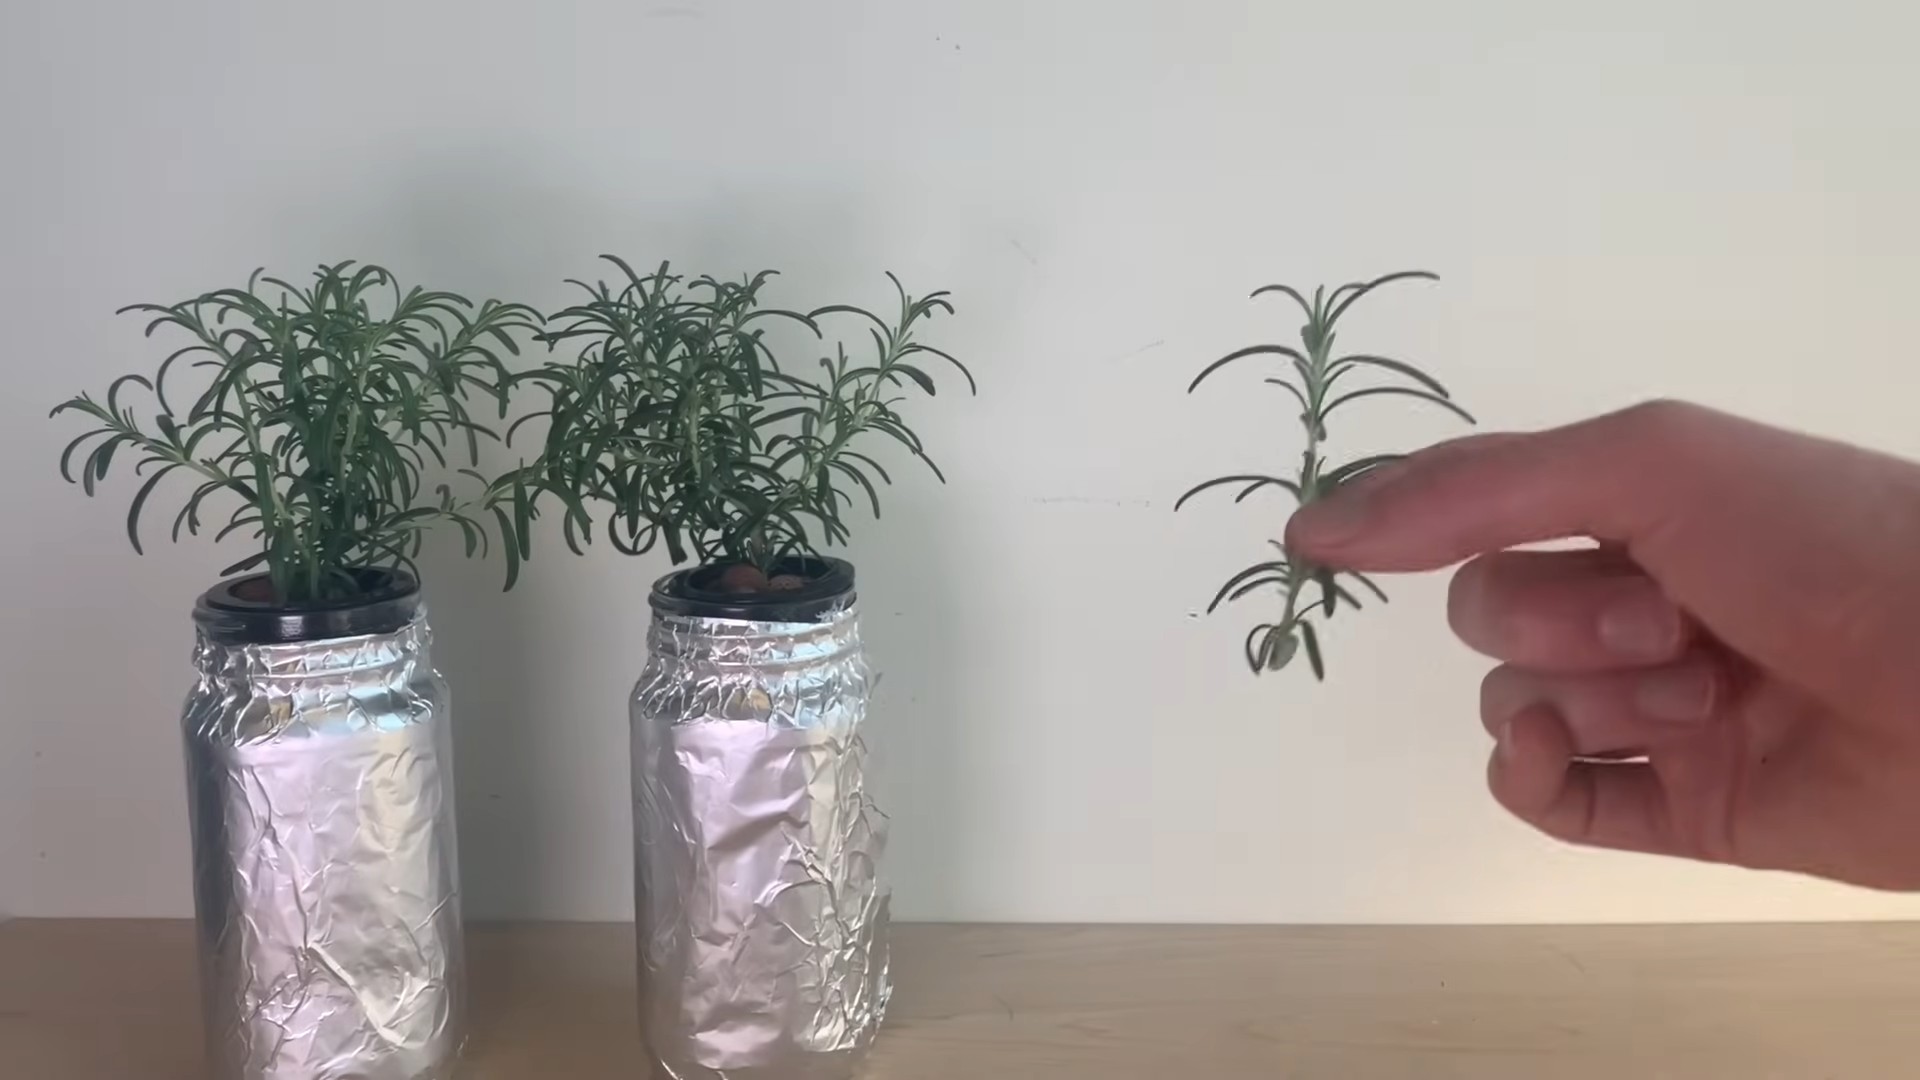
Propagating Rosemary from Cuttings (Optional)
Want to multiply your rosemary without spending extra money? Propagating from cuttings is a fun and rewarding way to do it!
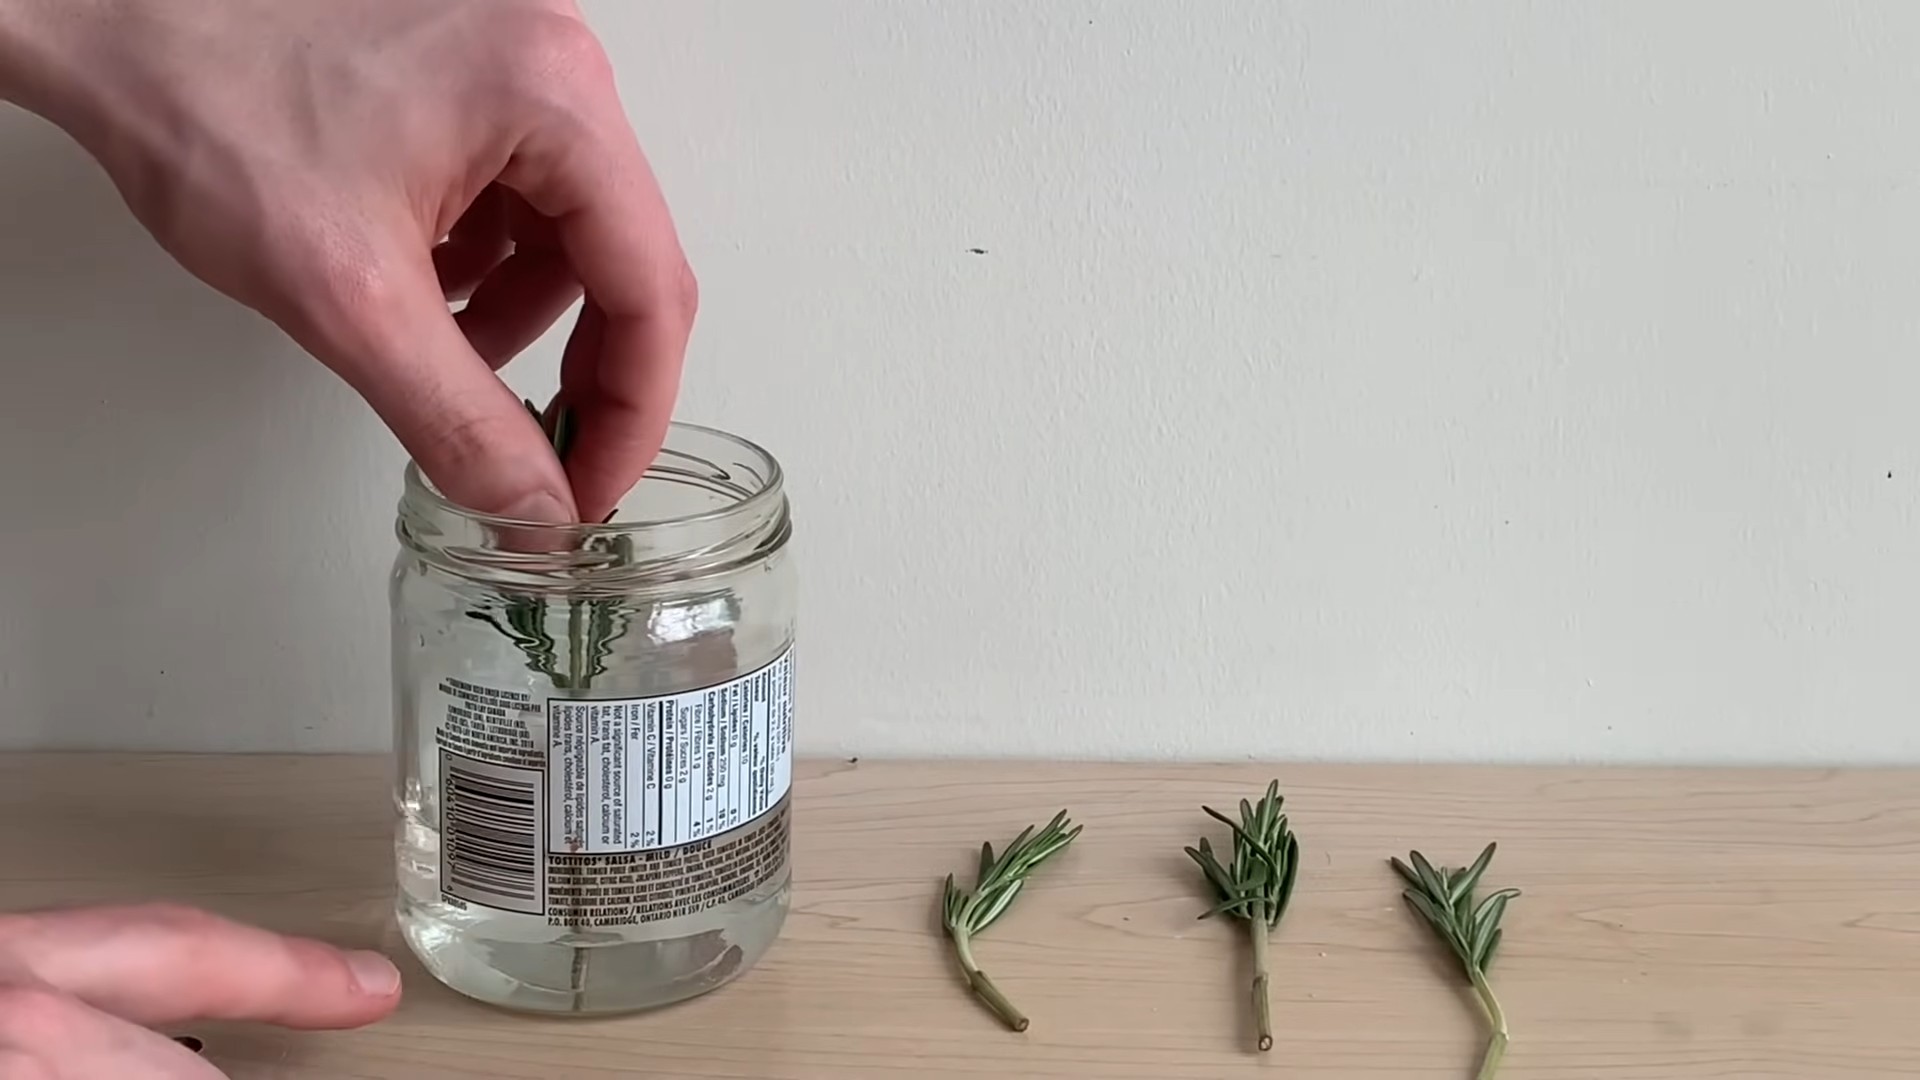
1. Take Cuttings: Using clean pruning shears or scissors, take 4-6 inch cuttings from new growth on a healthy rosemary plant. Remove the leaves from the bottom inch or two of the cutting.
2. Rooting Hormone (Optional): Dip the cut end of the cutting in rooting hormone powder or liquid. This helps stimulate root growth, but it’s not strictly necessary.
3. Plant the Cuttings: Fill a small pot with well-draining potting mix. Make a small hole in the soil and insert the cutting. Gently press the soil around the cutting to secure it.
4. Create a Humid Environment: Cover the pot with a plastic bag or place it in a humidity dome to create a humid environment. This helps prevent the cuttings from drying out.
5. Water and Wait: Water the cuttings gently and keep the soil consistently moist, but not soggy. Place the pot in a warm, bright location, but out of direct sunlight.
6. Check for Roots: After a few weeks, gently tug on the cuttings to see if they have rooted. If you feel resistance, that means roots have formed!
7. Transplant (If Needed): Once the cuttings have developed a good root system, you can transplant them into larger pots.
Caring for Your Indoor Rosemary
Now that your rosemary is planted, it’s time to learn how to keep it happy and healthy. Here’s what you need to know:
Light
Rosemary needs at least 6-8 hours of sunlight per day. A south-facing window is ideal. If you don’t have enough natural light, supplement with a grow light. I’ve found that using a full-spectrum LED grow light for about 12 hours a day really makes a difference, especially during the darker winter months.
Watering
Water your rosemary when the top inch of soil feels dry to the touch. Avoid overwatering, as this can lead to root rot. Rosemary prefers to be on the drier side. When you do water, water thoroughly until water drains out of the drainage holes. I usually check my rosemary every few days and water it when the leaves start to look a little droopy.
Humidity
Rosemary prefers relatively low humidity. Avoid placing it in a humid bathroom or kitchen. If your home is very dry, you can increase humidity by placing the pot on a tray filled with pebbles and water, making sure the bottom of the pot isn’t sitting directly in the water.
Temperature
Rosemary prefers temperatures between 60-70°F (15-21°C). Avoid placing it near drafts or heat sources.
Fertilizing
Feed your rosemary with a balanced liquid fertilizer every 2-4 weeks during the growing season (spring and summer). Dilute the fertilizer to half strength to avoid burning the roots. I personally use a fertilizer specifically formulated for herbs, but any balanced fertilizer will work.
Pruning
Pruning is essential for keeping your rosemary plant healthy and bushy. Trim the tips of the stems regularly to encourage new growth. You can also prune to shape the plant and remove any dead or yellowing leaves. Don’t be afraid to prune! Rosemary is a resilient plant and will bounce back quickly. Plus, you can use the pruned stems for cooking!
Pest Control
Rosemary is relatively pest-resistant, but it can occasionally be affected by spider mites, aphids, or whiteflies. If you notice any pests, treat them with insecticidal soap or neem oil. I always try to use organic pest control methods whenever possible.
Troubleshooting Common Problems
Even with the best care, you might encounter some challenges along the way. Here are a few common problems and how to fix them:
* Yellowing Leaves: This can be caused by overwatering, underwatering, or nutrient deficiencies. Check the soil moisture and adjust your watering accordingly. If the soil is dry, water thoroughly. If the soil is soggy, allow it to dry out before watering again. You can also try fertilizing with a balanced fertilizer.
* Drooping Leaves: This can be caused by underwatering, lack of sunlight, or root rot. Check the soil moisture and adjust your watering accordingly. Make sure your rosemary is getting enough sunlight. If you suspect root rot, repot the plant in fresh, well-draining soil.
* Leggy Growth: This is usually caused by insufficient light. Move your rosemary to a brighter location or supplement with a grow light. Prune the leggy stems to encourage bushier growth.
* Powdery Mildew: This is a fungal disease that can affect rosemary in humid conditions. Improve air circulation around the plant and treat with a fungicide if necessary.
Harvesting Your Rosemary
One of the best parts of growing your own rosemary is being able to harvest it whenever you need it!
* When to Harvest: You can harvest rosemary at any time, but the flavor is most intense in the morning.
* How to Harvest: Use pruning shears or scissors to cut off stems as needed. Avoid cutting off more than one-third of the plant at a time.
* Using Your Rosemary: Fresh rosemary can be used in a variety of dishes, from roasted meats and vegetables to soups and sauces. You can also dry rosemary for later use. To dry rosemary, simply hang the stems upside down in a cool, dry place until they are completely dry.
Enjoying Your Homegrown Rosemary
Growing rosemary indoors is a rewarding experience that allows you to enjoy fresh, fragrant herbs year-round. With a little care and attention, you can have a thriving rosemary plant that will provide you with delicious herbs for years to come. So go ahead, give it a try! I promise you won’t regret it. Happy gardening
Conclusion
So, there you have it! Mastering the art of growing rosemary indoors is not only achievable, but it’s also incredibly rewarding. Imagine having fresh, fragrant rosemary sprigs at your fingertips, ready to elevate your culinary creations or infuse your home with its invigorating scent. No more last-minute trips to the grocery store or settling for dried herbs that lack the vibrant flavor of the fresh stuff. This DIY trick transforms your kitchen into a miniature herb garden, bringing a touch of the Mediterranean to your everyday life.
But why is this a must-try? Beyond the convenience and cost savings, growing your own rosemary connects you to the natural world in a small but meaningful way. Nurturing a plant from a tiny seedling or cutting to a thriving herb is a deeply satisfying experience. Plus, you have complete control over the growing environment, ensuring that your rosemary is free from harmful pesticides and chemicals. You’re essentially creating your own organic, sustainable source of this versatile herb.
And the possibilities don’t stop there! Feel free to experiment with different varieties of rosemary. ‘Blue Boy’ is a compact variety perfect for smaller spaces, while ‘Tuscan Blue’ boasts upright growth and beautiful blue flowers. You can also try different potting mixes to see what works best for your indoor environment. Some gardeners swear by a mix of potting soil, perlite, and vermiculite for optimal drainage, while others prefer a soilless mix specifically designed for herbs.
Consider using decorative pots to add a touch of style to your indoor herb garden. Terracotta pots are a classic choice, but you can also use ceramic pots, hanging baskets, or even repurposed containers. Just make sure the pot has drainage holes to prevent waterlogging.
Don’t be afraid to get creative with your rosemary! Use it to flavor roasted meats, vegetables, and soups. Infuse olive oil with rosemary for a delicious dipping sauce or salad dressing. Add rosemary sprigs to your bath for a relaxing and aromatic experience. The possibilities are endless!
Growing rosemary indoors is a journey, not a destination. There will be challenges along the way, but with a little patience and attention, you’ll be rewarded with a thriving herb that will bring joy to your life for years to come.
We wholeheartedly encourage you to give this DIY trick a try. Start small, be patient, and don’t be afraid to experiment. And most importantly, share your experience with us! We’d love to hear about your successes, your challenges, and any tips or tricks you’ve discovered along the way. Post photos of your indoor rosemary garden on social media using #IndoorRosemary and tag us so we can celebrate your green thumb! Let’s create a community of indoor herb enthusiasts and inspire others to bring the beauty and flavor of fresh rosemary into their homes.
Frequently Asked Questions (FAQ)
Why is my indoor rosemary plant turning brown?
Browning rosemary leaves are a common issue, and there are several potential causes. Overwatering is a frequent culprit, as rosemary prefers well-draining soil and doesn’t like to sit in soggy conditions. Check the soil moisture by sticking your finger about an inch deep. If it feels wet, hold off on watering until it dries out a bit. Underwatering can also cause browning, especially if the leaves are dry and brittle. Make sure you’re providing enough water, but avoid overwatering.
Another possibility is insufficient sunlight. Rosemary needs at least six hours of direct sunlight per day to thrive. If your plant isn’t getting enough light, the leaves may turn brown and drop off. Consider moving your plant to a sunnier location or supplementing with a grow light.
Finally, nutrient deficiencies can also cause browning leaves. Rosemary needs a balanced fertilizer to stay healthy. Use a fertilizer specifically formulated for herbs, following the instructions on the label.
How often should I water my indoor rosemary plant?
The frequency of watering depends on several factors, including the size of the pot, the type of soil, the temperature, and the humidity. As a general rule, water your rosemary plant when the top inch of soil feels dry to the touch. Avoid overwatering, as this can lead to root rot. During the winter months, when the plant is not actively growing, you can reduce the frequency of watering.
A good way to check if your rosemary needs water is to lift the pot. If it feels light, it’s likely time to water. When you do water, water thoroughly until water drains out of the drainage holes. This ensures that the entire root ball is moistened.
What kind of soil is best for growing rosemary indoors?
Rosemary prefers well-draining soil that is slightly acidic to neutral. A good potting mix for rosemary should contain a combination of potting soil, perlite, and vermiculite. Perlite and vermiculite help to improve drainage and aeration, which are essential for healthy root growth. You can also use a soilless mix specifically designed for herbs. Avoid using heavy, clay-based soils, as these can retain too much moisture and lead to root rot.
How much sunlight does my indoor rosemary plant need?
Rosemary needs at least six hours of direct sunlight per day to thrive. If you don’t have a sunny window, you can supplement with a grow light. Place the grow light about 6-12 inches above the plant and leave it on for 12-14 hours per day.
Can I propagate rosemary from cuttings?
Yes, propagating rosemary from cuttings is a relatively easy way to create new plants. Take a 4-6 inch cutting from a healthy rosemary plant, removing the lower leaves. Dip the cut end in rooting hormone and plant it in a pot filled with well-draining potting mix. Keep the soil moist but not soggy, and place the pot in a warm, sunny location. It should take about 4-6 weeks for the cuttings to root.
My rosemary plant is getting leggy. What should I do?
Leggy growth is often a sign of insufficient sunlight. Move your plant to a sunnier location or supplement with a grow light. You can also prune your rosemary plant to encourage bushier growth. Use clean, sharp pruning shears to trim back the stems, cutting just above a leaf node.
What are some common pests that affect indoor rosemary plants?
Common pests that can affect indoor rosemary plants include spider mites, aphids, and whiteflies. Inspect your plant regularly for signs of infestation, such as webbing, sticky residue, or small insects on the leaves. If you find pests, you can try spraying your plant with insecticidal soap or neem oil. You can also try wiping the leaves with a damp cloth to remove the pests.
Can I use my indoor rosemary for cooking?
Absolutely! That’s one of the best things about growing your own rosemary. Simply snip off a few sprigs as needed and use them in your favorite recipes. Rosemary is a versatile herb that can be used to flavor roasted meats, vegetables, soups, and sauces.
How do I harvest rosemary from my indoor plant?
To harvest rosemary, simply snip off a few sprigs with clean, sharp pruning shears. Avoid cutting more than one-third of the plant at a time, as this can stress the plant. The best time to harvest rosemary is in the morning, after the dew has dried.
How do I store fresh rosemary?
Fresh rosemary can be stored in the refrigerator for up to two weeks. Wrap the sprigs in a damp paper towel and place them in a plastic bag. You can also freeze rosemary for longer storage. Simply wash the sprigs, dry them thoroughly, and place them in a freezer bag.

Leave a Comment