

Plant Spinach Fast Harvest – sounds like a dream, right? I know, I know, we’ve all been there, staring longingly at those tiny spinach seeds, picturing bountiful harvests, only to be met with… well, not much. But what if I told you that a fast spinach harvest is totally achievable, even if you’re a gardening newbie like I once was?
Spinach, a leafy green packed with nutrients, has been cultivated for centuries, with roots tracing back to ancient Persia. It’s a staple in diets worldwide, from Popeye’s favorite power-up to delicious salads and stir-fries. But let’s be honest, waiting weeks (or even months!) for those first tender leaves can be frustrating. That’s where these DIY tricks come in!
This article is your ultimate guide to unlocking the secrets of a speedy spinach harvest. We’ll dive into simple, yet effective, techniques that will have you enjoying fresh, homegrown spinach sooner than you ever thought possible. Imagine adding vibrant, vitamin-rich spinach to your meals just weeks after planting! I’m going to share my favorite hacks to help you plant spinach fast harvest and enjoy the fruits (or rather, the leaves!) of your labor in record time. So, grab your gardening gloves, and let’s get started!
DIY: Supercharge Your Spinach Harvest!
Hey there, fellow gardeners! Are you dreaming of endless spinach salads and smoothies, but tired of waiting ages for your plants to mature? Well, I’ve got a secret weapon for you: a DIY method to significantly speed up your spinach harvest. This isn’t magic, but it’s pretty darn close! I’m going to walk you through every step, from prepping your seeds to enjoying those delicious, leafy greens. Let’s get started!
Understanding the Spinach Growth Cycle (and How to Hack It!)
Before we dive into the nitty-gritty, let’s quickly touch on why this method works. Spinach, like many leafy greens, thrives in cooler temperatures. Heat stress can cause it to bolt (go to seed), making the leaves bitter and less palatable. Our goal is to create an environment that encourages rapid, healthy growth *before* the summer heat kicks in. We’ll achieve this through a combination of seed priming, strategic planting, and consistent care.
Materials You’ll Need
* Spinach seeds (choose a variety known for fast growth, like ‘Tyee’ or ‘Space’)
* A shallow container (like a plastic takeout container or seed tray)
* Paper towels
* Water (filtered or rainwater is best)
* A well-draining potting mix or garden soil amended with compost
* A sunny location with at least 6 hours of sunlight per day (or grow lights if needed)
* A watering can or hose with a gentle spray nozzle
* Optional: Liquid seaweed fertilizer
Section 1: Seed Priming – The Secret Weapon
Seed priming is like giving your spinach seeds a head start. It involves pre-soaking them to initiate the germination process *before* they even hit the soil. This can shave days off your harvest time!
Why Prime Seeds?
* Faster germination: Seeds absorb moisture, triggering the internal processes needed for sprouting.
* More uniform germination: All seeds germinate around the same time, leading to a more even crop.
* Improved seedling vigor: Primed seeds often produce stronger, healthier seedlings.
Step-by-Step Seed Priming:
1. Prepare Your Container: Line your shallow container with a couple of layers of damp paper towels. Make sure the paper towels are thoroughly wet, but not dripping. You want them moist, not soggy.
2. Spread the Seeds: Sprinkle your spinach seeds evenly over the damp paper towels. Avoid overcrowding them; give them a little space to breathe.
3. Cover and Wait: Cover the seeds with another layer of damp paper towels. Again, make sure they’re moist but not soaking wet.
4. Seal the Container: Place the container in a plastic bag or cover it with a lid to create a humid environment. This will prevent the paper towels from drying out.
5. Find a Warm Spot: Store the container in a warm location (around 65-75°F or 18-24°C). A kitchen counter or a spot near a radiator works well.
6. Check Regularly: Check the seeds every day. Keep the paper towels moist by spritzing them with water as needed. You should start to see tiny white sprouts emerging from the seeds within 2-3 days.
7. Don’t Wait Too Long: Once the sprouts are about ¼ inch (0.6 cm) long, it’s time to plant them. Don’t let them grow too long in the paper towels, or they’ll become difficult to handle.
Section 2: Planting Your Primed Spinach Seeds
Now that your seeds are primed and ready to go, it’s time to get them in the soil!
Choosing the Right Location:
Spinach needs plenty of sunlight, but it also prefers cooler temperatures. If you live in a warmer climate, try to find a spot that gets morning sun and afternoon shade. You can also use shade cloth to protect your plants from the intense midday sun.
Preparing the Soil:
Spinach thrives in well-draining soil that’s rich in organic matter. Before planting, amend your soil with compost or well-rotted manure. This will provide your plants with the nutrients they need to grow quickly and healthily.
Planting Instructions:
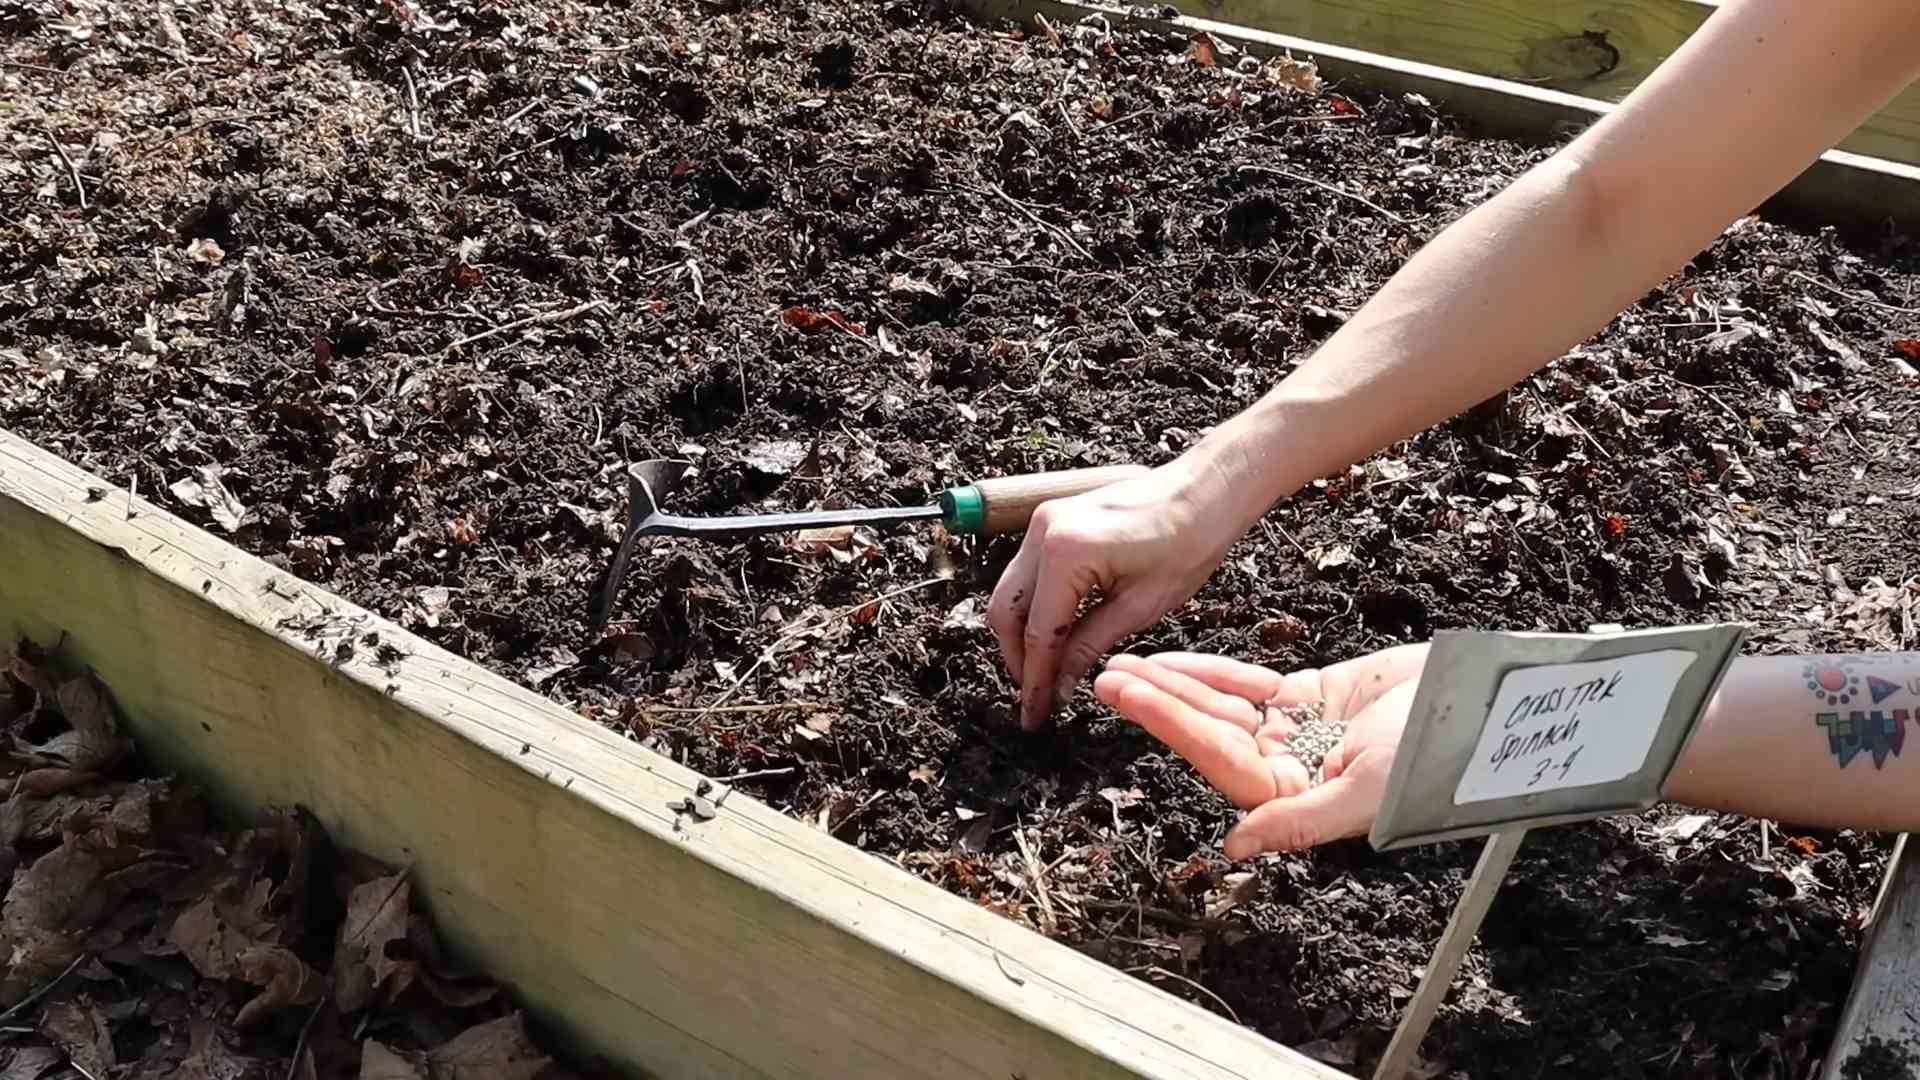
1. Prepare Your Planting Area: Whether you’re planting in a raised bed, container, or directly in the ground, loosen the soil and remove any rocks or debris.
2. Create Shallow Furrows: Make shallow furrows (about ½ inch or 1.2 cm deep) in the soil, spacing them about 6 inches (15 cm) apart.
3. Gently Place the Seeds: Carefully place the primed spinach seeds in the furrows, spacing them about 1 inch (2.5 cm) apart. Be very gentle, as the sprouts are delicate.
4. Cover the Seeds: Gently cover the seeds with a thin layer of soil.
5. Water Thoroughly: Water the planting area gently but thoroughly. Use a watering can or hose with a gentle spray nozzle to avoid disturbing the seeds.
Section 3: Ongoing Care for a Speedy Harvest
Consistent care is crucial for maximizing your spinach harvest. Here’s what you need to do to keep your plants happy and healthy:
Watering:
Spinach needs consistent moisture to thrive. Water your plants regularly, especially during dry spells. Aim to keep the soil consistently moist, but not waterlogged. Water in the morning to allow the foliage to dry before nightfall, which can help prevent fungal diseases.
Fertilizing:
Spinach is a heavy feeder, so it benefits from regular fertilization. Apply a liquid seaweed fertilizer every 2-3 weeks to provide your plants with essential nutrients. You can also side-dress your plants with compost or well-rotted manure.
Weeding:
Keep your planting area free of weeds, which can compete with your spinach plants for nutrients and water. Hand-pull weeds carefully to avoid disturbing the spinach roots.
Pest Control:
Spinach can be susceptible to pests like aphids and leaf miners. Inspect your plants regularly for signs of infestation. If you find pests, you can try spraying them with insecticidal soap or neem oil. You can also cover your plants with row covers to prevent pests from reaching them.
Thinning:
Once your spinach seedlings have developed a few true leaves, thin them out so that they are about 3-4 inches (7.5-10 cm) apart. This will give them enough space to grow and prevent overcrowding. You can eat the thinned seedlings as baby spinach!
Section 4: Harvesting Your Bountiful Spinach Crop
The moment you’ve been waiting for! With our seed priming and careful cultivation, you should be harvesting spinach much faster than usual.
When to Harvest:
You can start harvesting spinach leaves as soon as they are large enough to eat, typically about 4-6 weeks after planting. The leaves will be most tender and flavorful when they are young.
How to Harvest:
There are two main ways to harvest spinach:
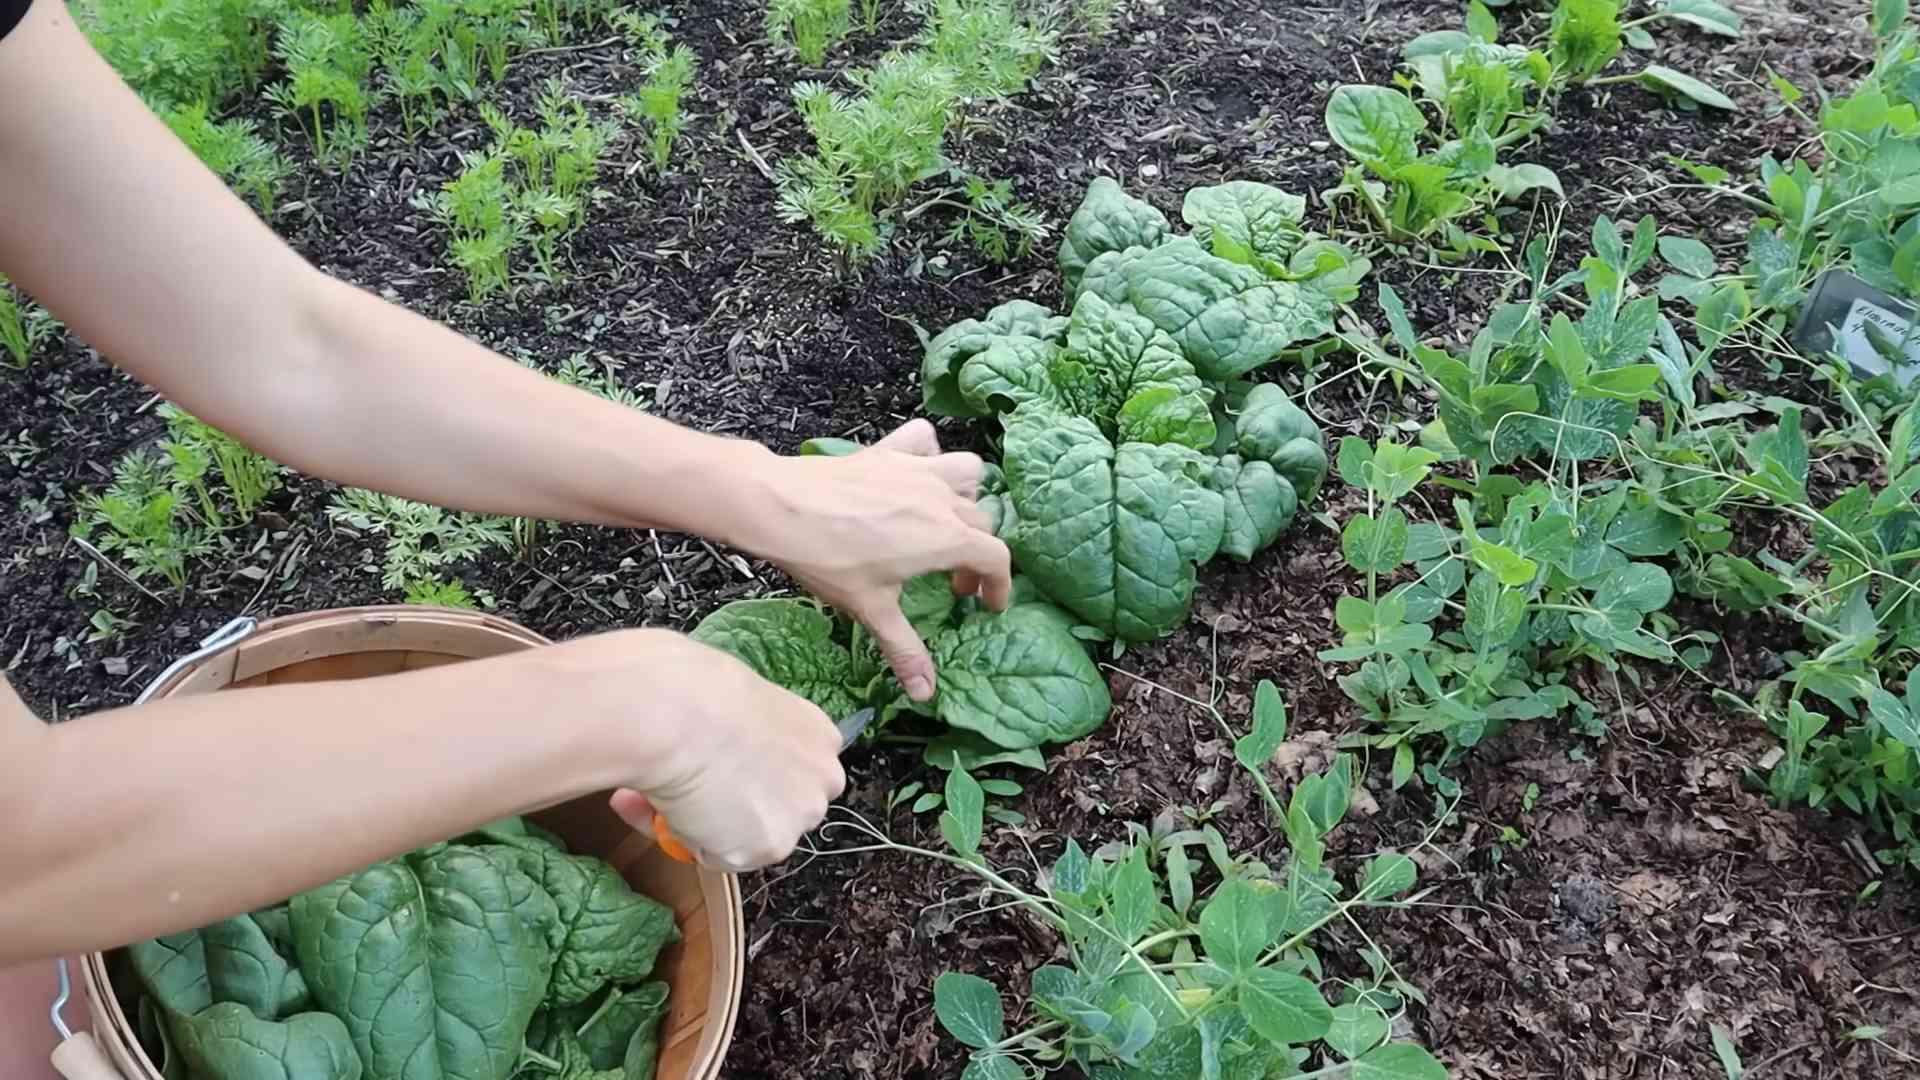
* Cut-and-Come-Again: This method involves harvesting only the outer leaves, leaving the inner leaves to continue growing. This allows you to harvest spinach multiple times from the same plant. To harvest, simply snip off the outer leaves with scissors or a knife, being careful not to damage the central bud.
* Whole Plant Harvest: This method involves harvesting the entire plant at once. This is a good option if you want to harvest a large amount of spinach at once, or if your plants are starting to bolt. To harvest, simply cut the plant off at the base.
Extending Your Harvest:
To extend your spinach harvest, consider these tips:
* Succession Planting: Plant new spinach seeds every 2-3 weeks to ensure a continuous supply of fresh greens.
* Choose Bolt-Resistant Varieties: Select spinach varieties that are known for their resistance to bolting.
* Provide Shade: Protect your plants from the intense summer heat by providing shade.
* Water Regularly: Consistent moisture is crucial for preventing bolting.
Troubleshooting
Even with the best planning, things can sometimes go wrong. Here are a few common spinach growing problems and how to fix them:
* Bolting: If your spinach plants start to bolt (send up a flower stalk), the leaves will become bitter and less palatable. To prevent bolting, choose bolt-resistant varieties, provide shade, and water regularly. If your plants do bolt, you can still harvest the leaves, but they may not taste as good.
* Yellowing Leaves: Yellowing leaves can be a sign of nutrient deficiency, overwatering, or underwatering. Check the soil moisture and adjust your watering accordingly. You can also apply a liquid fertilizer to provide your plants with essential nutrients.
* Pest Infestations: Aphids, leaf miners, and other pests can damage spinach leaves. Inspect your plants regularly for signs of infestation and take action as needed.
* Fungal Diseases: Fungal diseases like downy
Conclusion
So, there you have it! This simple yet effective DIY trick to plant spinach fast harvest is a game-changer for any gardener, regardless of experience level. Forget waiting weeks for those first tender leaves; with this method, you’ll be enjoying fresh, homegrown spinach much sooner than you ever thought possible.
Why is this a must-try? Because it addresses the two biggest hurdles in spinach cultivation: slow germination and vulnerability to early pests. By pre-sprouting your seeds and providing a protected environment for the seedlings, you’re giving your spinach plants a significant head start. This translates to a faster harvest, increased yields, and ultimately, more delicious and nutritious spinach on your table.
But the beauty of this method lies in its adaptability. Feel free to experiment with variations to suit your specific needs and preferences. For instance, if you live in a particularly hot climate, consider using a shaded area for your seedling trays to prevent overheating. You could also try different types of seed starting mixes to see which one works best for your soil conditions.
Another exciting variation is to incorporate companion planting right from the start. Sow a few radish seeds alongside your spinach in the seedling tray. Radishes germinate quickly and help break up the soil, creating pathways for the spinach roots to grow. Plus, they act as a “trap crop,” attracting pests away from your precious spinach seedlings.
Don’t be afraid to get creative with your container choices, too. While seedling trays are ideal for large-scale planting, you can easily adapt this method to smaller containers like yogurt cups or egg cartons. Just make sure to provide adequate drainage and enough space for the roots to develop.
Beyond radishes, consider other companion plants like chamomile or marigolds. Chamomile is known to improve the flavor of spinach, while marigolds deter nematodes and other harmful pests. Planting these alongside your spinach, either in the seedling tray or after transplanting, can further enhance your harvest.
And speaking of transplanting, remember to harden off your seedlings before moving them to their final location. This involves gradually exposing them to outdoor conditions over a period of several days, which helps them acclimate to the sun, wind, and temperature fluctuations.
Ultimately, the key to success with this DIY trick is observation and adaptation. Pay close attention to your seedlings, monitor their growth, and adjust your approach as needed. Don’t be discouraged if you encounter challenges along the way; gardening is a learning process, and every experience is an opportunity to improve your skills.
We are confident that this method will revolutionize your spinach growing experience. So, what are you waiting for? Gather your supplies, follow the steps outlined in this article, and get ready to enjoy a bountiful harvest of fresh, homegrown spinach in record time.
We are incredibly eager to hear about your experiences with this DIY trick. Did it work for you? Did you try any variations? What challenges did you encounter, and how did you overcome them? Share your stories, tips, and photos in the comments section below. Your feedback will not only help other readers but also contribute to our collective knowledge of successful spinach cultivation. Let’s grow together!
Frequently Asked Questions
What is the ideal temperature for spinach germination?
Spinach seeds germinate best in cool temperatures, ideally between 50°F and 70°F (10°C and 21°C). High temperatures can inhibit germination, so it’s crucial to provide a cool environment, especially during the pre-sprouting phase. If you’re starting your seeds indoors, a cool basement or a shaded area can work well. If you’re starting them outdoors, choose a location that receives partial shade, especially during the hottest part of the day. Monitoring the soil temperature is also helpful; you can use a soil thermometer to ensure it stays within the optimal range.
How long does it typically take for spinach seeds to germinate using this method?
Using the pre-sprouting method, you can expect to see germination within 3-5 days, which is significantly faster than direct sowing. Direct sowing can take anywhere from 7-14 days, depending on soil temperature and moisture levels. The pre-sprouting process gives the seeds a head start by providing them with the ideal conditions for germination, ensuring a quicker and more reliable emergence. Keep in mind that these are estimates, and the actual germination time may vary slightly depending on the specific variety of spinach and environmental conditions.
What type of soil is best for growing spinach?
Spinach thrives in well-drained soil that is rich in organic matter. A slightly acidic to neutral pH, between 6.5 and 7.0, is ideal. Before planting, amend your soil with compost or well-rotted manure to improve its fertility and drainage. Avoid heavy clay soils, as they can become waterlogged and hinder root development. If you have clay soil, consider adding sand or other amendments to improve its drainage. A soil test can help you determine the pH and nutrient levels of your soil, allowing you to make necessary adjustments before planting.
How often should I water my spinach plants?
Spinach requires consistent moisture to thrive. Water deeply and regularly, especially during dry periods. Aim to keep the soil consistently moist but not waterlogged. Overwatering can lead to root rot, so it’s essential to ensure proper drainage. A good rule of thumb is to water when the top inch of soil feels dry to the touch. Mulching around your spinach plants can help retain moisture and suppress weeds. Consider using a soaker hose or drip irrigation to deliver water directly to the roots, minimizing water loss through evaporation.
What are some common pests and diseases that affect spinach, and how can I prevent them?
Spinach is susceptible to several pests and diseases, including aphids, leaf miners, flea beetles, and downy mildew. To prevent these problems, practice good garden hygiene, such as removing plant debris and weeds that can harbor pests and diseases. Crop rotation can also help prevent soilborne diseases from building up. Inspect your plants regularly for signs of pests or diseases, and take action promptly if you notice any problems. Insecticidal soap or neem oil can be effective for controlling aphids and other pests. For downy mildew, choose resistant varieties and ensure good air circulation around your plants. Companion planting with marigolds or other pest-repelling plants can also help deter pests.
Can I grow spinach in containers?
Yes, spinach grows well in containers, making it a great option for gardeners with limited space. Choose a container that is at least 6 inches deep and has good drainage. Use a high-quality potting mix that is rich in organic matter. Water regularly and fertilize as needed. Place your container in a location that receives at least 4-6 hours of sunlight per day. Container-grown spinach may dry out more quickly than spinach grown in the ground, so monitor the moisture levels closely.
How do I know when my spinach is ready to harvest?
Spinach is ready to harvest when the leaves are large enough to eat, typically about 4-6 inches long. You can harvest individual leaves as needed, or you can cut the entire plant at the base. Harvesting regularly encourages continued growth. Avoid harvesting during the hottest part of the day, as the leaves may wilt quickly. Wash the leaves thoroughly before eating.
Can I grow spinach in the winter?
Yes, you can grow spinach in the winter, especially in mild climates. In colder climates, you can protect your spinach plants with row covers or a cold frame. Choose winter-hardy varieties of spinach, such as ‘Winter Bloomsdale’ or ‘Tyee’. Plant your spinach in the fall, giving it time to establish before the onset of winter. Provide adequate moisture and protection from extreme cold. With proper care, you can enjoy fresh spinach throughout the winter months.
What are some good companion plants for spinach?
Spinach benefits from companion planting with several different plants. Radishes help break up the soil and attract pests away from spinach. Chamomile is believed to improve the flavor of spinach. Marigolds deter nematodes and other harmful pests. Garlic and onions can also help repel pests. Planting these companions alongside your spinach can help improve its growth and yield.
How can I save spinach seeds for next year?
Saving spinach seeds is relatively easy. Allow a few plants to bolt (go to seed). Once the seed heads are dry and brown, cut them off and place them in a paper bag. Allow the seed heads to dry completely. Then, crush the seed heads to release the seeds. Remove any debris and store the seeds in an airtight container in a cool, dry place. Properly stored spinach seeds can remain viable for several years.

Leave a Comment