

Grow Grapes at Home? Absolutely! Imagine stepping into your backyard and plucking juicy, sun-ripened grapes straight from the vine. Sounds like a dream, right? Well, it doesn’t have to be! This DIY guide is packed with simple, yet effective tricks to help you cultivate your own thriving grapevine, even if you’re a complete beginner.
Grape cultivation has a rich history, dating back thousands of years. From ancient civilizations using grapes for wine production to modern-day enthusiasts enjoying them fresh off the vine, the allure of growing your own grapes is timeless. For centuries, grapes have been a symbol of abundance and prosperity, and now you can bring that same feeling to your own home.
Why should you learn to grow grapes at home? Because store-bought grapes simply can’t compare to the flavor and satisfaction of harvesting your own. Plus, you’ll know exactly what’s going into your food – no harmful pesticides or chemicals. This DIY project is not only rewarding but also a sustainable way to enjoy delicious, healthy fruit. I’m excited to share these easy-to-follow tips and tricks that will transform your garden into a mini vineyard. Let’s get started!
Growing Grapes at Home: A DIY Guide for Budding Viticulturists
Hey there, fellow garden enthusiasts! Ever dreamt of plucking juicy, sun-ripened grapes straight from your own backyard? Well, dream no more! Growing grapes at home is totally achievable, even if you don’t have acres of vineyard. It takes a little planning, patience, and elbow grease, but trust me, the reward of homegrown grapes is absolutely worth it. I’m going to walk you through everything you need to know, from choosing the right variety to harvesting your delicious bounty. Let’s get started!
Choosing the Right Grape Variety
Before you even think about digging a hole, you need to pick the perfect grape variety for your climate and taste. This is a crucial step, so don’t rush it!
* Consider your climate: Grapes are surprisingly adaptable, but some varieties thrive in warmer climates, while others are more cold-hardy. Check your USDA plant hardiness zone to make sure the variety you choose is suitable.
* Think about your intended use: Are you planning to make wine, eat them fresh, or make jams and jellies? Different varieties are better suited for different purposes. Table grapes are generally sweeter and have thinner skins, while wine grapes have higher acidity and more complex flavors.
* Research disease resistance: Some grape varieties are more resistant to common diseases like powdery mildew and black rot. Choosing a disease-resistant variety will save you a lot of headaches (and fungicide!).
* Popular Choices:
* ‘Concord’: A classic American grape, known for its distinctive flavor and hardiness. Great for juice, jams, and jellies.
* ‘Thompson Seedless’: The most popular table grape in the world! Sweet, crisp, and seedless.
* ‘Niagara’: Another American grape with a strong, sweet flavor. Good for juice and fresh eating.
* ‘Reliance’: A cold-hardy seedless table grape with a sweet, fruity flavor.
* ‘Cabernet Sauvignon’: A popular red wine grape, known for its complex flavors and aromas. Requires a warmer climate.
* ‘Chardonnay’: A popular white wine grape, known for its versatility and adaptability.
Preparing the Planting Site
Grapes need plenty of sunshine and well-drained soil to thrive. Here’s how to get your planting site ready:
* Sunlight: Grapes need at least 6-8 hours of direct sunlight per day. Choose a location that gets plenty of sun throughout the growing season.
* Soil: Grapes prefer well-drained soil with a pH between 6.0 and 7.0. If your soil is heavy clay or sandy, amend it with compost or other organic matter to improve drainage and fertility.
* Drainage Test: Dig a hole about 1 foot deep and fill it with water. If the water drains away within a few hours, your soil has good drainage. If it takes longer, you’ll need to improve drainage before planting.
* Clearing the Area: Remove all weeds, grass, and other vegetation from the planting area. This will help prevent competition for nutrients and water.
* Soil Testing: It’s always a good idea to get your soil tested to determine its pH and nutrient levels. You can purchase a soil testing kit at your local garden center or send a sample to your local agricultural extension office.
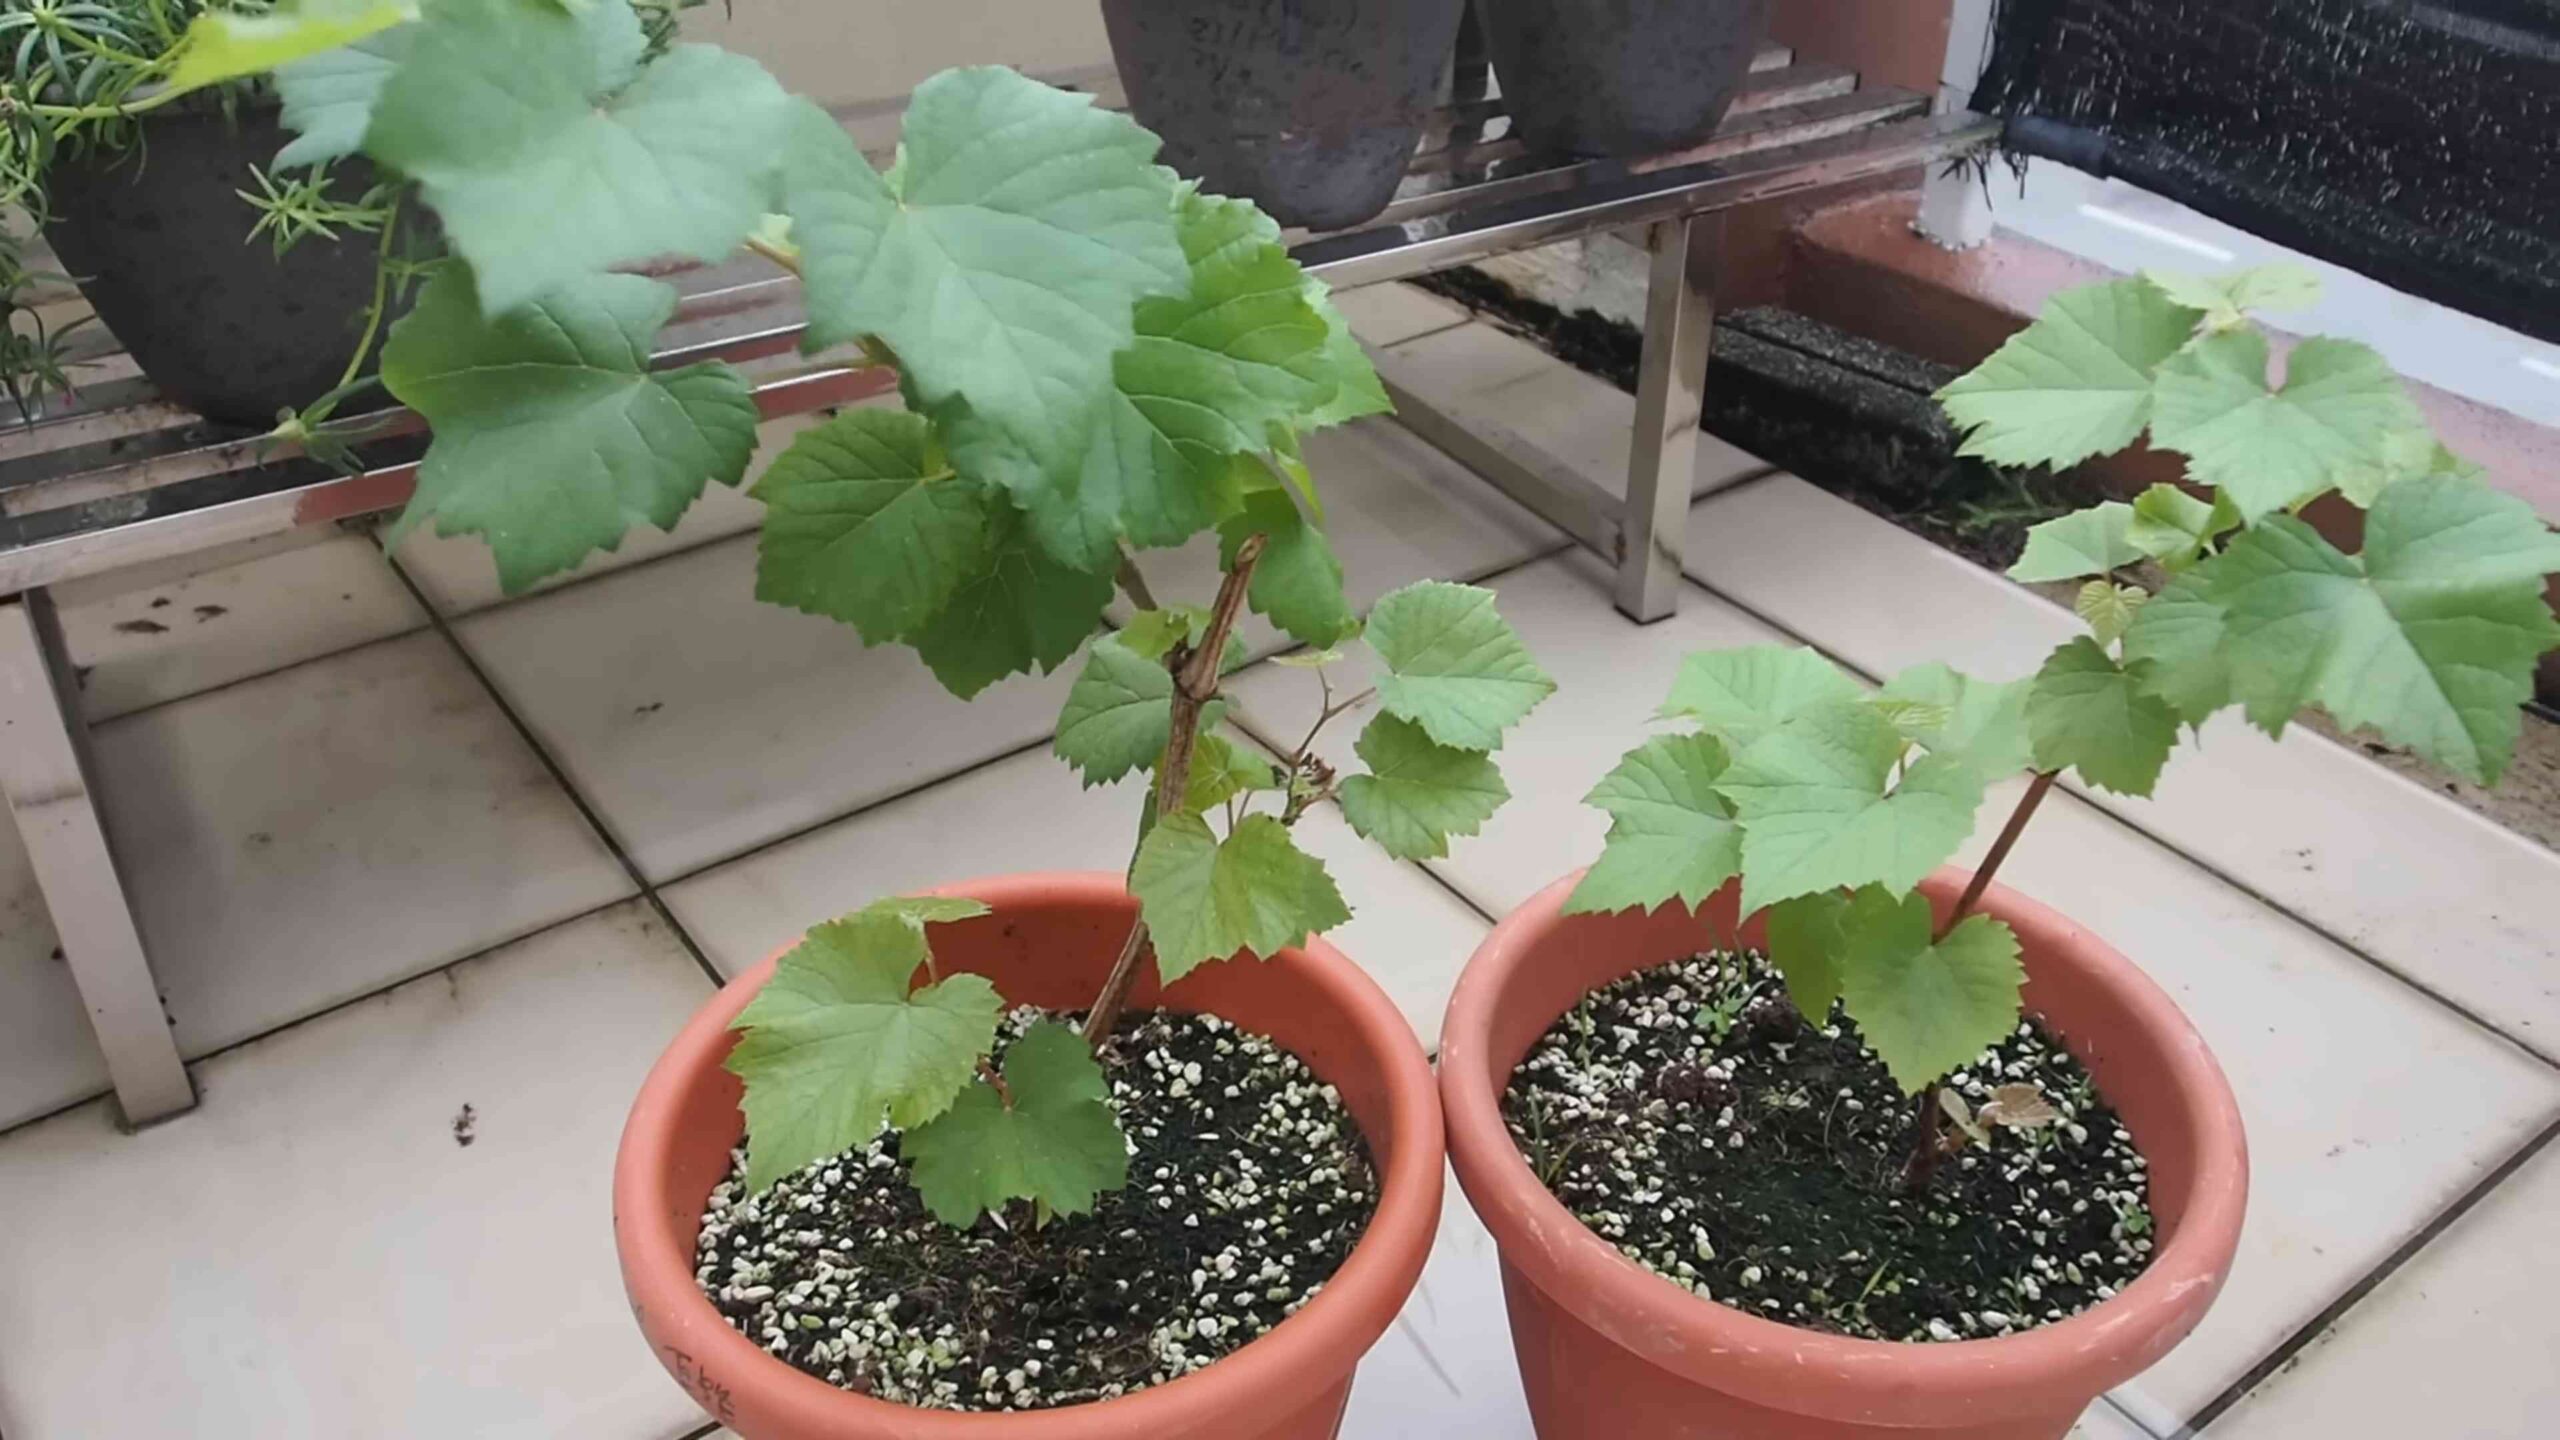
Planting Your Grape Vines
Now for the fun part! Planting your grape vines is a relatively simple process, but it’s important to do it correctly to ensure they get off to a good start.
1. Timing: The best time to plant grape vines is in early spring, after the last frost. You can also plant them in the fall, but make sure to give them enough time to establish roots before winter.
2. Spacing: Space your grape vines according to the variety and training system you’re using. Generally, table grapes should be spaced 8-10 feet apart, while wine grapes can be spaced closer together, around 6-8 feet apart.
3. Digging the Hole: Dig a hole that is twice as wide and as deep as the root ball of your grape vine.
4. Preparing the Roots: Gently remove the grape vine from its container and loosen the roots. If the roots are circling the pot, gently tease them apart to encourage them to grow outward.
5. Planting: Place the grape vine in the hole, making sure the top of the root ball is level with the ground. Backfill the hole with soil, gently tamping it down to remove air pockets.
6. Watering: Water the newly planted grape vine thoroughly.
7. Mulching: Apply a layer of mulch around the base of the grape vine to help retain moisture and suppress weeds. Use organic mulch such as wood chips, straw, or shredded bark.
Training and Pruning Your Grape Vines
Training and pruning are essential for growing healthy, productive grape vines. These practices help to shape the vine, control its growth, and improve fruit quality.
Training Systems
There are several different training systems you can use for grape vines, each with its own advantages and disadvantages. Here are a few of the most common:
* Cane Pruning: This system involves training the vine to a single trunk and then selecting a few canes (one-year-old shoots) to produce fruit. Cane pruning is best suited for varieties that produce fruit on the previous year’s growth.
* Spur Pruning: This system involves training the vine to a single trunk and then pruning the canes back to short spurs (short, stubby branches). Spur pruning is best suited for varieties that produce fruit on the current year’s growth.
* Arbor: If you have a sturdy arbor, you can train your grape vines to grow over it. This is a great way to add shade and beauty to your backyard.
Pruning Techniques
Pruning is best done in late winter or early spring, before the buds begin to swell. Here are a few basic pruning techniques:
* Remove dead, damaged, or diseased wood: This is the first step in any pruning job.
* Thin out the canopy: Remove some of the excess growth to improve air circulation and sunlight penetration.
* Shorten the canes: Depending on the training system you’re using, you may need to shorten the canes to encourage fruit production.
* Remove suckers: Suckers are shoots that grow from the base of the vine. Remove them regularly to prevent them from competing with the main vine.
Watering and Fertilizing
Grapes need consistent watering, especially during dry periods. Water deeply and regularly, especially during the first year after planting.
* Watering Schedule: Water deeply once or twice a week, depending on the weather and soil conditions.
* Fertilizing: Fertilize your grape vines in early spring with a balanced fertilizer. Follow the instructions on the fertilizer label. You can also amend the soil with compost or other organic matter.
* Avoid Over-Fertilizing: Too much fertilizer can lead to excessive vegetative growth and reduced fruit production.
Pest and Disease Control
Grapes can be susceptible to a variety of pests and diseases. Here are a few of the most common:
* Powdery Mildew: A fungal disease that causes a white, powdery coating on the leaves and fruit.
* Black Rot: Another fungal disease that causes dark, sunken lesions on the leaves and fruit.
* Japanese Beetles: These pests can skeletonize the leaves of grape vines.
* Grape Phylloxera: Root-feeding insects that can damage or kill grape vines.
Preventative Measures
* Choose disease-resistant varieties: This is the best way to prevent disease problems.
* Provide good air circulation: Prune your grape vines regularly to improve air circulation and sunlight penetration.
* Water properly: Avoid overwatering, which can create a favorable environment for fungal diseases.
* Monitor your vines regularly: Check your vines regularly for signs of pests or diseases.
Treatment Options
* Fungicides: Use a fungicide to control fungal diseases like powdery mildew and black rot.
* Insecticides: Use an insecticide to control insect pests like Japanese beetles.
* Biological Control: Introduce beneficial insects, such as ladybugs, to control pests.
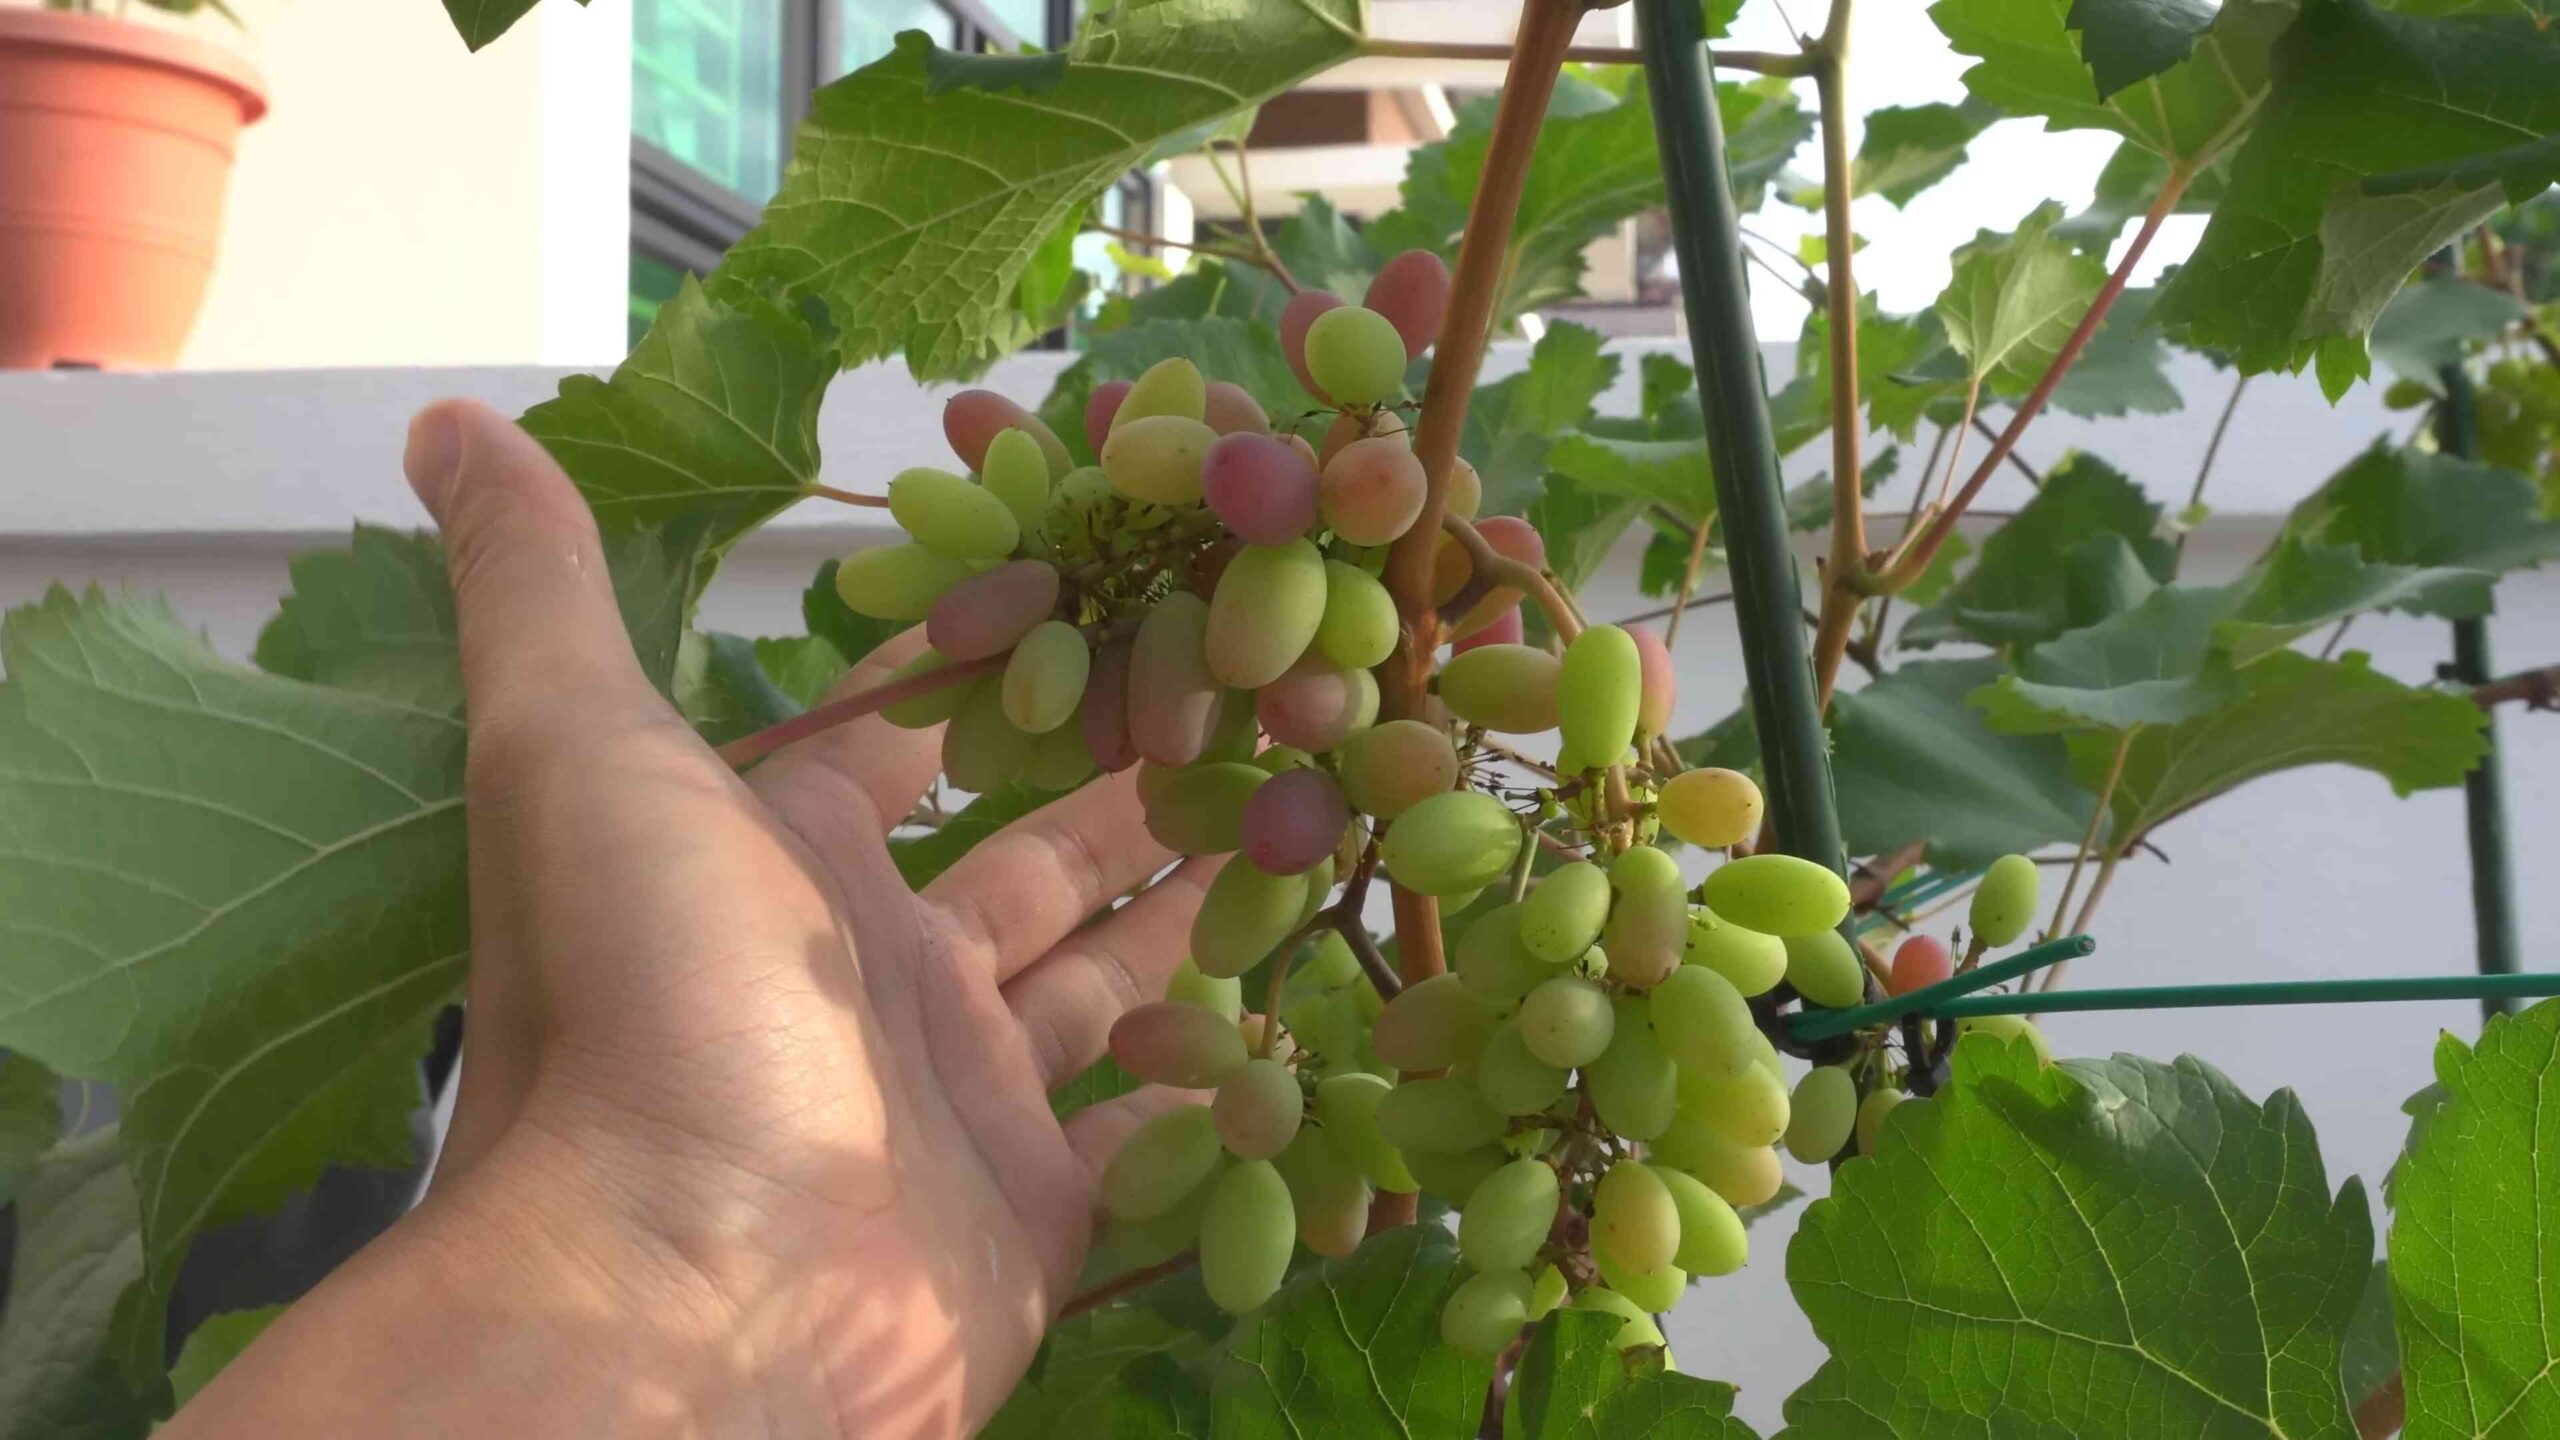
Harvesting Your Grapes
The moment you’ve been waiting for! Harvesting your grapes is the culmination of all your hard work.
* Timing: Grapes are typically ready to harvest in late summer or early fall. The exact timing will depend on the variety and the weather.
* Signs of Ripeness: Look for these signs of ripeness:
* The grapes should be plump and juicy.
* The grapes should be easy to pull from the vine.
* The grapes should have a sweet, intense flavor.
*
Conclusion
So, there you have it! Growing grapes at home, while it might seem daunting at first, is entirely achievable with a little patience, planning, and the right approach. We’ve walked you through the essential steps, from selecting the perfect grape variety for your climate to nurturing your vines for a bountiful harvest. The satisfaction of plucking sun-ripened grapes from your own backyard is an experience that simply can’t be replicated by store-bought fruit. The flavor is more intense, the texture is more satisfying, and you have the added bonus of knowing exactly where your food came from and how it was grown.
This isn’t just about having fresh grapes; it’s about connecting with nature, learning a new skill, and potentially even creating your own homemade wine or grape juice. Imagine the pride you’ll feel serving your own grapes to friends and family, or crafting a unique vintage from your homegrown harvest.
Why is this DIY grape-growing trick a must-try? Because it empowers you to take control of your food source, enjoy the freshest possible produce, and experience the joy of gardening in a truly rewarding way. Plus, think of the environmental benefits – reducing your carbon footprint by sourcing locally (from your own backyard!), avoiding pesticides and herbicides if you choose to grow organically, and contributing to a greener planet.
Don’t be afraid to experiment! There are countless variations you can explore. Try different training methods, such as the cordon or cane system, to see which works best for your space and grape variety. Consider interplanting your grapevines with companion plants like rosemary or lavender to attract beneficial insects and deter pests. You could even try grafting different grape varieties onto a single rootstock to create a unique and diverse vineyard in miniature.
And remember, growing grapes at home is a journey, not a destination. There will be challenges along the way, but the rewards are well worth the effort. So, grab your gardening gloves, choose your grape variety, and get ready to embark on this exciting adventure.
We’re confident that with the knowledge you’ve gained, you’ll be well on your way to enjoying a thriving grapevine and a delicious harvest. Now, it’s your turn! We encourage you to try this DIY trick and share your experiences with us. Let us know what grape varieties you chose, what challenges you faced, and what successes you celebrated. Share your photos, your tips, and your stories in the comments below. We can all learn from each other and create a vibrant community of home grape growers. Happy growing!
Frequently Asked Questions (FAQ)
What is the best time of year to plant grapevines?
The best time to plant grapevines is typically in early spring or late fall, when the vines are dormant. This allows the roots to establish themselves before the heat of summer or the cold of winter sets in. In warmer climates, fall planting is often preferred, while in colder climates, spring planting is generally recommended to avoid potential frost damage to newly planted vines. However, container-grown grapevines can be planted at almost any time of year, as long as the ground is not frozen and the weather is not excessively hot or dry.
How much space do grapevines need?
Grapevines need a significant amount of space to grow and thrive. The exact spacing will depend on the variety of grape, the training system you choose, and the overall size of your vineyard. As a general rule, allow at least 8-10 feet between vines in a row and 10-12 feet between rows. This spacing allows for adequate sunlight penetration, air circulation, and room for the vines to grow and mature. If you are growing grapes on a smaller scale, such as in a backyard garden, you may be able to get away with slightly closer spacing, but be sure to prune your vines regularly to prevent overcrowding.
What kind of soil is best for growing grapes?
Grapes prefer well-drained soil that is moderately fertile. The ideal soil pH is between 6.0 and 7.0. Heavy clay soils can be problematic, as they tend to retain too much moisture and can lead to root rot. Sandy soils, on the other hand, may drain too quickly and not provide enough nutrients. If you have heavy clay soil, amend it with organic matter, such as compost or well-rotted manure, to improve drainage and aeration. If you have sandy soil, amend it with organic matter to improve water retention and nutrient availability. A soil test can help you determine the pH and nutrient levels of your soil and identify any amendments that may be needed.
How often should I water my grapevines?
The watering needs of grapevines will vary depending on the climate, soil type, and stage of growth. Young grapevines need more frequent watering than established vines. In general, water deeply and infrequently, allowing the soil to dry out slightly between waterings. During hot, dry weather, you may need to water your vines more frequently. Avoid overwatering, as this can lead to root rot. A good rule of thumb is to water when the top inch of soil feels dry to the touch. Drip irrigation is an excellent way to water grapevines, as it delivers water directly to the roots and minimizes water loss through evaporation.
How do I prune grapevines?
Pruning is essential for maintaining the health and productivity of grapevines. The timing and method of pruning will depend on the variety of grape and the training system you choose. In general, grapevines are pruned during the dormant season, typically in late winter or early spring. The goal of pruning is to remove dead, damaged, or diseased wood, as well as to shape the vine and promote fruit production. There are several different pruning methods, including cane pruning and spur pruning. Cane pruning involves removing most of the previous year’s growth and leaving only a few canes with a certain number of buds. Spur pruning involves cutting back the previous year’s growth to short spurs with only a few buds each. It’s important to research the specific pruning requirements of your grape variety and to follow a consistent pruning schedule each year.
What are some common pests and diseases that affect grapevines?
Grapevines are susceptible to a variety of pests and diseases, including aphids, spider mites, Japanese beetles, powdery mildew, downy mildew, and black rot. Regular monitoring of your vines can help you detect problems early and take appropriate action. Many organic and conventional control methods are available for managing pests and diseases. Some preventative measures include ensuring good air circulation, avoiding overhead watering, and using disease-resistant grape varieties.
How long does it take for grapevines to produce fruit?
It typically takes 2-3 years for grapevines to start producing fruit. The first year is focused on establishing the root system and growing the vine. In the second year, the vine will continue to grow and develop. In the third year, you may start to see a small crop of grapes. The full yield of the vine will typically be reached in 4-5 years. Patience is key when growing grapes!
Can I grow grapes in containers?
Yes, you can grow grapes in containers, but it requires careful planning and attention. Choose a large container with good drainage, at least 20 gallons in size. Select a grape variety that is well-suited for container growing, such as ‘Thompson Seedless’ or ‘Reliance’. Use a high-quality potting mix and fertilize regularly. Container-grown grapevines will need more frequent watering than those grown in the ground. You may also need to provide support for the vines, such as a trellis or stake.
How do I know when my grapes are ripe?
Determining when grapes are ripe can be tricky, as it depends on the variety and your personal preferences. Some general indicators of ripeness include:
* **Color:** The grapes should have reached their characteristic color for the variety.
* **Taste:** The grapes should taste sweet and flavorful, with a balance of acidity.
* **Texture:** The grapes should be plump and juicy, with a slightly soft texture.
* **Seed Color:** The seeds should be brown and easily separated from the pulp.
* **Ease of Picking:** Ripe grapes should be easy to pick from the vine.
It’s best to sample a few grapes from different parts of the vine to get a good sense of their ripeness.
What can I do with my homegrown grapes?
The possibilities are endless! You can eat them fresh, make grape juice, jelly, jam, or even wine. You can also dry them to make raisins or use them in baking and cooking. Homegrown grapes are a versatile and delicious addition to any kitchen.
Leave a Comment