

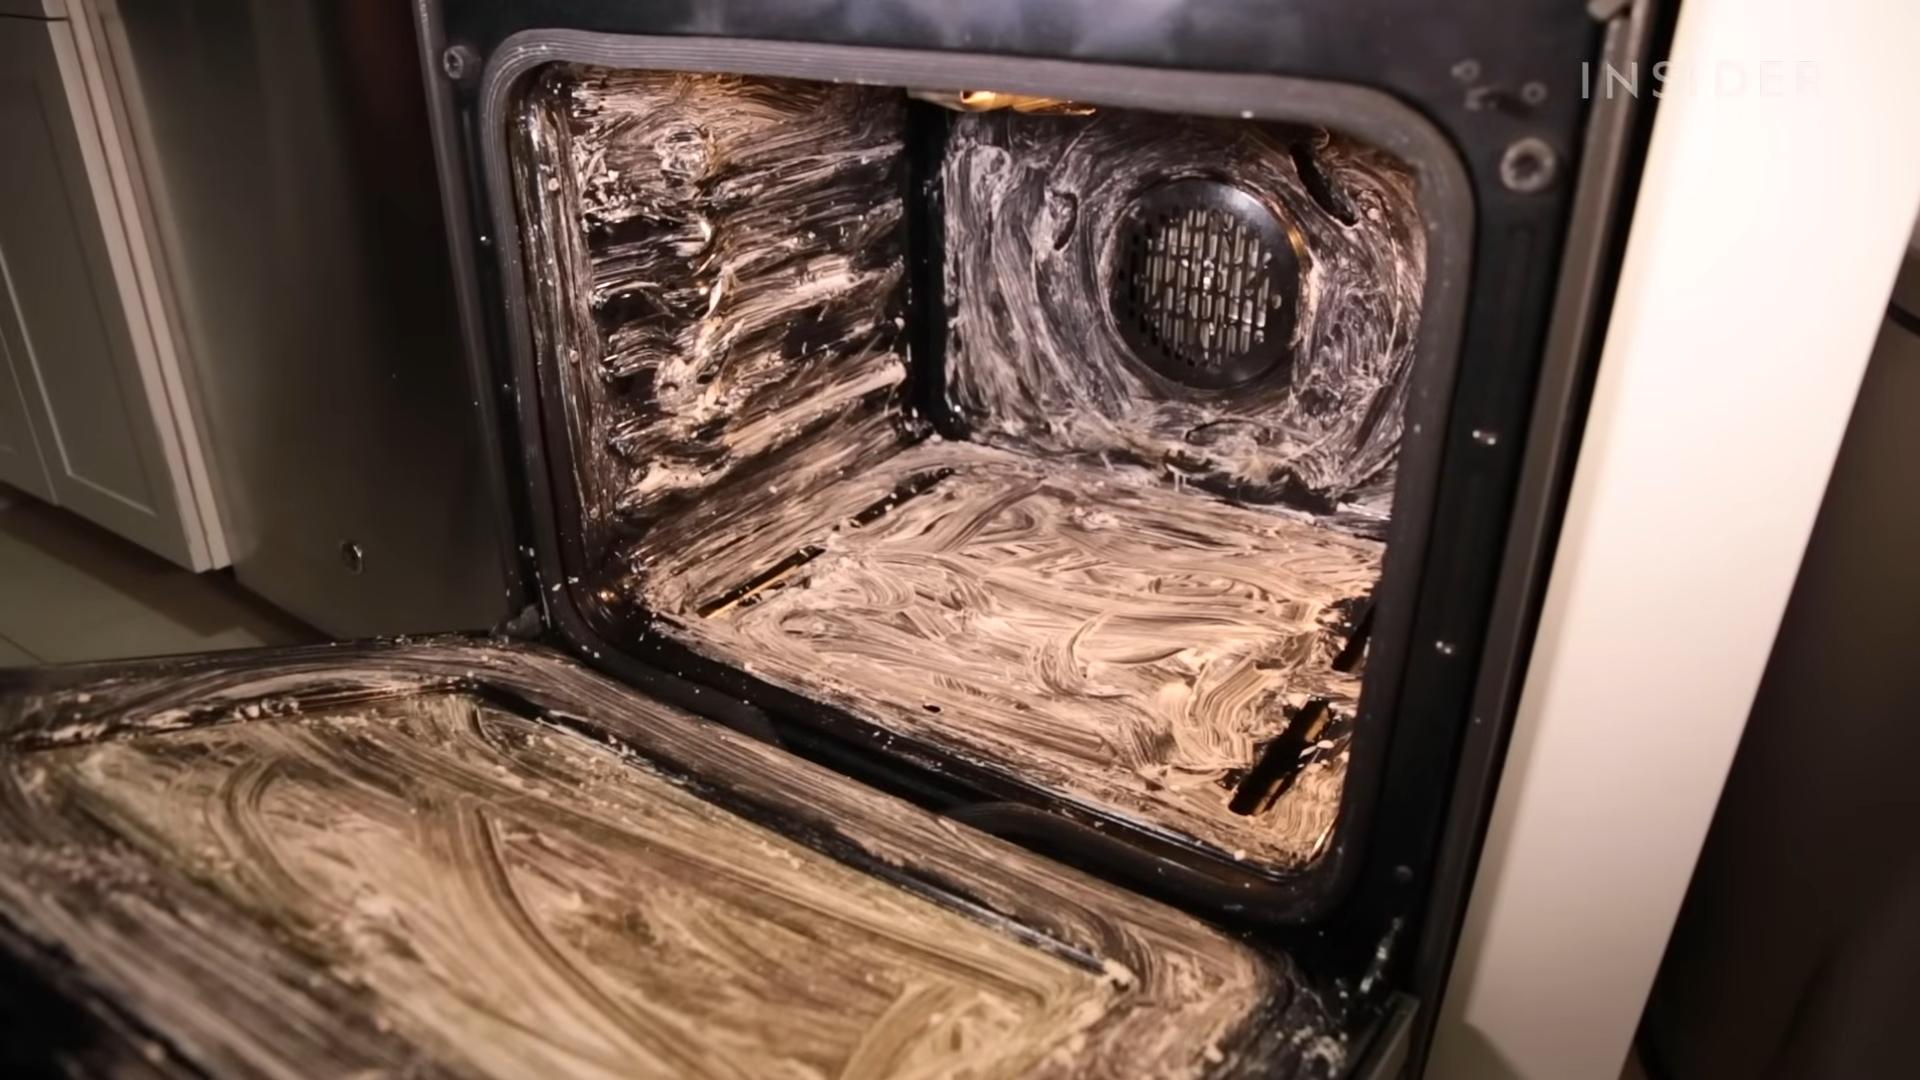
Oven Cleaning Baking Soda Vinegar: Sounds like a science experiment, right? Well, in a way, it is! But trust me, it’s a delicious experiment that ends with a sparkling clean oven and the satisfaction of knowing you conquered that greasy beast without harsh chemicals. For generations, resourceful home cooks have relied on the power of simple ingredients to tackle tough cleaning tasks. Think about it – before the age of fancy sprays and foams, our grandmothers were keeping their ovens spotless using little more than elbow grease and the magic of baking soda and vinegar.
Let’s be honest, nobody *loves* cleaning the oven. It’s a chore we all dread, often putting it off until the baked-on grime reaches epic proportions. But a clean oven isn’t just about aesthetics; it’s about food safety and efficiency. A grimy oven can affect the taste of your food, smoke up your kitchen, and even pose a fire hazard. That’s why mastering this oven cleaning baking soda vinegar method is a game-changer. It’s a safe, effective, and budget-friendly way to keep your oven in tip-top shape, ensuring your culinary creations always come out perfectly. I’m going to show you how to ditch the harsh chemicals and embrace a natural, DIY approach to oven cleaning that will leave you wondering why you didn’t try it sooner!
Growing Mint Indoors: A Beginner’s Guide to Fresh Flavor All Year Round
Hey there, fellow plant enthusiasts! Are you craving the refreshing taste of mint but don’t have a garden, or maybe the weather outside is just not cooperating? Don’t worry, I’ve got you covered! Growing mint indoors is surprisingly easy, and I’m going to walk you through every step so you can enjoy fresh mint whenever you need it. Let’s get started!
Choosing the Right Mint Variety
First things first, let’s talk about mint varieties. While all mint is delicious, some are better suited for indoor growing than others. Here are a few of my favorites:
* Spearmint: This is your classic mint, the one you probably think of when you hear “mint.” It’s got a refreshing, slightly sweet flavor that’s perfect for teas, cocktails, and desserts. It’s also pretty forgiving, making it a great choice for beginners.
* Peppermint: Peppermint has a stronger, more intense flavor than spearmint, thanks to its higher menthol content. It’s fantastic for candies, chocolates, and adding a zing to your drinks.
* Chocolate Mint: If you’re a chocolate lover, you absolutely need to try chocolate mint! It has a subtle chocolate aroma and flavor that’s just divine. It’s a bit more delicate than spearmint or peppermint, so it might require a little extra attention.
* Apple Mint: This variety has a fruity, apple-like aroma and flavor. It’s a great addition to salads, fruit salads, and even savory dishes.
You can usually find these varieties at your local garden center or nursery. When choosing your mint plant, look for healthy, vibrant green leaves and avoid plants that look wilted or have any signs of pests or diseases.
Gathering Your Supplies
Okay, now that we’ve chosen our mint variety, let’s gather the supplies we’ll need. Here’s a checklist:
* A Pot: Choose a pot that’s at least 6 inches in diameter and has drainage holes. Mint likes to spread, so a slightly larger pot is always a good idea.
* Potting Mix: Use a high-quality potting mix that’s well-draining. Avoid using garden soil, as it can be too heavy and compact for container gardening.
* Watering Can or Spray Bottle: You’ll need something to water your mint plant. A watering can with a long spout is ideal for reaching the soil without getting the leaves wet.
* Grow Light (Optional): If you don’t have a sunny windowsill, you might want to invest in a grow light. This will ensure that your mint plant gets enough light to thrive.
* Scissors or Pruning Shears: You’ll need these for harvesting and pruning your mint plant.
* Fertilizer (Optional): A balanced liquid fertilizer can help your mint plant grow strong and healthy.
Planting Your Mint
Alright, let’s get our hands dirty and plant our mint!
1. Prepare the Pot: Fill the pot with potting mix, leaving about an inch of space at the top.
2. Remove the Mint from its Container: Gently squeeze the sides of the container to loosen the mint plant. Carefully remove the plant, being careful not to damage the roots.
3. Loosen the Roots: Gently loosen the roots with your fingers. This will encourage them to spread out and establish themselves in the new pot.
4. Plant the Mint: Place the mint plant in the center of the pot and fill in the remaining space with potting mix. Make sure the top of the root ball is level with the soil surface.
5. Water Thoroughly: Water the mint plant thoroughly until water drains out of the drainage holes. This will help settle the soil and hydrate the roots.
Finding the Perfect Spot
Now that our mint is planted, we need to find the perfect spot for it to thrive.
* Sunlight: Mint loves sunlight, so aim for at least 6 hours of direct sunlight per day. A south-facing windowsill is ideal. If you don’t have a sunny windowsill, you can use a grow light.
* Temperature: Mint prefers temperatures between 65°F and 75°F (18°C and 24°C). Avoid placing your mint plant near drafts or heat sources.
* Humidity: Mint likes humidity, so you might want to mist it occasionally, especially during dry winter months. You can also place a tray of water near the plant to increase humidity.
Caring for Your Indoor Mint
Now comes the fun part – taking care of your mint plant! Here’s what you need to know:
1. Watering: Water your mint plant when the top inch of soil feels dry to the touch. Avoid overwatering, as this can lead to root rot. Make sure the pot has good drainage.
2. Fertilizing: Feed your mint plant with a balanced liquid fertilizer every 2-4 weeks during the growing season (spring and summer). Follow the instructions on the fertilizer label.
3. Pruning: Pruning is essential for keeping your mint plant healthy and productive. Regularly pinch off the top leaves to encourage bushier growth. You can also prune back the stems to control the size of the plant.
4. Pest Control: Keep an eye out for pests like aphids, spider mites, and whiteflies. If you spot any pests, you can try spraying them with insecticidal soap or neem oil.
5. Repotting: Mint is a fast grower, so you might need to repot it into a larger pot every year or two. When repotting, choose a pot that’s slightly larger than the current one and use fresh potting mix.
Harvesting Your Mint
The best part about growing mint indoors is being able to harvest fresh leaves whenever you need them!
1. When to Harvest: You can start harvesting mint leaves as soon as the plant is established and has several sets of leaves.
2. How to Harvest: Use scissors or pruning shears to cut off stems just above a leaf node (the point where a leaf grows out of the stem). This will encourage new growth.
3. How Much to Harvest: Don’t harvest more than one-third of the plant at a time. This will allow the plant to recover and continue growing.
Using Your Fresh Mint
Now that you’ve harvested your fresh mint, it’s time to put it to good use! Here are a few ideas:
* Tea: Steep fresh mint leaves in hot water for a refreshing and soothing tea.
* Cocktails: Muddle fresh mint leaves in cocktails like mojitos and mint juleps.
* Desserts: Add fresh mint leaves to desserts like ice cream, chocolate mousse, and fruit salads.
* Savory Dishes: Use fresh mint leaves in savory dishes like salads, soups, and sauces.
* Garnish: Use fresh mint leaves as a garnish for drinks and dishes.
Troubleshooting
Even with the best care, sometimes things can go wrong. Here are a few common problems you might encounter when growing mint indoors and how to fix them:
* Yellowing Leaves: This could be a sign of overwatering, underwatering, or nutrient deficiency. Check the soil moisture and adjust your watering accordingly. If the soil is dry, water thoroughly. If the soil is soggy, let it dry out before watering again. You can also try fertilizing your mint plant with a balanced liquid fertilizer.
* Leggy Growth: This means your mint plant isn’t getting enough light. Move it to a sunnier location or use a grow light.
* Pests: As mentioned earlier, keep an eye out for pests like aphids, spider mites, and whiteflies. Spray them with insecticidal soap or neem oil.
* Root Rot: This is caused by overwatering and poor drainage. Make sure your pot has drainage holes and avoid overwatering. If you suspect root rot, repot your mint plant into fresh potting mix.
Propagating Your Mint
Mint is incredibly easy to propagate, which means you can easily create new plants from cuttings. Here’s how:
1. Take a Cutting: Use scissors or pruning shears to cut off a stem that’s about 4-6 inches long. Remove the leaves from the bottom inch of the stem.
2. Root the Cutting: Place the cutting in a glass of water, making sure the bottom inch of the stem is submerged. Place the glass in a bright, indirect light.
3. Wait for Roots to Grow: Change the water every few days. After a week or two, you should see roots starting to grow.
4. Plant the Cutting: Once the roots are about an inch long, you can plant the cutting in a pot filled with potting mix. Water thoroughly.
And there you have it! You’ve successfully propagated a new mint plant
Conclusion
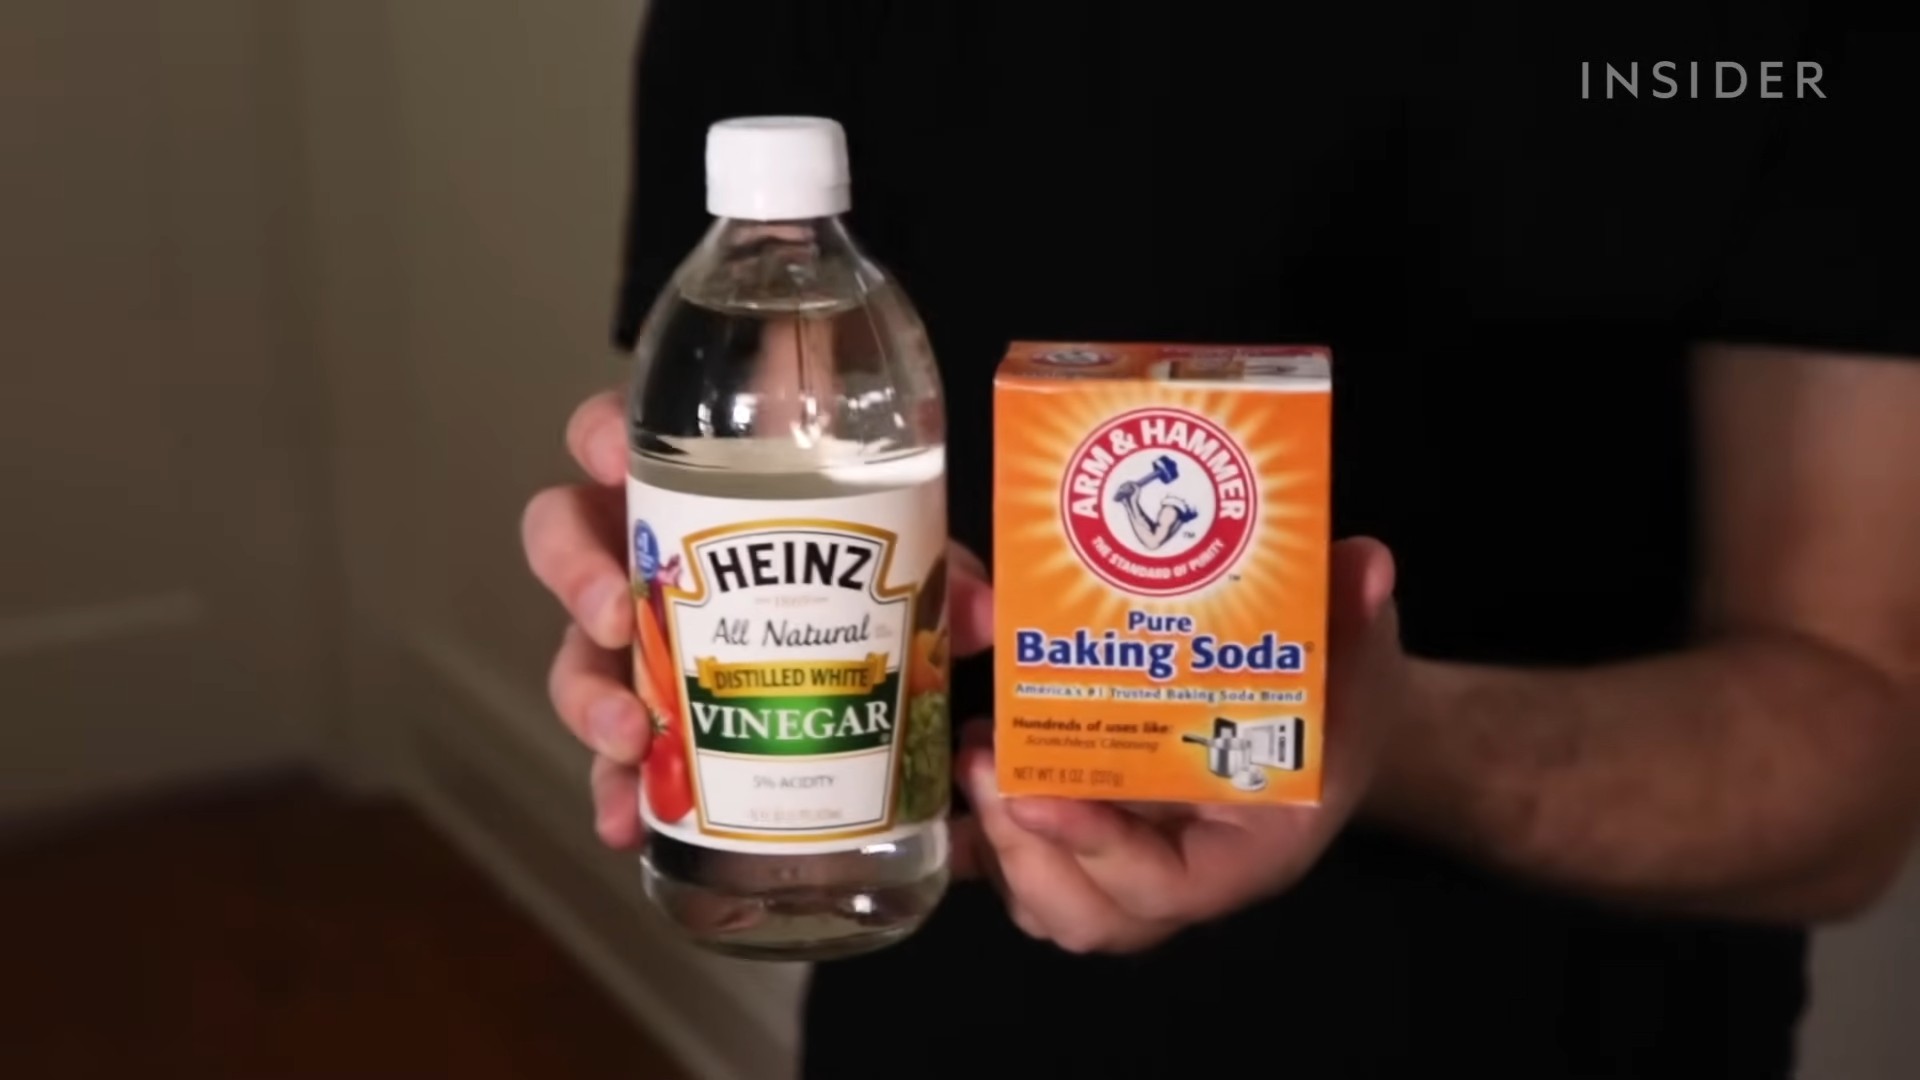
So, there you have it! Ditching those harsh chemicals and embracing the power of baking soda and vinegar for oven cleaning is not just a trend; it’s a revolution in home care. We’ve walked you through a simple, effective, and surprisingly satisfying method to reclaim your oven’s sparkle without the fumes and the worry.
Why is this DIY oven cleaning trick a must-try? Because it’s safe for your family, your pets, and the environment. It’s incredibly cost-effective, utilizing ingredients you likely already have in your pantry. And, most importantly, it works! You’ll be amazed at the grime and grease that this dynamic duo can lift, leaving you with a clean oven ready to bake up your next culinary masterpiece.
But the beauty of DIY lies in its adaptability. Feel free to experiment with variations to suit your specific needs. For particularly stubborn stains, create a thicker paste of baking soda and water and let it sit overnight. Add a few drops of your favorite essential oil, like lemon or tea tree, to the baking soda paste for an extra boost of freshness and antibacterial power. If you’re dealing with a self-cleaning oven, you can still use this method for spot cleaning or to maintain cleanliness between self-cleaning cycles. Just be sure to consult your oven’s manual before applying any cleaning solutions.
Consider using a pumice stone gently on baked-on messes after the baking soda paste has had time to work. This can help lift stubborn residue without scratching the oven surface. Remember to always test in an inconspicuous area first.
Don’t be intimidated by the thought of cleaning your oven. This baking soda and vinegar method is straightforward and forgiving. The key is patience and persistence. Let the baking soda paste do its work, and don’t be afraid to repeat the process if necessary.
We’re confident that once you try this method, you’ll be hooked. You’ll not only have a sparkling clean oven, but you’ll also have the satisfaction of knowing you’ve done it in a safe and sustainable way.
So, what are you waiting for? Gather your baking soda, vinegar, water, and a little elbow grease, and get ready to transform your oven. We’re eager to hear about your experiences! Share your before-and-after photos and your tips and tricks in the comments below. Let’s build a community of clean oven enthusiasts! Let us know if you have any questions. Happy cleaning!
Frequently Asked Questions (FAQ)
Q: Is baking soda and vinegar oven cleaning really as effective as commercial oven cleaners?
A: While commercial oven cleaners often contain harsh chemicals that can quickly dissolve grease and grime, the baking soda and vinegar method is surprisingly effective, especially with a little patience and elbow grease. It might require a bit more scrubbing, particularly for heavily soiled ovens, but the results are comparable, and you avoid the harmful fumes and potential health risks associated with chemical cleaners. The key is to allow the baking soda paste to sit for an extended period, ideally overnight, to loosen the baked-on residue. For particularly stubborn spots, you may need to repeat the process. Many users find that the peace of mind knowing they’re using safe and natural ingredients outweighs the slightly increased effort.
Q: Can I use this method on a self-cleaning oven?
A: Yes, you can use the baking soda and vinegar method on a self-cleaning oven, but with a few precautions. First, always consult your oven’s manual before using any cleaning products, even natural ones. While baking soda and vinegar are generally safe, some oven manufacturers may have specific recommendations or warnings. Second, avoid applying the baking soda paste to any heating elements or sensitive electronic components. Focus on the interior surfaces of the oven, such as the walls, floor, and door. Finally, remember that the self-cleaning cycle is designed to burn off food residue at high temperatures. Using the baking soda and vinegar method can help reduce the amount of residue that needs to be burned off, making the self-cleaning cycle more efficient and potentially extending the life of your oven. This method is also great for spot cleaning between self-cleaning cycles.
Q: How long should I leave the baking soda paste on the oven surfaces?
A: For optimal results, it’s best to leave the baking soda paste on the oven surfaces for at least 12 hours, or even overnight. This allows the baking soda to penetrate and loosen the baked-on grease and grime. If your oven is only lightly soiled, you might get away with a shorter soaking time, such as 4-6 hours. However, for heavily soiled ovens, the longer the paste sits, the easier it will be to scrub away the residue. You can also lightly spray the paste with water periodically to keep it moist and prevent it from drying out completely, which can make it harder to remove.
Q: What kind of vinegar should I use?
A: Plain white vinegar is the best choice for oven cleaning. It’s inexpensive, readily available, and has a high acidity level that helps to dissolve grease and grime. Avoid using other types of vinegar, such as apple cider vinegar or balsamic vinegar, as they may contain sugars or other additives that could leave a sticky residue on your oven surfaces.
Q: How do I remove the baking soda paste after it has soaked?
A: After the baking soda paste has soaked for the recommended time, use a damp sponge or cloth to wipe away as much of the paste as possible. You may need to use a bit of elbow grease to scrub away stubborn residue. For particularly difficult spots, try using a plastic scraper or an old toothbrush to loosen the grime. Once you’ve removed as much of the paste as possible, spray the oven surfaces with white vinegar. The vinegar will react with any remaining baking soda, creating a fizzing action that helps to lift away any remaining residue. Finally, wipe the oven surfaces clean with a damp cloth and dry thoroughly.
Q: Is it safe to use baking soda and vinegar around children and pets?
A: Yes, baking soda and vinegar are generally considered safe to use around children and pets. They are both non-toxic and do not emit harmful fumes. However, it’s always a good idea to keep children and pets away from the oven while you’re cleaning it, just to prevent them from accidentally ingesting the baking soda paste or getting vinegar in their eyes. Also, ensure the oven is thoroughly rinsed and dried before allowing children or pets near it after cleaning.
Q: My oven has a strong odor after cleaning with baking soda and vinegar. How do I get rid of it?
A: If your oven has a strong odor after cleaning with baking soda and vinegar, there are a few things you can try. First, make sure you’ve thoroughly rinsed all the baking soda and vinegar residue from the oven surfaces. Any remaining residue can contribute to the odor. Second, try placing a bowl of vinegar or baking soda in the oven overnight to absorb any lingering odors. You can also try heating the oven to a low temperature (around 200 degrees Fahrenheit) for about an hour with the door slightly ajar. This will help to evaporate any remaining moisture and odors. Finally, you can try placing a few lemon or orange peels in the oven and heating it at a low temperature for about 30 minutes. The citrus peels will release a fresh, clean scent that will help to mask any lingering odors.
Q: Can I use this method to clean my oven door glass?
A: Yes, the baking soda and vinegar method is excellent for cleaning oven door glass. The baked-on grease and grime on the glass can be particularly stubborn, but the baking soda paste will help to loosen it. Apply the paste to the glass, let it sit for several hours or overnight, and then scrub it away with a damp sponge or cloth. You may need to use a plastic scraper to remove any stubborn residue. Finish by wiping the glass clean with a vinegar-water solution for a streak-free shine.
Q: What if I don’t have baking soda? Can I use something else?
A: While baking soda is the key ingredient in this cleaning method due to its mild abrasive and alkaline properties, you could try using cream of tartar as a substitute, although it may not be as effective. Mix it with water to form a paste and follow the same steps as with baking soda. However, for optimal results, baking soda is highly recommended.
Q: How often should I clean my oven using this method?
A: The frequency of cleaning depends on how often you use your oven and how messy it gets. For most households, cleaning the oven every 3-6 months is sufficient. However, if you frequently cook messy dishes or notice a buildup of grease and grime, you may need to clean it more often. Regular spot cleaning can also help to prevent buildup and make the cleaning process easier.

Leave a Comment