

Bucket mushroom growing might sound like something out of a science fiction movie, but trust me, it’s a surprisingly simple and rewarding DIY project you can tackle right in your own backyard! Forget those expensive gourmet mushrooms at the grocery store; imagine harvesting your own fresh, delicious fungi with minimal effort and maximum satisfaction.
Mushrooms have been revered for centuries across various cultures, not just for their culinary uses but also for their medicinal properties and even spiritual significance. From ancient Chinese emperors seeking the “elixir of life” in rare mushrooms to modern-day mycologists exploring their incredible potential, the fascination with fungi is deeply rooted in human history. Now, you can participate in this fascinating world with a simple bucket!
Why should you try bucket mushroom growing? Well, for starters, it’s incredibly space-efficient, perfect for apartment dwellers or anyone with limited garden space. Plus, it’s a fantastic way to recycle old buckets and other materials, making it an eco-friendly project. But most importantly, it’s about the joy of nurturing something from start to finish and enjoying the fruits (or should I say, fungi?) of your labor. I’m going to guide you through the entire process, from selecting the right mushroom species to harvesting your bountiful crop. Get ready to embark on a fun and fulfilling journey into the wonderful world of home-grown mushrooms!
Grow Your Own Gourmet Mushrooms in a Bucket: A Beginner’s Guide
Hey there, fellow mushroom enthusiasts! Ever dreamt of harvesting your own delicious, fresh mushrooms right in your backyard (or even your apartment)? Well, I’m here to tell you it’s totally achievable, and surprisingly easy, with this simple bucket mushroom growing method. Forget expensive kits and complicated setups – all you need is a bucket, some substrate, mushroom spawn, and a little patience. Let’s dive in!
Choosing Your Mushroom and Substrate
Before we get our hands dirty, let’s talk about the stars of the show: the mushrooms and their food source.
* Mushroom Selection: Oyster mushrooms are the absolute best choice for beginners. They’re fast-growing, relatively forgiving, and produce a generous yield. Plus, they’re incredibly versatile in the kitchen! You can find different varieties like Blue Oyster, Pink Oyster, or Pearl Oyster, each with its own unique flavor profile and appearance.
* Substrate Options: The substrate is what the mushrooms will feed on. Straw is a fantastic and readily available option. You can use wheat straw, oat straw, or even rice straw. Just make sure it’s clean and free from mold. Another great option is hardwood sawdust, especially for varieties like Shiitake. You can often find this at local woodworking shops. I’ve even used coffee grounds mixed with straw with great success!
Preparing the Substrate
This is a crucial step, as it sterilizes the substrate and makes it a welcoming environment for your mushroom spawn.
* Pasteurization (for Straw): Pasteurization kills off competing organisms that could hinder mushroom growth.
1. Chop the straw into smaller pieces (around 2-4 inches long) for easier handling and better colonization.
2. Fill a large pot or container with water and bring it to a temperature of 160-180°F (71-82°C). A candy thermometer is your best friend here!
3. Submerge the chopped straw in the hot water and let it soak for 60-90 minutes. This ensures thorough pasteurization.
4. Drain the straw well. You want it to be moist but not dripping wet. Think of a wrung-out sponge.
* Sterilization (for Sawdust): Sawdust requires a more intense sterilization process to eliminate contaminants.
1. Mix the sawdust with water until it’s about 60% moisture content. You should be able to squeeze a handful and have a few drops of water come out.
2. Pack the moistened sawdust into autoclavable bags (or oven-safe bags if you’re careful).
3. Sterilize in a pressure cooker at 15 PSI for 90 minutes. This is the most effective method.
4. Alternatively, you can bake the sawdust in an oven at 250°F (121°C) for 2-3 hours. Make sure the bags are sealed tightly to prevent drying out.
5. Let the substrate cool completely before moving on to the next step.
Preparing the Bucket
Now, let’s get our bucket ready for its new role as a mushroom farm!
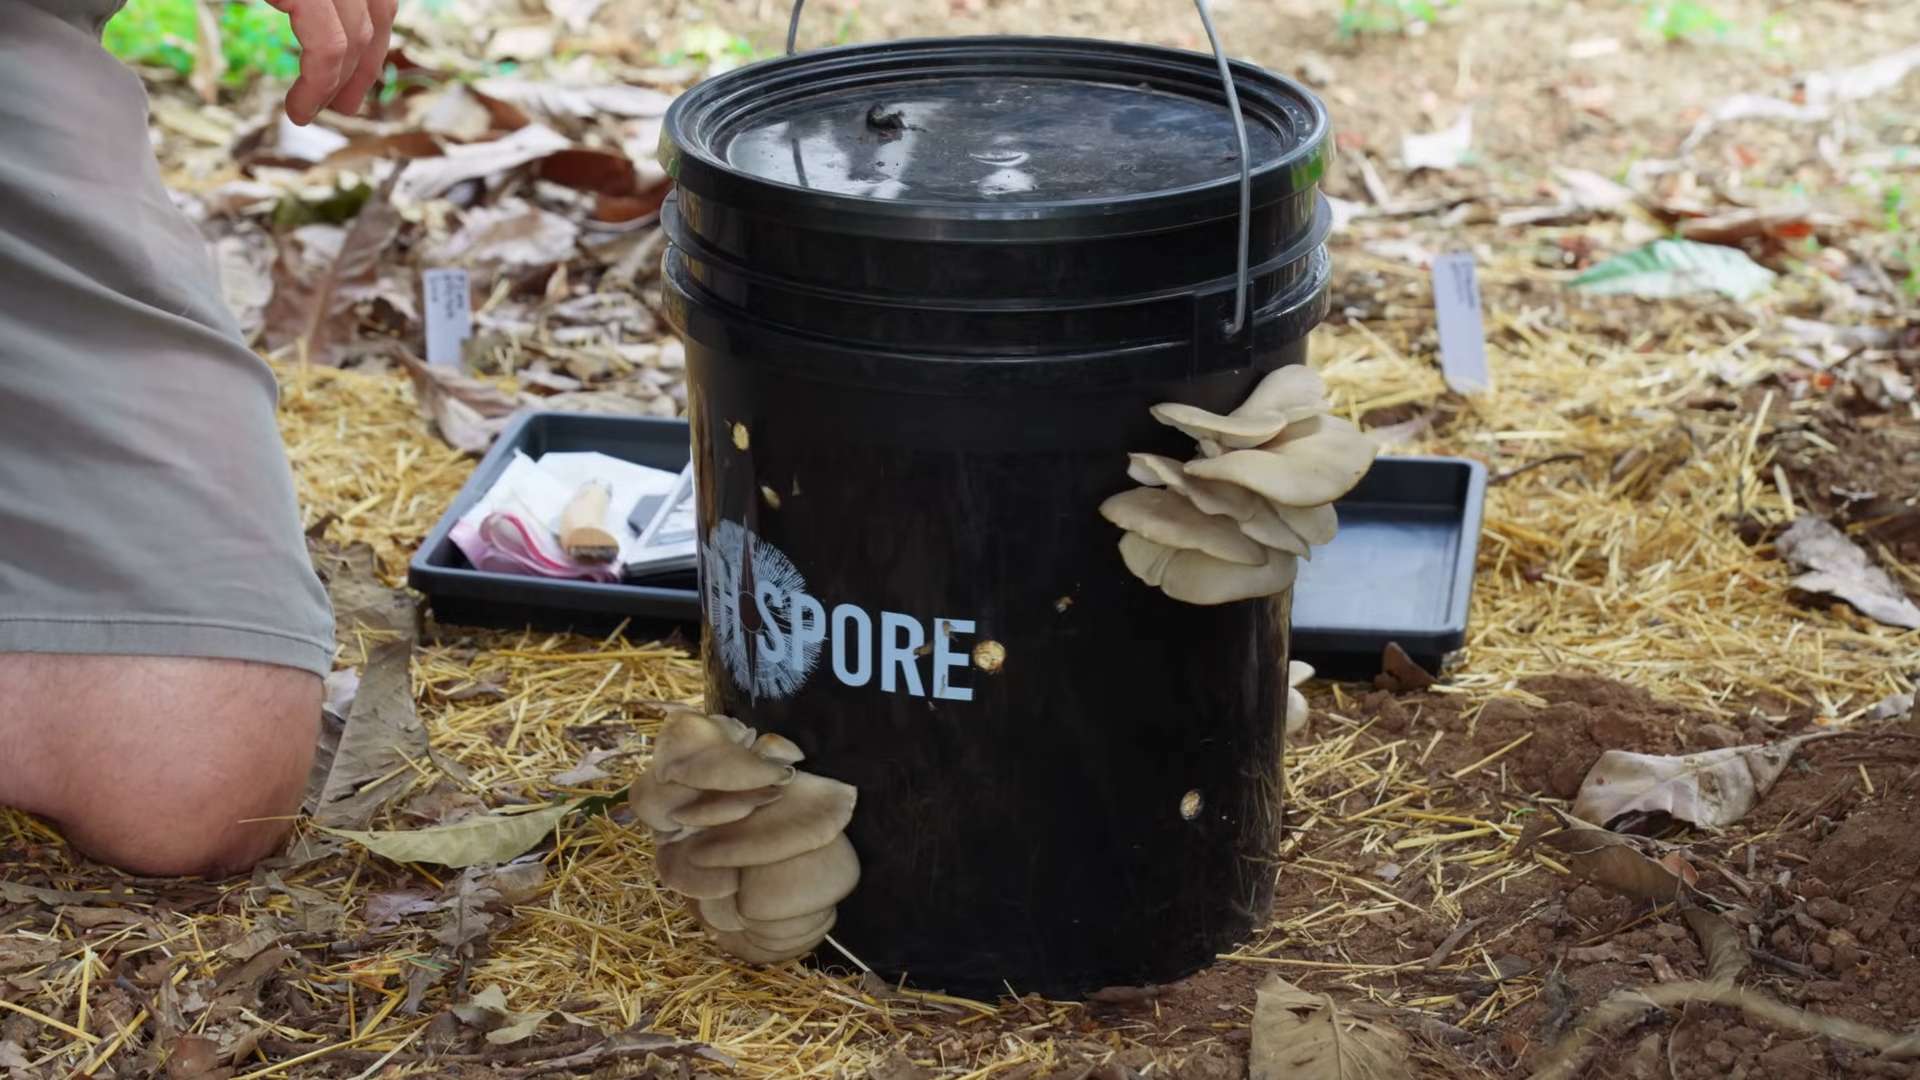
* Choosing the Right Bucket: A food-grade plastic bucket (5-gallon is a good size) is ideal. Make sure it’s clean and free from any chemicals.
* Drilling Holes: This is where the mushrooms will eventually fruit from.
1. Drill holes around the sides of the bucket, spacing them about 4-6 inches apart. I usually make 6-8 holes per bucket.
2. The holes should be about 1/2 inch to 1 inch in diameter. This provides enough space for the mushrooms to emerge.
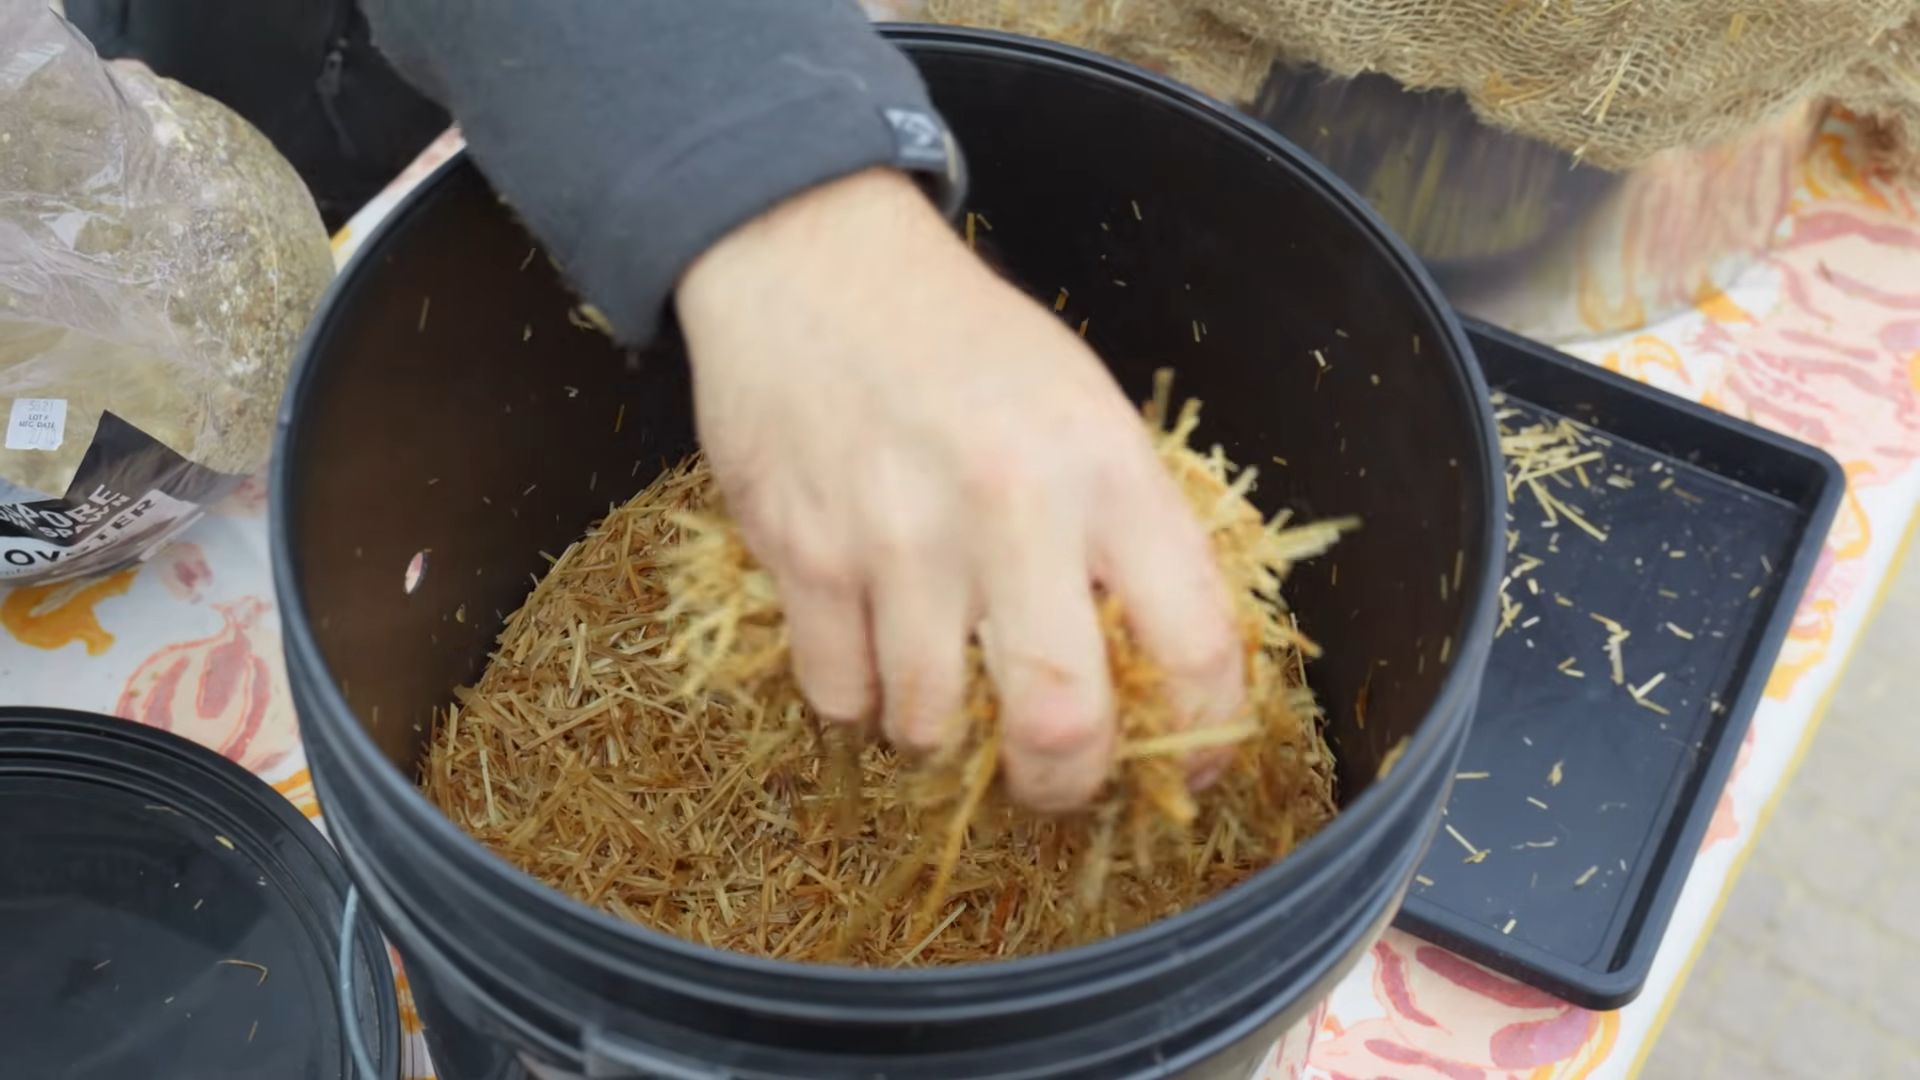
Inoculating the Substrate
This is the exciting part where we introduce the mushroom spawn to the substrate!
* Layering Technique:
1. Start with a layer of pasteurized/sterilized substrate at the bottom of the bucket (about 2-3 inches).
2. Sprinkle a generous layer of mushroom spawn over the substrate. Aim for about 1/2 inch to 1 inch of spawn per layer.
3. Repeat the layering process – substrate, then spawn – until the bucket is almost full, leaving a few inches of space at the top.
4. Finish with a final layer of substrate on top.
* Mixing Technique (Alternative):
1. In a clean container, thoroughly mix the pasteurized/sterilized substrate with the mushroom spawn. A good ratio is about 1 part spawn to 5-10 parts substrate.
2. Pack the inoculated substrate into the bucket, leaving a few inches of space at the top.
* Packing the Bucket: Gently pack the substrate down as you layer or mix. This helps to eliminate air pockets and encourages colonization.
Incubation
This is the waiting game, but it’s crucial for the mushrooms to establish themselves.
* Finding the Right Spot:
1. Place the inoculated bucket in a dark, humid, and well-ventilated area. A basement, closet, or garage works well.
2. The ideal temperature for oyster mushroom colonization is between 65-75°F (18-24°C).
* Maintaining Humidity:
1. Humidity is key! You want to keep the substrate moist but not soaking wet.
2. You can mist the inside of the bucket with water every day or two, or cover the top of the bucket with a damp cloth or plastic wrap to retain moisture.
3. Avoid direct sunlight, as it can dry out the substrate and inhibit growth.
* Monitoring Colonization:
1. Over the next few weeks, you’ll notice white, fuzzy mycelium (the vegetative part of the mushroom) spreading throughout the substrate.
2. This is a good sign! It means the mushroom spawn is actively colonizing the substrate.
3. The colonization process typically takes 2-4 weeks, depending on the mushroom variety and environmental conditions.
Fruiting
The moment we’ve all been waiting for – mushroom time!
* Triggering Fruiting:
1. Once the substrate is fully colonized (completely covered in white mycelium), it’s time to trigger fruiting.
2. Move the bucket to a location with more light (indirect sunlight is best) and fresh air.
3. Lower the temperature slightly, if possible (around 60-70°F or 15-21°C).
4. Increase humidity even further. Mist the bucket and the surrounding area frequently.
* Providing Light and Air:
1. Mushrooms need light to develop properly. Indirect sunlight or artificial light (like a fluorescent bulb) is sufficient.
2. Fresh air is also essential for fruiting. Make sure the area is well-ventilated.
* Harvesting Your Mushrooms:
1. You’ll start to see tiny mushroom “pins” forming around the holes in the bucket.
2. These pins will rapidly grow into mature mushrooms within a few days.
3. Harvest the mushrooms when the caps are fully formed but before they start to drop spores (you’ll see a powdery substance on the surrounding surfaces).
4. To harvest, gently twist and pull the mushrooms from the bucket.
5. Don’t leave any mushroom stems behind, as they can rot and attract pests.
Post-Harvest Care and Subsequent Flushes
The fun doesn’t stop after the first harvest! You can often get multiple flushes of mushrooms from the same bucket.
* Resting Period:
1. After harvesting, give the bucket a resting period of about a week or two.
2. During this time, continue to mist the bucket and maintain humidity.
* Rehydrating the Substrate:
1. To encourage subsequent flushes, you may need to rehydrate the substrate.
2. You can do this by soaking the bucket in a tub of cold water for 12-24 hours.
3. Drain the bucket well before returning it to its fruiting location.
* Repeat the Fruiting Process:
1. After rehydrating, repeat the fruiting process – provide light, fresh air, and humidity.
2. You can typically get 2-3 flushes of mushrooms from a single bucket.
* Composting the Spent Substrate:
1. Once the substrate stops producing mushrooms, you can compost it.
2. The spent substrate is a great addition to your garden, as it’s rich in nutrients.
Troubleshooting
Even with the best intentions, things can sometimes go wrong. Here are a few common issues and how to address them:
* Contamination: Green or black mold indicates contamination. Unfortunately, there’s not much
Conclusion
So, there you have it! Growing your own mushrooms in a bucket is not just a fun project; it’s a gateway to fresh, delicious, and sustainable food right in your own home. We’ve walked you through the process, highlighting the simplicity and affordability of this method. Forget those expensive store-bought mushrooms that have traveled miles to reach your plate. With this DIY trick, you can cultivate a constant supply of flavorful fungi, knowing exactly where they came from and what went into growing them.
The beauty of this bucket mushroom growing method lies in its adaptability. Feel free to experiment with different mushroom varieties. Oyster mushrooms are a fantastic starting point due to their resilience and rapid growth, but don’t be afraid to branch out and try shiitake, lion’s mane, or even wine cap mushrooms once you’ve gained some experience. Each variety offers a unique flavor profile and texture, adding exciting dimensions to your culinary creations.
Consider the substrate as well. While we’ve focused on straw, you can also incorporate other organic materials like coffee grounds, cardboard, or even hardwood sawdust, depending on the type of mushroom you’re cultivating. Remember to research the specific needs of your chosen mushroom variety to ensure optimal growth conditions.
Beyond the culinary benefits, growing mushrooms in a bucket is an incredibly rewarding experience. It’s a chance to connect with nature, learn about the fascinating world of fungi, and reduce your environmental footprint. You’re essentially recycling organic waste and transforming it into a valuable food source.
This DIY bucket mushroom growing method is a must-try for anyone interested in sustainable living, gardening, or simply enjoying fresh, homegrown food. It’s a project that’s accessible to beginners, yet offers endless opportunities for experimentation and learning.
We encourage you to take the plunge and embark on your own mushroom-growing adventure. Don’t be intimidated by the process; it’s much simpler than you might think. And most importantly, don’t be afraid to make mistakes. Every failure is a learning opportunity that will bring you closer to success.
Once you’ve harvested your first batch of homegrown mushrooms, we’d love to hear about your experience! Share your photos, tips, and challenges in the comments below. Let’s build a community of mushroom enthusiasts and inspire others to discover the joys of bucket mushroom growing. Your insights could be invaluable to someone just starting out. So, get your bucket ready, gather your supplies, and prepare to be amazed by the magic of mushrooms!
Frequently Asked Questions (FAQ)
What type of bucket should I use?
Ideally, you should use a food-grade plastic bucket. These are typically marked with a symbol indicating they are safe for contact with food. A 5-gallon bucket is a good size to start with, but you can use larger or smaller buckets depending on your space and desired yield. Avoid using buckets that have previously contained harsh chemicals, as these could contaminate your mushrooms. Thoroughly clean and sanitize the bucket before use, regardless of its previous contents.
What is the best substrate for growing mushrooms in a bucket?
The best substrate depends on the type of mushroom you’re growing. Oyster mushrooms thrive on straw, coffee grounds, and cardboard. Shiitake mushrooms prefer hardwood sawdust. Wine cap mushrooms can be grown on wood chips and straw. Research the specific needs of your chosen mushroom variety to determine the most suitable substrate. Ensure the substrate is properly pasteurized or sterilized to eliminate competing organisms.
How do I pasteurize or sterilize the substrate?
Pasteurization involves heating the substrate to a temperature that kills most harmful microorganisms without completely sterilizing it. This can be done by soaking the substrate in hot water (around 160-180°F) for an hour or steaming it for a similar duration. Sterilization involves heating the substrate to a higher temperature (typically in an autoclave or pressure cooker) to kill all microorganisms. This is generally recommended for more demanding mushroom varieties. For straw, a simple hot water pasteurization is usually sufficient for oyster mushrooms.
How much spawn do I need?
A general guideline is to use about 5-10% spawn by weight of the substrate. For example, if you’re using 10 pounds of straw, you would need 0.5 to 1 pound of spawn. Using more spawn can speed up colonization and reduce the risk of contamination.
Where should I place the bucket while the mushrooms are growing?
The ideal location depends on the mushroom variety, but generally, you’ll want a cool, dark, and humid environment. A basement, garage, or shed can work well. Avoid direct sunlight, as it can dry out the substrate and inhibit mushroom growth. Maintain a temperature range suitable for your chosen mushroom variety. Oyster mushrooms typically prefer temperatures between 60-75°F.
How often should I water the mushrooms?
Mushrooms need a humid environment to thrive. Mist the inside of the bucket and the mushrooms themselves with water regularly, especially when you see the first pinheads (baby mushrooms) forming. Avoid overwatering, as this can lead to mold growth. The substrate should be moist but not soggy.
How long does it take for mushrooms to grow?
The time it takes for mushrooms to grow depends on the variety, temperature, and humidity. Oyster mushrooms typically start pinning (forming baby mushrooms) within a week or two of inoculation and can be harvested within a few days after that. Shiitake mushrooms can take several months to fruit.
How do I harvest the mushrooms?
Harvest mushrooms when the caps are fully formed but before they start to drop spores. Gently twist or cut the mushrooms off at the base of the stem. Avoid pulling them out, as this can damage the mycelium and reduce future yields.
Can I get multiple flushes of mushrooms from the same bucket?
Yes, you can typically get multiple flushes (harvests) of mushrooms from the same bucket. After harvesting the first flush, allow the substrate to rest for a week or two. Mist the bucket regularly to maintain humidity. A second or even third flush of mushrooms should appear. The subsequent flushes may be smaller than the first.
What if my bucket gets contaminated with mold?
Contamination is a common issue in mushroom cultivation. If you see mold growing in your bucket, it’s important to address it quickly. Small patches of mold can sometimes be removed, but if the contamination is widespread, it’s best to discard the entire bucket to prevent the mold from spreading to other areas. Proper pasteurization or sterilization of the substrate is crucial to minimize the risk of contamination.
Is bucket mushroom growing safe?
Yes, bucket mushroom growing is generally safe, but it’s important to take precautions. Always use food-grade materials and thoroughly clean and sanitize your equipment. Avoid growing mushrooms in areas where they could be exposed to harmful chemicals or pollutants. Properly identify the mushroom species you are growing to ensure they are edible. If you are unsure about the safety of a particular mushroom, it’s best to err on the side of caution and discard it.
Leave a Comment