

Grow Bag Cantaloupe Hack: Ever dreamt of biting into a juicy, homegrown cantaloupe, bursting with flavor, but thought you didn’t have the space? I get it! Many of us are limited by small yards, balconies, or even just a sunny windowsill. But what if I told you that you could cultivate these sweet melons even in the most compact spaces? That’s where the magic of grow bags comes in, and I’m here to share my favorite cantaloupe hack with you!
For centuries, humans have cultivated melons, with evidence suggesting their origins trace back to Africa and Asia. These fruits were prized for their sweetness and refreshing qualities, becoming a symbol of summer abundance in many cultures. Now, you can continue this tradition, even without a sprawling garden.
This DIY grow bag cantaloupe hack is a game-changer because it allows you to control the soil quality, drainage, and sunlight exposure, all crucial for growing healthy and delicious cantaloupes. Plus, it’s incredibly budget-friendly and a fun weekend project! Forget store-bought melons that lack that authentic, sun-ripened taste. With this simple trick, you’ll be enjoying the sweet rewards of your own labor in no time. Let’s dive in and unlock the secrets to growing cantaloupes in grow bags!
Grow Bag Cantaloupe: My Secret to Sweet Success!
Okay, friends, let me tell you about my absolute favorite gardening hack: growing cantaloupe in grow bags! I know, I know, it sounds a little crazy. Cantaloupes are big, sprawling plants, right? But trust me, with a few tweaks and a little TLC, you can harvest delicious, homegrown cantaloupe even if you’re short on space. I’ve been doing this for years, and I’m excited to share my secrets with you.
Why Grow Bags?
Before we dive into the how-to, let’s talk about why grow bags are perfect for cantaloupe.
* Excellent Drainage: Cantaloupe roots hate sitting in soggy soil. Grow bags provide fantastic drainage, preventing root rot and other moisture-related problems.
* Improved Aeration: The breathable fabric of grow bags allows for better air circulation around the roots, promoting healthy growth.
* Temperature Control: Grow bags warm up faster in the spring, giving your cantaloupe a head start. They also help regulate soil temperature during hot summer months.
* Portability: Need to move your cantaloupe to a sunnier spot? No problem! Grow bags are easy to move around.
* Space Saving: Even if you only have a patio or balcony, you can still enjoy homegrown cantaloupe.
Choosing the Right Grow Bag and Variety
This is crucial! Not all grow bags and cantaloupe varieties are created equal.
* Grow Bag Size: I recommend a minimum of 20-gallon grow bag for each cantaloupe plant. A 25 or 30-gallon bag is even better, giving the roots plenty of room to spread out.
* Cantaloupe Variety: Opt for smaller, bush-type cantaloupe varieties. These are more compact and better suited for container gardening. Some of my favorites include:
* Minnesota Midget: A classic choice, known for its small size and sweet flavor.
* Bush Star: Another compact variety that produces delicious, early-maturing fruit.
* Sugar Baby: While technically a watermelon, it’s small enough to grow in a large grow bag and offers similar care requirements.
* Jenny Lind: A unique, turban-shaped cantaloupe with a distinctive flavor.
Getting Started: What You’ll Need
Here’s a list of everything you’ll need to embark on your cantaloupe-growing adventure:
* Grow bag (20-30 gallon)
* High-quality potting mix (specifically for vegetables)
* Cantaloupe seeds or seedlings
* Slow-release fertilizer (formulated for vegetables)
* Watering can or hose
* Trellis or support system (optional, but recommended)
* Gardening gloves
* Hand trowel
* Mulch (straw, wood chips, or shredded leaves)
Step-by-Step Guide: Planting Your Cantaloupe
Alright, let’s get our hands dirty! Here’s how I plant my cantaloupe in grow bags:
1. Prepare the Grow Bag: Unfold your grow bag and place it in its final location. Once it’s filled with soil, it will be heavy, so it’s best to move it before planting.
2. Fill with Potting Mix: Fill the grow bag with high-quality potting mix, leaving about 2-3 inches of space at the top. Don’t use garden soil, as it can compact and doesn’t drain well in containers.
3. Add Fertilizer: Mix in a slow-release fertilizer according to the package directions. This will provide your cantaloupe with essential nutrients throughout the growing season.
4. Planting Seeds (Optional): If you’re starting from seed, sow 2-3 seeds per grow bag, about 1 inch deep. Water gently and keep the soil consistently moist. Once the seedlings emerge, thin them to one strong plant per bag.
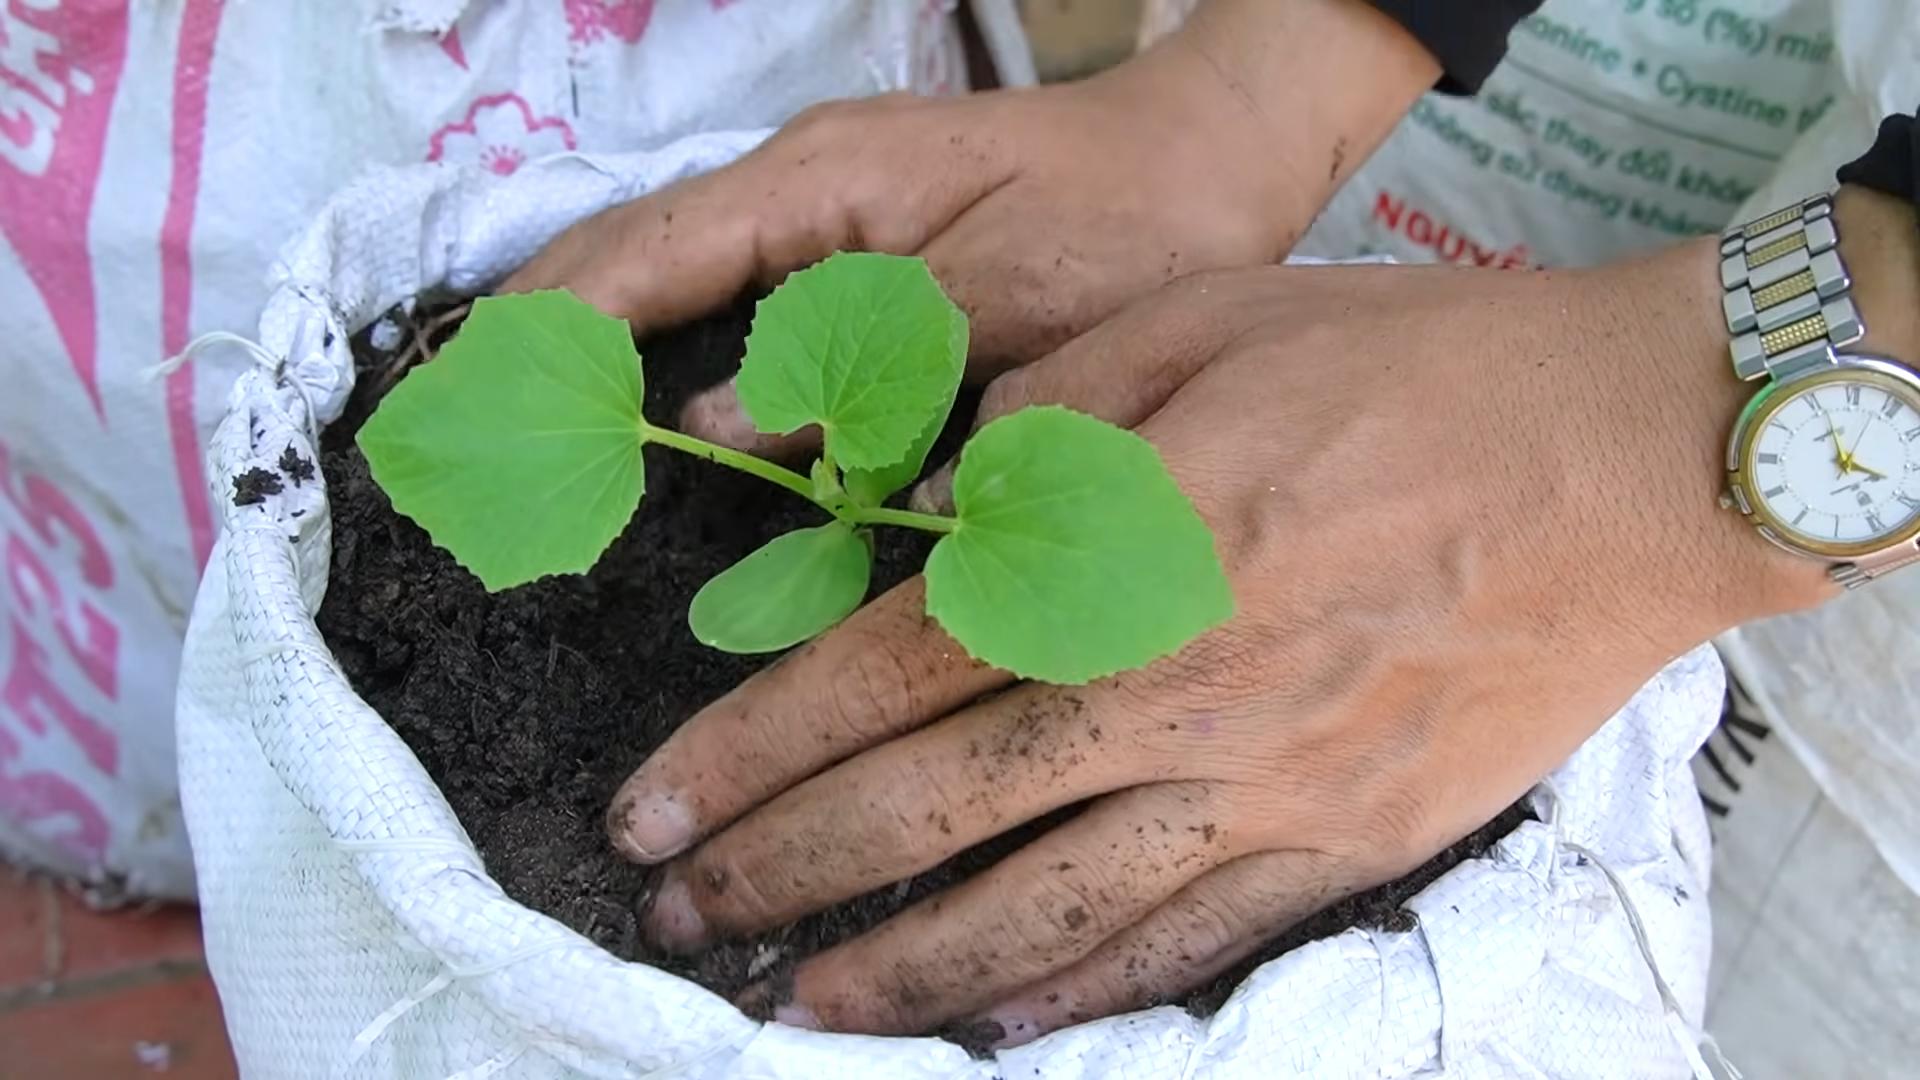
5. Planting Seedlings: If you’re using seedlings, gently remove them from their containers and loosen the roots slightly. Dig a hole in the potting mix large enough to accommodate the root ball.
6. Place Seedling in Hole: Place the seedling in the hole, ensuring that the top of the root ball is level with the surrounding soil.
7. Backfill with Soil: Fill in the hole with potting mix and gently firm the soil around the plant.
8. Water Thoroughly: Water the newly planted cantaloupe thoroughly, until water drains out of the bottom of the grow bag.
9. Add Mulch: Apply a layer of mulch around the base of the plant to help retain moisture, suppress weeds, and regulate soil temperature.
Caring for Your Cantaloupe: The Key to a Bountiful Harvest
Now that your cantaloupe is planted, it’s time to provide it with the care it needs to thrive.
1. Watering: Cantaloupe needs consistent moisture, especially during hot weather. Water deeply whenever the top inch of soil feels dry to the touch. Avoid overhead watering, as this can lead to fungal diseases. I prefer to water at the base of the plant.
2. Fertilizing: Even with slow-release fertilizer, your cantaloupe will benefit from supplemental feeding. Every 2-3 weeks, feed with a liquid fertilizer that’s high in phosphorus and potassium. These nutrients are essential for fruit development.
3. Sunlight: Cantaloupe needs at least 6-8 hours of direct sunlight per day. Choose a sunny location for your grow bag.
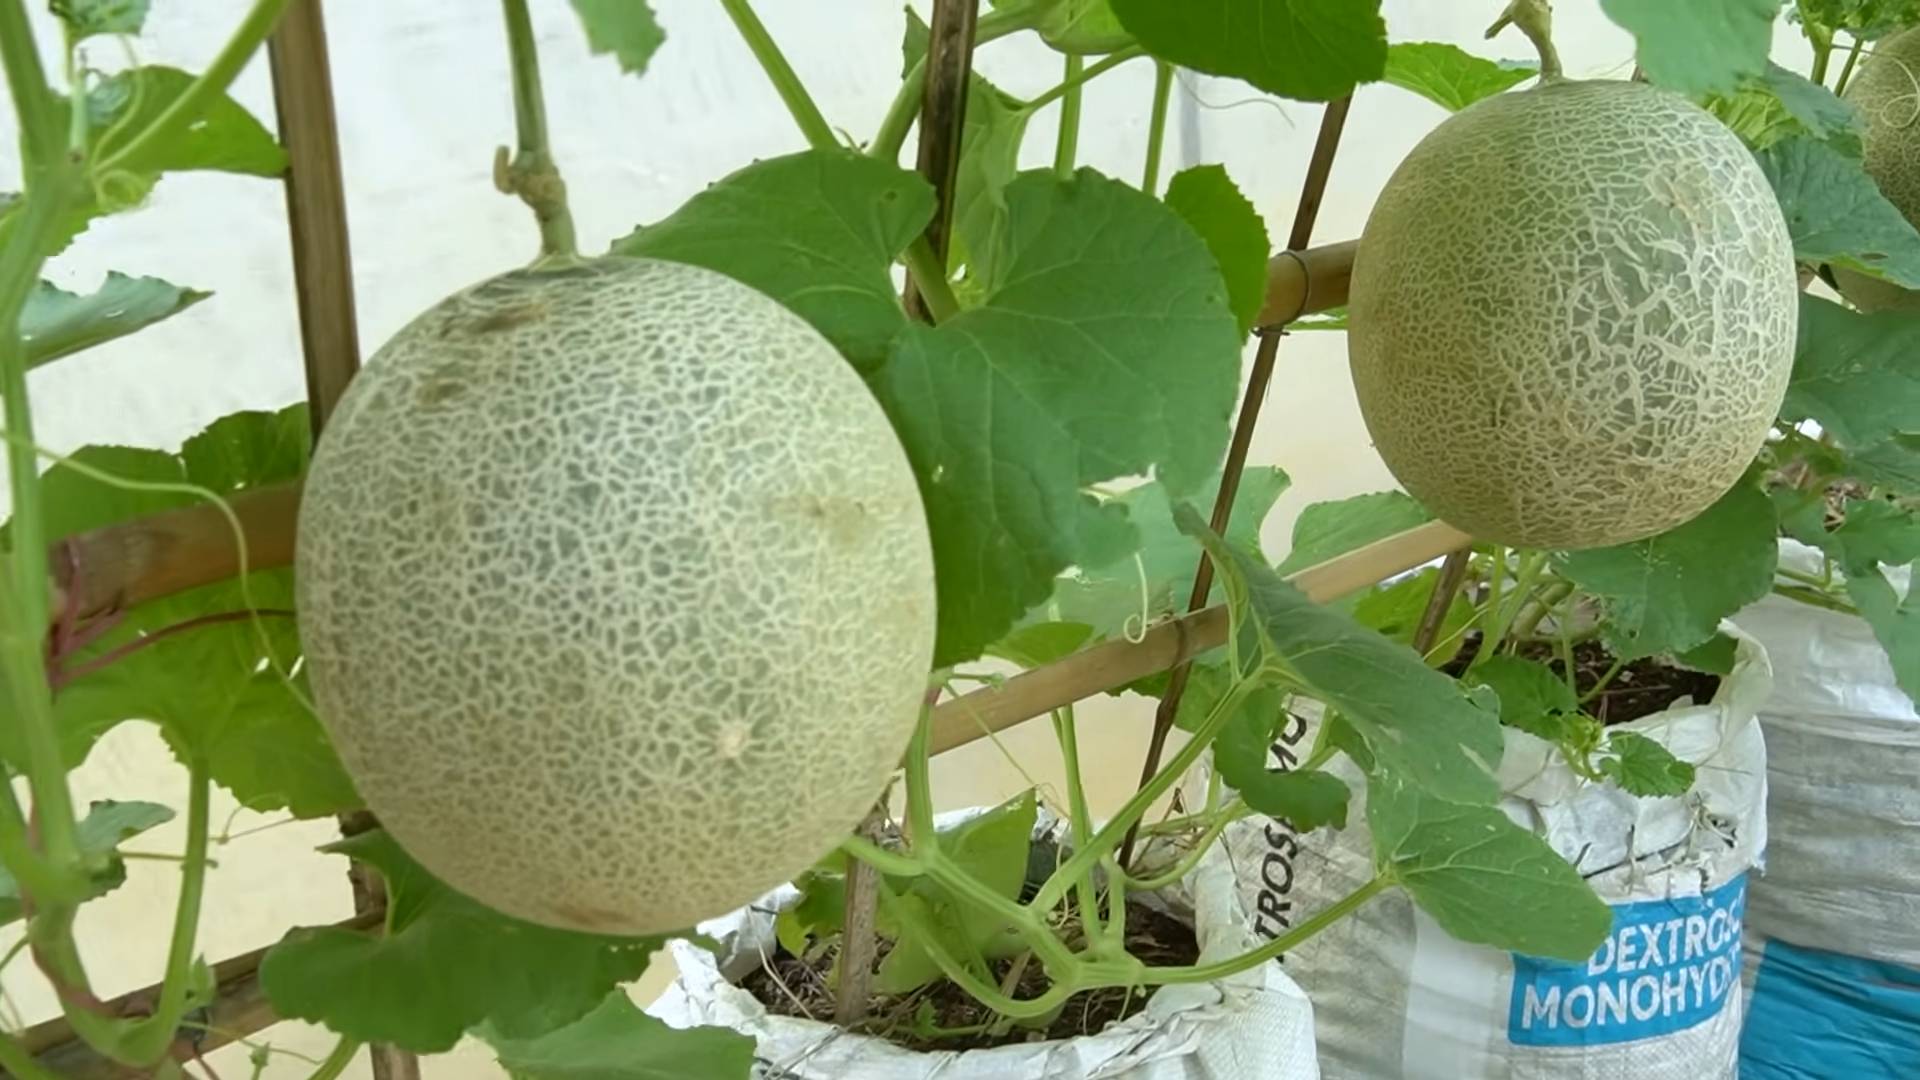
4. Trellising (Highly Recommended): As your cantaloupe vine grows, it will need support. A trellis or other support system will help keep the fruit off the ground, preventing rot and making harvesting easier. I use a simple A-frame trellis made from bamboo stakes and twine. You can also use a tomato cage for smaller varieties.
5. Pruning: Pruning can help improve air circulation and encourage fruit production. Remove any yellowing or damaged leaves. You can also pinch off the tips of the vines to encourage branching.
6. Pollination: Cantaloupe relies on bees and other pollinators to produce fruit. If you’re not seeing much bee activity in your garden, you may need to hand-pollinate the flowers. To do this, use a small paintbrush to transfer pollen from the male flowers (those with a thin stem) to the female flowers (those with a small fruit behind the flower).
7. Pest and Disease Control: Keep an eye out for common cantaloupe pests, such as aphids, squash bugs, and cucumber beetles. Treat infestations promptly with insecticidal soap or neem oil. Prevent fungal diseases by providing good air circulation and avoiding overhead watering.
Harvesting Your Cantaloupe: The Sweet Reward
The moment you’ve been waiting for! Knowing when to harvest cantaloupe can be tricky, but here are a few signs to look for:
* Color Change: The skin of the cantaloupe will change from green to a tan or yellowish color.
* Aroma: The cantaloupe will have a sweet, musky aroma.
* Stem Slip: The stem where the cantaloupe attaches to the vine will begin to crack and separate easily. This is called “slipping.”
* Sound: When you tap the cantaloupe, it should sound hollow.
To harvest, gently twist the cantaloupe from the vine. If it’s ripe, it should come off easily. If it doesn’t, it’s not quite ready.
Troubleshooting: Common Problems and Solutions
Even with the best care, you may encounter some challenges along the way. Here are a few common problems and how to fix them:
* Yellowing Leaves: This could be a sign of overwatering, underwatering, nutrient deficiency, or disease. Check the soil moisture, fertilize if needed, and inspect the leaves for signs of pests or disease.
* Lack of Fruit: This could be due to poor pollination, insufficient sunlight, or nutrient deficiency. Hand-pollinate the flowers, ensure the plant is getting enough sunlight, and fertilize with a balanced fertilizer.
* Fruit Rot: This is often caused by fruit sitting on damp soil. Trellising the plant and mulching around the base can help prevent fruit rot.
* Pest Infestations: Treat pest infestations promptly with insecticidal soap or neem oil.
Enjoying Your Homegrown Cantaloupe
Congratulations! You’ve successfully grown cantaloupe in a grow bag. Now it’s time to enjoy the fruits (literally!) of your labor. Freshly harvested cantaloupe is incredibly sweet and flavorful. Eat it plain, add it to fruit salads, or blend it into smoothies. The possibilities are endless! I love to grill cantaloupe slices for a smoky, caramelized treat.
Growing cantaloupe in grow bags is a rewarding experience that allows you to
Conclusion
So, there you have it! This Grow Bag Cantaloupe Hack isn’t just a gardening shortcut; it’s a game-changer for anyone who dreams of harvesting sweet, juicy cantaloupes, even with limited space or less-than-ideal soil conditions. We’ve walked you through the simple steps, highlighting how this method maximizes sunlight exposure, improves drainage, and ultimately leads to a more bountiful and delicious harvest.
Why is this a must-try? Because it democratizes cantaloupe cultivation! No longer is this delectable melon reserved for those with sprawling gardens and expert gardening skills. Grow bags offer a controlled environment, allowing you to nurture your cantaloupe plants with precision. The improved drainage prevents root rot, a common culprit behind disappointing harvests. And the concentrated sunlight exposure, especially when you strategically position your grow bags, translates to sweeter, more flavorful fruit.
But don’t stop there! Feel free to experiment with different cantaloupe varieties. While we’ve focused on classic cantaloupes, consider trying smaller, personal-sized varieties like ‘Sugar Cube’ or ‘Minnesota Midget’ for even better success in grow bags. You can also explore companion planting. Marigolds, for example, are known to deter pests and can be planted alongside your cantaloupes in the same grow bag. Basil is another excellent choice, believed to improve the flavor of the fruit.
Another variation to consider is the type of trellis you use. While a simple tomato cage works well for smaller plants, you might need a sturdier trellis system as your cantaloupes grow larger. A-frame trellises or even a repurposed pallet can provide ample support. Just ensure the trellis is strong enough to bear the weight of the developing melons.
Don’t be afraid to get creative with your grow bag setup. If you live in a particularly hot climate, consider using lighter-colored grow bags to reflect sunlight and prevent the soil from overheating. You can also add a layer of mulch to the top of the soil to help retain moisture and suppress weeds.
The key to success with this Grow Bag Cantaloupe Hack is consistent monitoring and care. Regularly check the soil moisture, fertilize as needed, and keep an eye out for pests or diseases. With a little attention, you’ll be rewarded with a harvest of homegrown cantaloupes that are far superior to anything you can buy in the store.
We are confident that this method will transform your cantaloupe-growing experience. So, grab your grow bags, select your favorite cantaloupe seeds, and get ready to enjoy the fruits (literally!) of your labor.
We’re eager to hear about your experiences! Share your photos, tips, and triumphs with us in the comments below. Let’s build a community of grow bag cantaloupe enthusiasts and learn from each other’s successes. Happy gardening!
Frequently Asked Questions
What size grow bag is best for cantaloupes?
A 15-20 gallon grow bag is generally recommended for growing cantaloupes. This size provides ample space for the root system to develop and allows for sufficient soil volume to retain moisture and nutrients. While you might be tempted to use a smaller bag, remember that cantaloupes are vigorous growers and need plenty of room to thrive. A larger bag also provides better stability, preventing the plant from tipping over as the melons grow larger.
How often should I water cantaloupes in grow bags?
Watering frequency depends on several factors, including the weather, the size of the plant, and the type of grow bag you’re using. Generally, you should water your cantaloupes deeply whenever the top inch of soil feels dry to the touch. During hot, sunny weather, this may mean watering daily, or even twice a day. In cooler, cloudier weather, you may only need to water every other day. The best way to determine if your cantaloupe needs water is to stick your finger into the soil and check the moisture level. Avoid overwatering, as this can lead to root rot. Grow bags with good drainage will help prevent this.
What type of soil should I use in my grow bag?
A well-draining, nutrient-rich potting mix is ideal for growing cantaloupes in grow bags. Avoid using garden soil, as it can be too heavy and compact, hindering root growth. Look for a potting mix that contains a blend of peat moss, perlite, and vermiculite. You can also amend the potting mix with compost or aged manure to provide additional nutrients. A slightly acidic to neutral pH (around 6.0-7.0) is best for cantaloupes.
Do I need to fertilize cantaloupes in grow bags?
Yes, cantaloupes are heavy feeders and require regular fertilization, especially when grown in grow bags. Start with a balanced fertilizer (e.g., 10-10-10) at planting time. Once the plants begin to flower, switch to a fertilizer that is higher in phosphorus and potassium to promote fruit development. Follow the instructions on the fertilizer package carefully. You can also supplement with liquid seaweed or fish emulsion for an extra boost of nutrients. Avoid over-fertilizing, as this can lead to excessive foliage growth at the expense of fruit production.
How do I know when my cantaloupe is ripe?
Determining when a cantaloupe is ripe can be tricky, but there are a few telltale signs to look for. First, the skin of the cantaloupe should change from green to a tan or yellowish color. Second, the stem should easily slip from the fruit with a gentle tug. This is known as the “full slip” stage. Third, the cantaloupe should have a sweet, musky aroma. Finally, the blossom end of the cantaloupe should be slightly soft to the touch. Avoid picking cantaloupes that are still green or have a hard, unripe feel.
How do I prevent pests and diseases from affecting my cantaloupes?
Prevention is key when it comes to pests and diseases. Start by choosing disease-resistant cantaloupe varieties. Ensure good air circulation around the plants by spacing them properly and pruning away any crowded foliage. Regularly inspect your plants for signs of pests or diseases. Common pests that affect cantaloupes include aphids, squash bugs, and cucumber beetles. These can be controlled with insecticidal soap or neem oil. Common diseases include powdery mildew and fusarium wilt. These can be prevented by avoiding overhead watering and ensuring good drainage. If you notice any signs of disease, remove the affected leaves or plants immediately.
Can I grow cantaloupes in grow bags indoors?
While it’s possible to grow cantaloupes indoors, it can be challenging. Cantaloupes require a lot of sunlight, so you’ll need to provide supplemental lighting with grow lights. You’ll also need to ensure good air circulation and pollination. Hand-pollinating the flowers is often necessary when growing cantaloupes indoors. Overall, growing cantaloupes in grow bags outdoors is generally easier and more successful.
How do I trellis my cantaloupe plants in grow bags?
Trellising cantaloupe plants in grow bags is essential for supporting the weight of the developing melons and preventing them from rotting on the ground. You can use a variety of trellising methods, including tomato cages, A-frame trellises, or even a simple fence. The key is to provide a sturdy support system that can handle the weight of the fruit. As the cantaloupes grow, you may need to tie them to the trellis with soft twine or fabric strips. This will help prevent them from breaking off the vine.
What are some good companion plants for cantaloupes in grow bags?
Companion planting can help improve the health and productivity of your cantaloupe plants. Some good companion plants for cantaloupes include marigolds, basil, nasturtiums, and radishes. Marigolds deter pests, basil improves the flavor of the fruit, nasturtiums attract beneficial insects, and radishes break up the soil and improve drainage. Avoid planting cantaloupes near potatoes or other members of the nightshade family, as they can compete for nutrients.
Leave a Comment