

Chili growing tips are what you need to transform your garden (or even your balcony!) into a fiery fiesta of flavor! Have you ever dreamed of plucking your own vibrant chilies, ready to spice up your favorite dishes? I know I have! From the mildest jalapeños to the scorching habaneros, the world of chili peppers is a fascinating one, steeped in history and bursting with culinary potential.
Chili peppers have been cultivated for thousands of years, dating back to ancient civilizations in South America. They weren’t just a food source; they held cultural and even medicinal significance. Now, centuries later, we can easily bring that same vibrant history into our own backyards. But let’s be honest, sometimes growing these little firecrackers can feel a bit intimidating. That’s where these DIY chili growing tips come in!
Why do you need these tricks and hacks? Because store-bought chilies, while convenient, often lack the intense flavor and freshness of homegrown varieties. Plus, there’s nothing quite like the satisfaction of nurturing a plant from seed to harvest. I’m here to share my favorite, easy-to-follow chili growing tips that will help you cultivate a thriving chili pepper garden, no matter your experience level. Get ready to unleash your inner chili farmer and add some serious heat to your life!
Growing Fiery Chilis: A DIY Guide to a Bountiful Harvest
Okay, chili lovers, gather ’round! I’m going to share my secrets to growing a fantastic chili pepper crop right in your own backyard (or even on your balcony!). Forget those bland, store-bought peppers – we’re talking about vibrant, flavorful chilis that will add a serious kick to your cooking. This guide is packed with tips and tricks I’ve learned over the years, so get ready to get your hands dirty!
Choosing Your Chili Variety
Before we even think about planting, we need to decide what kind of chili we want to grow. The options are endless, ranging from mild bell peppers (yes, they’re technically chilis!) to scorching hot habaneros and ghost peppers. Here’s a quick rundown to help you choose:
* Mild: Bell peppers, Anaheim, Poblano. Great for stuffing, roasting, or adding a subtle flavor to dishes.
* Medium: Jalapeño, Serrano, Cayenne. Versatile peppers that add a noticeable kick without being overwhelming.
* Hot: Habanero, Scotch Bonnet, Bird’s Eye. Proceed with caution! These peppers pack a serious punch and are best used sparingly.
* Extremely Hot: Ghost Pepper (Bhut Jolokia), Carolina Reaper, Trinidad Scorpion. Only for the truly adventurous! Handle with gloves and extreme care.
Consider your climate and growing space when making your choice. Some varieties thrive in warmer climates, while others are more tolerant of cooler temperatures. Also, think about how you plan to use your chilis. Do you want to make hot sauce, dry them for spices, or use them fresh in your cooking?
Starting Your Chili Seeds
Starting your chili seeds indoors is crucial, especially if you live in a region with a shorter growing season. This gives your plants a head start and ensures a better harvest.
What You’ll Need:
* Chili seeds (obviously!)
* Seed starting trays or small pots
* Seed starting mix (a light, well-draining mix is essential)
* Spray bottle with water
* Heat mat (optional, but highly recommended)
* Grow light (optional, but helpful)
* Clear plastic dome or plastic wrap
Step-by-Step Instructions:
1. Prepare Your Seed Starting Trays: Fill your seed starting trays or pots with seed starting mix. Gently tap the trays to settle the mix and remove any air pockets.
2. Sow Your Seeds: Make a small indentation (about ¼ inch deep) in the center of each cell or pot. Place 1-2 chili seeds in each indentation. Cover the seeds with a thin layer of seed starting mix.
3. Water Gently: Use a spray bottle to gently moisten the soil. Avoid overwatering, as this can lead to damping off (a fungal disease that kills seedlings).
4. Provide Warmth: Place your seed starting trays on a heat mat. Chili seeds germinate best in warm temperatures (around 75-85°F). If you don’t have a heat mat, you can place the trays in a warm location, such as on top of your refrigerator.
5. Provide Light: If you’re using a grow light, position it a few inches above the seed starting trays. If you’re not using a grow light, place the trays in a sunny window. However, be aware that seedlings grown in a window may become leggy (tall and spindly) due to insufficient light.
6. Maintain Humidity: Cover the seed starting trays with a clear plastic dome or plastic wrap to create a humid environment. This will help the seeds germinate.
7. Monitor and Water: Check the soil moisture daily. Keep the soil consistently moist, but not soggy. Remove the plastic dome or plastic wrap once the seeds have germinated.
8. Thin Seedlings: Once the seedlings have developed their first true leaves (the leaves that appear after the initial seed leaves), thin them out by snipping off the weaker seedling at the base. Leave only the strongest seedling in each cell or pot.
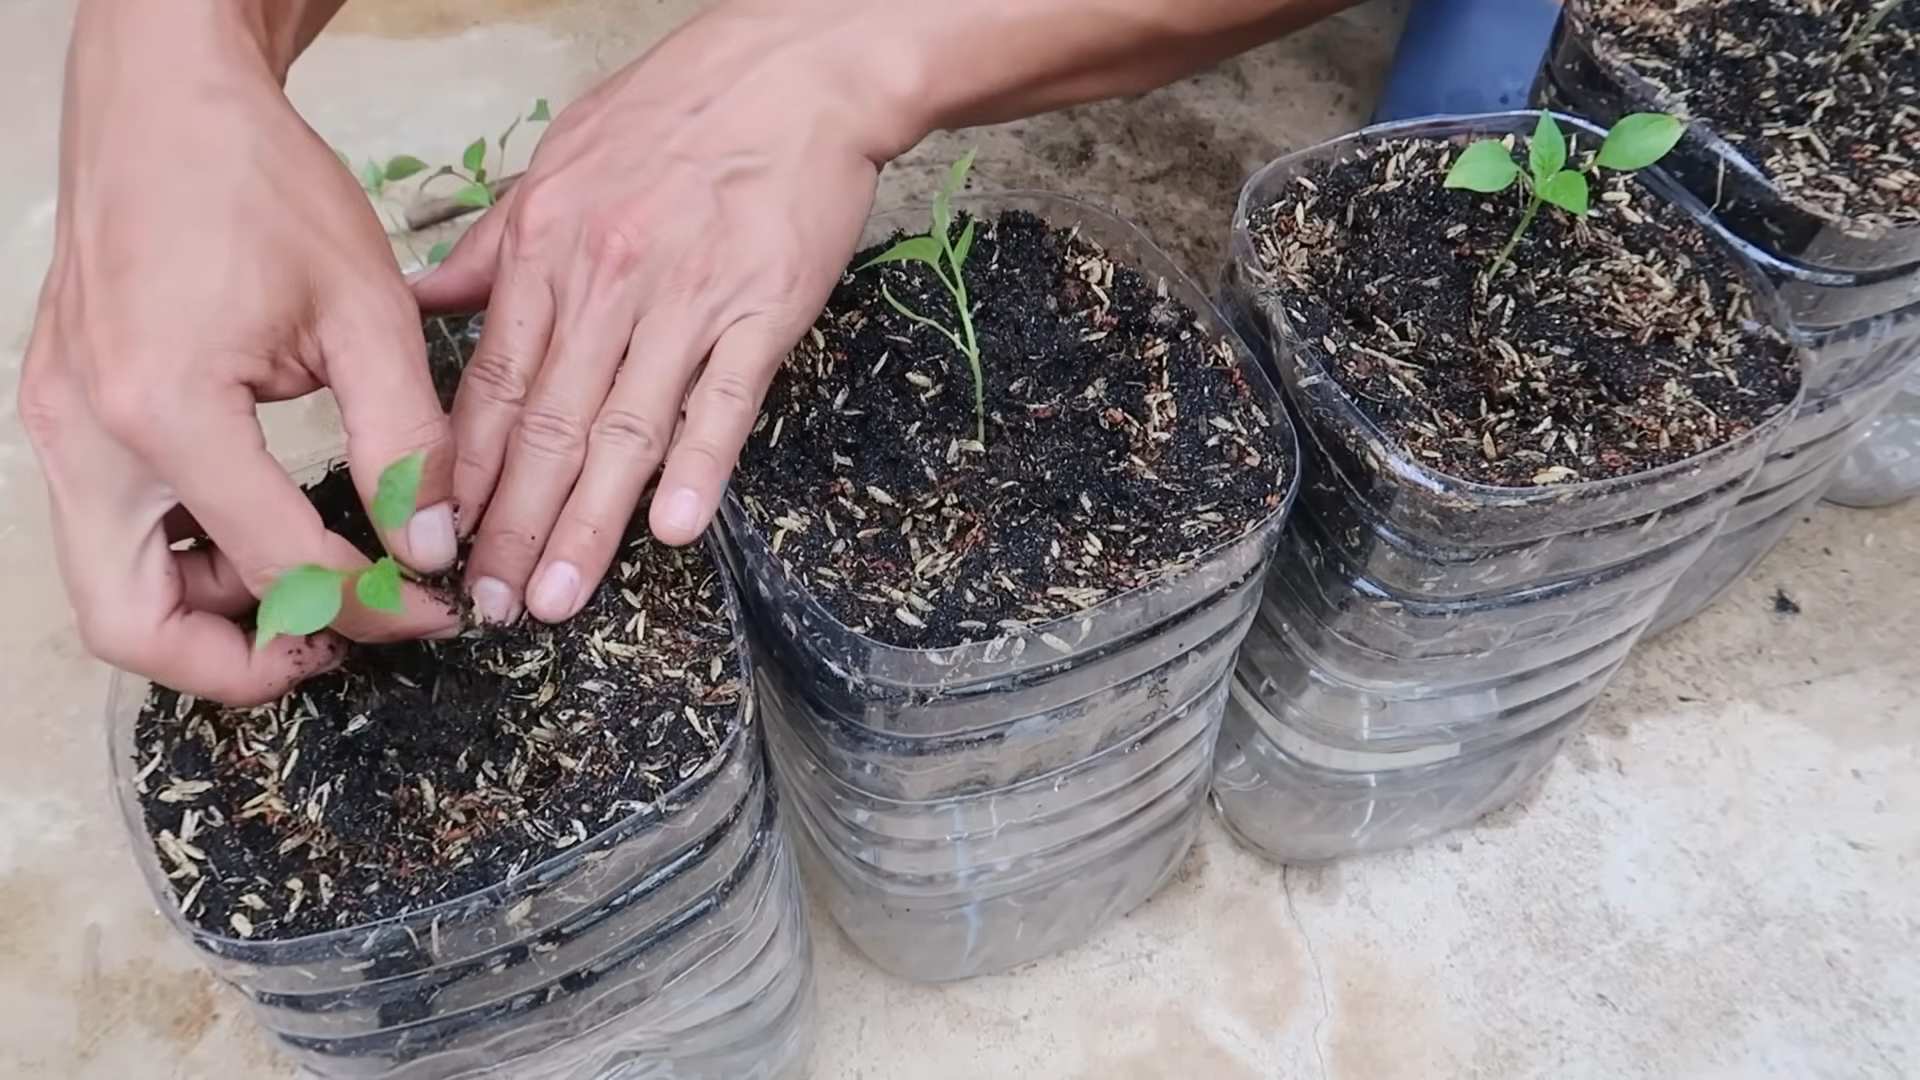
Transplanting Your Chili Seedlings
Once your chili seedlings have grown to a decent size (around 4-6 inches tall) and the weather has warmed up, it’s time to transplant them into larger pots or directly into your garden.
What You’ll Need:
* Larger pots (if transplanting into pots) or a prepared garden bed
* Potting mix or garden soil
* Trowel
* Watering can
* Fertilizer (optional)
Step-by-Step Instructions:
1. Harden Off Your Seedlings: Before transplanting your seedlings outdoors, you need to harden them off. This means gradually exposing them to outdoor conditions over a period of 7-10 days. Start by placing the seedlings in a sheltered location outdoors for a few hours each day, gradually increasing the amount of time they spend outside. This will help them acclimate to the sun, wind, and temperature changes.
2. Prepare Your Pots or Garden Bed: If you’re transplanting into pots, choose pots that are at least 12 inches in diameter. Fill the pots with a good quality potting mix. If you’re transplanting into a garden bed, choose a location that receives at least 6-8 hours of sunlight per day. Amend the soil with compost or other organic matter to improve drainage and fertility.
3. Transplant Your Seedlings: Gently remove the seedlings from their seed starting trays or pots. Be careful not to damage the roots. Dig a hole in the potting mix or garden soil that is large enough to accommodate the root ball. Place the seedling in the hole and backfill with soil. Gently firm the soil around the base of the plant.
4. Water Thoroughly: Water the seedlings thoroughly after transplanting. This will help them settle into their new home.
5. Fertilize (Optional): If you want to give your seedlings a boost, you can fertilize them with a balanced fertilizer. Follow the instructions on the fertilizer label.
Caring for Your Chili Plants
Now that your chili plants are in their final location, it’s time to provide them with the care they need to thrive.
Watering:
Water your chili plants regularly, especially during hot, dry weather. Water deeply, allowing the soil to dry out slightly between waterings. Avoid overwatering, as this can lead to root rot.
Fertilizing:
Fertilize your chili plants every 2-3 weeks with a balanced fertilizer. You can also use a fertilizer specifically formulated for peppers.
Pruning:
Pruning your chili plants can help to improve air circulation and encourage bushier growth. Remove any dead or yellowing leaves. You can also pinch off the tips of the branches to encourage the plant to branch out.
Pest and Disease Control:
Keep an eye out for pests and diseases. Common chili plant pests include aphids, spider mites, and whiteflies. Common diseases include powdery mildew and blossom end rot. Treat any infestations or diseases promptly. Insecticidal soap or neem oil can be effective for controlling pests. Fungicides can be used to treat diseases.
Support:
As your chili plants grow, they may need support to prevent them from falling over. You can use stakes, cages, or trellises to support the plants. This is especially important for varieties that produce heavy fruits.
Harvesting Your Chilis
The moment we’ve all been waiting for! Harvesting your chilis is the most rewarding part of the process.
When to Harvest:
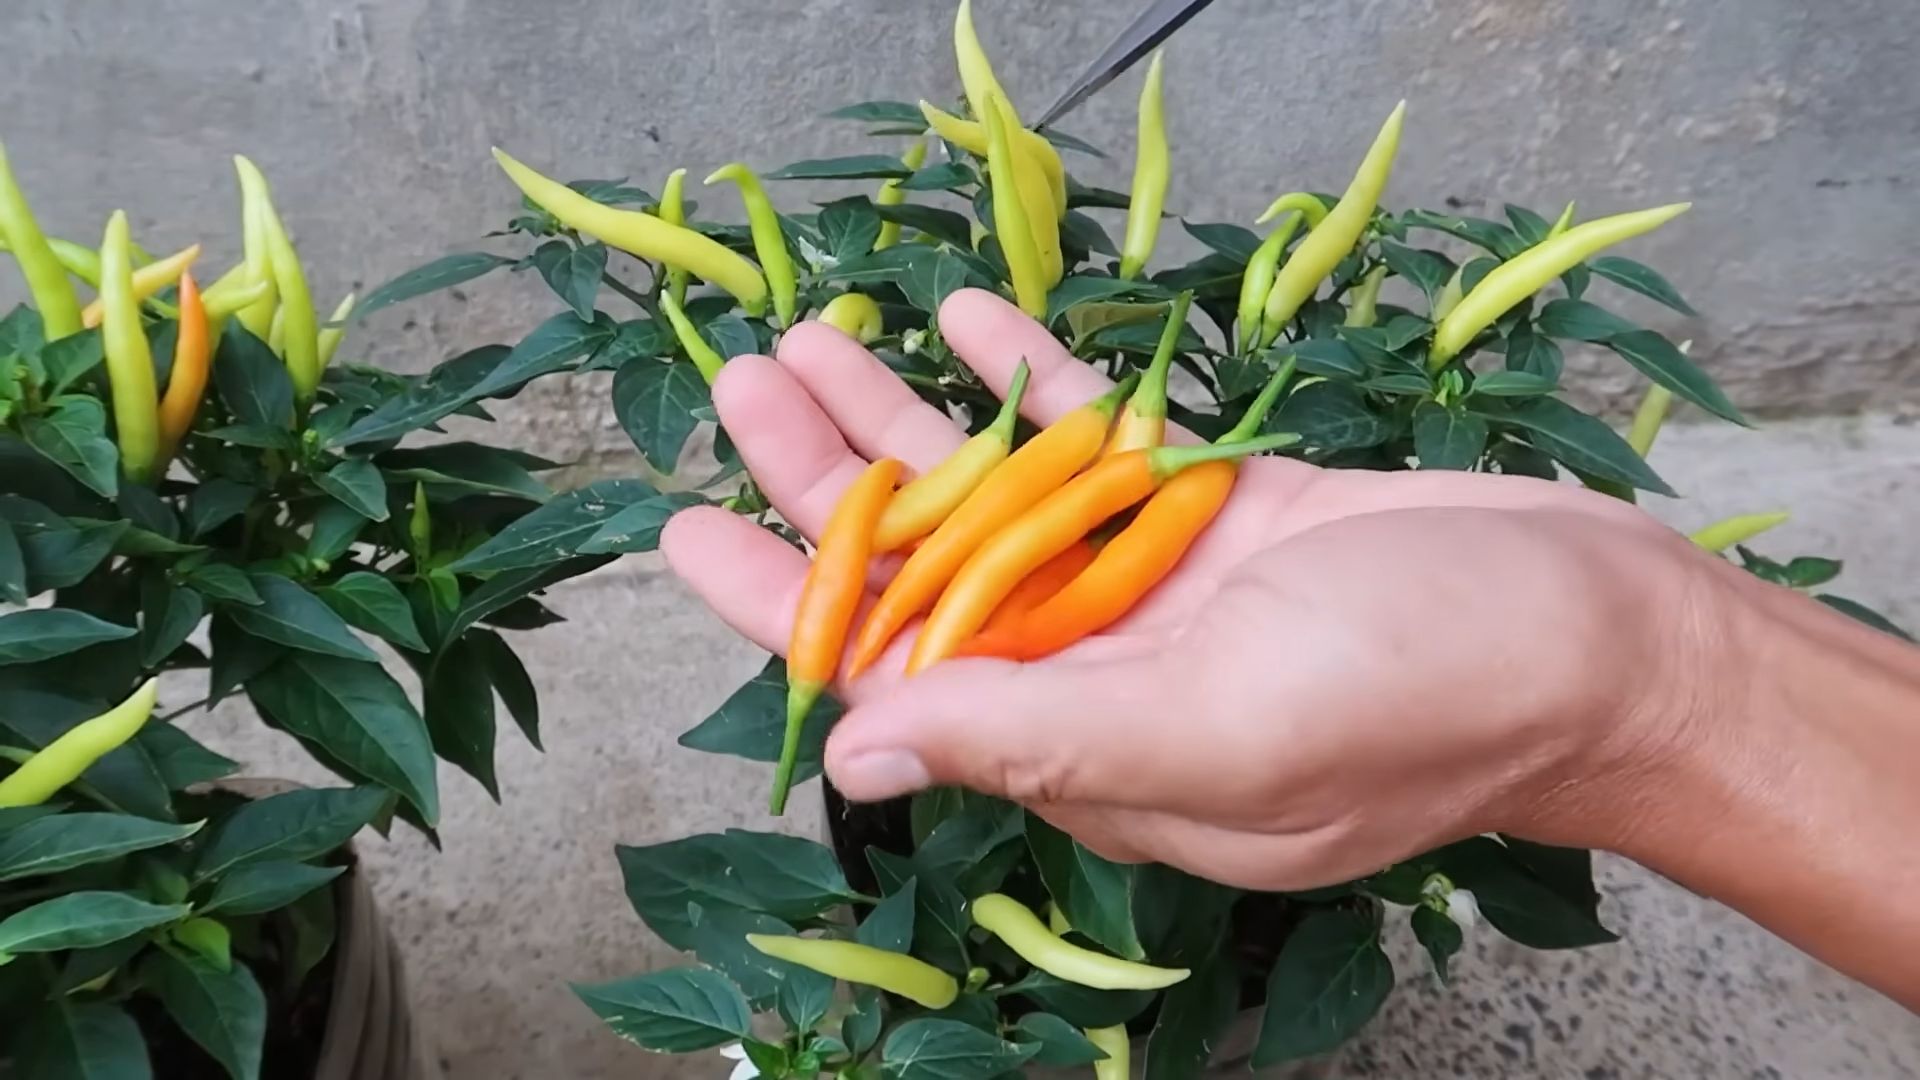
The best time to harvest your chilis depends on the variety and your personal preference. Generally, chilis are ready to harvest when they have reached their mature color and size. For example, jalapeños are typically harvested when they are dark green and about 2-3 inches long. Habaneros are typically harvested when they are bright orange or red.
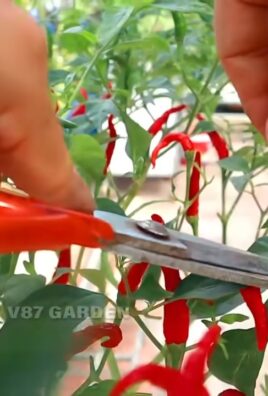
How to Harvest:
Use a sharp knife or scissors to cut the chilis from the plant. Be careful not to damage the plant. Wear gloves when harvesting hot chilis to avoid skin irritation.
Storing Your Chilis:
Fresh chilis can be stored in the refrigerator for up to a week. You can also dry them, freeze them, or pickle them for longer storage.
Troubleshooting Common Chili Growing Problems
Even with the best care, you might encounter some problems along the way. Here are a few common issues and how to address them:
* Blossom End Rot: This is caused by a calcium deficiency and results in a dark, sunken spot on the bottom of the chili. To prevent it, ensure consistent watering and add calcium to the soil (bone meal works well).
* Aphids: These tiny pests suck the sap from your plants. Blast them off with a strong stream of water or use insecticidal soap.
* Lack of Fruit: This could be due to a lack of pollination. Gently shake the plants to help distribute pollen, or use a small paintbrush to manually pollinate the flowers.
* Yellowing Leaves: This could indicate overwatering,
Conclusion
So, there you have it! Growing your own chili peppers doesn’t have to be a daunting task. By implementing these simple yet effective DIY chili growing tips, you’re setting yourself up for a bountiful harvest of fiery goodness. Forget those bland, store-bought peppers – imagine the satisfaction of adding homegrown heat to your favorite dishes!
This isn’t just about saving money (though that’s certainly a perk!). It’s about connecting with your food, understanding the growing process, and enjoying the unparalleled flavor of fresh, organically grown chilies. The difference in taste between a commercially grown chili and one nurtured in your own garden is truly remarkable. You’ll notice a brighter, cleaner flavor, and a more intense heat that’s simply unmatched.
But the best part? You can tailor your chili garden to your exact preferences. Want a milder heat? Opt for varieties like Anaheim or Poblano. Craving intense fire? Habaneros, Scotch Bonnets, or even Ghost Peppers are waiting to ignite your taste buds. Experiment with different soil amendments, watering schedules, and even companion planting to see what works best for your specific climate and growing conditions.
Consider these variations to further enhance your chili growing experience:
* **Hydroponic Chili Growing:** For those with limited space or challenging soil conditions, hydroponics offers a fantastic alternative. You can grow chilies indoors year-round with the right setup.
* **Container Gardening:** If you don’t have a traditional garden, container gardening is your friend. Choose large pots with good drainage and use a high-quality potting mix.
* **Vertical Gardening:** Maximize your space by growing chilies vertically on trellises or in hanging baskets. This is especially effective for smaller chili varieties.
* **Fermenting Your Harvest:** Once you’ve harvested your chilies, consider fermenting them to create delicious hot sauces, pastes, or powders. Fermentation adds a unique depth of flavor and preserves your chilies for longer.
* Seed Saving: Save seeds from your best-performing plants to ensure a consistent supply of your favorite chili varieties year after year.
Don’t be afraid to experiment and find what works best for you. Growing chilies is a journey of discovery, and there’s always something new to learn.
We’re confident that these DIY chili growing tips will empower you to cultivate a thriving chili garden. So, grab your seeds, get your hands dirty, and prepare for a flavor explosion!
We’d love to hear about your experiences! Share your chili growing successes (and challenges!) in the comments below. What varieties are you growing? What tips have you found most helpful? Let’s create a community of chili enthusiasts and learn from each other. Happy growing!
Frequently Asked Questions (FAQ)
What is the best time to start chili seeds?
The ideal time to start chili seeds depends on your climate. In general, you should start seeds indoors 6-8 weeks before the last expected frost. This gives the seedlings enough time to develop before being transplanted outdoors. If you live in a warmer climate with a longer growing season, you can start seeds later. A good rule of thumb is to check your local frost dates and work backward from there. Starting seeds indoors provides a controlled environment, ensuring higher germination rates and stronger seedlings. Using a heat mat can also significantly improve germination, as chili seeds prefer warmer temperatures.
What kind of soil is best for growing chilies?
Chilies thrive in well-draining soil that is rich in organic matter. A slightly acidic to neutral pH (around 6.0-7.0) is ideal. You can amend your soil with compost, aged manure, or other organic materials to improve its fertility and drainage. Avoid heavy clay soils, as they can become waterlogged and lead to root rot. If you’re growing chilies in containers, use a high-quality potting mix specifically formulated for vegetables. Consider adding perlite or vermiculite to improve drainage and aeration. Regular soil testing can help you determine if your soil needs any amendments.
How often should I water my chili plants?
Watering frequency depends on several factors, including the climate, soil type, and size of the plant. In general, you should water your chili plants deeply whenever the top inch of soil feels dry to the touch. Avoid overwatering, as this can lead to root rot. During hot, dry weather, you may need to water more frequently. Mulching around your plants can help retain moisture and reduce the need for frequent watering. Check the soil moisture regularly, especially during the fruiting stage, as chilies need consistent moisture to produce plump, juicy peppers.
What are some common pests and diseases that affect chili plants?
Chili plants can be susceptible to various pests and diseases, including aphids, spider mites, whiteflies, blossom-end rot, and fungal diseases. Regularly inspect your plants for signs of infestation or disease. Treat any problems promptly with appropriate organic or chemical controls. Encourage beneficial insects, such as ladybugs and lacewings, to help control pests. Ensure good air circulation around your plants to prevent fungal diseases. Blossom-end rot is often caused by calcium deficiency, so amend your soil with calcium-rich materials if necessary.
How much sunlight do chili plants need?
Chili plants need at least 6-8 hours of direct sunlight per day to thrive. Choose a sunny location in your garden or provide supplemental lighting if growing indoors. Insufficient sunlight can lead to leggy growth, reduced flowering, and smaller peppers. If you live in a very hot climate, provide some afternoon shade to prevent the plants from scorching. Rotate your plants regularly to ensure even exposure to sunlight.
When should I harvest my chilies?
The harvesting time depends on the variety of chili and your personal preference. Most chilies will change color as they ripen, from green to red, yellow, or orange. You can harvest chilies at any stage of ripeness, but the flavor and heat will intensify as they mature. Use pruning shears or scissors to cut the chilies from the plant, leaving a small stem attached. Handle chilies with care, as some varieties can be very hot. Wear gloves when handling hot chilies to avoid skin irritation.
Can I grow chilies indoors?
Yes, you can grow chilies indoors, especially if you have limited outdoor space or live in a climate with a short growing season. Choose a sunny window or provide supplemental lighting with grow lights. Use a well-draining potting mix and ensure good air circulation. Water regularly and fertilize as needed. Consider using self-pollinating chili varieties or hand-pollinating the flowers to ensure fruit set. Indoor chili growing allows you to enjoy fresh chilies year-round.
How do I increase the heat of my chilies?
Several factors can influence the heat of your chilies, including genetics, growing conditions, and stress levels. To increase the heat, ensure your plants receive plenty of sunlight, water them regularly but avoid overwatering, and provide them with a balanced fertilizer. Stressing the plants slightly by withholding water for short periods can also increase the heat. Choose hotter chili varieties if you want a guaranteed fiery experience. Remember that the heat level can vary even within the same variety, depending on the growing conditions.
How do I store my harvested chilies?
There are several ways to store harvested chilies, depending on how long you want to preserve them. You can dry them, freeze them, pickle them, or make hot sauce. Drying chilies is a simple method that involves hanging them in a well-ventilated area or using a dehydrator. Frozen chilies can be stored in airtight bags or containers for several months. Pickling chilies is a great way to preserve them in vinegar or brine. Making hot sauce is a fun and creative way to use your chilies and experiment with different flavors.
What are some good companion plants for chilies?
Companion planting can benefit chili plants by attracting beneficial insects, repelling pests, and improving soil health. Good companion plants for chilies include basil, tomatoes, carrots, onions, and garlic. Basil repels aphids and whiteflies, while tomatoes provide shade and support. Carrots improve soil drainage, and onions and garlic deter pests. Avoid planting chilies near fennel or brassicas (cabbage, broccoli, cauliflower), as they can inhibit growth.
Leave a Comment