

Radish Growing Tips: Unlock the secrets to a vibrant and bountiful harvest, right in your own backyard! Have you ever dreamt of plucking crisp, peppery radishes straight from the earth, adding a zesty kick to your salads and snacks? I know I have! But sometimes, getting those little red gems to thrive can feel like a bit of a mystery. That’s where these DIY tricks and hacks come in – I’m here to share my tried-and-true methods for radish-growing success.
Radishes have a surprisingly rich history, dating back to ancient times. They were cultivated in Egypt before the pyramids were even built! Throughout history, they’ve been valued not only for their taste but also for their medicinal properties. Today, with the rise of home gardening, more and more people are rediscovering the joy of growing their own food, and radishes are a perfect starting point.
Why do you need these radish growing tips? Because let’s face it, sometimes those tiny seeds can be a bit temperamental. They can bolt in hot weather, get nibbled on by pests, or simply refuse to plump up. But fear not! With a few simple DIY tricks, you can overcome these challenges and enjoy a continuous supply of delicious, homegrown radishes. I’ll guide you through everything from soil preparation to pest control, ensuring you get the most out of your radish patch. Let’s get digging!
Growing Radishes: From Seed to Salad in Weeks!
Hey there, fellow garden enthusiasts! I’m so excited to share my tried-and-true methods for growing radishes. These little root veggies are incredibly rewarding because they’re fast-growing and relatively easy to cultivate, even for beginners. Plus, the peppery bite they add to salads and other dishes is just fantastic. Let’s dive in!
Choosing the Right Radish Variety
Before we get our hands dirty, let’s talk about radish varieties. There’s more to radishes than just the classic red globe! Different varieties mature at different rates and have varying flavors and textures. Here are a few of my favorites:
* **Cherry Belle:** This is your classic, round, bright red radish. It’s quick to mature (around 22 days) and has a mild, slightly sweet flavor. Perfect for beginners!
* **French Breakfast:** These are elongated, red radishes with a white tip. They have a milder flavor than Cherry Belle and are ready in about 25 days. I love them sliced on buttered bread with a sprinkle of sea salt.
* **Easter Egg:** This is a mix of radishes in different colors – red, pink, purple, and white. They’re fun to grow and add a pop of color to your garden and your plate. They mature in about 25 days.
* **Black Spanish:** This is a winter radish with black skin and white flesh. It has a much stronger, more pungent flavor than the spring varieties and takes longer to mature (around 50-60 days). I usually grate it into slaws or use it in stir-fries.
* **Daikon:** While technically a radish, daikon is much larger and milder than other varieties. It’s often used in Asian cuisine and can be pickled, grated, or cooked. Maturity time varies depending on the variety, but it’s generally around 50-70 days.
Choosing the right variety depends on your taste preferences and the time of year you’re planting. For spring and fall crops, I usually stick with the faster-maturing varieties like Cherry Belle and French Breakfast. For winter crops, I might try Black Spanish or Daikon.
Preparing the Soil
Radishes thrive in loose, well-drained soil. If your soil is heavy clay, you’ll need to amend it with organic matter to improve drainage. Here’s what I do:
* **Clear the area:** Remove any rocks, weeds, or debris from the planting area.
* **Amend the soil:** Dig in plenty of compost or well-rotted manure. This will improve drainage, add nutrients, and help the soil retain moisture. I usually aim for a 2-3 inch layer of compost.
* **Loosen the soil:** Use a garden fork or tiller to loosen the soil to a depth of at least 6 inches. This will make it easier for the radish roots to grow.
* **Smooth the surface:** Rake the soil smooth to create a level planting surface.
A well-prepared seedbed is crucial for successful radish growing. Don’t skip this step!
Planting the Seeds
Radishes are best grown directly from seed. They don’t transplant well, so starting them indoors is generally not recommended. Here’s how I plant my radish seeds:
1. **Check the planting dates:** Radishes are a cool-season crop, so they’re best planted in early spring or late summer/early fall. Check your local planting calendar for the best dates in your area. I usually aim to plant about 4-6 weeks before the last expected frost in spring or 6-8 weeks before the first expected frost in fall.
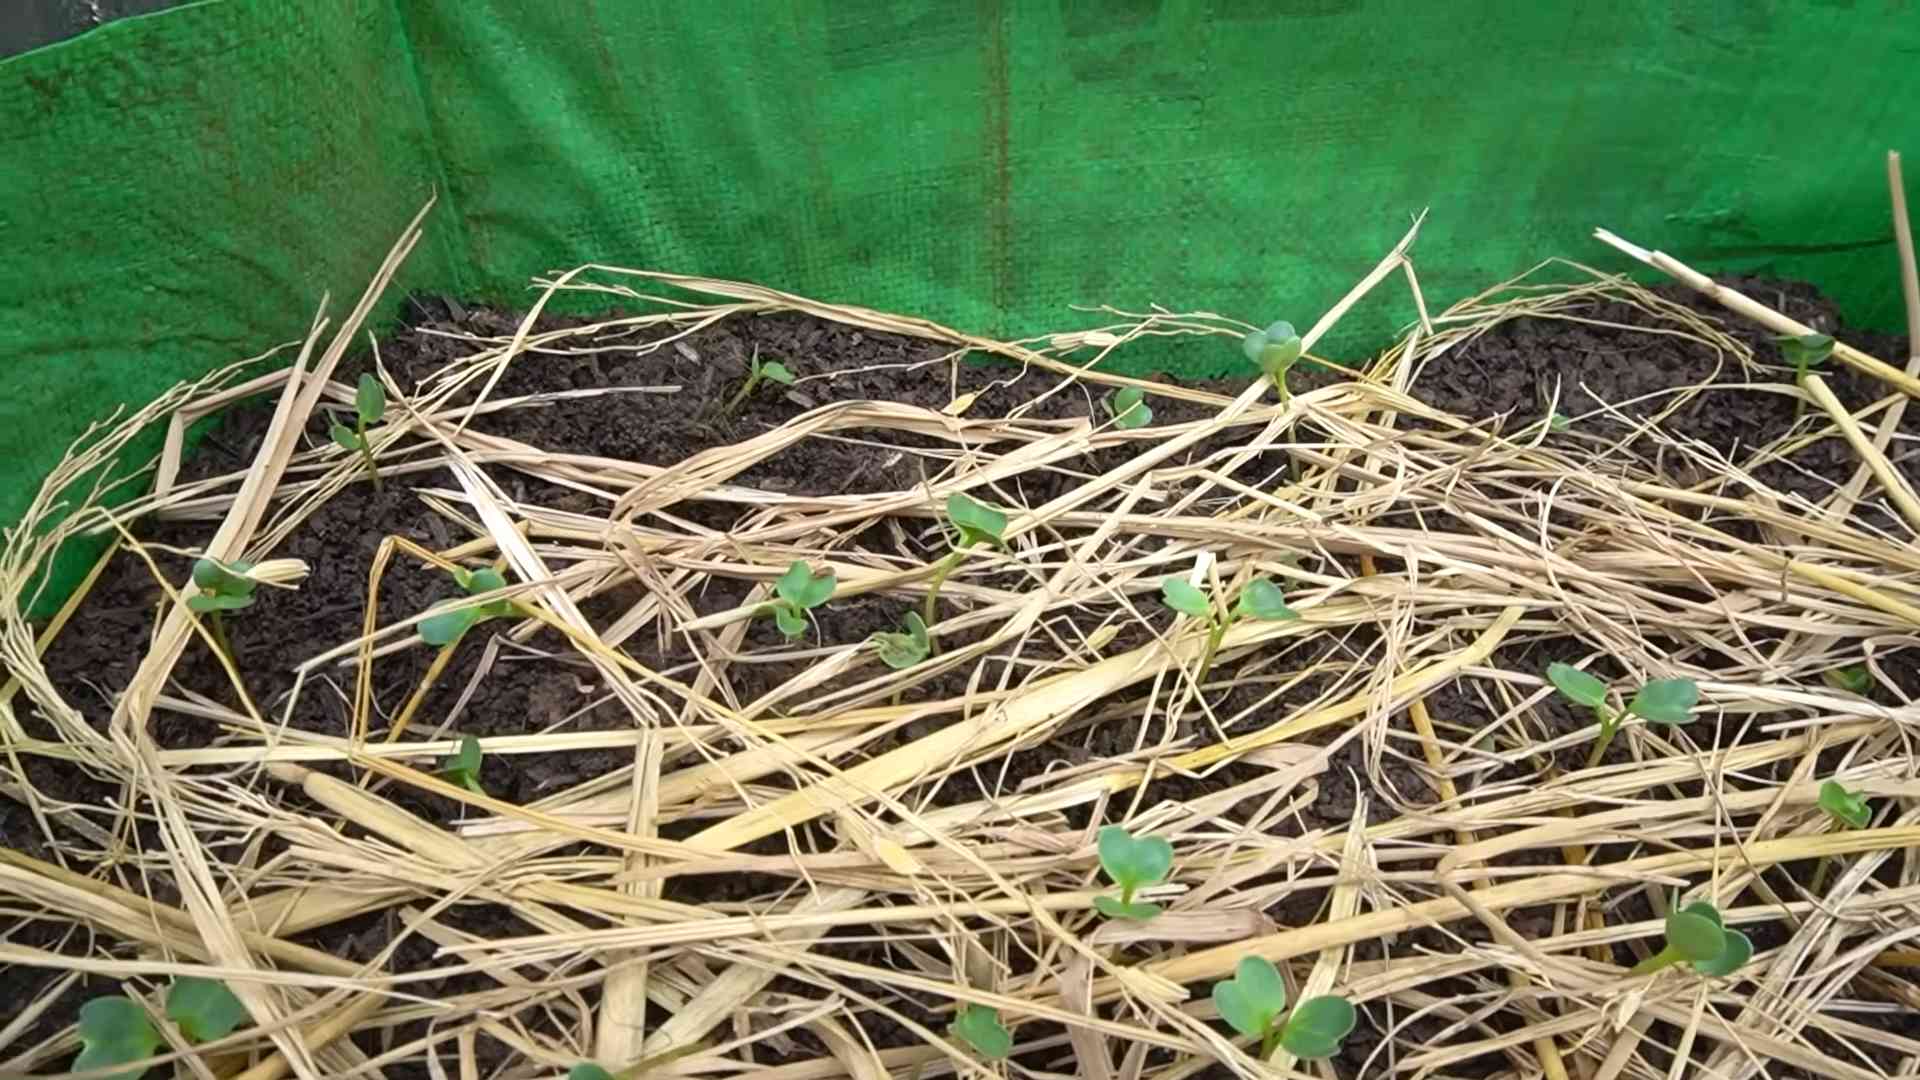
2. **Create shallow furrows:** Use your finger or a garden tool to create shallow furrows in the soil, about 1/2 inch deep and 1 inch apart.
3. **Sow the seeds:** Sprinkle the radish seeds evenly into the furrows. Don’t sow them too thickly, or you’ll have to thin them later.
4. **Cover the seeds:** Gently cover the seeds with soil and pat it down lightly.
5. **Water thoroughly:** Water the planting area gently but thoroughly. Keep the soil moist until the seeds germinate.
Remember to succession plant your radishes! Sow a new batch of seeds every 1-2 weeks to ensure a continuous harvest.
Caring for Your Radishes
Radishes are relatively low-maintenance, but there are a few things you can do to help them thrive:
* **Watering:** Keep the soil consistently moist, but not waterlogged. Radishes need plenty of water to grow quickly and develop crisp, flavorful roots. I usually water them deeply every few days, or more often if the weather is hot and dry.
* **Thinning:** If your radish seedlings are crowded, thin them out to about 1-2 inches apart. This will give them enough room to grow and prevent them from becoming stunted. I usually thin them when they have their first true leaves.
* **Weeding:** Keep the planting area free of weeds. Weeds can compete with radishes for water and nutrients. I usually hand-weed regularly to keep the weeds under control.
* **Fertilizing:** Radishes don’t need a lot of fertilizer, but a light feeding of a balanced fertilizer can help them grow faster. I usually apply a liquid fertilizer every 2-3 weeks.
* **Pest Control:** Radishes are generally pest-resistant, but they can be attacked by flea beetles and root maggots. Flea beetles can be controlled with insecticidal soap or neem oil. Root maggots can be prevented by covering the planting area with row covers.
Consistent watering is key to growing plump, juicy radishes. Don’t let the soil dry out!
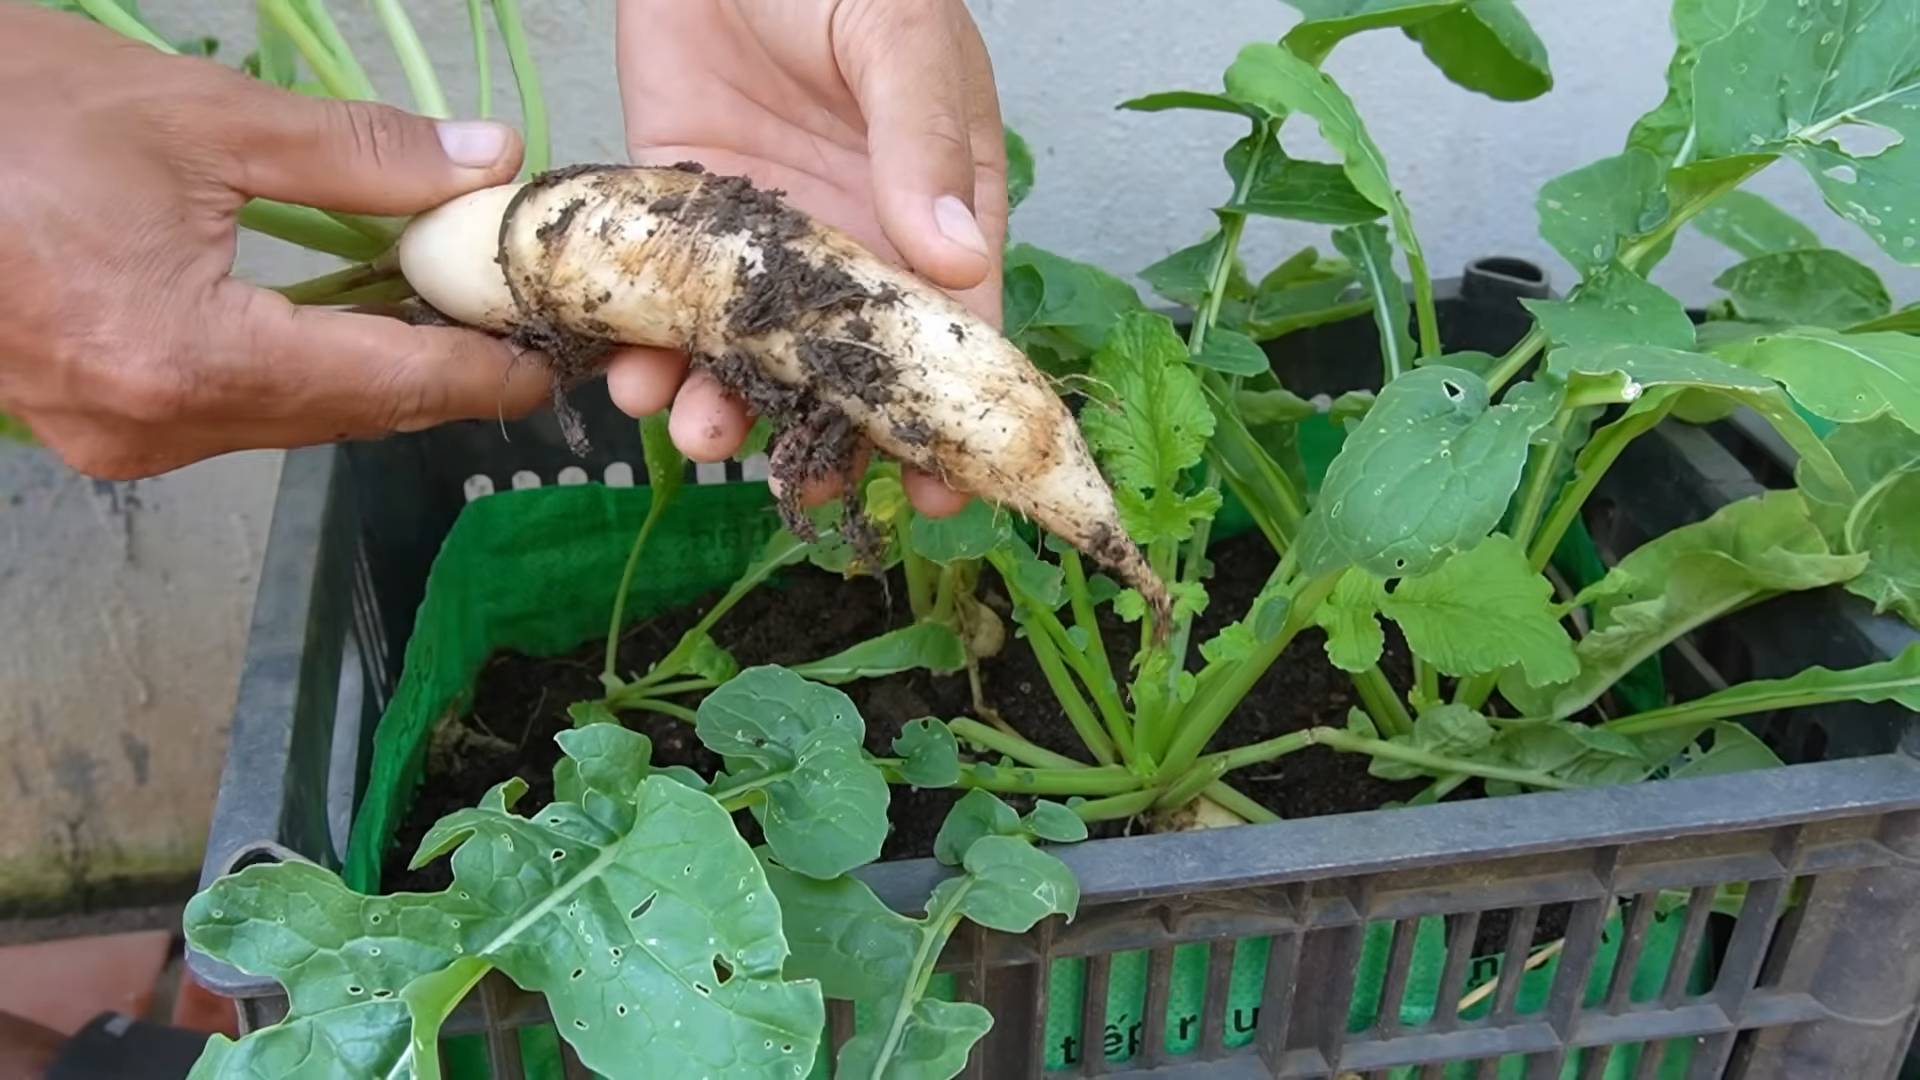
Harvesting Your Radishes
The best part of growing radishes is the harvest! Radishes are ready to harvest when they reach the desired size. This will vary depending on the variety, but most varieties are ready in about 3-4 weeks.
1. **Check for size:** Gently brush away the soil around the base of the radish to check its size.
2. **Pull them up:** When the radishes are the right size, gently pull them up from the soil.
3. **Wash and trim:** Wash the radishes thoroughly and trim off the tops and roots.
4. **Store them:** Store the radishes in the refrigerator in a plastic bag or container. They will keep for about a week.
Don’t let your radishes get too big! Overmature radishes can become woody and bitter.
Troubleshooting Common Problems
Even with the best care, you might encounter some problems when growing radishes. Here are a few common issues and how to deal with them:
* **Radishes are small and stunted:** This is usually caused by overcrowding or poor soil. Thin the seedlings to give them more room to grow and amend the soil with compost.
* **Radishes are cracked:** This is usually caused by inconsistent watering. Keep the soil consistently moist, but not waterlogged.
* **Radishes are woody and bitter:** This is usually caused by letting them get too big or by growing them in hot weather. Harvest them when they’re the right size and plant them in the cool season.
* **Radishes are attacked by pests:** Flea beetles and root maggots are the most common pests of radishes. Control flea beetles with insecticidal soap or neem oil. Prevent root maggots by covering the planting area with row covers.
Don’t be discouraged if you encounter problems! With a little troubleshooting, you can usually get your radishes back on track.
Enjoying Your Radish Harvest
Now that you’ve harvested your radishes, it’s time to enjoy them! Here are a few of my favorite ways to eat radishes:
* **In salads:** Radishes add a peppery bite to salads. I love them sliced thinly and tossed with lettuce, cucumbers, and a vinaigrette dressing.
* **On buttered bread:** This is a classic French snack. Slice radishes thinly and arrange them on buttered bread with a sprinkle of sea salt.
* **Pickled:** Pickled radishes are a delicious and tangy condiment. I love them on tacos, sandwiches, and salads.
* **Roasted:** Roasting radishes mellows their flavor and brings out their sweetness. I love them roasted with other root vegetables like carrots and potatoes.
* **In stir-fries:** Radishes add a crunchy texture and peppery flavor to stir-fries. I usually add them towards the end of cooking so they don’t get too soft.
Don’t forget to eat the radish greens! They’re nutritious and delicious. You can add them to salads, stir-fries, or soups.
Growing radishes is a fun and rewarding experience. With a little care and attention, you can have a bountiful harvest of these peppery root veggies in just a few weeks. Happy gardening!
Conclusion
So, there you have it! Growing your own radishes doesn’t have to be a gamble. By implementing these simple yet effective radish growing tips, you’re setting yourself up for a harvest of crisp, peppery delights. Forget those bland, store-bought radishes – imagine the vibrant flavor and satisfying crunch of radishes you nurtured from seed to table.
This isn’t just about saving a few dollars; it’s about connecting with your food, understanding the growing process, and experiencing the joy of harvesting something you created. Plus, fresh radishes are incredibly versatile. Beyond the classic salad addition, try them thinly sliced on buttered bread with a sprinkle of sea salt, roasted for a sweeter flavor, or even pickled for a tangy treat.
Ready to take your radish game to the next level? Consider experimenting with different varieties. ‘French Breakfast’ radishes are known for their mild flavor and elongated shape, while ‘Cherry Belle’ radishes offer a classic round shape and vibrant red color. For a spicier kick, try ‘Black Spanish’ radishes. You can also succession plant your radishes, sowing new seeds every couple of weeks, to ensure a continuous harvest throughout the growing season. Another variation to consider is companion planting. Radishes are known to deter certain pests, so planting them near carrots or lettuce can be beneficial.
Don’t be intimidated if you’re a beginner gardener. Radishes are incredibly forgiving and quick to mature, making them the perfect crop to build your confidence. The key is to provide them with the right conditions: well-drained soil, consistent moisture, and plenty of sunlight.
We’re confident that these radish growing tips will transform your gardening experience. But the real magic happens when you put them into practice. So, grab some seeds, prepare your soil, and get ready to enjoy the fruits (or rather, roots!) of your labor.
We’d love to hear about your radish-growing adventures! Share your experiences, successes, and even your challenges in the comments below. What varieties did you try? What techniques worked best for you? Your insights can help other gardeners learn and grow, too. Let’s cultivate a community of radish enthusiasts! Happy gardening!
Frequently Asked Questions (FAQ)
What is the best time to plant radishes?
Radishes are a cool-season crop, meaning they thrive in cooler temperatures. The best time to plant them is in early spring or late summer/early fall. In spring, sow seeds as soon as the soil can be worked, typically 4-6 weeks before the last expected frost. For a fall harvest, plant seeds about 4-6 weeks before the first expected frost. Avoid planting radishes during the hottest months of summer, as high temperatures can cause them to become tough and bitter.
How much sunlight do radishes need?
Radishes need at least 6 hours of sunlight per day to grow properly. Choose a location in your garden that receives full sun for the majority of the day. If you live in a particularly hot climate, some afternoon shade can be beneficial to prevent the soil from drying out too quickly.
What kind of soil is best for growing radishes?
Radishes prefer loose, well-drained soil that is rich in organic matter. Amend heavy clay soil with compost or other organic materials to improve drainage and aeration. Avoid soils that are compacted or rocky, as these can hinder root development. A soil pH of 6.0 to 7.0 is ideal for radish growth.
How often should I water my radishes?
Consistent moisture is crucial for growing plump, juicy radishes. Water regularly, especially during dry periods, to keep the soil consistently moist but not waterlogged. Aim for about 1 inch of water per week. Uneven watering can cause radishes to crack or become tough. Mulching around the plants can help retain moisture in the soil.
How far apart should I plant radish seeds?
Sow radish seeds about ½ inch deep and ½ to 1 inch apart in rows that are 6-12 inches apart. Once the seedlings emerge, thin them to 1-2 inches apart to allow them enough space to develop properly. Overcrowding can result in small, stunted radishes.
How long does it take for radishes to mature?
Radishes are one of the fastest-growing vegetables, with most varieties maturing in just 20-30 days. Check the seed packet for the specific maturity time of the variety you are growing. Harvest radishes as soon as they reach the desired size, as they can become tough and bitter if left in the ground too long.
Why are my radishes cracking?
Cracking in radishes is usually caused by inconsistent watering. When the soil dries out and then is suddenly saturated with water, the radishes can absorb water too quickly, causing them to split. To prevent cracking, water regularly and consistently, especially during dry periods. Mulching can also help retain moisture in the soil.
Why are my radishes so spicy?
The spiciness of radishes is influenced by several factors, including variety, growing conditions, and maturity. Some varieties are naturally spicier than others. Hot weather and dry soil can also increase the spiciness of radishes. Harvesting radishes when they are young and tender can help reduce their spiciness.
Can I eat radish greens?
Yes, radish greens are edible and nutritious. They have a peppery flavor similar to the roots. You can use them in salads, soups, stir-fries, or as a garnish. Choose young, tender greens for the best flavor and texture. Be sure to wash them thoroughly before eating.
What are some common pests and diseases that affect radishes?
Radishes are generally pest-resistant, but some common pests include flea beetles, root maggots, and aphids. Flea beetles can damage the leaves, while root maggots can tunnel into the roots. Aphids can suck the sap from the plants. To control these pests, use row covers, insecticidal soap, or diatomaceous earth. Common diseases that affect radishes include damping-off and white rust. Damping-off can kill seedlings, while white rust can cause white pustules on the leaves. To prevent these diseases, use well-drained soil, avoid overcrowding, and practice crop rotation.

Leave a Comment