

Cabbage garden in plastic bottles? Yes, you read that right! Forget sprawling fields and back-breaking labor; we’re bringing the farm to your balcony, patio, or even windowsill with this ingenious DIY project. Imagine harvesting fresh, crisp cabbage right outside your door, all thanks to a few repurposed plastic bottles. Sounds too good to be true? Stick with me, and I’ll show you how incredibly simple and rewarding it can be.
Growing cabbage has a rich history, dating back to ancient times when it was prized for its nutritional value and medicinal properties. From the humble peasant’s stew to the elaborate dishes of royalty, cabbage has nourished generations. But traditionally, cultivating cabbage required significant space and resources. That’s where our plastic bottle hack comes in!
In today’s world, where space is a premium and sustainability is key, this DIY trick is a game-changer. Many of us dream of fresh, homegrown produce but are limited by apartment living or small yards. Plus, reducing plastic waste is a win for everyone! This method not only allows you to enjoy the taste of homegrown cabbage, but it also contributes to a greener planet. So, if you’re looking for a fun, eco-friendly, and space-saving way to cultivate your own cabbage garden in plastic bottles, you’ve come to the right place. Let’s get started!
Cabbage in a Plastic Bottle Garden: A DIY Guide for Space-Saving Growing
Hello garden friends! Do you also have the problem that your garden isn’t the biggest, but you still don’t want to miss out on fresh cabbage? Or maybe you don’t have a garden at all, just a balcony or a terrace? Don’t worry, I have the perfect solution for you: a cabbage garden in plastic bottles! This is not only super space-saving but also a great way to recycle plastic waste while growing fresh vegetables. Let’s get started together!
What you need for your plastic bottle cabbage garden:
- Plastic bottles: Large PET bottles (e.g., from water or juice) are best. The larger the bottle, the better for the cabbage.
- Cabbage seedlings: you can either buy ready-made seedlings at a garden center or grow your own from seed.
- Soil: Good potting soil or vegetable soil is ideal.
- Knife or scissors: For cutting the plastic bottles.
- Drill or a nail: For the drainage holes.
- Watering can or hose: For watering the plants.
- Optional: Pebbles or clay shards for drainage.
- Optional: Labels and a pen for labeling the cabbage varieties.
- Optional: Wire or string for hanging the bottles (if you want to hang them).
Preparing the Plastic Bottles
Before we can start planting, we need to prepare the plastic bottles. But it’s very easy, I promise!
1. Cleaning the bottles: First, you should thoroughly clean the plastic bottles with warm water and dish soap. Remove all labels and adhesive residues. Make sure no soap residue remains in the bottles.
2. Cutting the bottles: Now comes the exciting part: cutting the bottles. There are different ways you can do this, depending on how you want to design your cabbage garden.
- Variant 1: Horizontal cutting: Cut the bottle horizontally, about 10-15 cm below the bottle neck. The upper part of the bottle will later be used as a kind of mini-greenhouse.
- Variant 2: Vertical cutting: Cut the bottle vertically so that you have two halves. You can then place these halves next to each other or attach them to a wall.
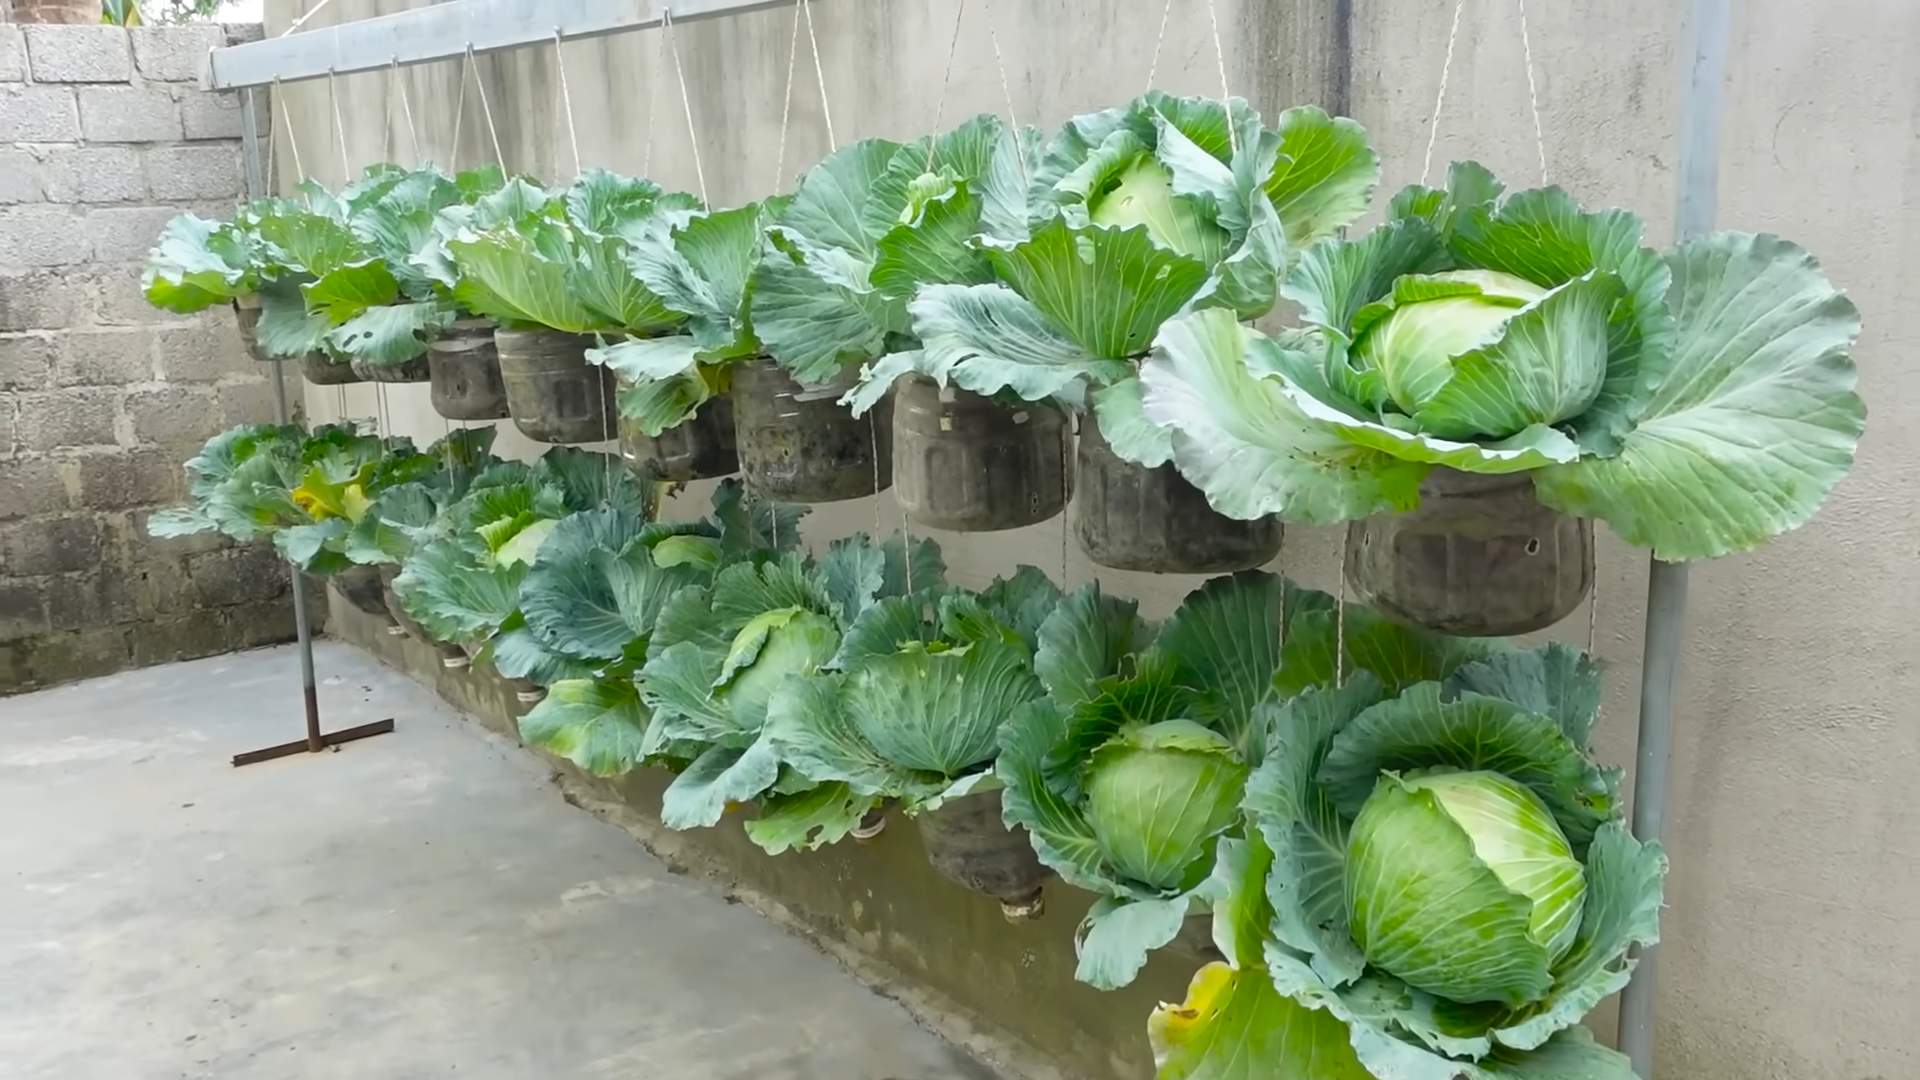
- Variant 3: Hanging the bottles: Cut a large hole in the side of the bottle so that the cabbage fits inside. Leave the bottle neck intact so you can hang the bottle later.
Personally, I prefer the horizontal variant because it’s the easiest and protects the cabbage well from wind and weather. But just try out what you like best!
3. Drilling drainage holes: To allow water to drain well and prevent the roots from rotting, you need to drill drainage holes in the bottom of the bottles. Use a drill or a nail and make 3-4 holes in the bottom of each bottle. Make sure the holes are not too large, so the soil doesn’t fall out.
4. Optional: Creating drainage: To improve drainage even further, you can place a layer of pebbles or clay shards at the bottom of the bottles. This prevents the soil from clogging the drainage holes.
Planting the Cabbage Seedlings
Now comes the best part: planting the cabbage seedlings!
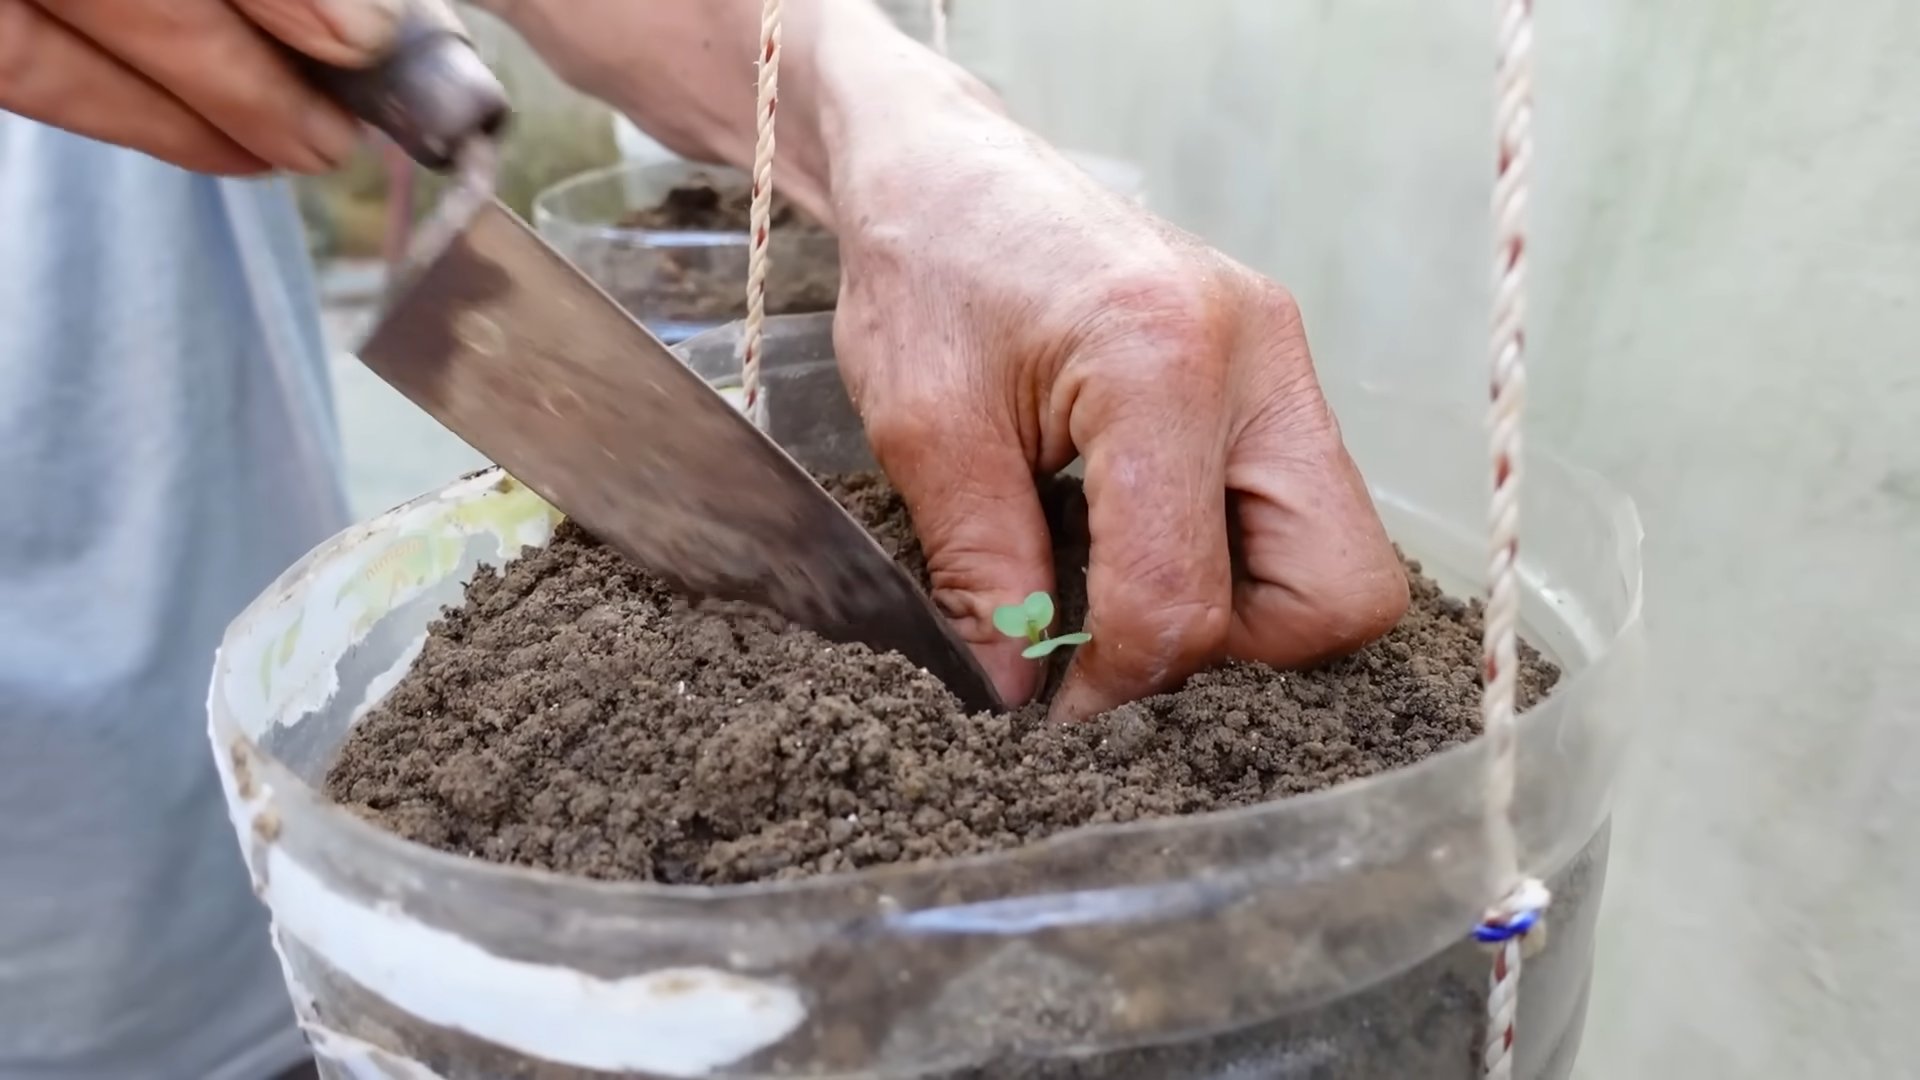
1. Filling with soil: Fill the prepared plastic bottles with soil. Leave about 2-3 cm of space to the rim to make watering easier.
2. Preparing planting holes: Make small planting holes in the soil with your fingers or a small spoon. The holes should be large enough for the root balls of the cabbage seedlings to fit in well.
3. Inserting the cabbage seedlings: Carefully take the cabbage seedlings out of their pots and place them in the planting holes. Be careful not to damage the roots. Fill the holes with soil and press it down lightly.
4. Watering in: Water the freshly planted cabbage seedlings thoroughly. This helps them to root in the new soil.
5. Optional: Mini-greenhouse: If you chose the horizontal bottle preparation variant, you can now place the upper part of the bottle over the seedlings as a mini-greenhouse. This protects them from wind and weather and creates a humid, warm climate that promotes growth. But be sure to ventilate the bottle regularly to prevent mold.
Caring for Your Cabbage Garden
For your cabbage to thrive, it naturally needs some care. But don’t worry, it’s not much work!
1. Watering: Cabbage needs regular water, especially during the growth phase. It’s best to water your plants in the morning or evening when the sun is not so strong. Make sure the soil is always slightly moist, but not too wet. Avoid waterlogging, as this can lead to root rot.
2. Fertilizing: Cabbage is a heavy feeder and therefore needs sufficient nutrients. Fertilize your plants regularly with an organic fertilizer or a special cabbage fertilizer. Pay attention to the dosage instructions of the manufacturer.
3. Pest protection: Cabbage can be infested by various pests, such as cabbage white butterflies, flea beetles, or aphids. Check your plants regularly for pests and combat them if necessary with natural remedies, such as nettle tea or neem oil.
4. Pruning side shoots: Some cabbage varieties form side shoots that you should regularly break off so the plant can put its energy into forming the main head.
5. Harvesting: Depending on the cabbage variety, you can harvest your cabbage after about 2-4 months. The cabbage is ripe when the head is firm and closed. Cut the cabbage with a sharp knife.
More Tips and Tricks for Your Plastic Bottle Cabbage Garden
- Location: Cabbage needs a sunny location to thrive. Place your plastic bottle gardens in a spot where they get at least 6 hours of sun a day.
- Variety selection: There are many different cabbage varieties that are suitable for growing in plastic bottles. Popular varieties include, for example, pointed cabbage, cauliflower, broccoli, or Brussels sprouts. Inform yourself about the characteristics of the different varieties before buying and choose the one that best suits your needs.
- Labeling: If you are growing different cabbage varieties, you should definitely label the bottles so you don’t get them mixed up.
- Upcycling: Use your plastic bottle cabbage garden as a way to recycle plastic waste and contribute to environmental protection.
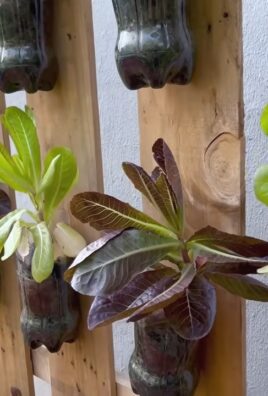
- Creativity: Be creative in designing your plastic bottle cabbage garden! You can paint the bottles, decorate them with patterns, or join them together to form a vertical wall.
I hope this guide has helped you to create your own cabbage garden in plastic bottles. Happy gardening and enjoy your meal! Let me know how it goes for you
Conclusion
So, there you have it! Transforming humble plastic bottles into a thriving cabbage garden is not just a quirky DIY project; it’s a game-changer for urban gardeners, space-conscious enthusiasts, and anyone looking to add a touch of sustainable charm to their lives. We’ve explored the step-by-step process, highlighting the benefits of this innovative approach, and hopefully, inspired you to ditch the traditional garden bed (at least partially!) and embrace the vertical potential of recycled materials.
But why is this DIY trick a must-try? Beyond the obvious environmental advantages of repurposing plastic waste, growing your cabbage in plastic bottles offers unparalleled control over your growing environment. You can easily move your mini-gardens to chase the sun, protect them from unexpected frosts, or even bring them indoors during harsh weather. This level of flexibility is a boon for beginners and seasoned gardeners alike, ensuring a healthier, more productive cabbage crop.
Furthermore, the visual appeal of a vertical cabbage garden is undeniable. Imagine a wall adorned with lush, green cabbages, a testament to your creativity and commitment to sustainable living. It’s a conversation starter, a source of pride, and a constant reminder that even the simplest materials can be transformed into something beautiful and functional.
Don’t limit yourself to just cabbage! This method is incredibly versatile. Experiment with different varieties of cabbage, from the classic green to the vibrant red or the crinkled Savoy. You can also adapt the technique to grow other leafy greens like lettuce, spinach, or even herbs. Consider adding companion plants like marigolds or basil to deter pests and enhance the flavor of your cabbage. Get creative with the design of your vertical garden. Arrange the bottles in different patterns, paint them with vibrant colors, or even add decorative elements to personalize your creation.
We understand that venturing into new DIY territory can be daunting, but we assure you that this project is surprisingly simple and rewarding. The initial setup might require a bit of time and effort, but the long-term benefits – fresh, homegrown cabbage, reduced waste, and a stunning garden display – are well worth the investment.
We wholeheartedly encourage you to try this DIY cabbage garden in plastic bottles. It’s a fantastic way to connect with nature, reduce your environmental footprint, and enjoy the delicious taste of homegrown produce. Once you’ve embarked on this green adventure, we’d love to hear about your experience! Share your photos, tips, and challenges in the comments section below. Let’s build a community of bottle-gardeners and inspire others to embrace sustainable living, one cabbage at a time. Your insights could be invaluable to fellow enthusiasts, helping them overcome obstacles and achieve gardening success. Let’s cultivate a greener future, together!
Frequently Asked Questions (FAQ)
What type of plastic bottles are best for growing cabbage?
Ideally, you should use sturdy, food-grade plastic bottles. Two-liter soda bottles or larger water bottles work well. Avoid using bottles that have contained harsh chemicals or pesticides, as these could contaminate your soil and plants. Thoroughly clean the bottles with soap and water before using them. Make sure to rinse them well to remove any soap residue. The thicker the plastic, the better, as it will provide more stability and insulation for your plants.
How do I ensure proper drainage in the plastic bottles?
Drainage is crucial for preventing root rot. Before adding soil, create drainage holes in the bottom of each bottle. You can use a drill, a nail, or even a hot glue gun to create several small holes. A layer of gravel or small stones at the bottom of the bottle can also improve drainage. Monitor the moisture level of the soil regularly and adjust your watering accordingly. If the soil feels soggy, you may need to add more drainage holes.
What type of soil should I use for growing cabbage in plastic bottles?
A well-draining potting mix is essential. Avoid using garden soil, as it can be too heavy and compact, hindering root growth. A mix of peat moss, perlite, and vermiculite is a good option. You can also add compost to enrich the soil and provide essential nutrients. Ensure the soil is loose and airy to allow for proper root development. Consider adding slow-release fertilizer to provide a steady supply of nutrients throughout the growing season.
How often should I water my cabbage plants in plastic bottles?
The frequency of watering depends on several factors, including the weather, the size of the bottles, and the type of soil. Generally, you should water your cabbage plants when the top inch of soil feels dry to the touch. Avoid overwatering, as this can lead to root rot. Water deeply, ensuring that the water drains out of the drainage holes. During hot weather, you may need to water more frequently. Check the soil moisture regularly and adjust your watering schedule accordingly.
How much sunlight do cabbage plants need when grown in plastic bottles?
Cabbage plants need at least six hours of sunlight per day. Choose a location that receives ample sunlight. If you live in a hot climate, provide some afternoon shade to prevent the plants from overheating. You can also use grow lights to supplement natural sunlight, especially during the winter months. Rotate the bottles regularly to ensure that all sides of the plants receive adequate sunlight.
How do I protect my cabbage plants from pests and diseases?
Regularly inspect your plants for signs of pests or diseases. Common cabbage pests include aphids, cabbage worms, and slugs. You can use organic pest control methods, such as insecticidal soap or neem oil, to control these pests. Companion planting with marigolds or basil can also help deter pests. To prevent diseases, ensure good air circulation and avoid overwatering. Remove any diseased leaves promptly to prevent the spread of infection.
Can I grow cabbage in plastic bottles indoors?
Yes, you can grow cabbage in plastic bottles indoors, but you will need to provide adequate lighting. Use grow lights to supplement natural sunlight. Choose a location that is well-ventilated and has a stable temperature. Monitor the moisture level of the soil regularly and adjust your watering accordingly. Indoor growing can be a great option for extending the growing season or for those who live in areas with limited outdoor space.
How do I harvest my cabbage from the plastic bottles?
Harvest your cabbage when the head is firm and has reached the desired size. Use a sharp knife to cut the head from the stem. Leave the roots in the bottle, as they may produce new shoots. You can also harvest individual leaves as needed, allowing the plant to continue growing. Regular harvesting encourages further growth and extends the harvest period.
What are some variations I can try with this DIY cabbage garden?
There are many ways to customize your DIY cabbage garden. You can paint the plastic bottles with vibrant colors or add decorative elements to personalize your creation. You can also arrange the bottles in different patterns to create a visually appealing display. Consider adding a trellis or support structure to help the plants grow vertically. Experiment with different varieties of cabbage and other leafy greens. You can also add companion plants to deter pests and enhance the flavor of your cabbage. The possibilities are endless!
How does growing cabbage in plastic bottles contribute to sustainability?
Growing cabbage in plastic bottles is a sustainable practice because it repurposes waste materials, reduces the need for traditional garden beds, and promotes local food production. By recycling plastic bottles, you are reducing the amount of waste that ends up in landfills. Growing your own cabbage reduces your reliance on commercially grown produce, which often involves long-distance transportation and the use of pesticides and herbicides. This DIY project is a small but significant step towards a more sustainable lifestyle.
Leave a Comment