

Growing peanuts backyard might seem like a whimsical dream reserved for sprawling farms, but I’m here to tell you it’s totally achievable, even in a small space! Forget those store-bought peanuts – imagine the satisfaction of harvesting your own homegrown crop, bursting with fresh, nutty flavor.
Peanuts, also known as groundnuts, have a fascinating history, dating back thousands of years to South America. They weren’t always a staple in American baseball games; their journey involved global trade and cultivation, eventually becoming a beloved snack and versatile ingredient worldwide. But why should you bother growing them yourself? Well, for starters, it’s incredibly rewarding to nurture a plant from seed to harvest. Plus, homegrown peanuts often taste superior to commercially grown ones, and you have complete control over the growing process, ensuring they’re free from unwanted chemicals.
This DIY guide is packed with simple tricks and hacks to help you successfully growing peanuts backyard, regardless of your gardening experience. We’ll cover everything from choosing the right variety and preparing your soil to harvesting and curing your peanuts for the perfect crunch. So, ditch the store-bought bags and get ready to experience the joy of growing your own delicious peanuts – it’s easier than you think!

Growing Peanuts in Your Backyard: A Beginner’s Guide
Hey there, fellow gardening enthusiasts! Ever thought about growing your own peanuts? It’s surprisingly easy and incredibly rewarding. Imagine the satisfaction of harvesting your own homegrown peanuts, roasting them up, and enjoying a delicious, healthy snack. I’m here to guide you through the entire process, from choosing the right peanuts to harvesting your bounty. Let’s get started!
Choosing the Right Peanuts and Location
Before you even think about planting, you need to make a few crucial decisions. First, what kind of peanuts do you want to grow? Second, where are you going to plant them?
* Peanut Varieties: There are four main types of peanuts: Virginia, Spanish, Runner, and Valencia.
* Virginia peanuts are known for their large size and are often roasted and sold as snack peanuts.
* Spanish peanuts have a reddish-brown skin and a nutty flavor, making them great for candies and peanut butter.
* Runner peanuts are the most commonly grown type in the US and are primarily used for peanut butter.
* Valencia peanuts are sweet and have three or more small kernels per shell. They’re great for boiling or roasting.
I personally prefer Virginia peanuts because I love their size and flavor when roasted, but feel free to experiment and find your favorite!
* Location, Location, Location: Peanuts need at least 6-8 hours of direct sunlight per day. They also prefer well-drained, sandy loam soil. Avoid heavy clay soil, as it can hinder the development of the peanut pods.
* Soil Testing: Before planting, it’s a good idea to test your soil’s pH. Peanuts thrive in slightly acidic soil with a pH between 6.0 and 6.5. You can purchase a soil testing kit at most garden centers or send a sample to your local agricultural extension office.
* Soil Amendment: If your soil is lacking in nutrients, amend it with compost or well-rotted manure. This will provide the peanuts with the necessary nutrients for healthy growth. Avoid adding too much nitrogen, as this can promote leafy growth at the expense of pod production.
Planting Your Peanuts
Now for the fun part – planting! This is where your peanut-growing journey truly begins.
1. Timing is Key: Peanuts are warm-weather crops and should be planted after the last frost when the soil temperature reaches at least 65°F (18°C). In most regions, this is typically in late spring or early summer.
2. Preparing the Seeds: You can plant raw, unsalted peanuts directly from the grocery store, but make sure they are unroasted. I recommend shelling the peanuts before planting, as this can speed up germination. Be careful not to damage the kernels when shelling.
3. Planting Depth and Spacing: Plant the peanut kernels about 1-2 inches deep and 6-8 inches apart in rows that are 2-3 feet apart. This spacing allows for adequate sunlight and air circulation.
4. Watering After Planting: Water the soil thoroughly after planting to ensure good seed-to-soil contact. Keep the soil consistently moist, but not waterlogged, until the seedlings emerge.
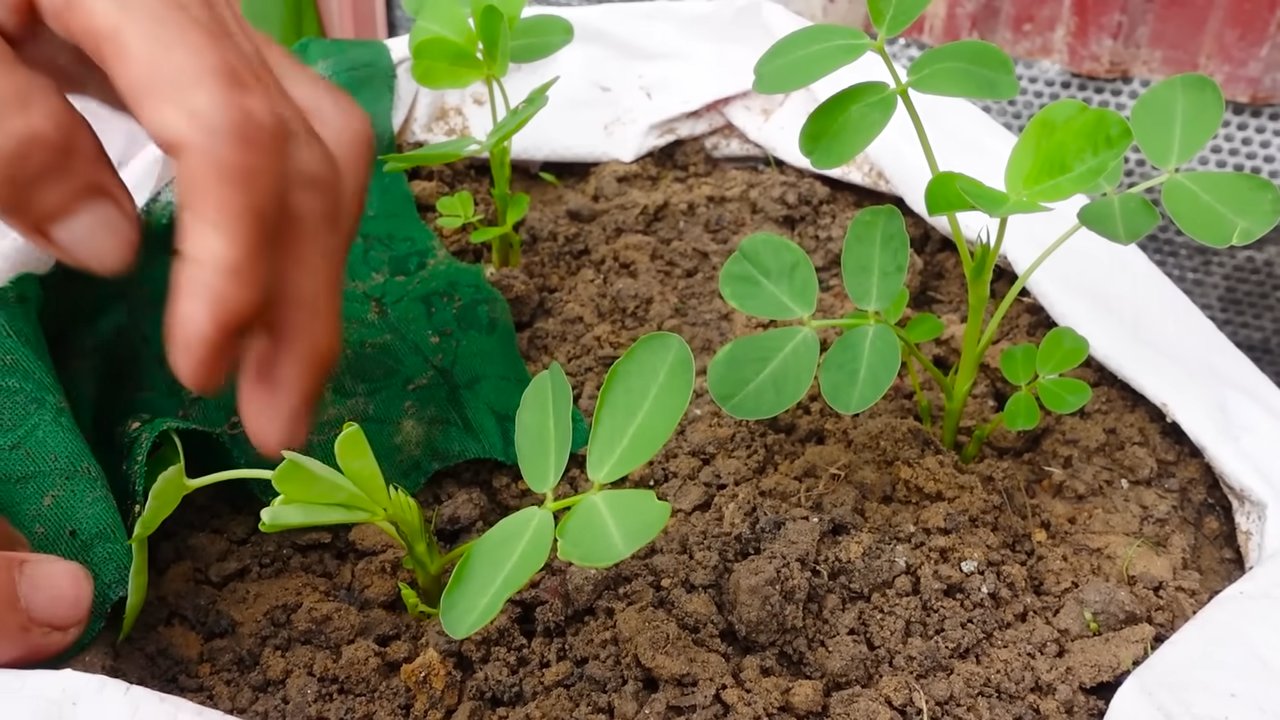
Caring for Your Peanut Plants
Once your peanut plants have sprouted, it’s important to provide them with the proper care to ensure a bountiful harvest.
* Watering: Peanuts need consistent moisture, especially during flowering and pod development. Water deeply and regularly, but avoid overwatering, which can lead to fungal diseases. I usually aim for about an inch of water per week, either from rainfall or irrigation.
* Weeding: Keep the area around your peanut plants free of weeds, as weeds can compete for nutrients and water. Hand-pull weeds regularly or use a hoe to cultivate the soil. Be careful not to damage the peanut plants’ roots when weeding.
* Fertilizing: Peanuts are legumes, which means they can fix nitrogen from the air. However, they still benefit from supplemental fertilization. Apply a balanced fertilizer (e.g., 10-10-10) at planting and again when the plants begin to flower. Follow the instructions on the fertilizer package for application rates.
* Hilling: This is a crucial step in peanut cultivation. As the peanut plants grow, they will produce small, peg-like structures called “pegs” that extend from the base of the plant into the soil. These pegs are where the peanut pods will develop. To encourage pod development, hill the soil around the base of the plants, covering the pegs with soil. This provides a dark, moist environment for the pods to mature. I usually hill my peanut plants every few weeks, starting when they are about 6 inches tall.
* Pest and Disease Control: Peanuts are relatively pest-resistant, but they can be susceptible to certain pests and diseases, such as aphids, spider mites, and leaf spot. Inspect your plants regularly for signs of infestation or disease. If you notice any problems, treat them promptly with an appropriate insecticide or fungicide. Organic options are always a good choice if you prefer to avoid synthetic chemicals.
Harvesting Your Peanuts
The moment you’ve been waiting for! Harvesting your own peanuts is a truly rewarding experience.
1. Knowing When to Harvest: Peanuts are typically ready to harvest about 120-150 days after planting, depending on the variety and growing conditions. A good indicator that your peanuts are ready to harvest is when the leaves begin to turn yellow and the plants start to die back. You can also dig up a few plants and check the pods. The pods should be mature, with well-defined veins and kernels that fill the shells.
2. Digging Up the Plants: Use a garden fork or shovel to carefully dig up the peanut plants, being careful not to damage the pods. Gently shake off any excess soil.
3. Curing the Peanuts: Curing is an essential step in peanut harvesting, as it allows the peanuts to dry properly and develop their flavor. There are two main methods for curing peanuts:
* Air Drying: Hang the peanut plants upside down in a well-ventilated, dry place for 2-4 weeks. Make sure the plants are not exposed to direct sunlight or rain.
* Forced-Air Drying: If you live in a humid climate, you may need to use a forced-air dryer to prevent mold growth. Spread the peanuts out on a screen or rack and use a fan to circulate air around them.
4. Threshing the Peanuts: Once the peanuts are fully cured, you can thresh them by hand or with a peanut thresher. To thresh by hand, simply pull the pods off the plants.
5. Storing Your Peanuts: Store your dried peanuts in a cool, dry place in airtight containers. They can be stored for several months.
Roasting Your Homegrown Peanuts
Now for the best part – enjoying the fruits (or rather, nuts) of your labor! Roasting your own peanuts is easy and delicious.
1. Preheating the Oven: Preheat your oven to 350°F (175°C).
2. Preparing the Peanuts: Spread the peanuts out in a single layer on a baking sheet.
3. Roasting the Peanuts: Roast the peanuts for 15-20 minutes, or until they are golden brown and fragrant. Stir them occasionally to ensure even roasting.
4. Cooling and Seasoning: Remove the peanuts from the oven and let them cool completely. You can season them with salt, pepper, or other spices to your liking.
5. Enjoy! Enjoy your freshly roasted, homegrown peanuts! They’re perfect for snacking, adding to salads, or making your own peanut butter.
Growing peanuts in your backyard is a fun and rewarding experience. With a little bit of planning and effort, you can enjoy a bountiful harvest of delicious, homegrown peanuts. So, what are you waiting for? Get out there and start planting! Happy gardening!
Conclusion
So, there you have it! Growing peanuts in your backyard isn’t just a fun gardening project; it’s a rewarding experience that brings the taste of fresh, homegrown goodness right to your table. Forget the store-bought peanuts that have traveled miles and lost their flavor along the way. Imagine the satisfaction of harvesting your own crop, knowing exactly where it came from and how it was grown. This DIY trick is a must-try for anyone who enjoys fresh produce, loves a hands-on project, or simply wants to add a unique element to their garden.
But why is this DIY peanut growing method so compelling? It’s about more than just saving money (though that’s a definite perk!). It’s about connecting with nature, understanding the growing process, and enjoying the unparalleled flavor of freshly harvested peanuts. The taste difference is truly remarkable – sweeter, nuttier, and bursting with a freshness you simply can’t find in commercially grown varieties. Plus, it’s a fantastic conversation starter and a great way to get kids involved in gardening and healthy eating.
Don’t be afraid to experiment with different varieties of peanuts to find your favorite. Virginia peanuts are known for their large size and are perfect for roasting, while Spanish peanuts are smaller and sweeter, ideal for peanut butter. Runner peanuts are a good all-around choice, and Valencia peanuts are known for having multiple peanuts per shell. Consider your climate and growing conditions when selecting your peanut variety.
For those in cooler climates, starting your peanut plants indoors can give them a head start. Use peat pots or biodegradable containers to avoid disturbing the roots when transplanting them outdoors. You can also try growing peanuts in raised beds or containers to improve drainage and soil temperature.
Another variation to consider is companion planting. Peanuts benefit from being planted near certain other plants. Marigolds can help deter nematodes, while herbs like rosemary and thyme can repel other pests. Planting peanuts near nitrogen-fixing plants like beans or peas can also improve soil fertility.
Remember to be patient! Growing peanuts takes time and attention. But the reward of harvesting your own delicious peanuts is well worth the effort. From planting the seeds to digging up the mature plants, every step of the process is a learning experience.
We wholeheartedly encourage you to give this DIY trick a try. You might be surprised at how easy and rewarding it is to grow your own peanuts. Once you’ve harvested your first crop, the possibilities are endless. Roast them, boil them, make peanut butter, or simply enjoy them straight from the shell.
And most importantly, we want to hear about your experience! Share your tips, tricks, and photos with us in the comments below. Let us know what worked for you, what challenges you faced, and what delicious creations you made with your homegrown peanuts. Together, we can build a community of backyard peanut growers and share the joy of this rewarding gardening project. So, grab your seeds, get your hands dirty, and start growing your own peanuts today! You’ll be amazed at the difference fresh, homegrown peanuts can make.
Frequently Asked Questions (FAQ)
What is the best time to plant peanuts?
The ideal time to plant peanuts is after the last frost, when the soil temperature has reached at least 65 degrees Fahrenheit (around 18 degrees Celsius). Peanuts need a long growing season of at least 120 days, so planting them in late spring or early summer is generally recommended. Check your local climate and planting zone for specific recommendations. In warmer climates with longer growing seasons, you may be able to plant peanuts earlier.
What kind of soil do peanuts need?
Peanuts thrive in well-drained, sandy loam soil. They prefer slightly acidic soil with a pH between 6.0 and 6.5. Avoid heavy clay soils, as they can become waterlogged and hinder peanut development. If your soil is heavy, amend it with compost, sand, and other organic matter to improve drainage and aeration. Good drainage is crucial for preventing fungal diseases and ensuring healthy peanut growth.
How much sunlight do peanuts need?
Peanuts require at least 6-8 hours of direct sunlight per day. Choose a sunny location in your backyard where your peanut plants will receive ample sunlight throughout the growing season. Insufficient sunlight can lead to stunted growth and reduced peanut production.
How often should I water my peanut plants?
Water your peanut plants regularly, especially during dry periods. Keep the soil consistently moist, but avoid overwatering, which can lead to root rot. Water deeply and less frequently, rather than shallowly and more often. As the peanuts mature, you can reduce watering slightly. Monitor the soil moisture and adjust your watering schedule accordingly.
How do I know when my peanuts are ready to harvest?
Peanuts are typically ready to harvest in the fall, about 120-150 days after planting. The leaves will start to turn yellow and brown, and the plants will begin to wilt. To check if the peanuts are ready, dig up a plant and examine the pods. The pods should be plump and full, with a distinct peanut aroma. The inside of the shells should have visible veins and a dark color. If the peanuts are still small and the shells are white, they are not yet ready to harvest.
How do I harvest peanuts?
To harvest peanuts, carefully dig up the entire plant, including the roots and pods. Gently shake off any excess soil. You can use a garden fork or shovel to loosen the soil around the plant before pulling it up. Be careful not to damage the pods during harvesting.
How do I cure peanuts after harvesting?
After harvesting, cure the peanuts to improve their flavor and prevent spoilage. Hang the entire plant upside down in a well-ventilated area for 2-4 weeks. The peanuts should be protected from rain and direct sunlight. Once the peanuts are dry, you can remove them from the plants and store them in a cool, dry place.
Can I grow peanuts in containers?
Yes, you can grow peanuts in containers. Choose a large container with good drainage holes. Fill the container with a well-draining potting mix. Plant 2-3 peanut seeds per container. Water regularly and provide adequate sunlight. Container-grown peanuts may require more frequent watering and fertilization than peanuts grown in the ground.
What are some common pests and diseases that affect peanuts?
Some common pests that affect peanuts include aphids, spider mites, and nematodes. Diseases that can affect peanuts include leaf spot, root rot, and white mold. Monitor your plants regularly for signs of pests or diseases. Use organic pest control methods, such as insecticidal soap or neem oil, to control pests. Ensure good drainage and air circulation to prevent fungal diseases.
Can I make peanut butter from my homegrown peanuts?
Absolutely! Making peanut butter from your homegrown peanuts is a delicious and rewarding experience. Simply roast the peanuts in the oven until they are golden brown. Let them cool slightly, then remove the skins by rubbing them between your hands. Place the peanuts in a food processor and blend until smooth, adding a pinch of salt and a touch of honey or maple syrup to taste. Store your homemade peanut butter in the refrigerator. The taste of homemade peanut butter from your own backyard peanuts is simply unbeatable!
Leave a Comment