

Grow bigger melons than you ever thought possible! Imagine sinking your teeth into a juicy, sweet melon that you nurtured from a tiny seed right in your own backyard. Sounds dreamy, right? Well, it doesn’t have to be just a dream! This article is packed with simple, yet effective, DIY tricks and hacks that will transform your melon-growing game.
For centuries, melons have been a symbol of abundance and prosperity, gracing tables from ancient Egypt to the sun-drenched fields of Italy. Cultivating these delicious fruits has always been a rewarding experience, connecting us to the earth and providing a taste of summer’s bounty. But let’s face it, sometimes our melon harvests can be a little… underwhelming. We’ve all been there, staring at a disappointingly small melon, wondering what went wrong.
That’s where these DIY tricks come in! I’m going to share my favorite, tried-and-true methods for helping you grow bigger melons, sweeter melons, and healthier melon plants overall. Whether you’re a seasoned gardener or just starting out, these tips are designed to be easy to follow and implement, using readily available materials. So, ditch the store-bought melons and get ready to impress your friends and family with your homegrown masterpieces. Let’s get growing!

How to Grow Melons That Will Make Your Neighbors Jealous!
Okay, melon lovers, let’s talk about how to get those prize-winning, juicy, and oh-so-satisfying melons you’ve always dreamed of. I’ve spent years experimenting in my garden, and I’m ready to share my secrets to growing melons that are bigger, sweeter, and healthier than ever before. Get ready to roll up your sleeves and get your hands dirty!
Choosing the Right Melon Variety
First things first, not all melons are created equal! Selecting the right variety for your climate and growing conditions is crucial. Some melons thrive in hot, dry climates, while others prefer more moderate temperatures.
* Consider your climate: Watermelons and cantaloupes generally need a long, hot growing season (70-90 days). Honeydew melons can tolerate slightly cooler temperatures.
* Think about space: Some melon varieties are vining and require a lot of space, while others are more compact. Bush varieties are great for smaller gardens.
* Read the seed packet: Pay close attention to the information on the seed packet, including days to maturity, disease resistance, and recommended growing conditions.
* My personal favorites: For watermelons, I love ‘Sugar Baby’ (early maturing and compact) and ‘Crimson Sweet’ (classic flavor and large size). For cantaloupes, ‘Athena’ is a reliable and disease-resistant choice. For honeydew, ‘Honeycrisp’ is a winner.
Preparing the Soil: The Foundation for Success
Melons are heavy feeders, meaning they need a lot of nutrients to grow and produce those big, delicious fruits. Proper soil preparation is essential for providing them with the nourishment they need.
* Sunlight is Key: Melons need at least 6-8 hours of direct sunlight per day. Choose a location in your garden that gets plenty of sun.
* Well-Drained Soil: Melons hate soggy feet! Make sure your soil drains well. If you have heavy clay soil, amend it with compost, aged manure, or other organic matter to improve drainage.
* Soil pH: Melons prefer a slightly acidic soil pH of 6.0-6.8. You can test your soil pH with a soil testing kit and amend it accordingly.
* Amend with Organic Matter: This is where the magic happens! Incorporate plenty of compost, aged manure, or other organic matter into the soil. This will improve drainage, aeration, and nutrient content. I usually add a generous layer (2-3 inches) of compost to my melon beds.
* Fertilize: Before planting, I like to add a slow-release fertilizer that’s high in phosphorus and potassium. These nutrients are essential for fruit development. Follow the instructions on the fertilizer package.
Planting Your Melon Seeds or Transplants
You can start melon seeds indoors 4-6 weeks before the last expected frost, or you can direct sow them in the garden after the soil has warmed up to at least 70°F (21°C).
* Starting Seeds Indoors:
1. Fill seed trays or small pots with a seed-starting mix.
2. Sow seeds about ½ inch deep.
3. Keep the soil moist but not soggy.
4. Provide plenty of light (either natural or artificial).
5. Harden off the seedlings before transplanting them into the garden. This means gradually exposing them to outdoor conditions over a period of 7-10 days.
* Direct Sowing:
1. Wait until the soil has warmed up to at least 70°F (21°C).
2. Sow seeds about 1 inch deep and 2-3 feet apart.
3. Water gently but thoroughly.
4. Thin seedlings to the strongest plant once they have a few true leaves.
* Transplanting Seedlings:
1. Dig a hole that is slightly larger than the root ball of the seedling.
2. Gently remove the seedling from its container.
3. Place the seedling in the hole and backfill with soil.
4. Water thoroughly.
5. Space plants according to the variety. Watermelons typically need more space than cantaloupes or honeydews.
Watering and Feeding Your Melons
Consistent watering and feeding are crucial for melon growth and fruit development.
* Watering:
1. Water deeply and regularly, especially during hot, dry weather.
2. Avoid overhead watering, as this can promote fungal diseases.
3. Use a soaker hose or drip irrigation to deliver water directly to the roots.
4. Water early in the morning to allow the foliage to dry before nightfall.
* Fertilizing:
1. Side-dress your melon plants with a fertilizer that’s high in potassium when the fruits start to develop. Potassium is essential for fruit sweetness and size.
2. You can also use a liquid fertilizer, such as fish emulsion or seaweed extract, every 2-3 weeks.
3. Avoid over-fertilizing, as this can lead to excessive foliage growth and reduced fruit production.
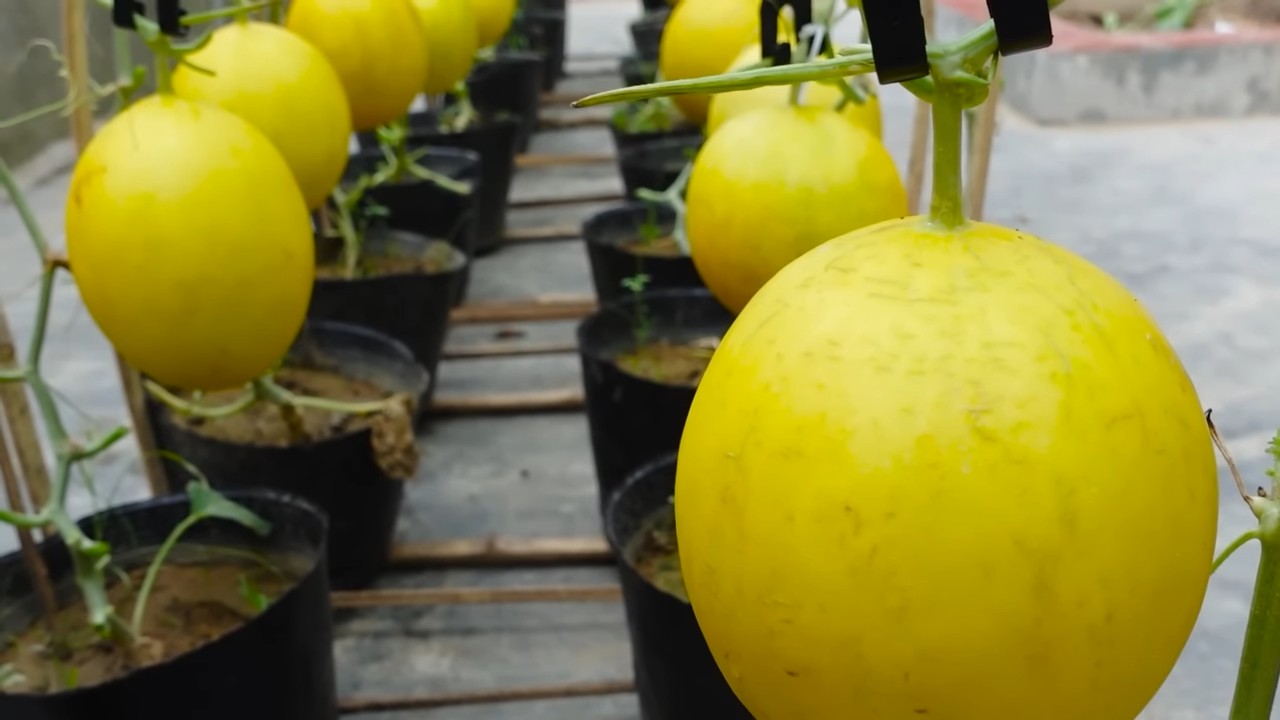
Pruning and Training Your Melon Vines
Pruning and training your melon vines can help improve air circulation, reduce disease risk, and encourage larger fruit.
* Pruning:
1. Remove any dead, damaged, or diseased leaves or vines.
2. Pinch off the tips of the vines to encourage branching.
3. Remove any suckers (small shoots that grow from the base of the plant).
4. For larger melons, you can limit the number of fruits per vine to 2-3. This will allow the plant to focus its energy on developing those fruits.
* Training:
1. Train the vines to grow along a trellis or fence to save space and improve air circulation.
2. You can also use stakes or cages to support the fruits as they grow larger.
3. Place a piece of cardboard or straw under the fruits to prevent them from rotting on the ground.
Hand Pollination (If Necessary)
Melons have separate male and female flowers. Bees and other pollinators are usually responsible for transferring pollen from the male flowers to the female flowers. However, if you’re not seeing a lot of bee activity in your garden, you may need to hand-pollinate your melons.
* How to Hand-Pollinate:
1. Identify the male and female flowers. Male flowers have a long, slender stem, while female flowers have a small, immature fruit at the base.
2. Use a small paintbrush or cotton swab to collect pollen from the male flower.
3. Gently transfer the pollen to the stigma (the sticky part) of the female flower.
4. Repeat this process for several female flowers.
5. Hand-pollinate in the morning, when the flowers are open and the pollen is fresh.
Protecting Your Melons from Pests and Diseases
Melons are susceptible to a variety of pests and diseases, so it’s important to take steps to protect them.
* Common Pests:
1. Squash bugs: Handpick them off the plants or use insecticidal soap.
2. Cucumber beetles: Cover the plants with row covers or use insecticidal soap.
3. Aphids: Spray the plants with a strong stream of water or use insecticidal soap.
4. Vine borers: Wrap the base of the stems with aluminum foil or use a systemic insecticide.
* Common Diseases:
1. Powdery mildew: Improve air circulation and use a fungicide.
2. Downy mildew: Improve air circulation and use a fungicide.
3. Fusarium wilt: Plant resistant varieties and practice crop rotation.
4. Anthracnose: Use a fungicide and avoid overhead watering.
* Prevention is Key:
1. Choose disease-resistant varieties.
2. Practice crop rotation.
3. Improve air circulation.
4. Avoid overhead watering.
5. Keep your garden clean and free of debris.
6. Monitor your plants regularly for signs of pests or diseases.
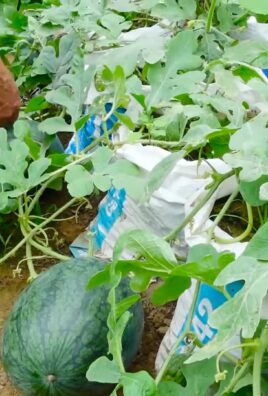
Harvesting Your Melons at the Peak of Perfection
Knowing when to harvest your melons is crucial for getting the best flavor and texture.
* Watermelons:
1. Look for a dry tendril closest to the melon.
2. Check the ground spot (the area where the melon rests on the ground). It should be yellow or cream-colored.
3. Thump the melon. A ripe watermelon will sound hollow.
* Cantaloupes:
1. The melon should slip easily from the vine with a gentle tug.
2. The skin should be a golden color and have a sweet
Conclusion
So, there you have it! This simple, yet effective DIY trick to grow bigger melons is more than just a gardening hack; it’s a pathway to unlocking the full potential of your melon patch. We’ve explored the science behind it, the practical steps involved, and the potential benefits you can reap – from bragging rights at the next neighborhood barbecue to a significantly increased yield of delicious, juicy melons.
But why is this a must-try? Because it empowers you to take control of your garden’s destiny. Instead of passively waiting for nature to take its course, you’re actively intervening to provide your melon plants with the support and resources they need to thrive. This isn’t about cheating nature; it’s about working in harmony with it, understanding its processes, and optimizing them for a bountiful harvest.
Imagine sinking your teeth into a perfectly ripe, incredibly large watermelon, cantaloupe, or honeydew melon that you nurtured from a tiny seed to a magnificent fruit. The satisfaction is unparalleled. And beyond the sheer size, this technique often leads to improved flavor and texture, as the plant can dedicate more energy to developing the fruit’s sweetness and succulence.
Don’t be afraid to experiment with variations! If you’re growing smaller melon varieties, you might need to adjust the amount of support you provide. Consider using different types of slings or trellises to accommodate the specific needs of your plants. You can also explore different nutrient solutions to further enhance growth and flavor. Perhaps try adding a touch of Epsom salts to the soil for an extra boost of magnesium, which is known to promote fruit development. Or, if you’re feeling adventurous, experiment with companion planting to attract beneficial insects and deter pests. Marigolds, for example, are known to repel nematodes, which can damage melon roots.
The key is to observe your plants closely and adapt your approach as needed. Gardening is a journey of learning and discovery, and there’s no one-size-fits-all solution. What works for one gardener in one climate might not work for another. That’s why it’s so important to be observant, adaptable, and willing to experiment.
We wholeheartedly encourage you to give this DIY trick a try. It’s a relatively simple and inexpensive way to significantly improve your melon harvest. And the best part? You’ll learn so much in the process. You’ll gain a deeper understanding of plant physiology, soil science, and the intricate relationship between plants and their environment.
But don’t just take our word for it. We want to hear about your experiences! Did this trick work for you? What challenges did you encounter? What variations did you try? Share your stories, tips, and photos in the comments section below. Let’s create a community of melon-growing enthusiasts who are passionate about sharing their knowledge and helping each other succeed. Together, we can unlock the secrets to growing the biggest, juiciest, and most delicious melons imaginable. So, grab your gardening gloves, get your hands dirty, and let’s get growing! Remember, the journey to grow bigger melons starts with a single seed and a little bit of ingenuity.
Frequently Asked Questions (FAQ)
What types of melons does this trick work best for?
This DIY trick is generally effective for a wide range of melon varieties, including watermelons, cantaloupes, honeydew melons, and even smaller melons like Galia or Charentais. However, the specific techniques and materials you use may need to be adjusted depending on the size and weight of the melon. For larger watermelons, you’ll need a more robust support system than you would for smaller cantaloupes. Consider the mature size of your chosen melon variety when planning your support structure.
How early in the growing season should I start supporting the melons?
It’s best to start supporting the melons as soon as they begin to develop and reach a significant size. This is typically when they are about the size of a softball or slightly larger. Waiting too long can put excessive strain on the vine and increase the risk of the melon detaching prematurely. Early support allows the vine to gradually adjust to the added weight and minimizes the risk of damage. Regularly check your melon plants and provide support as soon as you notice the fruits starting to swell.
What materials are best for creating the support slings?
The best materials for creating support slings are those that are strong, durable, and breathable. Burlap, old t-shirts (cut into strips), netting, and even pantyhose can all work well. Avoid using materials that are too rigid or that could potentially cut into the melon’s skin. The material should be able to distribute the weight evenly and provide adequate support without causing damage. Breathable materials are important to prevent moisture buildup, which can lead to rot.
How often should I water and fertilize my melon plants?
Melon plants require consistent watering, especially during fruit development. Water deeply and regularly, aiming to keep the soil consistently moist but not waterlogged. The frequency of watering will depend on your climate, soil type, and the size of your plants. As for fertilization, melons benefit from a balanced fertilizer early in the growing season, followed by a fertilizer higher in phosphorus and potassium during fruit development. These nutrients promote strong root growth, abundant flowering, and large, flavorful fruits. Follow the instructions on your fertilizer label and avoid over-fertilizing, which can harm your plants.
What are some common pests and diseases that affect melon plants, and how can I prevent them?
Common pests that affect melon plants include aphids, squash bugs, vine borers, and cucumber beetles. Diseases include powdery mildew, downy mildew, and fusarium wilt. To prevent these problems, practice good garden hygiene, such as removing plant debris and weeds. Use row covers to protect young plants from pests. Encourage beneficial insects, such as ladybugs and lacewings, which prey on aphids. Choose disease-resistant melon varieties whenever possible. If you notice signs of pests or diseases, treat them promptly with appropriate organic or chemical controls. Crop rotation can also help to prevent soilborne diseases.
Can I use this trick for melons grown in containers?
Yes, you can absolutely use this trick for melons grown in containers. However, you’ll need to ensure that your containers are large enough to accommodate the melon plants’ root systems and that you provide adequate support for the vines and fruits. Choose a container that is at least 20 gallons in size for larger melon varieties. You may also need to use a trellis or other support structure to keep the vines from sprawling. The same principles of supporting the developing melons with slings or netting apply to container-grown melons.
What if my melon starts to rot while it’s still on the vine?
If you notice a melon starting to rot while it’s still on the vine, it’s important to take action quickly to prevent the rot from spreading. Remove the affected melon immediately and dispose of it properly. Inspect the remaining melons for any signs of rot or damage. Improve air circulation around the plants by pruning away excess foliage. Ensure that the soil is well-draining and avoid overwatering. You may also need to treat the plants with a fungicide to prevent further spread of the disease.
How do I know when my melon is ripe and ready to harvest?
Determining when a melon is ripe and ready to harvest depends on the specific variety. However, there are some general indicators to look for. For watermelons, look for a dull, rather than shiny, rind and a yellowish spot on the underside where the melon rested on the ground. The tendril closest to the melon should also be brown and dry. For cantaloupes, the melon should slip easily from the vine when gently tugged. Honeydew melons will develop a slightly waxy feel and a sweet aroma. Pay attention to the specific characteristics of your chosen melon variety and consult a gardening guide for more detailed information.
Will this trick affect the taste of my melons?
This trick, in itself, doesn’t directly affect the taste of your melons. However, by providing adequate support and allowing the plant to focus its energy on fruit development, it can indirectly lead to improved flavor. When the plant is not stressed by the weight of the melons, it can allocate more resources to producing sugars and other compounds that contribute to the fruit’s sweetness and flavor. Proper watering and fertilization also play a crucial role in determining the taste of your melons.
Is there a risk of the support system damaging the melon?
Yes, there is a potential risk of the support system damaging the melon if it’s not properly designed or installed. Avoid using materials that are too abrasive or that could cut into the melon’s skin. Ensure that the support system is strong enough to bear the weight of the melon without collapsing or putting excessive pressure on the fruit. Regularly inspect the support system for any signs of wear or damage and make repairs as needed. By taking these precautions, you can minimize the risk of damage and ensure that your melons reach their full potential.
Leave a Comment