

Juicing wheatgrass at home might sound like something only health gurus do, but trust me, it’s easier (and more rewarding!) than you think. Forget expensive juice bars – we’re bringing the power of this vibrant green elixir right to your kitchen! For centuries, cultures around the world have recognized the potent benefits of grasses, using them for medicinal and nutritional purposes. While the modern wheatgrass craze is relatively recent, its roots are firmly planted in ancient wisdom.
Why should you bother with juicing wheatgrass at home? Well, let’s face it: we all want to feel our best. In today’s fast-paced world, it’s easy to fall short on essential nutrients. Wheatgrass is packed with vitamins, minerals, and antioxidants, offering a concentrated dose of goodness in a small shot. Plus, learning to juice it yourself is incredibly empowering! I’m going to show you some simple DIY tricks and hacks that will make juicing wheatgrass at home a breeze, even if you don’t have fancy equipment. Get ready to unlock a natural energy boost and a vibrant glow – all from the comfort of your own home!
DIY Wheatgrass Juicing: A Beginner’s Guide to Green Goodness
Hey there, health enthusiasts! Ever wanted to tap into the incredible benefits of wheatgrass juice but felt intimidated by the cost or accessibility? Well, fear no more! I’m going to walk you through the surprisingly simple process of growing and juicing your own wheatgrass at home. Trust me, it’s easier than you think, and the fresh, vibrant juice is totally worth the effort.
What You’ll Need: Gathering Your Supplies
Before we dive in, let’s make sure you have everything you need. This is a pretty low-cost project, which is another reason why I love it!
* **Wheatgrass Seeds:** Look for organic, hard red winter wheat seeds specifically labeled for sprouting or growing wheatgrass. You can find these at health food stores, garden centers, or online.
* **Growing Trays:** You’ll need at least two shallow trays with drainage holes. One tray will hold the soil, and the other will act as a drip tray to catch excess water. I like using trays that are around 10×20 inches.
* **Growing Medium:** You can use potting soil, seed starting mix, or even coconut coir. I prefer using a seed starting mix because it’s lightweight and drains well. Avoid using soil with added fertilizers, as we want pure, clean wheatgrass.
* **Spray Bottle:** A simple spray bottle for misting the seeds and seedlings.
* **Water:** Filtered water is best.
* **Sharp Scissors or Knife:** For harvesting the wheatgrass.
* **Wheatgrass Juicer:** This is the most important piece of equipment! A dedicated wheatgrass juicer is essential for extracting the juice efficiently. Masticating juicers (also known as slow juicers) work best because they gently crush the wheatgrass to extract the maximum amount of juice. Centrifugal juicers aren’t suitable for wheatgrass as they don’t extract enough juice and can damage the machine.
* **Optional: Blackout Period Supplies:** A dark towel, a lid for the tray, or even a dark room can be used for the initial blackout period.
Phase 1: Planting Your Wheatgrass Seeds
This is where the magic begins! Getting the planting right is crucial for a healthy and abundant harvest.
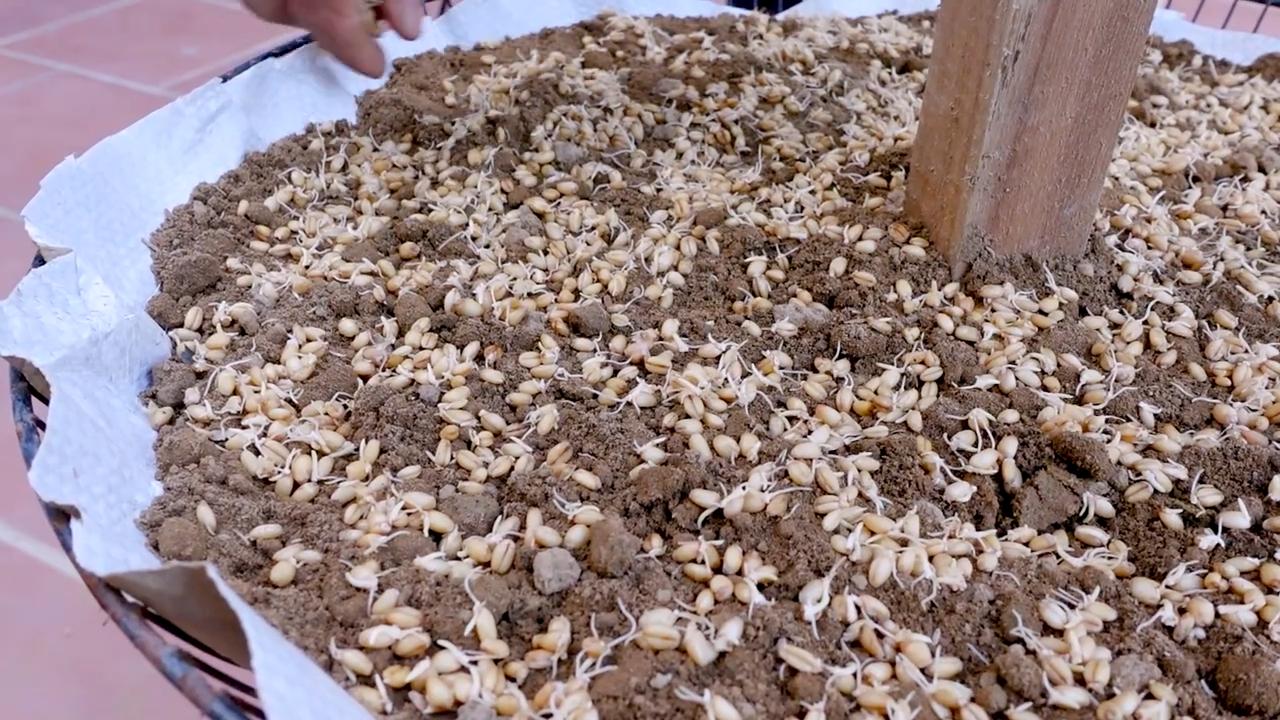
1. **Soaking the Seeds:** Start by soaking your wheatgrass seeds in a bowl of cool, filtered water for 8-12 hours. This helps to soften the seed coat and kickstart the germination process. I usually do this overnight. You’ll notice the seeds will swell up considerably.
2. **Preparing the Tray:** While the seeds are soaking, prepare your growing tray. Fill it with your chosen growing medium, leaving about an inch of space at the top. Gently level the soil and moisten it thoroughly with your spray bottle. The soil should be damp but not soggy.
3. **Sowing the Seeds:** Drain the soaked seeds and spread them evenly over the surface of the soil. You want a dense layer of seeds, but not so thick that they’re piled on top of each other. A good rule of thumb is to aim for about 1/4 inch of seeds covering the soil.
4. **Covering the Seeds:** Lightly press the seeds into the soil with your hand or a flat object. Then, mist the seeds with water again.
5. **The Blackout Period:** This is a crucial step for promoting strong root growth. Cover the tray with a dark towel, a lid, or place it in a dark room for 2-3 days. This mimics the natural germination process that occurs underground. Make sure to mist the seeds with water at least once a day during this period to keep them moist.
Phase 2: Nurturing Your Wheatgrass
Once the seeds have sprouted, it’s time to give them the light and care they need to thrive.
1. **Introducing Light:** After the blackout period, you’ll see that the seeds have sprouted and are starting to turn green. Remove the cover and place the tray in a well-lit area, but avoid direct sunlight, which can scorch the delicate seedlings. An east-facing window is ideal.
2. **Watering:** Continue to mist the wheatgrass seedlings with water 1-2 times a day, keeping the soil consistently moist. Avoid overwatering, which can lead to mold growth. You can also water from the bottom by pouring water into the drip tray and allowing the soil to absorb it.
3. **Monitoring for Mold:** Keep an eye out for any signs of mold growth. If you see any, gently remove the affected areas and improve air circulation by placing a small fan near the tray. A diluted hydrogen peroxide solution (1 part hydrogen peroxide to 10 parts water) can also be sprayed on the affected areas to help control mold.
4. **Rotation:** Rotate the tray regularly to ensure that all sides receive equal amounts of light. This will help the wheatgrass grow evenly.
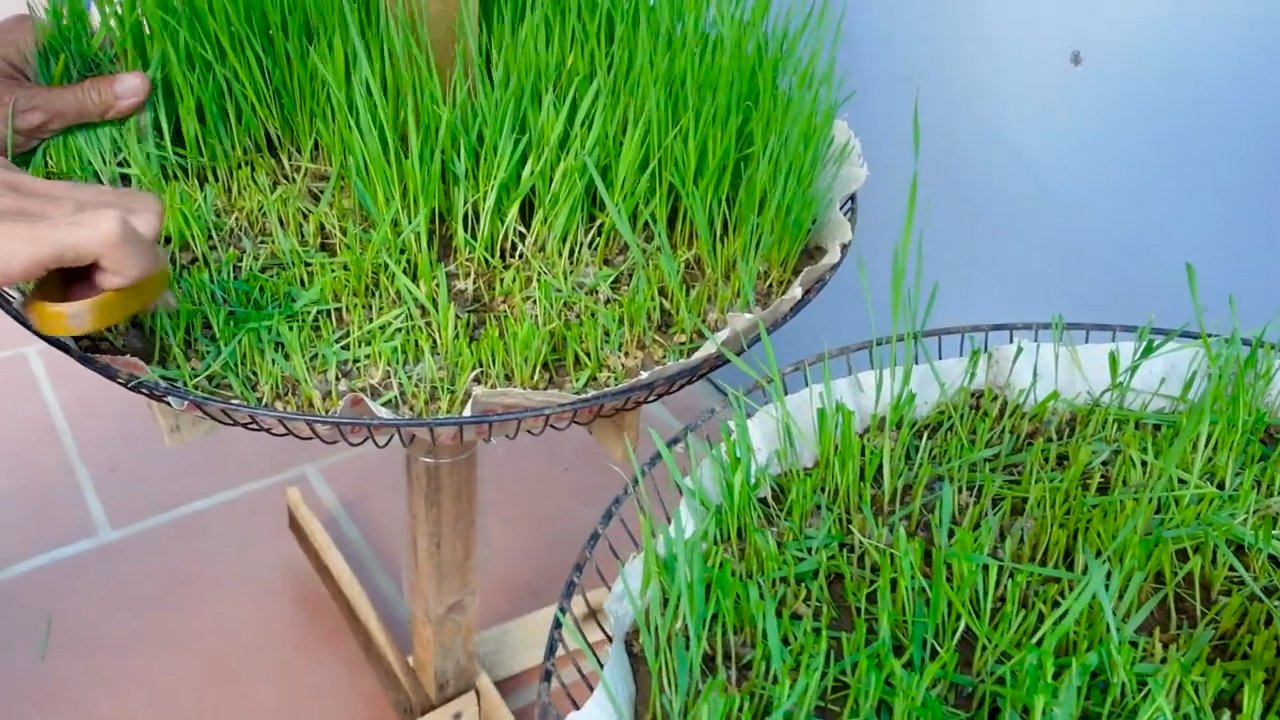
Phase 3: Harvesting and Juicing Your Wheatgrass
The moment you’ve been waiting for! Harvesting and juicing your own wheatgrass is incredibly rewarding.
1. **Harvesting:** Your wheatgrass is ready to harvest when it’s about 6-8 inches tall and has developed a vibrant green color. This usually takes about 7-10 days after removing the cover.
2. **Cutting the Wheatgrass:** Using sharp scissors or a knife, cut the wheatgrass about an inch above the soil line. This allows for a second harvest, although the second harvest won’t be as potent as the first.
3. **Preparing for Juicing:** Rinse the harvested wheatgrass thoroughly with water to remove any dirt or debris.
4. **Juicing:** Feed the wheatgrass into your wheatgrass juicer, following the manufacturer’s instructions. Be sure to feed it slowly and steadily to allow the juicer to extract the maximum amount of juice.
5. **Enjoying Your Juice:** Drink your freshly squeezed wheatgrass juice immediately for the best flavor and nutritional benefits. The taste can be quite strong, so you might want to mix it with a little apple juice, lemon juice, or ginger to make it more palatable. I personally like to take it as a shot!
Tips and Tricks for Wheatgrass Success
Here are a few extra tips to help you grow the best wheatgrass possible:
* Seed Density: Finding the right seed density is key. Too few seeds, and you’ll have sparse growth. Too many, and you risk overcrowding and mold. Experiment to find what works best for you.
* Water Quality: Using filtered water is important to avoid introducing contaminants to your wheatgrass.
* Air Circulation: Good air circulation is essential for preventing mold growth. A small fan can make a big difference.
* Second Harvest: You can get a second harvest from your wheatgrass, but it won’t be as potent as the first. After harvesting, continue to water and care for the tray as usual.
* Storage: If you can’t juice all of your wheatgrass at once, you can store it in the refrigerator for a few days. Wrap it in a damp paper towel and place it in a plastic bag.
* Cleaning Your Juicer: Clean your wheatgrass juicer thoroughly after each use to prevent buildup and ensure optimal performance.
* Experiment with Varieties: While hard red winter wheat is the most common type of wheatgrass, you can experiment with other varieties to see which one you prefer.
* Don’t Give Up! Sometimes things don’t go perfectly the first time. Don’t be discouraged if you encounter problems. Just learn from your mistakes and try again.
Troubleshooting Common Problems
Even with the best intentions, you might encounter some challenges along the way. Here’s how to troubleshoot some common problems:
* Mold Growth: As mentioned earlier, mold can be a problem, especially in humid environments. Improve air circulation, avoid overwatering, and use a diluted hydrogen peroxide solution to control mold.
* Slow Germination: If your seeds are taking longer than expected to germinate, make sure they are properly soaked and kept moist during the blackout period. The temperature can also affect germination, so try to keep the tray in a warm place.
* Yellowing Wheatgrass: Yellowing wheatgrass can be a sign of nutrient deficiency or overwatering. Make sure you’re using a good quality growing medium and avoid overwatering.
* Uneven Growth: Uneven growth can be caused by uneven lighting. Rotate the tray regularly to ensure that all sides receive equal amounts of light.
Why Grow Your Own Wheatgrass?
Okay, so why go through all this effort? Here’s why I think growing your own wheatgrass is totally worth it:
* Freshness: You can’t beat the freshness of homegrown wheatgrass. The juice is packed with nutrients and enzymes that are lost over time when wheatgrass is stored.
* Cost Savings: Buying wheatgrass juice can be expensive. Growing your own is a much more affordable option in the long run.
* Control: You have complete control over the growing process, ensuring that your wheatgrass
Conclusion
So, there you have it! Mastering the art of juicing wheatgrass at home is not just a trendy health kick; it’s a gateway to unlocking a potent source of nutrients and vitality. We’ve walked through the process, demystified the equipment, and armed you with the knowledge to confidently create your own vibrant green shots.
Why is this DIY trick a must-try? Because it puts you in complete control. You know exactly where your wheatgrass comes from, how it’s grown, and how it’s processed. This translates to a fresher, more potent juice, bursting with enzymes and chlorophyll that are often lost in commercially produced alternatives. Plus, let’s be honest, there’s a certain satisfaction that comes from nurturing your own little patch of green goodness and transforming it into a powerful elixir. You’re not just consuming a product; you’re participating in a process, connecting with nature, and taking a proactive step towards your well-being.
But the benefits extend beyond just freshness and control. Juicing wheatgrass at home is also incredibly cost-effective in the long run. Think about the price of those tiny wheatgrass shots at your local juice bar. They add up quickly! By investing in a simple setup and growing your own wheatgrass, you can enjoy a daily dose of this superfood without breaking the bank.
Looking for variations? Absolutely! While a straight wheatgrass shot is the purist’s choice, don’t be afraid to experiment. Try blending your wheatgrass juice with a squeeze of lemon or lime to brighten the flavor. Add it to a smoothie with other fruits and vegetables for a more palatable and nutrient-rich concoction. A small amount of apple or pineapple can also help to sweeten the taste. You can even freeze your wheatgrass juice into ice cubes for a quick and easy addition to your morning smoothie. Remember to start small and gradually increase the amount of wheatgrass juice you consume as your body adjusts.
Ready to embark on your wheatgrass juicing journey? We wholeheartedly encourage you to give it a try. It’s easier than you might think, and the rewards are well worth the effort. Don’t be intimidated by the initial setup; start small, experiment, and find what works best for you.
And most importantly, we want to hear about your experience! Share your tips, tricks, and triumphs in the comments below. What kind of juicer are you using? What are your favorite ways to incorporate wheatgrass juice into your diet? What challenges have you faced, and how have you overcome them? Your insights can help and inspire others to embrace the power of juicing wheatgrass at home. Let’s build a community of wheatgrass enthusiasts and support each other on our journey to better health!
Don’t delay, start juicing wheatgrass at home today!
Frequently Asked Questions (FAQ)
What exactly is wheatgrass, and why is it so good for me?
Wheatgrass is essentially the young grass of the common wheat plant. It’s harvested before the wheat kernels develop, at a stage when it’s incredibly rich in nutrients. Think of it as a concentrated dose of sunshine and earth. It’s packed with chlorophyll, vitamins (A, C, E, and K), minerals (iron, calcium, magnesium), amino acids, and enzymes. These nutrients work synergistically to support various bodily functions, including detoxification, immune system support, and energy production. Many people report increased energy levels, improved digestion, and a general sense of well-being after incorporating wheatgrass into their diet. The high chlorophyll content is also believed to have cleansing and oxygenating properties.
What kind of juicer is best for juicing wheatgrass?
This is a crucial question! Not all juicers are created equal when it comes to wheatgrass. Centrifugal juicers, the kind you might use for fruits and vegetables, are generally not effective for wheatgrass. They tend to produce a lot of foam and waste, and they don’t extract nearly as much juice. The best type of juicer for wheatgrass is a masticating juicer, also known as a slow juicer or cold-press juicer. These juicers use an auger to slowly crush and squeeze the wheatgrass, extracting a higher yield of juice with minimal oxidation. This preserves more of the nutrients and enzymes. Manual wheatgrass juicers are also an option, especially if you’re on a budget or want a more portable solution. They require a bit more elbow grease, but they can be very effective. Research different models and read reviews before making a purchase to find one that suits your needs and budget.
How do I grow my own wheatgrass?
Growing your own wheatgrass is surprisingly easy and rewarding. You’ll need wheatgrass seeds (available online or at health food stores), trays with drainage holes, soil (or a soilless growing medium like coco coir), and a spray bottle. Soak the seeds in water for 8-12 hours, then drain and spread them evenly over the soil in your trays. Water gently with the spray bottle, keeping the soil moist but not soggy. Cover the trays with a lid or damp towel for the first few days to create a humid environment. Once the seeds have sprouted, remove the cover and place the trays in a well-lit area, but avoid direct sunlight, which can scorch the young grass. Continue to water regularly, and your wheatgrass should be ready to harvest in about 7-10 days, when it’s about 4-6 inches tall.
How much wheatgrass juice should I drink?
It’s best to start small and gradually increase your intake. A typical serving size is 1-2 ounces (30-60 ml) of wheatgrass juice per day. Some people can tolerate more, but it’s important to listen to your body. Drinking too much wheatgrass juice too quickly can cause nausea, headaches, or other digestive discomforts. It’s also a good idea to drink wheatgrass juice on an empty stomach for optimal absorption.
How do I store wheatgrass juice?
Wheatgrass juice is best consumed immediately after juicing, as it begins to lose its nutrients and enzymes over time. If you need to store it, keep it in an airtight container in the refrigerator for no more than 24 hours. The longer it sits, the more its nutritional value will diminish. You can also freeze wheatgrass juice in ice cube trays for longer storage. This is a convenient way to have a ready supply of wheatgrass juice for smoothies or other recipes.
What if I don’t like the taste of wheatgrass juice?
The taste of wheatgrass juice can be quite strong and earthy, which some people find off-putting. Don’t worry, there are ways to make it more palatable! As mentioned earlier, try blending it with lemon or lime juice, or adding it to a smoothie with fruits and vegetables. You can also dilute it with water or juice. The key is to experiment and find what works best for you. Remember, you’re not drinking it for the taste; you’re drinking it for the health benefits!
Are there any potential side effects of drinking wheatgrass juice?
While wheatgrass juice is generally safe for most people, some individuals may experience mild side effects, such as nausea, headaches, or digestive discomfort. These side effects are usually temporary and can be minimized by starting with a small dose and gradually increasing your intake. If you have any underlying health conditions or are taking medications, it’s always a good idea to consult with your doctor before adding wheatgrass juice to your diet. Also, be sure to purchase wheatgrass seeds from a reputable source to avoid contamination.
Can I juice wheatgrass if I have a gluten intolerance or celiac disease?
Yes, you can usually juice wheatgrass even if you have a gluten intolerance or celiac disease. Wheatgrass is harvested before the wheat plant produces gluten in the grain. However, it’s important to ensure that the wheatgrass is grown and processed in a gluten-free environment to avoid cross-contamination. Look for wheatgrass seeds that are certified gluten-free. If you’re highly sensitive to gluten, it’s always best to consult with your doctor or a registered dietitian before consuming wheatgrass juice.


Leave a Comment