

Brussels Sprouts Mini Planters: Ever dreamed of having a tiny, adorable Brussels sprouts farm right on your windowsill? I know I have! Forget those sprawling vegetable gardens that require acres of land and hours of back-breaking work. We’re talking miniature marvels, bite-sized bursts of green goodness grown with your own two hands. This DIY project is all about bringing the joy of gardening into even the smallest of spaces, and trust me, it’s easier than you think!
The history of growing Brussels sprouts stretches back centuries, with roots in (pun intended!) the Brussels region of Belgium. While traditionally grown in larger fields, the concept of miniature gardening has gained immense popularity in recent years, fueled by a desire for sustainable living and a connection to nature, even in urban environments. People are increasingly seeking ways to grow their own food, reduce their carbon footprint, and add a touch of greenery to their homes.
That’s where these Brussels Sprouts Mini Planters come in. Imagine the satisfaction of harvesting your own fresh, organic Brussels sprouts, knowing exactly where they came from and how they were grown. Plus, it’s a fantastic way to teach kids about the life cycle of plants and the importance of healthy eating. This DIY trick not only provides you with delicious, homegrown vegetables but also adds a charming, rustic touch to your home decor. So, let’s get our hands dirty and create some miniature magic!
DIY Brussels Sprouts Mini Planters: From Kitchen Scrap to Cute Decor!
Hey there, fellow plant enthusiasts! Ever thought about turning your leftover Brussels sprouts stems into adorable mini planters? Well, get ready to be amazed because I’m going to show you exactly how to do it! This project is super fun, eco-friendly, and a fantastic way to add a touch of green to your home. Plus, it’s a great conversation starter!
What You’ll Need:
Before we dive in, let’s gather our supplies. Don’t worry, you probably have most of these things lying around already!
* **Brussels Sprouts Stems:** Save those stems after you’ve enjoyed your Brussels sprouts! The thicker, the better.
* **Small Succulent Cuttings or Air Plants:** These are perfect because they don’t need much soil and are relatively low-maintenance.
* **Potting Soil (Succulent Mix Recommended):** A well-draining mix is crucial for succulents.
* **Craft Knife or Small Spoon:** For hollowing out the stems.
* **Small Drill (Optional):** For drainage holes (highly recommended).
* **Waterproof Sealer (Optional):** To prolong the life of your planters.
* **Paint or Markers (Optional):** For decorating your planters.
* **Small Brush (Optional):** For applying the sealer or paint.
* **Gloves (Optional):** To protect your hands.
* **Paper Towels:** For cleaning up any messes.
Preparing the Brussels Sprouts Stems
Okay, let’s get our hands dirty! This is where the magic begins.
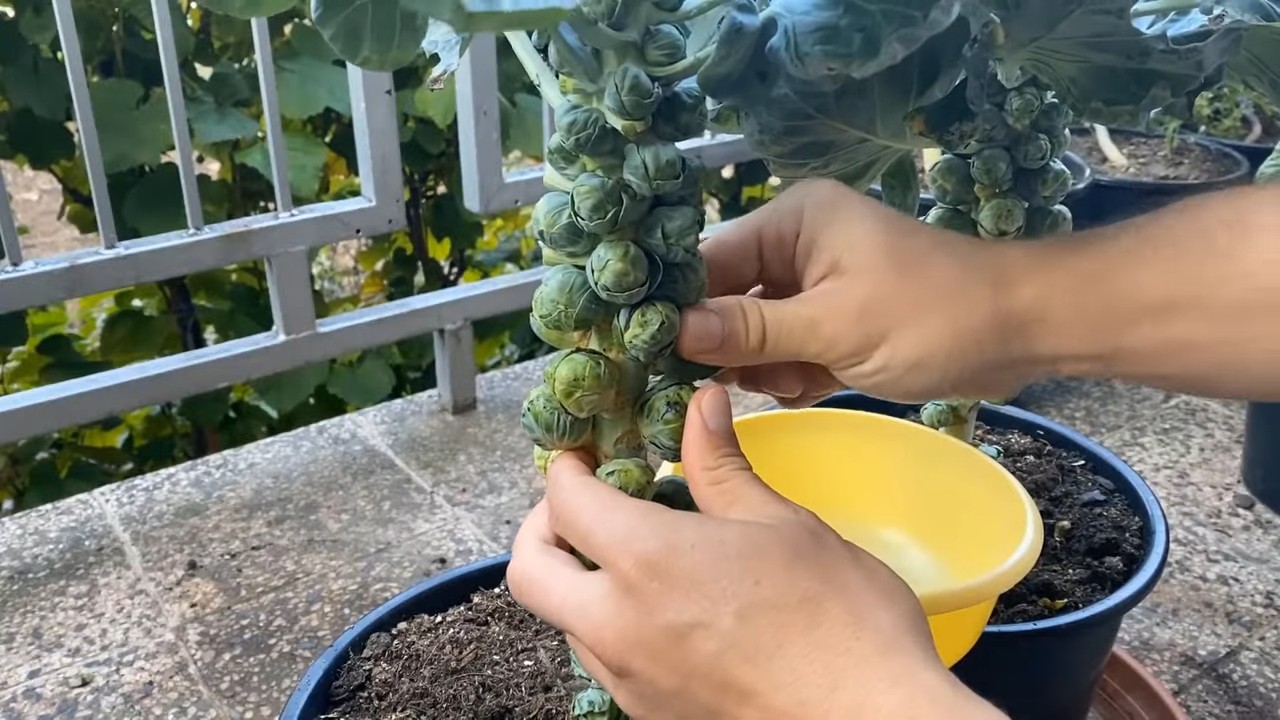
1. **Clean the Stems:** First things first, give those Brussels sprouts stems a good rinse under cold water. Remove any remaining leaves or dirt. Pat them dry with a paper towel.
2. **Hollowing Out the Stems:** This is the trickiest part, but don’t worry, I’ll guide you through it. Using your craft knife or small spoon, carefully hollow out the center of each stem. You want to create a small cavity that can hold a bit of soil and your succulent cutting. Be patient and work slowly to avoid accidentally cutting through the sides of the stem. I found that using a small spoon to scoop out the center worked best for me, especially with smaller stems.
3. **Creating Drainage (Crucial!):** This is super important for the health of your plants. Succulents hate sitting in water, so drainage is key. Using a small drill, carefully drill a small hole in the bottom of each stem. If you don’t have a drill, you can try using a nail and hammer, but be extra careful not to crack the stem. If you absolutely can’t make a drainage hole, be *extremely* careful not to overwater your plants.
4. **Applying Waterproof Sealer (Optional but Recommended):** To help your mini planters last longer, consider applying a waterproof sealer to the inside and outside of the stems. This will help protect them from moisture and prevent them from rotting too quickly. Let the sealer dry completely according to the manufacturer’s instructions. I used a clear, non-toxic sealer that I found at my local craft store.
Planting Your Succulents
Now for the fun part – planting!
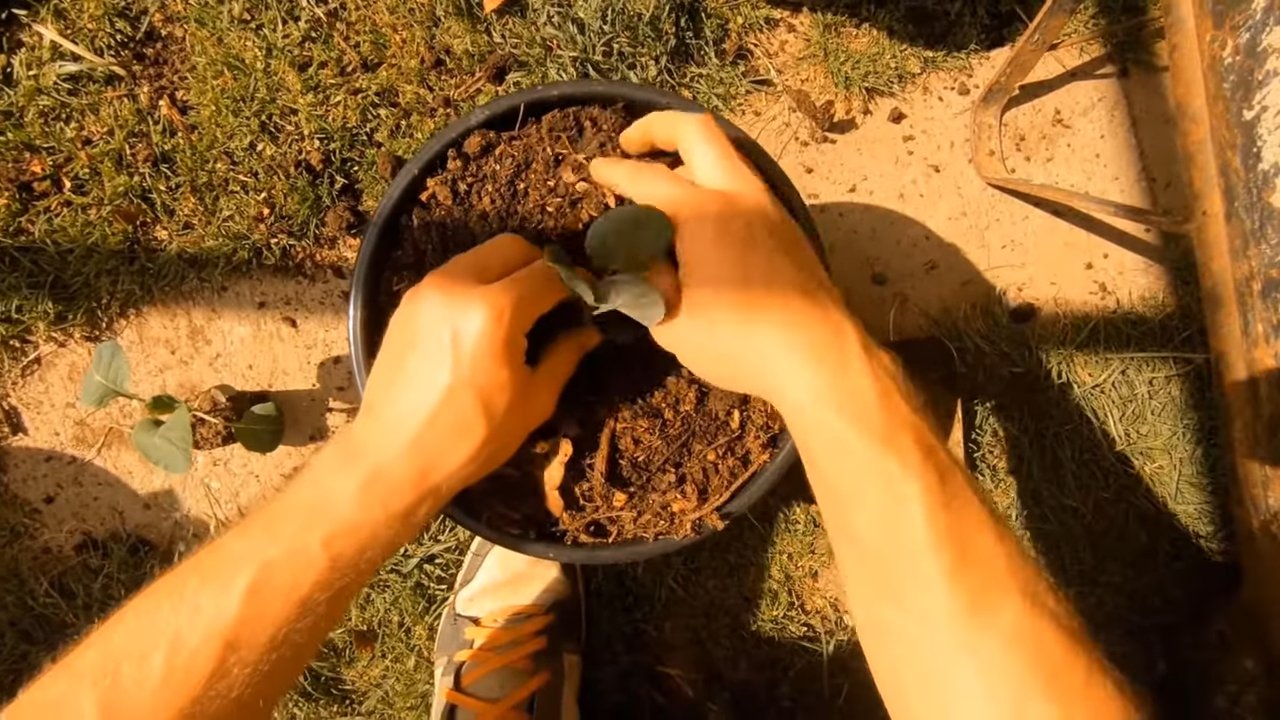
1. **Adding Soil:** Carefully fill the hollowed-out cavity of each stem with your succulent potting mix. Don’t pack it too tightly, just enough to provide a good base for your cutting.
2. **Planting the Cuttings:** Gently insert your succulent cuttings into the soil. Make sure the roots (if any) are covered. If you’re using air plants, you don’t need soil – just nestle them snugly into the cavity.
3. **Watering (Sparingly!):** After planting, lightly water the soil. Remember, succulents don’t need much water, so less is more. I usually use a spray bottle to mist the soil rather than pouring water directly in.
Decorating Your Mini Planters (Optional)
Want to add a personal touch? Here are some ideas for decorating your Brussels sprouts mini planters:
1. **Painting:** Use acrylic paints to add colorful designs to the stems. You could paint stripes, polka dots, or even little faces!
2. **Markers:** Use permanent markers to draw intricate patterns or write inspirational messages on the stems.
3. **Natural Elements:** Glue small pebbles, moss, or twigs to the stems for a rustic look.
4. **Glitter:** Add a touch of sparkle with glitter glue.
5. **Twine or Ribbon:** Wrap twine or ribbon around the stems for a charming, farmhouse-style look.
Caring for Your Mini Planters
Now that you’ve created your adorable Brussels sprouts mini planters, it’s important to know how to care for them.
1. **Light:** Place your planters in a bright, sunny location. Succulents need plenty of light to thrive. A windowsill is usually a good spot.
2. **Watering:** Water sparingly, only when the soil is completely dry. Overwatering is the biggest killer of succulents. I usually water mine every 1-2 weeks, depending on the humidity.
3. **Fertilizing:** Fertilize your succulents sparingly, only during the growing season (spring and summer). Use a diluted succulent fertilizer.
4. **Repotting:** Eventually, your succulents may outgrow their mini planters. When this happens, you can carefully transplant them into larger pots.
Troubleshooting
Sometimes things don’t go exactly as planned. Here are some common problems you might encounter and how to fix them:
* **Stem Rotting:** This is usually caused by overwatering. Make sure your stems have good drainage and that you’re not watering too frequently. If the stem is already rotting, you may need to discard it and start over.
* **Succulent Dying:** This could be caused by overwatering, underwatering, or lack of light. Adjust your watering schedule and make sure your plants are getting enough sunlight.
* **Pests:** Succulents can sometimes be susceptible to pests like mealybugs. If you notice any pests, treat them with an insecticidal soap.
Alternative Plants to Use
While succulents and air plants are my go-to choices for this project, you can experiment with other small plants as well. Here are a few ideas:
* **Sedum:** These are low-growing succulents that come in a variety of colors and textures.
* **Echeveria:** These are rosette-shaped succulents that are very popular and easy to care for.
* **Haworthia:** These are small, slow-growing succulents that are perfect for small containers.
* **Moss:** If you want a more lush, green look, you can use moss instead of succulents.
* **Small Herbs:** You could even try planting small herbs like thyme or rosemary in your mini planters.
Displaying Your Mini Planters
Now that you’ve created your adorable Brussels sprouts mini planters, it’s time to show them off! Here are some ideas for displaying them:
* **Windowsill:** A windowsill is a classic spot for displaying small plants.
* **Bookshelf:** Add a touch of green to your bookshelf with your mini planters.
* **Desk:** Brighten up your workspace with a little bit of nature.
* **Table Centerpiece:** Create a unique and eye-catching table centerpiece with your mini planters.
* **Gift:** These mini planters make a thoughtful and unique gift for plant lovers.
Why I Love This Project
I absolutely adore this DIY project because it’s so simple, eco-friendly, and rewarding. It’s a great way to repurpose kitchen scraps and create something beautiful and unique. Plus, it’s a fun and easy way to add a touch of green to your home. I also love that it’s a great conversation starter – people are always amazed when they find out that my mini planters are made from Brussels sprouts stems!
So, there you have it! A complete guide to creating your own Brussels sprouts mini planters. I hope you have as much fun with this project as I did. Happy planting!
Conclusion
So, there you have it! Transforming humble Brussels sprouts into adorable mini planters is not just a fun craft project; it’s a sustainable and surprisingly effective way to start your seeds indoors. This DIY trick offers a unique blend of practicality and charm, allowing you to nurture your seedlings in a biodegradable container that enriches the soil as it decomposes. Forget those plastic starter trays that clutter your space and contribute to waste. Embrace the natural elegance and eco-friendliness of Brussels sprouts mini planters.
Why is this a must-try? Because it’s simple, cost-effective, and environmentally conscious. You’re repurposing food waste, reducing your reliance on plastic, and providing your seedlings with a nutrient-rich start. Plus, let’s be honest, they look absolutely delightful! Imagine a windowsill lined with these tiny green vessels, each cradling the promise of a future garden.
But the beauty of this DIY doesn’t stop there. Feel free to experiment!
* Try different varieties of Brussels sprouts. Larger sprouts might offer more stability, while smaller ones could be perfect for tiny seeds like lettuce or herbs.
* Get creative with your soil mix. Add compost, worm castings, or even a sprinkle of mycorrhizae to give your seedlings an extra boost.
* Decorate your planters! Use food-safe markers to add whimsical designs or label your seedlings. This is a great activity to do with kids.
* Consider using these planters for succulents or air plants. While not traditional seed starters, the unique shape and natural texture of the Brussels sprouts can create a stunning display. Just be sure to provide adequate drainage.
We are confident that you will love this method of starting your seeds. It’s a conversation starter, a sustainable solution, and a delightful way to connect with nature. We highly encourage you to give this Brussels sprouts mini planter project a try. It’s a simple way to add a touch of green to your life and contribute to a more sustainable future.
Once you’ve created your own mini Brussels sprouts planters, we’d love to hear about your experience! Share your photos, tips, and variations in the comments below. Let’s inspire each other to embrace creative and eco-friendly gardening practices. Did you find a particular variety of Brussels sprouts worked best? Did you encounter any challenges? What seeds did you start? Your feedback is invaluable and will help others succeed with this project. Happy planting!
Frequently Asked Questions (FAQ)
What kind of seeds are best to start in Brussels sprouts mini planters?
The beauty of these mini planters is their versatility! You can start a wide variety of seeds, but smaller seeds tend to work best initially. Think herbs like basil, chives, and oregano; leafy greens like lettuce, spinach, and kale; and flowers like pansies, violas, and petunias. Larger seeds like beans or peas might outgrow the planter quickly, but you can certainly start them and transplant them to larger containers once they develop a few true leaves. Consider the size of the mature plant when choosing your seeds. For example, starting tomato seeds in these small planters is fine, but you’ll need to transplant them to larger pots as they grow.
How long will the Brussels sprouts mini planters last before they decompose?
The lifespan of your Brussels sprouts mini planters depends on several factors, including the humidity levels, the type of soil you use, and the variety of Brussels sprouts. Generally, you can expect them to last for about 2-3 weeks before they start to noticeably decompose. This is usually enough time for your seedlings to develop a healthy root system and be ready for transplanting. Keep an eye on the planters and transplant your seedlings as soon as you see roots emerging from the sides or bottom, or if the sprout starts to soften significantly.
How do I prevent the Brussels sprouts from rotting too quickly?
To prolong the life of your Brussels sprouts mini planters, avoid overwatering. Soggy soil will accelerate decomposition. Ensure the soil is moist but not waterlogged. You can also place the planters on a tray or saucer to catch any excess water. Good air circulation can also help prevent rot. Avoid placing the planters in a tightly enclosed space. If you live in a very humid environment, consider using a well-draining soil mix to help prevent moisture buildup.
Do I need to remove the Brussels sprouts planter before transplanting?
No, that’s the beauty of this method! The Brussels sprouts planter is biodegradable and will decompose in the soil, providing nutrients to your growing plant. When transplanting, simply plant the entire Brussels sprouts mini planter directly into the ground or a larger container. The roots will grow through the sprout as it decomposes.
What type of soil should I use for my Brussels sprouts mini planters?
A good quality seed starting mix is ideal. These mixes are typically lightweight, well-draining, and sterile, which helps prevent fungal diseases that can affect young seedlings. You can also make your own seed starting mix by combining equal parts peat moss (or coconut coir), vermiculite, and perlite. Avoid using garden soil, as it can be too heavy and may contain pests or diseases.
Can I reuse Brussels sprouts mini planters?
Unfortunately, no. Once the Brussels sprouts have started to decompose, they are no longer suitable for reuse. However, you can compost the remnants of the sprout after transplanting your seedlings, further reducing waste and enriching your garden soil.
What if my Brussels sprouts mini planter starts to mold?
A little bit of surface mold is not uncommon, especially in humid environments. It’s usually harmless and can be gently wiped away with a clean cloth. However, if you notice excessive mold growth, it could indicate that the soil is too wet or that there’s not enough air circulation. Reduce watering and ensure the planters are in a well-ventilated area. If the mold persists, consider transplanting your seedlings to a fresh Brussels sprouts planter with new soil.
Is this method suitable for all climates?
Yes, this method is suitable for all climates, as it’s primarily used for starting seeds indoors. However, the lifespan of the Brussels sprouts planter may vary depending on the humidity levels in your area. In drier climates, the planters may last longer, while in humid climates, they may decompose more quickly. Adjust your watering accordingly.
Where can I find Brussels sprouts that are suitable for this project?
You can find Brussels sprouts at most grocery stores and farmers markets. Look for sprouts that are firm, tightly closed, and free from blemishes. Larger sprouts are generally easier to work with, but smaller sprouts can also be used for smaller seeds. Organic Brussels sprouts are a great choice if you want to avoid pesticides.
Can I use other vegetables or fruits as mini planters?
Absolutely! The concept of using biodegradable containers for seed starting can be applied to other vegetables and fruits as well. Orange peels, lemon halves, and even eggshells can be used as mini planters. Just be sure to provide adequate drainage and choose fruits and vegetables that are sturdy enough to hold the soil and seedlings. Experiment and see what works best for you!


Leave a Comment