

Growing Broccoli Calabrese at Home can seem daunting, but trust me, with a few simple tricks and a little DIY spirit, you can harvest your own delicious and nutritious broccoli right in your backyard! Forget those bland, overpriced heads at the grocery store. Imagine the satisfaction of serving up a vibrant, homegrown broccoli dish, knowing exactly where it came from and how it was grown.
Broccoli, a member of the Brassica family, has a fascinating history. Originating in Italy, its name “Calabrese” actually refers to the Calabria region, where it was first cultivated. For centuries, it was a prized vegetable in Italian cuisine, and its popularity has since spread worldwide. But why buy it when you can easily grow it yourself?
In today’s world, where we’re increasingly conscious of food miles and the impact of our choices on the environment, growing Broccoli Calabrese at Home is more relevant than ever. Plus, let’s be honest, who doesn’t love a good DIY project? This article will equip you with easy-to-follow tips and tricks to successfully cultivate your own broccoli, even if you’re a complete beginner. We’ll cover everything from seed starting to pest control, ensuring you have a bountiful harvest. So, grab your gardening gloves, and let’s get started on this exciting journey of growing your own delicious and healthy broccoli!
Growing Broccoli Calabrese at Home: A DIY Guide
Okay, so you want to grow your own Broccoli Calabrese? Awesome! It’s totally doable, even if you don’t have a huge garden. I’m going to walk you through everything you need to know, from starting seeds to harvesting those delicious green heads. Let’s get started!
Choosing the Right Time and Place
Timing is everything when it comes to broccoli. You want to avoid the hottest part of summer, as high temperatures can cause the heads to bolt (flower prematurely) and become bitter.
* For a Spring Harvest: Start seeds indoors 6-8 weeks before the last expected frost.
* For a Fall Harvest: Start seeds outdoors in mid-summer, about 85-100 days before the first expected frost.
Location, Location, Location:
* Sunlight: Broccoli needs at least 6 hours of direct sunlight per day. The more, the better!
* Soil: Well-draining soil is crucial. Broccoli doesn’t like soggy feet. Aim for a slightly acidic to neutral pH (6.0-7.0).
* Space: Give each plant plenty of room to grow. They can get pretty big! Aim for 18-24 inches between plants and 30-36 inches between rows.
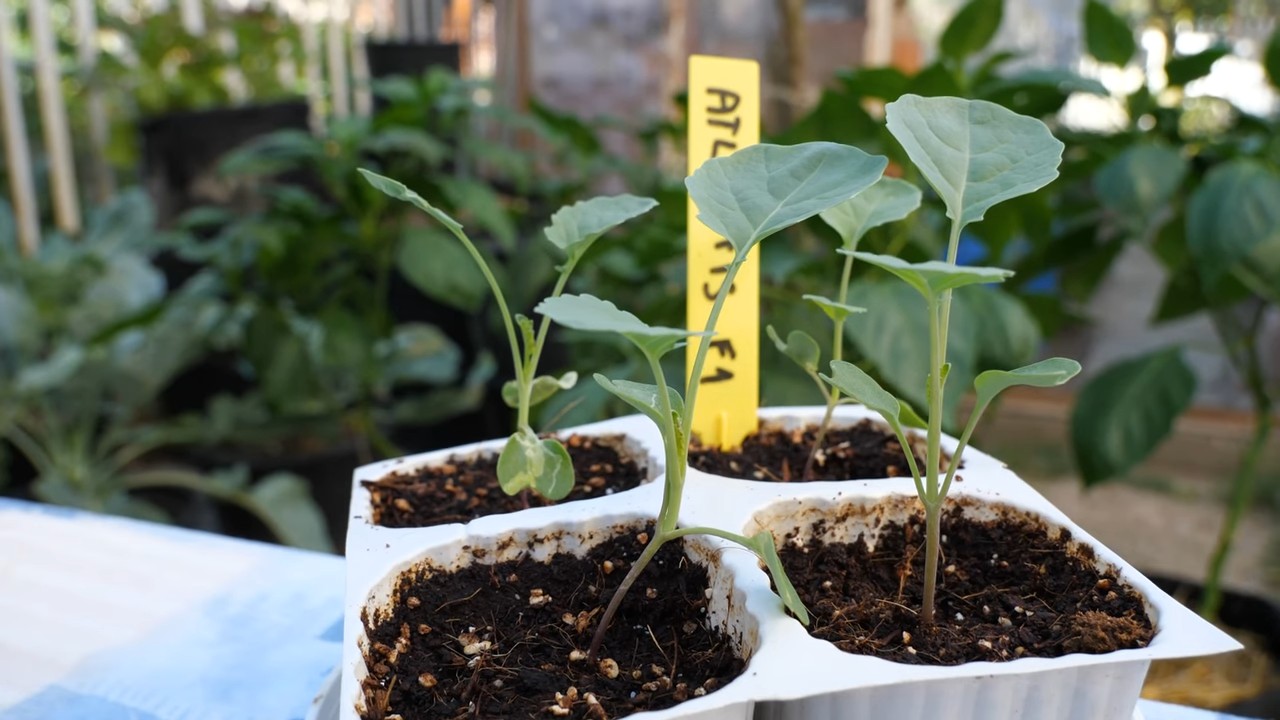
Starting Your Broccoli Seeds
I usually start my broccoli seeds indoors because it gives them a head start and protects them from pests. But you can direct sow if you live in a mild climate.
What You’ll Need:
* Broccoli Calabrese seeds
* Seed starting trays or small pots
* Seed starting mix (a light, sterile mix is best)
* Watering can or spray bottle
* Grow lights (optional, but highly recommended)
* Heat mat (optional, but helps with germination)
Step-by-Step Instructions:
1. Prepare Your Seed Starting Trays: Fill your seed starting trays or pots with seed starting mix. Gently tap the trays to settle the mix.
2. Sow the Seeds: Make a small indentation (about ¼ inch deep) in the center of each cell or pot. Place 2-3 seeds in each indentation. This increases your chances of at least one seed germinating.
3. Cover the Seeds: Gently cover the seeds with more seed starting mix.
4. Water Thoroughly: Use a watering can or spray bottle to gently water the soil. You want it to be moist but not soggy.
5. Provide Warmth: Place the trays on a heat mat (if using) and cover them with a humidity dome or plastic wrap to retain moisture.
6. Provide Light: Place the trays under grow lights or in a sunny window. If using grow lights, keep them a few inches above the trays and run them for 14-16 hours per day.
7. Monitor Germination: Broccoli seeds typically germinate in 5-10 days. Keep the soil moist and the temperature warm.
8. Thin the Seedlings: Once the seedlings have their first true leaves (the second set of leaves), thin them to one plant per cell or pot. Choose the strongest seedling and snip off the others at the soil line. Don’t pull them out, as this can disturb the roots of the remaining seedling.
Preparing the Garden Bed
While your seedlings are growing indoors, it’s time to get your garden bed ready.
What You’ll Need:
* Garden fork or tiller
* Compost or well-rotted manure
* Balanced fertilizer (e.g., 10-10-10)
* Lime (if your soil is acidic)
* Measuring tools (for fertilizer and lime)
Step-by-Step Instructions:
1. Clear the Area: Remove any weeds, rocks, or debris from the garden bed.
2. Loosen the Soil: Use a garden fork or tiller to loosen the soil to a depth of at least 12 inches. This will improve drainage and allow the broccoli roots to penetrate easily.
3. Amend the Soil: Incorporate plenty of compost or well-rotted manure into the soil. This will add nutrients and improve soil structure. Aim for a 2-4 inch layer.
4. Fertilize the Soil: Apply a balanced fertilizer according to the package directions. Broccoli is a heavy feeder, so it needs plenty of nutrients.
5. Adjust the pH (If Necessary): If your soil is acidic (pH below 6.0), add lime to raise the pH. Follow the package directions for application rates. You can get a soil test kit at most garden centers to determine your soil’s pH.
6. Rake the Soil: Rake the soil smooth and level.
Transplanting Your Broccoli Seedlings
Once your seedlings have 4-6 true leaves and the weather is consistently warm (no danger of frost), it’s time to transplant them into the garden.
What You’ll Need:
* Your broccoli seedlings
* Trowel or shovel
* Watering can or hose
* Mulch (straw, wood chips, or shredded leaves)
Step-by-Step Instructions:
1. Harden Off the Seedlings: Before transplanting, you need to harden off the seedlings. This means gradually exposing them to outdoor conditions over a period of 7-10 days. Start by placing them in a sheltered spot outdoors for a few hours each day, gradually increasing the amount of time they spend outside. This will help them adjust to the sun, wind, and temperature changes.
2. Choose a Cloudy Day: Transplant on a cloudy day or in the late afternoon to minimize stress on the seedlings.
3. Dig Holes: Dig holes that are slightly larger than the root balls of the seedlings. Space the holes 18-24 inches apart.
4. Remove the Seedlings: Gently remove the seedlings from their trays or pots. Be careful not to damage the roots. If the roots are tightly bound, gently loosen them with your fingers.
5. Plant the Seedlings: Place the seedlings in the holes and backfill with soil. Make sure the top of the root ball is level with the soil surface.
6. Water Thoroughly: Water the seedlings thoroughly after planting.
7. Mulch Around the Plants: Apply a layer of mulch around the plants to help retain moisture, suppress weeds, and regulate soil temperature.
Caring for Your Broccoli Plants
Now that your broccoli plants are in the ground, it’s important to provide them with the care they need to thrive.
Watering:
* Broccoli needs consistent moisture, especially during head formation. Water deeply whenever the top inch of soil feels dry.
* Avoid overhead watering, as this can promote fungal diseases. Use a soaker hose or drip irrigation if possible.
Fertilizing:
* Side-dress the plants with a nitrogen-rich fertilizer (e.g., ammonium nitrate or blood meal) about 3-4 weeks after transplanting. Follow the package directions for application rates.
* You can also use a liquid fertilizer every 2-3 weeks.
Weeding:
* Keep the garden bed free of weeds, as they can compete with the broccoli plants for nutrients and water.
* Hand-pull weeds or use a hoe to cultivate the soil. Be careful not to damage the broccoli roots.
Pest Control:
* Broccoli is susceptible to several pests, including cabbage worms, aphids, and flea beetles.
* Inspect your plants regularly for signs of pests.
* Use organic pest control methods, such as insecticidal soap, neem oil, or Bacillus thuringiensis (Bt).
* You can also cover the plants with row covers to prevent pests from reaching them.
Disease Control:
* Broccoli can be affected by several diseases, including clubroot, black rot, and downy mildew.
* Choose disease-resistant varieties if possible.
* Practice good sanitation by removing any diseased plant material from the garden.
* Avoid overhead watering and provide good air circulation to prevent fungal diseases.
* Use copper-based fungicides if necessary.
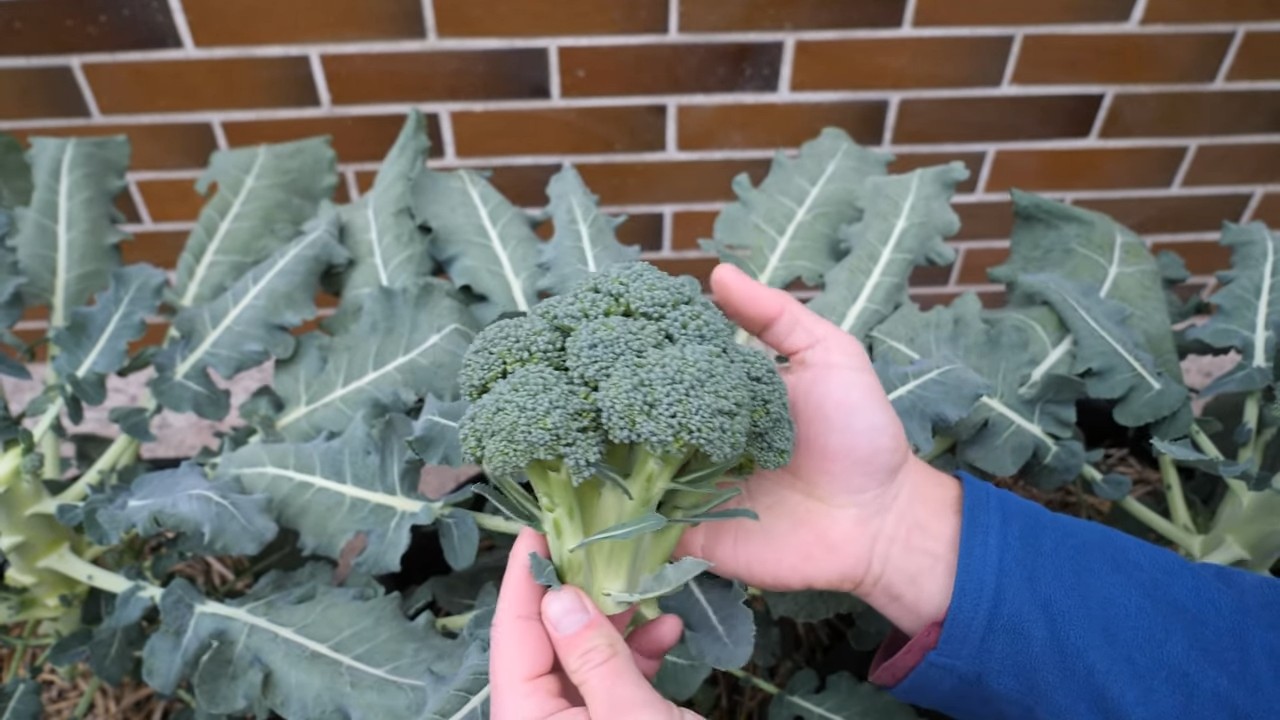
Harvesting Your Broccoli
The moment you’ve been waiting for! Harvesting your homegrown broccoli is super rewarding.
When to Harvest:
* Harvest the main head when it is firm, tight, and dark green. The individual florets should be tightly closed.
* The head should be about 6-8 inches in diameter.
* Don’t wait too long to harvest, as the florets will start to open and the head will become bitter.
How to Harvest:
1. Cut the Head: Use a sharp knife to cut the main head from the plant. Cut the stem at an angle, about 5-6 inches below the head.
2. Encourage Side Shoots: After harvesting the main head
Conclusion
So, there you have it! Growing Broccoli Calabrese at home isn’t just a gardening project; it’s an investment in fresh, flavorful, and nutritious meals. We’ve walked through the entire process, from selecting the right seeds to harvesting your bountiful crop. But why is this DIY approach a must-try?
Firstly, the taste difference is undeniable. Store-bought broccoli, often shipped long distances and stored for extended periods, simply can’t compare to the crisp, vibrant flavor of freshly harvested Broccoli Calabrese from your own garden. You control the growing conditions, ensuring optimal taste and texture.
Secondly, you’re in charge of what goes into your food. No more worrying about excessive pesticides or herbicides. Growing your own broccoli allows you to embrace organic practices, providing your family with healthy and safe vegetables. This peace of mind is invaluable.
Thirdly, it’s incredibly rewarding. There’s a unique satisfaction in nurturing a plant from seed to harvest, knowing you’ve played a direct role in providing for yourself and your loved ones. It’s a connection to nature that’s both grounding and fulfilling.
But the journey doesn’t end here! Feel free to experiment with different varieties of Broccoli Calabrese. Consider trying Romanesco broccoli for its unique fractal pattern and slightly nutty flavor, or perhaps sprouting broccoli for its tender shoots and leaves. You can also adjust your planting schedule to extend your harvest season, ensuring a continuous supply of fresh broccoli throughout the year.
Think about companion planting to enhance your broccoli’s growth and deter pests. Marigolds, for example, are known to repel nematodes and other harmful insects. Herbs like dill and rosemary can also attract beneficial insects that prey on common broccoli pests.
Don’t be afraid to get creative with your fertilizer choices. Compost tea, made from steeping compost in water, is a fantastic organic fertilizer that provides essential nutrients to your broccoli plants. You can also use fish emulsion or seaweed extract for an extra boost.
And remember, growing Broccoli Calabrese at home is a learning experience. Don’t be discouraged if you encounter challenges along the way. Every mistake is an opportunity to learn and improve your gardening skills.
We wholeheartedly encourage you to give this DIY trick a try. It’s a rewarding, healthy, and delicious way to enhance your life. Once you’ve harvested your first crop, we’d love to hear about your experience! Share your photos, tips, and challenges in the comments below. Let’s build a community of home gardeners who are passionate about growing their own food. Happy gardening!
Frequently Asked Questions (FAQ)
What is the best time of year to plant Broccoli Calabrese?
The best time to plant Broccoli Calabrese depends on your climate. In cooler regions with mild summers, you can start seeds indoors 6-8 weeks before the last expected frost and transplant them outdoors in the spring. In warmer regions with hot summers, it’s best to plant in the late summer or early fall for a winter harvest. Broccoli prefers cooler temperatures, so avoid planting during the hottest months.
How much sun does Broccoli Calabrese need?
Broccoli Calabrese requires at least 6 hours of direct sunlight per day to thrive. Choose a location in your garden that receives ample sunlight throughout the day. If you live in a particularly hot climate, some afternoon shade can be beneficial to prevent the plants from overheating.
What kind of soil is best for growing Broccoli Calabrese?
Broccoli Calabrese prefers well-drained, fertile soil that is rich in organic matter. The ideal soil pH is between 6.0 and 7.0. Before planting, amend your soil with compost or well-rotted manure to improve its fertility and drainage. You can also add a slow-release fertilizer to provide essential nutrients to the plants.
How often should I water Broccoli Calabrese?
Broccoli Calabrese needs consistent moisture to grow properly. Water deeply and regularly, especially during dry periods. Aim to keep the soil consistently moist but not waterlogged. Mulching around the plants can help retain moisture and suppress weeds. Check the soil moisture regularly by sticking your finger into the soil. If the top inch feels dry, it’s time to water.
What are some common pests and diseases that affect Broccoli Calabrese?
Broccoli Calabrese is susceptible to several pests and diseases, including cabbage worms, aphids, flea beetles, clubroot, and downy mildew. To prevent pest problems, consider using row covers to protect your plants. You can also handpick pests off the plants or use organic insecticides like neem oil or insecticidal soap. To prevent diseases, ensure good air circulation around the plants and avoid overhead watering. If you notice signs of disease, remove the affected leaves and treat the plants with a fungicide if necessary.
How do I know when my Broccoli Calabrese is ready to harvest?
Broccoli Calabrese is ready to harvest when the central head is firm, tight, and dark green. The individual florets should be tightly closed. If the florets start to open and turn yellow, it’s a sign that the broccoli is overripe. Use a sharp knife to cut the head off the plant, leaving a few inches of stem. After harvesting the central head, the plant may produce smaller side shoots that you can also harvest.
Can I grow Broccoli Calabrese in containers?
Yes, you can grow Broccoli Calabrese in containers, but you’ll need to choose a large container that is at least 12 inches in diameter and 12 inches deep. Use a high-quality potting mix and ensure that the container has good drainage. Water regularly and fertilize every few weeks. Container-grown broccoli may require more frequent watering and fertilizing than broccoli grown in the ground.
How can I extend my Broccoli Calabrese harvest?
To extend your Broccoli Calabrese harvest, consider succession planting. Plant a new batch of seeds every few weeks to ensure a continuous supply of fresh broccoli. You can also choose varieties that mature at different times. After harvesting the central head, the plant will often produce smaller side shoots that you can harvest for several weeks.
Is Broccoli Calabrese a good source of nutrients?
Yes, Broccoli Calabrese is an excellent source of nutrients. It is rich in vitamins C and K, as well as fiber, folate, and potassium. It also contains antioxidants and other beneficial compounds that can help protect against chronic diseases. Adding Broccoli Calabrese to your diet is a great way to improve your overall health.
What are some creative ways to use my homegrown Broccoli Calabrese?
The possibilities are endless! You can steam, roast, stir-fry, or grill your homegrown Broccoli Calabrese. Add it to salads, soups, and casseroles. You can even blend it into smoothies for a healthy boost. Get creative and experiment with different recipes to find your favorite ways to enjoy this delicious and nutritious vegetable. Don’t forget that the leaves and stems are also edible and can be used in similar ways.
Leave a Comment